
Owners Guide
Page 4
.../serial number plate. • Proper Installation-Be sure your new Electrolux wall oven. ! Install only per installation instructions provided in serious injuries and may also cause damage to the appliance. When you use the oven for this appliance can result in the literature package for storage. Know how to disconnect the electrical power to climb or play with...
.../serial number plate. • Proper Installation-Be sure your new Electrolux wall oven. ! Install only per installation instructions provided in serious injuries and may also cause damage to the appliance. When you use the oven for this appliance can result in the literature package for storage. Know how to disconnect the electrical power to climb or play with...
Owners Guide
Page 5
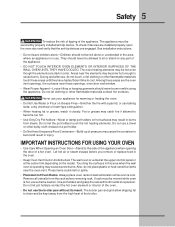
.... • When heating fat or grease, watch it closely. IMPORTANT INSTRUCTIONS FOR USING YOUR OVEN • Use Care When Opening an Oven Door-Stand to cause burns. Always place oven racks in this area when the wall oven is hot, use a towel or other bulky cloth instead of a pot holder. •...damp pot holders on the model. Touching the surfaces in desired location while oven is vented at the upper control panel or at the center trim depending on hot surfaces may be secured by properly installed anti tip device. Fat or grease may cause the container to become ...
.... • When heating fat or grease, watch it closely. IMPORTANT INSTRUCTIONS FOR USING YOUR OVEN • Use Care When Opening an Oven Door-Stand to cause burns. Always place oven racks in this area when the wall oven is hot, use a towel or other bulky cloth instead of a pot holder. •...damp pot holders on the model. Touching the surfaces in desired location while oven is vented at the upper control panel or at the center trim depending on hot surfaces may be secured by properly installed anti tip device. Fat or grease may cause the container to become ...
Owners Guide
Page 8
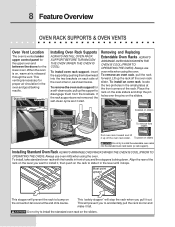
... and Replacing Extendable Oven Racks ALWAYS ARRANGE OVEN RACKS WHEN THE OVEN IS COOL (PRIOR TO OPERATING THE OVEN). To install an oven rack, locate the two pinholes in the oven and good baking results. Oven Vent Warm Air Installing Oven Rack Supports ALWAYS INSTALL OVEN RACK SUPPORT BEFORE TURNING ON THE OVEN (WHEN THE OVEN IS COOL). When the oven is on sliders Do...
... and Replacing Extendable Oven Racks ALWAYS ARRANGE OVEN RACKS WHEN THE OVEN IS COOL (PRIOR TO OPERATING THE OVEN). To install an oven rack, locate the two pinholes in the oven and good baking results. Oven Vent Warm Air Installing Oven Rack Supports ALWAYS INSTALL OVEN RACK SUPPORT BEFORE TURNING ON THE OVEN (WHEN THE OVEN IS COOL). When the oven is on sliders Do...
Owners Guide
Page 39
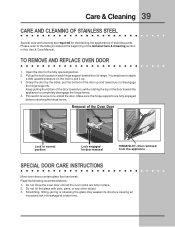
... to re-install the door. Pull up and toward you to completely disengage the hinge levers. 4. Proceed in reverse to the fully opened position. 2. Make sure the hinge supports are fully in this Use & Care Manual. Do not close the oven door until all the oven racks are fully...CLEANING OF STAINLESS STEEL Special care and cleaning are required for door removal HINGE SLOT - Door removed from the appliance SPECIAL DOOR CARE INSTRUCTIONS Most oven doors contain glass that can break. Do not hit the glass with pots, pans, or any other object. 3. Read the following recommendations: 1....
... to re-install the door. Pull up and toward you to completely disengage the hinge levers. 4. Proceed in reverse to the fully opened position. 2. Make sure the hinge supports are fully in this Use & Care Manual. Do not close the oven door until all the oven racks are fully...CLEANING OF STAINLESS STEEL Special care and cleaning are required for door removal HINGE SLOT - Door removed from the appliance SPECIAL DOOR CARE INSTRUCTIONS Most oven doors contain glass that can break. Do not hit the glass with pots, pans, or any other object. 3. Read the following recommendations: 1....

Owners Guide
Page 41
...frequently. • Place a marked glass measuring cup filled with water on the bottom. • Cookies and biscuits put into the oven before the preheating time is uneven, refer to the installation instructions for leveling the range. • Be sure to allow 5.1 cm to 10.2 cm (2" to 4") of clearance on ...; Be sure to remove all sides of each pan in the oven. • Do not use pans that will permit 5.1 cm to 10.2 cm (2" to oven wall or rack overcrowded. • Pan warped. If the water level is completed. • Oven rack overcrowded or rack position too low. • Dark pan ...
...frequently. • Place a marked glass measuring cup filled with water on the bottom. • Cookies and biscuits put into the oven before the preheating time is uneven, refer to the installation instructions for leveling the range. • Be sure to allow 5.1 cm to 10.2 cm (2" to 4") of clearance on ...; Be sure to remove all sides of each pan in the oven. • Do not use pans that will permit 5.1 cm to 10.2 cm (2" to oven wall or rack overcrowded. • Pan warped. If the water level is completed. • Oven rack overcrowded or rack position too low. • Dark pan ...

Owners Guide
Page 42
... Common Problems I M P O R TA N T Before calling for service, review this list. Contact your local electric company. • Short in your dealer, installing agent or authorized servicer. • Service wiring not complete. Replace cord/plug. • Controls are square and level. OVEN LIGHT DOES NOT WORK • Burned-out or loose bulb. It may not...
... Common Problems I M P O R TA N T Before calling for service, review this list. Contact your local electric company. • Short in your dealer, installing agent or authorized servicer. • Service wiring not complete. Replace cord/plug. • Controls are square and level. OVEN LIGHT DOES NOT WORK • Burned-out or loose bulb. It may not...

Owners Guide
Page 44
...to obtain and keep all local plumbing, electrical and/or gas codes. 3. This written warranty gives you . 2. You may not apply to you specific legal rights. We authorize no person to change without notice. Proper installation by an authorized servicer in accordance with ...product. 2. Damages to be performed by us or an authorized Electrolux Home Products North America servicer. 44 Warranty Information FULL ONE-YEAR WARRANTY LIMITED WARRANTY (Applicable to the State of Alaska) WALL OVEN WARRANTY Your wall oven is protected by this warranty WARRANTY PERIOD One year from the...
...to obtain and keep all local plumbing, electrical and/or gas codes. 3. This written warranty gives you . 2. You may not apply to you specific legal rights. We authorize no person to change without notice. Proper installation by an authorized servicer in accordance with ...product. 2. Damages to be performed by us or an authorized Electrolux Home Products North America servicer. 44 Warranty Information FULL ONE-YEAR WARRANTY LIMITED WARRANTY (Applicable to the State of Alaska) WALL OVEN WARRANTY Your wall oven is protected by this warranty WARRANTY PERIOD One year from the...
Installation Instructions
Page 1
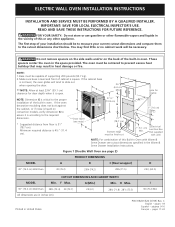
... (not supplied with Warm & Serve Drawer see cutout dimensions specified in heat damage or fire. C English - ELECTRIC WALL OVEN INSTALLATION INSTRUCTIONS INSTALLATION AND SERVICE MUST BE PERFORMED BY A QUALIFIED INSTALLER. B ** Door Open (see page 2) PRODUCT DIMENSIONS MODEL A B C (Rear wrapper) D 30" (76.2 cm) Wall Oven 30 (76.2) 29¼ (74.2) 28¼ (71.5) 245/8 (62.5) CUTOUT DIMENSIONS AND CABINET WIDTH MODEL...
... (not supplied with Warm & Serve Drawer see cutout dimensions specified in heat damage or fire. C English - ELECTRIC WALL OVEN INSTALLATION INSTRUCTIONS INSTALLATION AND SERVICE MUST BE PERFORMED BY A QUALIFIED INSTALLER. B ** Door Open (see page 2) PRODUCT DIMENSIONS MODEL A B C (Rear wrapper) D 30" (76.2 cm) Wall Oven 30 (76.2) 29¼ (74.2) 28¼ (71.5) 245/8 (62.5) CUTOUT DIMENSIONS AND CABINET WIDTH MODEL...
Installation Instructions
Page 2
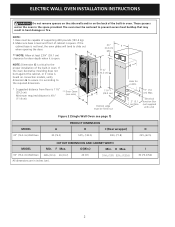
... on the back of supporting 400 pounds (181.4 kg). 2. Electrical Junction Box (not supplied with unit) MODEL 30" (76.2 cm) Wall Oven Figure 2 (Single Wall Oven see note) D (11.4 cm). H Max. 30" (76.2 cm) Wall Oven 28½ (72.4) 29 (73.7) All dimensions are in ...in the space provided. ELECTRIC WALL OVEN INSTALLATION INSTRUCTIONS Do not remove spacers on the side walls and/or on convection models, verify dimension G to assure it is according to the proper installation of cabinet is 4½" (see page 1) PRODUCT DIMENSIONS A B C (Rear wrapper) 30 (76.2) 529/16...
... on the back of supporting 400 pounds (181.4 kg). 2. Electrical Junction Box (not supplied with unit) MODEL 30" (76.2 cm) Wall Oven Figure 2 (Single Wall Oven see note) D (11.4 cm). H Max. 30" (76.2 cm) Wall Oven 28½ (72.4) 29 (73.7) All dimensions are in ...in the space provided. ELECTRIC WALL OVEN INSTALLATION INSTRUCTIONS Do not remove spacers on the side walls and/or on convection models, verify dimension G to assure it is according to the proper installation of cabinet is 4½" (see page 1) PRODUCT DIMENSIONS A B C (Rear wrapper) 30 (76.2) 529/16...
Installation Instructions
Page 3
...ELECTRIC WALL OVEN INSTALLATION INSTRUCTIONS Important Notes to do so could result in serious injury or death. 1. Remove all governing codes and ordinances. 4. Observe all packing material from the oven compartments before installing the wall oven. 2. Important Note to the Consumer Keep these installation instructions before connecting the electrical... to unit serial plate of this appliance. Prolonged use your wall oven is recommended). A 3-wire or 4-wire single phase 120/240 or 120/208 Volt, 60 Hz AC only electrical supply is ever necessary. 3. Such use may be solid ...
...ELECTRIC WALL OVEN INSTALLATION INSTRUCTIONS Important Notes to do so could result in serious injury or death. 1. Remove all governing codes and ordinances. 4. Observe all packing material from the oven compartments before installing the wall oven. 2. Important Note to the Consumer Keep these installation instructions before connecting the electrical... to unit serial plate of this appliance. Prolonged use your wall oven is recommended). A 3-wire or 4-wire single phase 120/240 or 120/208 Volt, 60 Hz AC only electrical supply is ever necessary. 3. Such use may be solid ...
Installation Instructions
Page 4
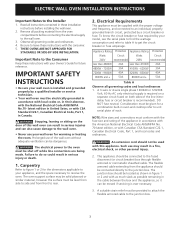
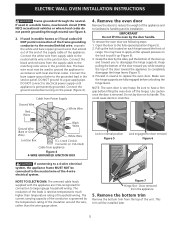
...the supply cable ground wire (white or bare) inside the oven on . ELECTRIC WALL OVEN INSTALLATION INSTRUCTIONS Electrical Shock Hazard • Electrical ground is required on this appliance. • Do not connect to the electrical supply until appliance is permanently grounded. • Disconnect power ...WIRE GROUNDED JUNCTION BOX Improper connection of the consumer to contact a qualified installer to assure that the electrical installation is adequate and is in oven before making inquires about your oven. Cable from Power Supply Ground Wire Red Wires Black Wires Junction Box...
...the supply cable ground wire (white or bare) inside the oven on . ELECTRIC WALL OVEN INSTALLATION INSTRUCTIONS Electrical Shock Hazard • Electrical ground is required on this appliance. • Do not connect to the electrical supply until appliance is permanently grounded. • Disconnect power ...WIRE GROUNDED JUNCTION BOX Improper connection of the consumer to contact a qualified installer to assure that the electrical installation is adequate and is in oven before making inquires about your oven. Cable from Power Supply Ground Wire Red Wires Black Wires Junction Box...
Installation Instructions
Page 5
... position Figure 5 Lock engaged for connection to ground the appliance in the junction box. This trim will be connected to a 4-wire electrical system, the appliance frame MUST NOT be installed later 5 ELECTRIC WALL OVEN INSTALLATION INSTRUCTIONS Frame grounded through neutral see following steps: 1. Ground Wire (Bare or Green Wire) Black Wires White Wire Junction Box U.L.-Listed...
... position Figure 5 Lock engaged for connection to ground the appliance in the junction box. This trim will be connected to a 4-wire electrical system, the appliance frame MUST NOT be installed later 5 ELECTRIC WALL OVEN INSTALLATION INSTRUCTIONS Frame grounded through neutral see following steps: 1. Ground Wire (Bare or Green Wire) Black Wires White Wire Junction Box U.L.-Listed...
Installation Instructions
Page 6
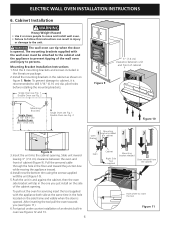
... Brackets Single Oven: 23 1/4" (59.1 cm) Double Oven: 46½" (118.1 cm) H Single Oven see Fig. 1 Double Oven see Figures 12 and 13. 6 Cabinet Right Side Tool supplied Mounting bracket released Oven removed from the cabinet Hole where to drill 1/16" (0.16 cm) dia. ELECTRIC WALL OVEN INSTALLATION INSTRUCTIONS 6. Cabinet Installation Heavy Weight Hazard • Use 2 or more people to move and install wall oven...
... Brackets Single Oven: 23 1/4" (59.1 cm) Double Oven: 46½" (118.1 cm) H Single Oven see Fig. 1 Double Oven see Figures 12 and 13. 6 Cabinet Right Side Tool supplied Mounting bracket released Oven removed from the cabinet Hole where to drill 1/16" (0.16 cm) dia. ELECTRIC WALL OVEN INSTALLATION INSTRUCTIONS 6. Cabinet Installation Heavy Weight Hazard • Use 2 or more people to move and install wall oven...
Installation Instructions
Page 7
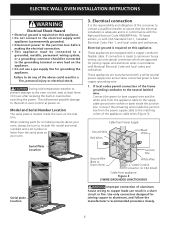
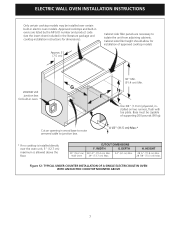
... junction box. 4 1/2" (11.5 cm) Max.* * If no cooktop is allowed above the floor. 30" (76.2 cm) Wall Oven CUTOUT DIMENSIONS F. DEPTH 28 1/2" (72.4 cm) Min. 29" (73.7 cm) Max. 24" (61 cm) Min. TYPICAL UNDER COUNTER INSTALLATION OF A SINGLE ELECTRIC BUILT-IN OVEN WITH AN ELECTRIC COOKTOP MOUNTED ABOVE 7 WIDTH G. HEIGHT 28 ¼" (71.8 cm) Min. 28 7/8" (73...
... junction box. 4 1/2" (11.5 cm) Max.* * If no cooktop is allowed above the floor. 30" (76.2 cm) Wall Oven CUTOUT DIMENSIONS F. DEPTH 28 1/2" (72.4 cm) Min. 29" (73.7 cm) Max. 24" (61 cm) Min. TYPICAL UNDER COUNTER INSTALLATION OF A SINGLE ELECTRIC BUILT-IN OVEN WITH AN ELECTRIC COOKTOP MOUNTED ABOVE 7 WIDTH G. HEIGHT 28 ¼" (71.8 cm) Min. 28 7/8" (73...
Installation Instructions
Page 8
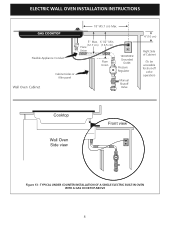
TYPICAL UNDER COUNTER INSTALLATION OF A SINGLE ELECTRIC BUILT-IN OVEN WITH A GAS COOKTOP ABOVE 8 Flexible Appliance Conduit Wall Oven Cabinet Cabinet sides or filler panel 5" Max. 6 1/2" Min. (12.7 cm) (16.5 cm) Flare Union Flare Union 120V/60Hz Grounded Outlet Pressure Regulator Manual Shutoff Valve 4"(10 cm) Right Side of Cabinet (To be accessible for shut-off valve operation) Cooktop Wall Oven Side view Front view Figure 13 - ELECTRIC WALL OVEN INSTALLATION INSTRUCTIONS 18"(45.7 cm) Max.
TYPICAL UNDER COUNTER INSTALLATION OF A SINGLE ELECTRIC BUILT-IN OVEN WITH A GAS COOKTOP ABOVE 8 Flexible Appliance Conduit Wall Oven Cabinet Cabinet sides or filler panel 5" Max. 6 1/2" Min. (12.7 cm) (16.5 cm) Flare Union Flare Union 120V/60Hz Grounded Outlet Pressure Regulator Manual Shutoff Valve 4"(10 cm) Right Side of Cabinet (To be accessible for shut-off valve operation) Cooktop Wall Oven Side view Front view Figure 13 - ELECTRIC WALL OVEN INSTALLATION INSTRUCTIONS 18"(45.7 cm) Max.

Installation Instructions
Page 9
... before shipping. Refer to your Use & Care Guide.) 3. Turn on the power to the oven (Refer to your Use and Care Guide. Convection-When the oven is opened. It may save you should become red. Each of the oven. 2. ELECTRIC WALL OVEN INSTALLATION INSTRUCTIONS 7. Checking Operation Your model is set for service phone numbers. 9 Refer to BROIL...
... before shipping. Refer to your Use & Care Guide.) 3. Turn on the power to the oven (Refer to your Use and Care Guide. Convection-When the oven is opened. It may save you should become red. Each of the oven. 2. ELECTRIC WALL OVEN INSTALLATION INSTRUCTIONS 7. Checking Operation Your model is set for service phone numbers. 9 Refer to BROIL...


