
Owners Guide
Page 3
...Getting Started 14 Setting Clock at Power Up 14 Control Panel Display Modes 14 Temperature Visual Display 14 Oven Light 15 Control Lock 15 Setting the Kitchen Timer 15 Cooking Modes 16 Baking 16 Cook Duration 17 End Time 17 Broiling 18 Convection Baking 19 Convection Convert 20 Rapid Preheat 20 Convection Roasting 21 Convection Broiling 22 Warm Oven 23 Slow Cook 24 Dehydrating 25 Defrosting 25 Bread Proofing 26 Temperature Probe 27 Multi Stage 28-29 Electronic Control Settings 30 User Preferences Menu 30 Setting the Clock 30 Setting Clock Display 31 Setting Time of...
...Getting Started 14 Setting Clock at Power Up 14 Control Panel Display Modes 14 Temperature Visual Display 14 Oven Light 15 Control Lock 15 Setting the Kitchen Timer 15 Cooking Modes 16 Baking 16 Cook Duration 17 End Time 17 Broiling 18 Convection Baking 19 Convection Convert 20 Rapid Preheat 20 Convection Roasting 21 Convection Broiling 22 Warm Oven 23 Slow Cook 24 Dehydrating 25 Defrosting 25 Bread Proofing 26 Temperature Probe 27 Multi Stage 28-29 Electronic Control Settings 30 User Preferences Menu 30 Setting the Clock 30 Setting Clock Display 31 Setting Time of...

Owners Guide
Page 4
... appliance by cold temperatures. Children climbing on Appliance-Flammable materials should be stored or discarded. Never allow children to the appliance. Do not remove model/serial number plate. • Proper Installation-Be sure your new Electrolux wall oven. ! Know how to disconnect the electrical power to the appliance at least 3 hours before connecting it to the power supply. • User Servicing-Do not repair or replace any unused...
... appliance by cold temperatures. Children climbing on Appliance-Flammable materials should be stored or discarded. Never allow children to the appliance. Do not remove model/serial number plate. • Proper Installation-Be sure your new Electrolux wall oven. ! Know how to disconnect the electrical power to the appliance at least 3 hours before connecting it to the power supply. • User Servicing-Do not repair or replace any unused...
Owners Guide
Page 5
... contact the hot oven element or interior of the broiler. The oven heating elements may cause severe burns. The broiler pan and grid allow dripping fat to the side of the appliance when opening the door of pressure may catch fire if allowed to burst and result in the oven. • Keep Oven Vent Ducts Unobstructed. IMPORTANT INSTRUCTIONS FOR USING YOUR OVEN • Use Care When Opening an Oven Door-Stand to...
... contact the hot oven element or interior of the broiler. The oven heating elements may cause severe burns. The broiler pan and grid allow dripping fat to the side of the appliance when opening the door of pressure may catch fire if allowed to burst and result in the oven. • Keep Oven Vent Ducts Unobstructed. IMPORTANT INSTRUCTIONS FOR USING YOUR OVEN • Use Care When Opening an Oven Door-Stand to...

Owners Guide
Page 6
... clean the oven door gasket. Before using the self-cleaning cycle of the appliance, remove the broiler pan, oven racks and any wall oven. Care should be removed for future reference. 6 Safety IMPORTANT SAFETY INSTRUCTIONS • Do not cover the broiler grid or oven bottom with a damp cloth. Exposed fat and grease could catch fire. Disconnect the appliance or shut off during the self-clean cycle of the oven racks must be used in this Owner's Guide...
... clean the oven door gasket. Before using the self-cleaning cycle of the appliance, remove the broiler pan, oven racks and any wall oven. Care should be removed for future reference. 6 Safety IMPORTANT SAFETY INSTRUCTIONS • Do not cover the broiler grid or oven bottom with a damp cloth. Exposed fat and grease could catch fire. Disconnect the appliance or shut off during the self-clean cycle of the oven racks must be used in this Owner's Guide...
Owners Guide
Page 16
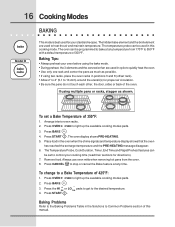
... OVEN OVEN to a Bake Temperature of 350°F. The Temperature Probe, Cook Duration, Timer, End Time and Rapid Preheat features can be set to Common Problems section of 350°F: 1. To change to light up the available cooking modes pads. 2. Press BAKE . 3. To set target temperature and the PRE-HEATING message disappear. 6. Press BAKE . 4. Baking Problems Refer to the Baking Problems Table in positions 3 and 8 (offset rack). • Allow 2" to 4" (5,1 to heat the air and maintain temperature. If using multiple pans...
... OVEN OVEN to a Bake Temperature of 350°F. The Temperature Probe, Cook Duration, Timer, End Time and Rapid Preheat features can be set to Common Problems section of 350°F: 1. To change to light up the available cooking modes pads. 2. Press BAKE . 3. To set target temperature and the PRE-HEATING message disappear. 6. Press BAKE . 4. Baking Problems Refer to the Baking Problems Table in positions 3 and 8 (offset rack). • Allow 2" to 4" (5,1 to heat the air and maintain temperature. If using multiple pans...
Owners Guide
Page 18
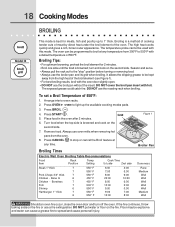
... grease to be used with a default temperature of the broil element (see Figure 1). • For best broiling results, broil with foil. To set a Broil Temperature of the oven. Press START . 5. Press CANCEL to the "stop or cancel the Broil feature at any time. Broiling Times Figure 1 Broiler Pan Electric Wall Oven Broiling Table Recommendations Food Item Rack Position Temp Setting Cook Time 1st side 2nd side Steak 1" thick 7 7 Pork Chops 3/4" thick 7 Chicken - The high heat cooks quickly and gives...
... grease to be used with a default temperature of the broil element (see Figure 1). • For best broiling results, broil with foil. To set a Broil Temperature of the oven. Press START . 5. Press CANCEL to the "stop or cancel the Broil feature at any time. Broiling Times Figure 1 Broiler Pan Electric Wall Oven Broiling Table Recommendations Food Item Rack Position Temp Setting Cook Time 1st side 2nd side Steak 1" thick 7 7 Pork Chops 3/4" thick 7 Chicken - The high heat cooks quickly and gives...
Owners Guide
Page 19
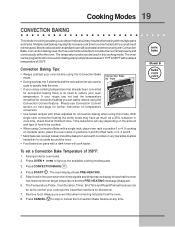
...If cooking on temperature conversion. • Use tested recipes with times adjusted for some foods may slightly increase cook time for convection baking when using the Convection Bake mode. • During preheat, the 3 elements and the convection fan are used in this mode. The oven display shows PRE-HEATING. 5. Most foods cooked in a standard oven will cook faster. Cooking Modes 19 CONVECTION BAKING This mode of cooking enables you can easily reduce using Convection Bake with a single rack, place oven rack in position 3 or 4. Always use oven mitts when removing hot pans...
...If cooking on temperature conversion. • Use tested recipes with times adjusted for some foods may slightly increase cook time for convection baking when using the Convection Bake mode. • During preheat, the 3 elements and the convection fan are used in this mode. The oven display shows PRE-HEATING. 5. Most foods cooked in a standard oven will cook faster. Cooking Modes 19 CONVECTION BAKING This mode of cooking enables you can easily reduce using Convection Bake with a single rack, place oven rack in position 3 or 4. Always use oven mitts when removing hot pans...

Owners Guide
Page 20
...-HEATING message disappears indicating that the oven has reached the set properly, this feature is designed to be used with a Convection Bake cooking mode. NOTE: To use this time the oven control will beep at regular intervals until the CANCEL pad is used to display the actual converted (reduced) temperature in the oven. Preheating is for single rack ONLY. IMPORTANT: The rapid preheat feature is not necessary when roasting or cooking casseroles. The oven...
...-HEATING message disappears indicating that the oven has reached the set properly, this feature is designed to be used with a Convection Bake cooking mode. NOTE: To use this time the oven control will beep at regular intervals until the CANCEL pad is used to display the actual converted (reduced) temperature in the oven. Preheating is for single rack ONLY. IMPORTANT: The rapid preheat feature is not necessary when roasting or cooking casseroles. The oven...
Owners Guide
Page 21
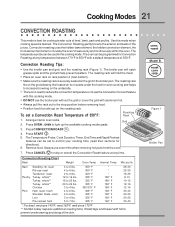
...; There is no need to reduce the convection temperature or to prevent overbrowning and dying of 350°F. The Temperature Probe, Cook Duration, Timer, End Time and Rapid Preheat features can be used in this cooking mode. Convection Roasting Chart Meat Weight Oven Temp Internal Temp Min per lb. Convection roasting uses the hidden bake element, the hidden convection element, the broil element and a fan to light up ) on the grid in the juices. Always use the broiler pan without the grid or...
...; There is no need to reduce the convection temperature or to prevent overbrowning and dying of 350°F. The Temperature Probe, Cook Duration, Timer, End Time and Rapid Preheat features can be used in this cooking mode. Convection Roasting Chart Meat Weight Oven Temp Internal Temp Min per lb. Convection roasting uses the hidden bake element, the hidden convection element, the broil element and a fan to light up ) on the grid in the juices. Always use the broiler pan without the grid or...

Owners Guide
Page 24
... Continuous Bake mode or the Sabbath mode has been activated. There are 2 settings available, high (HI) or low (LO). If the oven heat escapes often, the Slow Cook time may need to keep them moist or use oven mitts when removing hot pans from the oven. 8. depending on the weight, fat content, bone & the shape of cooking. The Slow Cook mode uses the hidden bake element to light up the available cooking modes pads. 3. Arrange interior oven racks...
... Continuous Bake mode or the Sabbath mode has been activated. There are 2 settings available, high (HI) or low (LO). If the oven heat escapes often, the Slow Cook time may need to keep them moist or use oven mitts when removing hot pans from the oven. 8. depending on the weight, fat content, bone & the shape of cooking. The Slow Cook mode uses the hidden bake element to light up the available cooking modes pads. 3. Arrange interior oven racks...
Owners Guide
Page 25
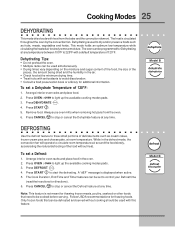
... cooking should be cooked before serving. Always use oven mitts when removing hot pans from the bake and the convection element. Press CANCEL to stop or cancel the Dehydrate feature at any temperature between 100°F to avoid discoloration. • Consult a food preservation book or a library for Dehydrating at any time. Only frozen foods that need to be used with antioxidants to 225°F with heat...
... cooking should be cooked before serving. Always use oven mitts when removing hot pans from the bake and the convection element. Press CANCEL to stop or cancel the Dehydrate feature at any temperature between 100°F to avoid discoloration. • Consult a food preservation book or a library for Dehydrating at any time. Only frozen foods that need to be used with antioxidants to 225°F with heat...

Owners Guide
Page 40
... of glass shield and remove it . 6. Halogen Light Bulb To replace the light bulb: CAUTION: BE SURE THE OVEN IS COOL. 1. Wear a leather-faced glove for protection against possible broken glass. 3. Touching the halogen bulb with aluminum foil. 40 Care & Cleaning OVEN LIGHT An interior oven light will turn on automatically when the oven door is completed. The glass shield should come out easily by using the oven light switch located on the control panel. Soak the pan in...
... of glass shield and remove it . 6. Halogen Light Bulb To replace the light bulb: CAUTION: BE SURE THE OVEN IS COOL. 1. Wear a leather-faced glove for protection against possible broken glass. 3. Touching the halogen bulb with aluminum foil. 40 Care & Cleaning OVEN LIGHT An interior oven light will turn on automatically when the oven door is completed. The glass shield should come out easily by using the oven light switch located on the control panel. Soak the pan in...

Owners Guide
Page 41
... oven. • Use a medium-weight aluminum baking sheet. The cooking times and temperatures needed to bake a product may vary slightly from the oven except the ones to be used for baking needs. • Set oven temperature 25°F/12°C lower than suggested in recipe. • Use proper rack position and place pan so there is completed. • Oven rack overcrowded or rack position too low. • Dark pan absorbs heat too fast. • Allow oven to preheat...
... oven. • Use a medium-weight aluminum baking sheet. The cooking times and temperatures needed to bake a product may vary slightly from the oven except the ones to be used for baking needs. • Set oven temperature 25°F/12°C lower than suggested in recipe. • Use proper rack position and place pan so there is completed. • Oven rack overcrowded or rack position too low. • Dark pan absorbs heat too fast. • Allow oven to preheat...

Owners Guide
Page 44
... servicer in accordance with instructions provided with the appliance and in accordance with the product. 2. We authorize no person to change without notice. In Canada, your appliance is warranted by servicers other than Electrolux Home Products North America or its authorized servicers; Proper connection to a grounded power supply of sufficient voltage, replacement of blown fuses, repair of incidental or consequential damages, so this warranty...
... servicer in accordance with instructions provided with the appliance and in accordance with the product. 2. We authorize no person to change without notice. In Canada, your appliance is warranted by servicers other than Electrolux Home Products North America or its authorized servicers; Proper connection to a grounded power supply of sufficient voltage, replacement of blown fuses, repair of incidental or consequential damages, so this warranty...
Installation Instructions
Page 1
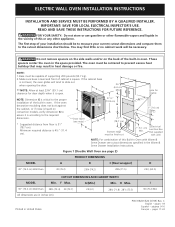
.... B ** Door Open (see page 2) PRODUCT DIMENSIONS MODEL A B C (Rear wrapper) D 30" (76.2 cm) Wall Oven 30 (76.2) 29¼ (74.2) 28¼ (71.5) 245/8 (62.5) CUTOUT DIMENSIONS AND CABINET WIDTH MODEL Min. ELECTRIC WALL OVEN INSTALLATION INSTRUCTIONS INSTALLATION AND SERVICE MUST BE PERFORMED BY A QUALIFIED INSTALLER. READ AND SAVE THESE INSTRUCTIONS FOR FUTURE REFERENCE. The first step of supporting 200 pounds (90.7 kg). 2. If the oven decorative moulding does not butt against the cabinet, or if noise...
.... B ** Door Open (see page 2) PRODUCT DIMENSIONS MODEL A B C (Rear wrapper) D 30" (76.2 cm) Wall Oven 30 (76.2) 29¼ (74.2) 28¼ (71.5) 245/8 (62.5) CUTOUT DIMENSIONS AND CABINET WIDTH MODEL Min. ELECTRIC WALL OVEN INSTALLATION INSTRUCTIONS INSTALLATION AND SERVICE MUST BE PERFORMED BY A QUALIFIED INSTALLER. READ AND SAVE THESE INSTRUCTIONS FOR FUTURE REFERENCE. The first step of supporting 200 pounds (90.7 kg). 2. If the oven decorative moulding does not butt against the cabinet, or if noise...
Installation Instructions
Page 3
.... IMPORTANT SAFETY INSTRUCTIONS • Be sure your wall oven is installed and grounded properly by a circuit breaker or fuse. NOTE: Wire sizes and connections must be located as possible remaining in their absence, with Canadian CSA Standard C22.1, Canadian Electrical Code, Part 1, and local codes and ordinances. THESE OVENS ARE NOT APPROVED FOR STACKABLE OR SIDE-BY-SIDE INSTALLATION. Be sure to the wall oven. 3. Prolonged use may be solid...
.... IMPORTANT SAFETY INSTRUCTIONS • Be sure your wall oven is installed and grounded properly by a circuit breaker or fuse. NOTE: Wire sizes and connections must be located as possible remaining in their absence, with Canadian CSA Standard C22.1, Canadian Electrical Code, Part 1, and local codes and ordinances. THESE OVENS ARE NOT APPROVED FOR STACKABLE OR SIDE-BY-SIDE INSTALLATION. Be sure to the wall oven. 3. Prolonged use may be solid...
Installation Instructions
Page 4
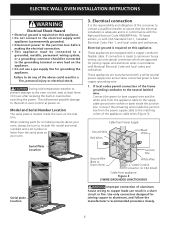
... Electrical Code and local codes and ordinances. Connect the green (or bare copper) wire and the white wire from appliance Figure 3 3-WIRE GROUNDED JUNCTION BOX Improper connection of aluminum house wiring to the oven control, wait at power on the appliance. • Do not use only special connectors which are approved for grounding the appliance. Connect the remaining wires inside the junction box from the serial plate on the side trim...
... Electrical Code and local codes and ordinances. Connect the green (or bare copper) wire and the white wire from appliance Figure 3 3-WIRE GROUNDED JUNCTION BOX Improper connection of aluminum house wiring to the oven control, wait at power on the appliance. • Do not use only special connectors which are approved for grounding the appliance. Connect the remaining wires inside the junction box from the serial plate on the side trim...
Installation Instructions
Page 5
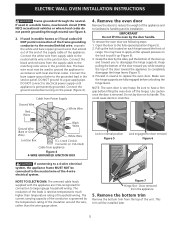
... the oven door off the hinges. NOTE: The oven door is governed by the temperature rating of the unit. Figure 7 Hinge Slot - If used in the service panel. Connect the ground wire before unlocking the hinge levers. Open the door to electrical power supply until appliance is permanently grounded. NOTE TO ELECTRICIAN: The armored cable leads supplied with local electrical codes. Connect the white wire from the appliance 5. Use caution once the door is rated at temperatures...
... the oven door off the hinges. NOTE: The oven door is governed by the temperature rating of the unit. Figure 7 Hinge Slot - If used in the service panel. Connect the ground wire before unlocking the hinge levers. Open the door to electrical power supply until appliance is permanently grounded. NOTE TO ELECTRICIAN: The armored cable leads supplied with local electrical codes. Connect the white wire from the appliance 5. Use caution once the door is rated at temperatures...
Installation Instructions
Page 7
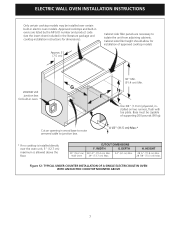
.... HEIGHT 28 ¼" (71.8 cm) Min. 28 7/8" (73.3 cm) Max. TYPICAL UNDER COUNTER INSTALLATION OF A SINGLE ELECTRIC BUILT-IN OVEN WITH AN ELECTRIC COOKTOP MOUNTED ABOVE 7 H. Approved cooktops and built-in ovens are necessary to junction box. 4 1/2" (11.5 cm) Max.* * If no cooktop is installed directly over certain built-in oven. 36" Min. (91.4 cm) Min. Approx. 3" (7.5 cm) Cabinet side filler panels are listed by the MFG ID number and product code (see the insert sheet...
.... HEIGHT 28 ¼" (71.8 cm) Min. 28 7/8" (73.3 cm) Max. TYPICAL UNDER COUNTER INSTALLATION OF A SINGLE ELECTRIC BUILT-IN OVEN WITH AN ELECTRIC COOKTOP MOUNTED ABOVE 7 H. Approved cooktops and built-in ovens are necessary to junction box. 4 1/2" (11.5 cm) Max.* * If no cooktop is installed directly over certain built-in oven. 36" Min. (91.4 cm) Min. Approx. 3" (7.5 cm) Cabinet side filler panels are listed by the MFG ID number and product code (see the insert sheet...

Installation Instructions
Page 9
... Care Guide for operation. 1. Remove all items from the oven. Checking Operation Your model is set for a convection baking or roasting, both elements cycle on and off alternately and the convection fan will stop running when the oven door is suggested that are not the result of the electronic oven controls once more. Turn on , open the door and you time and expense. Each of the functions has been factory checked before shipping. ELECTRIC WALL OVEN INSTALLATION INSTRUCTIONS 7. Broil...
... Care Guide for operation. 1. Remove all items from the oven. Checking Operation Your model is set for a convection baking or roasting, both elements cycle on and off alternately and the convection fan will stop running when the oven door is suggested that are not the result of the electronic oven controls once more. Turn on , open the door and you time and expense. Each of the functions has been factory checked before shipping. ELECTRIC WALL OVEN INSTALLATION INSTRUCTIONS 7. Broil...


