
Datasheet
Page 1
Free EdiView viewer app for iPhone & Android phones IC-7110 / IC-7110W / IC-7110P 1.3Mpx H.264 Day & Night PT Network Camera Fast Ethernet / Wireless / PoE The Edimax IC‐7110 series pan and tilt network camera is detected in the specified areas, this network camera will produce snapshots or video footage ...an eye on the IR LEDs to scan a pre‐defined path automatically or even control the camera's pan and tilt remotely via a web browser or the Edimax viewer software. Motorized Pan & Tilt With the ability to pan ±355 degrees and tilt ±120 degrees, this network camera to ...
Free EdiView viewer app for iPhone & Android phones IC-7110 / IC-7110W / IC-7110P 1.3Mpx H.264 Day & Night PT Network Camera Fast Ethernet / Wireless / PoE The Edimax IC‐7110 series pan and tilt network camera is detected in the specified areas, this network camera will produce snapshots or video footage ...an eye on the IR LEDs to scan a pre‐defined path automatically or even control the camera's pan and tilt remotely via a web browser or the Edimax viewer software. Motorized Pan & Tilt With the ability to pan ±355 degrees and tilt ±120 degrees, this network camera to ...

Datasheet
Page 2
...edimax.com FEATURES & TECHNICAL SPECIFICATIONS Video / Audio 1.3 megapixel CMOS sensor 1.0 lux 3.58mm, f/2.0 Recording format: AVI Video compression: H.264, MPEG‐4 & M‐JPEG 2‐way audio Standards Interface Fast Ethernet IEEE 802.3/802.3u Wireless IEEE 802.11b/g/n (IC‐7110W only) PoE IEEE 802.3af (IC...) 1 USB port for Wi‐Fi adapter (IC‐7110 only) 2 Detachable antennas (IC‐7110W only) Management RF Output Power LED Indicators EdiView Finder (Windows/Mac) 16‐channel viewer Web management interface Firmware upgradable iPhone & iPad viewer app ...
...edimax.com FEATURES & TECHNICAL SPECIFICATIONS Video / Audio 1.3 megapixel CMOS sensor 1.0 lux 3.58mm, f/2.0 Recording format: AVI Video compression: H.264, MPEG‐4 & M‐JPEG 2‐way audio Standards Interface Fast Ethernet IEEE 802.3/802.3u Wireless IEEE 802.11b/g/n (IC‐7110W only) PoE IEEE 802.3af (IC...) 1 USB port for Wi‐Fi adapter (IC‐7110 only) 2 Detachable antennas (IC‐7110W only) Management RF Output Power LED Indicators EdiView Finder (Windows/Mac) 16‐channel viewer Web management interface Firmware upgradable iPhone & iPad viewer app ...
Quick Install Guide
Page 6
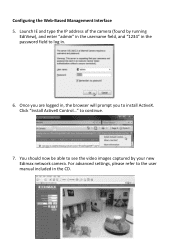
For advanced settings, please refer to install ActiveX. Click "Install ActiveX Control..." Once you to the user manual included in , the browser will prompt you are logged in the CD. 5 You should now be able to see the video images captured by running EdiView), and enter "admin" in the username field, and "1234" in the password field to continue. 7. Launch IE and type the IP address of the camera (found by your new Edimax network camera. to log in. 6. Configuring the Web-Based Management Interface 5.
For advanced settings, please refer to install ActiveX. Click "Install ActiveX Control..." Once you to the user manual included in , the browser will prompt you are logged in the CD. 5 You should now be able to see the video images captured by running EdiView), and enter "admin" in the username field, and "1234" in the password field to continue. 7. Launch IE and type the IP address of the camera (found by your new Edimax network camera. to log in. 6. Configuring the Web-Based Management Interface 5.

Quick Install Guide
Page 7
... Google Android market to finish the installation. Note: Each network camera comes with a Smartphone 8. Note: You may also find MAC address. 6 Log onto the camera web configuration page (Default IP:192.168.2.3). Enter the Cloud ID, Username and Password to download "Ediview". The sticker on the bottom of the camera says...
... Google Android market to finish the installation. Note: Each network camera comes with a Smartphone 8. Note: You may also find MAC address. 6 Log onto the camera web configuration page (Default IP:192.168.2.3). Enter the Cloud ID, Username and Password to download "Ediview". The sticker on the bottom of the camera says...
Quick Install Guide
Page 8
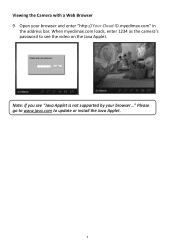
Please go to www.java.com to see "Java Applet is not supported by your browser and enter "http://Your Cloud ID.myedimax.com" in the address bar. Open your browser..." Note: If you see the video on the Java Applet. Viewing the Camera with a Web Browser 9. When myedimax.com loads, enter 1234 as the camera's password to update or install the Java Applet. 7
Please go to www.java.com to see "Java Applet is not supported by your browser and enter "http://Your Cloud ID.myedimax.com" in the address bar. Open your browser..." Note: If you see the video on the Java Applet. Viewing the Camera with a Web Browser 9. When myedimax.com loads, enter 1234 as the camera's password to update or install the Java Applet. 7
Manual
Page 4
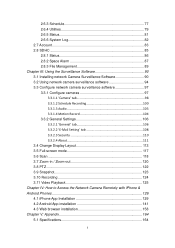
... Video Playback 125 Chapter IV: How to Access the Network Camera Remotely with iPhone & Android Phones 126 4.1 iPhone App Installation 129 4.2 Android App installation 141 4.3 Web browser installation 158 Chapter V: Appendix 164 5.1 Specifications 164 3
... Video Playback 125 Chapter IV: How to Access the Network Camera Remotely with iPhone & Android Phones 126 4.1 iPhone App Installation 129 4.2 Android App installation 141 4.3 Web browser installation 158 Chapter V: Appendix 164 5.1 Specifications 164 3

Manual
Page 20
If you wish to assign another IP address to this network camera is not 192.168.2, you have to log onto the web configuration interface of the camera first. 1.6 Locating the IP Address of this Network Camera Default IP address of this network camera, you ‟ll have to change the IP address of your computer is 192.168.2.3. Click „Start‟ -> „Control Panel‟ 19 If the left three fields of the IP address of your computer first: 1.
If you wish to assign another IP address to this network camera is not 192.168.2, you have to log onto the web configuration interface of the camera first. 1.6 Locating the IP Address of this Network Camera Default IP address of this network camera, you ‟ll have to change the IP address of your computer is 192.168.2.3. Click „Start‟ -> „Control Panel‟ 19 If the left three fields of the IP address of your computer first: 1.
Manual
Page 28
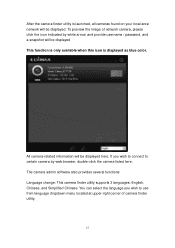
... language you wish to connect to use from language dropdown menu located at upper-right corner of network camera, please click the icon indicated by web browser, double-click the camera listed here. All camera-related information will be displayed here. If you wish to certain camera by white arrow, and...
... language you wish to connect to use from language dropdown menu located at upper-right corner of network camera, please click the icon indicated by web browser, double-click the camera listed here. All camera-related information will be displayed here. If you wish to certain camera by white arrow, and...
Manual
Page 32
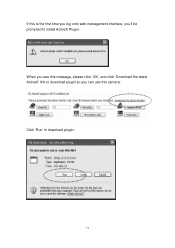
If this is the first time you log onto web management interface, you‟ll be prompted to install ActiveX Plugin: When you see this message, please click „OK‟, and click „Download the latest ActiveX‟ link to download plugin so you can use this camera: Click „Run‟ to download plugin: 31
If this is the first time you log onto web management interface, you‟ll be prompted to install ActiveX Plugin: When you see this message, please click „OK‟, and click „Download the latest ActiveX‟ link to download plugin so you can use this camera: Click „Run‟ to download plugin: 31
Manual
Page 34
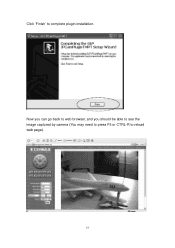
Click „Finish‟ to reload web page). 33 Now you can go back to web browser, and you should be able to see the image captured by camera (You may need to press F5 or CTRL-R to complete plugin installation.
Click „Finish‟ to reload web page). 33 Now you can go back to web browser, and you should be able to see the image captured by camera (You may need to press F5 or CTRL-R to complete plugin installation.
Manual
Page 36
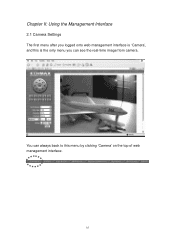
Chapter II: Using the Management Interface 2.1 Camera Settings The first menu after you logged onto web management interface is „Camera‟, and this is the only menu you can always back to this menu by clicking „Camera‟ on the top of web management interface. 35 You can see the real-time image from camera.
Chapter II: Using the Management Interface 2.1 Camera Settings The first menu after you logged onto web management interface is „Camera‟, and this is the only menu you can always back to this menu by clicking „Camera‟ on the top of web management interface. 35 You can see the real-time image from camera.
Manual
Page 40
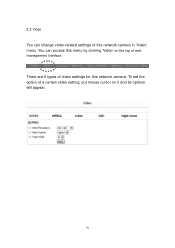
2.2 Video You can access this network camera in „Video‟ menu. You can change video-related settings of this menu by clicking „Video‟ on it and its options will appear. 39 There are 5 types of web management interface. To set the option of a certain video setting, put mouse cursor on the top of video settings for this network camera.
2.2 Video You can access this network camera in „Video‟ menu. You can change video-related settings of this menu by clicking „Video‟ on it and its options will appear. 39 There are 5 types of web management interface. To set the option of a certain video setting, put mouse cursor on the top of video settings for this network camera.
Manual
Page 46
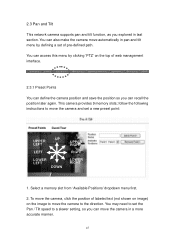
...) on the image to move the camera in a more accurate manner. 45 This camera provides 9 memory slots; To move the camera, click the position of web management interface. 2.3.1 Preset Points You can define the camera position and save the position so you can access this menu by defining a set of pre...
...) on the image to move the camera in a more accurate manner. 45 This camera provides 9 memory slots; To move the camera, click the position of web management interface. 2.3.1 Preset Points You can define the camera position and save the position so you can access this menu by defining a set of pre...

Manual
Page 51
After you wish to set, and then refer to instructions given below: 50 There are 6 sub-menus available here: Please click the network setting you selected „Network‟, network setting menu will appear. You can be found in this menu, and you have to specify TCP/IP parameters in this menu by clicking „LAN‟ on the top of web management interface. 2.4 Network Settings All network-related settings can access this menu if you want to change IP address, use PPPoE, Dynamic DNS, and activate UPnP function.
After you wish to set, and then refer to instructions given below: 50 There are 6 sub-menus available here: Please click the network setting you selected „Network‟, network setting menu will appear. You can be found in this menu, and you have to specify TCP/IP parameters in this menu by clicking „LAN‟ on the top of web management interface. 2.4 Network Settings All network-related settings can access this menu if you want to change IP address, use PPPoE, Dynamic DNS, and activate UPnP function.
Manual
Page 53
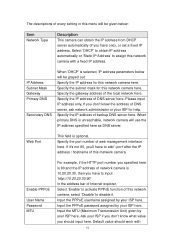
Specify the subnet mask for this network camera here. If you don‟t know what value you ‟ll have to disable it. Web Port This field is 10.20.20.30, then you have to assign this metwork camera. Specify the IP address for help. Input the PPPoE ... network administrator or your ISP here. Please input IP address only. Specify the port number of the local network here. Specify the gateway address of web management interface here. Enable PPPoE User Name Password MTU For example, if the HTTP port number you specified here is 90 and the IP address...
Specify the subnet mask for this network camera here. If you don‟t know what value you ‟ll have to disable it. Web Port This field is 10.20.20.30, then you have to assign this metwork camera. Specify the IP address for help. Input the PPPoE ... network administrator or your ISP here. Please input IP address only. Specify the port number of the local network here. Specify the gateway address of web management interface here. Enable PPPoE User Name Password MTU For example, if the HTTP port number you specified here is 90 and the IP address...
Manual
Page 60
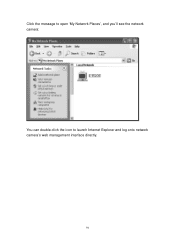
Click the message to open „My Network Places‟, and you‟ll see the network camera: You can double-click the icon to launch Internet Explorer and log onto network camera‟s web management interface directly. 59
Click the message to open „My Network Places‟, and you‟ll see the network camera: You can double-click the icon to launch Internet Explorer and log onto network camera‟s web management interface directly. 59
Manual
Page 61
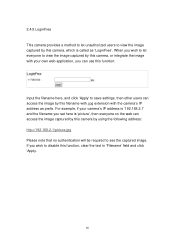
... following address: http://192.168.2.1/picture.jpg Please note that no authentication will be required to see the captured image. For example, if your own web application, you wish to disable this camera, which is „picture‟, then everyone to view the image captured by this camera, or integrate the...
... following address: http://192.168.2.1/picture.jpg Please note that no authentication will be required to see the captured image. For example, if your own web application, you wish to disable this camera, which is „picture‟, then everyone to view the image captured by this camera, or integrate the...
Manual
Page 75
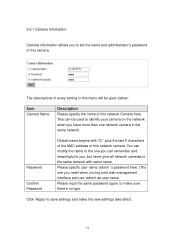
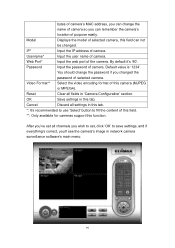
...can remember and meaningful to you to identify your camera on the network when you have more than one you need when you log onto web management interface and use „admin‟ as user name. 2.6.1 Camera Information Camera information allows you , but never give all network ...cameras in the same network with „IC-„ plus the last 6 characters of the MAC address of this network Camera here. Please specify user name „admin‟ „s password ...
...can remember and meaningful to you to identify your camera on the network when you have more than one you need when you log onto web management interface and use „admin‟ as user name. 2.6.1 Camera Information Camera information allows you , but never give all network ...cameras in the same network with „IC-„ plus the last 6 characters of the MAC address of this network Camera here. Please specify user name „admin‟ „s password ...
Manual
Page 100
... channels you wish to set, click „OK‟ to fill the content of this field. **: Only available for cameras support this function. Web Port* Input the web port of camera. Password Input the password of the camera. Video Format** Select the video encoding format of camera. Username* Input the user name...
... channels you wish to set, click „OK‟ to fill the content of this field. **: Only available for cameras support this function. Web Port* Input the web port of camera. Password Input the password of the camera. Video Format** Select the video encoding format of camera. Username* Input the user name...
Manual
Page 159
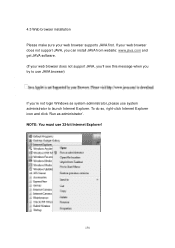
If your web browser does not support JAVA, you ‟re not login Windows as administrator‟. To do so, right-click Internet Explorer icon and click „Run as system administrator, please use system administrator to launch Internet Explorer. NOTE: You must use 32-bit Internet Explorer! 158 4.3 Web browser installation Please make sure your web browser does not support JAVA, you‟ll see this message when you try to use JAVA browser) If you can install JAVA from website: www.java.com and get JAVA software. (If your web browser supports JAVA first.
If your web browser does not support JAVA, you ‟re not login Windows as administrator‟. To do so, right-click Internet Explorer icon and click „Run as system administrator, please use system administrator to launch Internet Explorer. NOTE: You must use 32-bit Internet Explorer! 158 4.3 Web browser installation Please make sure your web browser does not support JAVA, you‟ll see this message when you try to use JAVA browser) If you can install JAVA from website: www.java.com and get JAVA software. (If your web browser supports JAVA first.