Quick Install Guide
Page 6
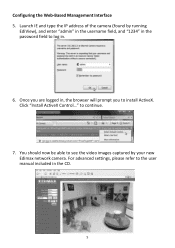
Click "Install ActiveX Control..." You should now be able to continue. 7. Configuring the Web-Based Management Interface 5. to see the video images captured by running EdiView), and enter "admin" in the username field, and "1234" in the password field to the user manual included in , the browser will prompt you are logged in the CD. 5 Once you to install ActiveX. For advanced settings, please refer to log in. 6. Launch IE and type the IP address of the camera (found by your new Edimax network camera.
Click "Install ActiveX Control..." You should now be able to continue. 7. Configuring the Web-Based Management Interface 5. to see the video images captured by running EdiView), and enter "admin" in the username field, and "1234" in the password field to the user manual included in , the browser will prompt you are logged in the CD. 5 Once you to install ActiveX. For advanced settings, please refer to log in. 6. Launch IE and type the IP address of the camera (found by your new Edimax network camera.
Quick Install Guide
Page 9
Increase the separation between the equipment and receiver. 3. Federal Communications Commission (FCC) Radiation Exposure Statement This equipment complies with FCC radiation exposure set forth for certification. This transmitter is restricted for use with the specific antenna tested in the application for an uncontrolled environment. However, special attention must ...
Increase the separation between the equipment and receiver. 3. Federal Communications Commission (FCC) Radiation Exposure Statement This equipment complies with FCC radiation exposure set forth for certification. This transmitter is restricted for use with the specific antenna tested in the application for an uncontrolled environment. However, special attention must ...
Manual
Page 3
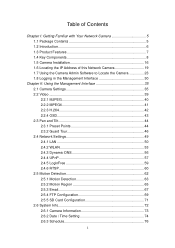
... Admin Software to Locate the Camera 23 1.8 Logging in the Management Interface 30 Chapter II: Using the Management Interface 35 2.1 Camera Settings 35 2.2 Video 39 2.2.1 MJPEG 40 2.2.2 MPEG4 41 2.2.3 H.264 42 2.2.4 OSD 43 2.3 Pan and Tilt 44 2.3.1 Preset Points 44 2.3.2 ...Guard Tour 46 2.4 Network Settings 49 2.4.1 LAN 50 2.4.2 WLAN 53 2.4.3 Dynamic DNS 56 2.4.4 UPnP 57 2.4.5 LoginFree 59 2.4.6 RTSP 60 2.5 Motion Detection 62 2.5.1 Motion Detection 63 2.5.2...
... Admin Software to Locate the Camera 23 1.8 Logging in the Management Interface 30 Chapter II: Using the Management Interface 35 2.1 Camera Settings 35 2.2 Video 39 2.2.1 MJPEG 40 2.2.2 MPEG4 41 2.2.3 H.264 42 2.2.4 OSD 43 2.3 Pan and Tilt 44 2.3.1 Preset Points 44 2.3.2 ...Guard Tour 46 2.4 Network Settings 49 2.4.1 LAN 50 2.4.2 WLAN 53 2.4.3 Dynamic DNS 56 2.4.4 UPnP 57 2.4.5 LoginFree 59 2.4.6 RTSP 60 2.5 Motion Detection 62 2.5.1 Motion Detection 63 2.5.2...
Manual
Page 4
... software 93 3.3 Configure network camera surveillance software 96 3.3.1 Configure cameras 96 3.3.1.1 'Camera' tab 97 3.3.1.2 Schedule Recording 99 3.3.1.3 Audio 102 3.3.1.4 Motion Record 103 3.3.2 General Settings 105 3.3.2.1 'General' tab 105 3.3.2.2 'E-Mail Setting' tab 107 3.3.2.3 Security 109 3.3.2.4 About 110 3.4 Change Display Layout 112 3.5 Full-screen mode 116 3.6 Scan 117 3.7 Zoom-in / Zoom-out 119 3.8 PTZ...
... software 93 3.3 Configure network camera surveillance software 96 3.3.1 Configure cameras 96 3.3.1.1 'Camera' tab 97 3.3.1.2 Schedule Recording 99 3.3.1.3 Audio 102 3.3.1.4 Motion Record 103 3.3.2 General Settings 105 3.3.2.1 'General' tab 105 3.3.2.2 'E-Mail Setting' tab 107 3.3.2.3 Security 109 3.3.2.4 About 110 3.4 Change Display Layout 112 3.5 Full-screen mode 116 3.6 Scan 117 3.7 Zoom-in / Zoom-out 119 3.8 PTZ...
Manual
Page 7
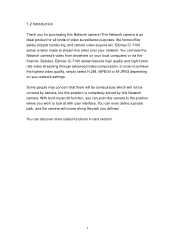
...settings. 1.2 Introduction Thank you for all kinds of video surveillance purposes, like home/office safety, kid/pet monitoring, and remote video acquire etc. This Network camera is completely solved by camera, but this problem is an ideal product for purchasing this Network camera. Besides, Edimax IC...-7100 series features high quality and high frame rate video streaming through advanced video compression. Edimax IC-7100 series is tailor made to look at with user interface. You can discover...
...settings. 1.2 Introduction Thank you for all kinds of video surveillance purposes, like home/office safety, kid/pet monitoring, and remote video acquire etc. This Network camera is completely solved by camera, but this problem is an ideal product for purchasing this Network camera. Besides, Edimax IC...-7100 series features high quality and high frame rate video streaming through advanced video compression. Edimax IC-7100 series is tailor made to look at with user interface. You can discover...
Manual
Page 8
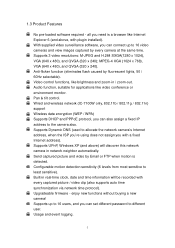
...new camera! Supports up to least sensitive). Usage and event logging. 7 1.3 Product Features No pre-loaded software required - Wired and wireless network (IC-7100W only, 802.11b / 802.11g / 802.11n) support Wireless data encryption (WEP / WPA) Supports DHCP and PPPoE protocol, you can also ...to different user. Video control functions, like video conference or environment monitor. all you can connect up to 16 users, and you can set different password to the camera also. With supplied video surveillance software, you need is detected. MPEG-4 XGA (1024 x 768), VGA (...
...new camera! Supports up to least sensitive). Usage and event logging. 7 1.3 Product Features No pre-loaded software required - Wired and wireless network (IC-7100W only, 802.11b / 802.11g / 802.11n) support Wireless data encryption (WEP / WPA) Supports DHCP and PPPoE protocol, you can also ...to different user. Video control functions, like video conference or environment monitor. all you can connect up to 16 users, and you can set different password to the camera also. With supplied video surveillance software, you need is detected. MPEG-4 XGA (1024 x 768), VGA (...
Manual
Page 15
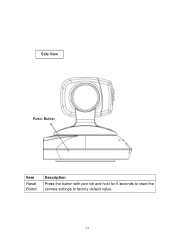
Side View Reset Button Item Reset Button Description Press the button with pen nib and hold for 5 seconds to reset the camera settings to factory default value. 14
Side View Reset Button Item Reset Button Description Press the button with pen nib and hold for 5 seconds to reset the camera settings to factory default value. 14

Manual
Page 17
1.5 Camera Installation Please follow the following instructions to the LAN jack of this network camera. 16 Unpack the product package and check if anything‟s missing. 2. Connect the Ethernet cable to your local area network, and connect the other end to set your network camera up. 1.
1.5 Camera Installation Please follow the following instructions to the LAN jack of this network camera. 16 Unpack the product package and check if anything‟s missing. 2. Connect the Ethernet cable to your local area network, and connect the other end to set your network camera up. 1.

Manual
Page 19
Launch Internet Explorer on the ceiling or wall, please use the tripod connector (located at a secure place, and point the camera to the place you wish to hang the camera on your computer, and following the instructions given in next section to secure the camera. 6. If you wish to monitor. 5. Place the camera at the bottom of the camera) to set the network camera. 18
Launch Internet Explorer on the ceiling or wall, please use the tripod connector (located at a secure place, and point the camera to the place you wish to hang the camera on your computer, and following the instructions given in next section to secure the camera. 6. If you wish to monitor. 5. Place the camera at the bottom of the camera) to set the network camera. 18
Manual
Page 23
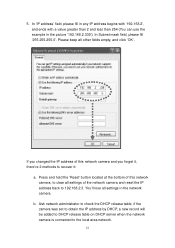
... network camera and you forget it, there‟re 2 methods to the local area network. 22 Please keep all settings of this network camera, to 192.168.2.3. You‟ll lose all settings in the picture „192.168.2.339‟). 5. b. In „IP address‟ field, please fill in any IP... back to clear all other fields empty, and click „OK‟. Ask network administrator to check the DHCP release table, if the camera was set to obtain the IP address by DHCP, a new record will be added to DHCP release table on DHCP server when the network camera is connected...
... network camera and you forget it, there‟re 2 methods to the local area network. 22 Please keep all settings of this network camera, to 192.168.2.3. You‟ll lose all settings in the picture „192.168.2.339‟). 5. b. In „IP address‟ field, please fill in any IP... back to clear all other fields empty, and click „OK‟. Ask network administrator to check the DHCP release table, if the camera was set to obtain the IP address by DHCP, a new record will be added to DHCP release table on DHCP server when the network camera is connected...
Manual
Page 29
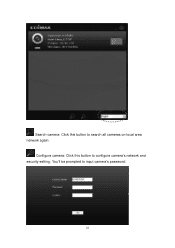
Configure camera: Click this button to search all cameras on local area network again. You‟ll be prompted to input camera‟s password: 28 Search camera: Click this button to configure camera‟s network and security setting.
Configure camera: Click this button to search all cameras on local area network again. You‟ll be prompted to input camera‟s password: 28 Search camera: Click this button to configure camera‟s network and security setting.
Manual
Page 30
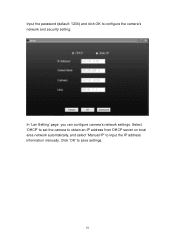
Input the password (default: 1234) and click OK to input the IP address information manually. Select „DHCP‟ to set the camera to obtain an IP address from DHCP server on local area network automatically, and select „Manual IP‟ to configure the camera‟s network and security setting: In „Lan Setting‟ page, you can configure camera‟s network settings. Click „OK‟ to save settings. 29
Input the password (default: 1234) and click OK to input the IP address information manually. Select „DHCP‟ to set the camera to obtain an IP address from DHCP server on local area network automatically, and select „Manual IP‟ to configure the camera‟s network and security setting: In „Lan Setting‟ page, you can configure camera‟s network settings. Click „OK‟ to save settings. 29

Manual
Page 36
Chapter II: Using the Management Interface 2.1 Camera Settings The first menu after you logged onto web management interface is „Camera‟, and this is the only menu you can always back to this menu by clicking „Camera‟ on the top of web management interface. 35 You can see the real-time image from camera.
Chapter II: Using the Management Interface 2.1 Camera Settings The first menu after you logged onto web management interface is „Camera‟, and this is the only menu you can always back to this menu by clicking „Camera‟ on the top of web management interface. 35 You can see the real-time image from camera.

Manual
Page 37
... / Saturation / Sharpness Volume Description Specifies the moving speed when you wan to increase or decrease brightness / saturation / sharpness setting value. Adjust the volume of audio output. Different encoding type requires different bandwidth, and provides different video quality. If you don...the frequency of electrical power; In certain environment, adjust brightness, saturation, and / or sharpness will take effect. The descriptions of every setting in a more ) fluorescent light(s), the image may look flashing. Available options are „MPEG4‟, „MJPEG‟, and &#...
... / Saturation / Sharpness Volume Description Specifies the moving speed when you wan to increase or decrease brightness / saturation / sharpness setting value. Adjust the volume of audio output. Different encoding type requires different bandwidth, and provides different video quality. If you don...the frequency of electrical power; In certain environment, adjust brightness, saturation, and / or sharpness will take effect. The descriptions of every setting in a more ) fluorescent light(s), the image may look flashing. Available options are „MPEG4‟, „MJPEG‟, and &#...
Manual
Page 38
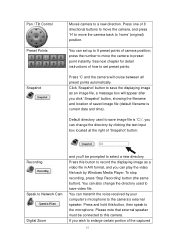
... back by your computer‟s microphone to Network Cam Digital Zoom and you can transmit the voice received by Windows Media Player. If you can set preset points. See next chapter for detail instructions of camera position; Click „Snapshot‟ button to save the displaying image as a video file in... AVI format, and you ‟ll be connected to this button, then speak to 9 preset points of how to set up to the microphone. Default directory used to a new direction.
... back by your computer‟s microphone to Network Cam Digital Zoom and you can transmit the voice received by Windows Media Player. If you can set preset points. See next chapter for detail instructions of camera position; Click „Snapshot‟ button to save the displaying image as a video file in... AVI format, and you ‟ll be connected to this button, then speak to 9 preset points of how to set up to the microphone. Default directory used to a new direction.

Manual
Page 39
Click this button and the image size will be adjusted to display the image captured by this camera). 38 You can drag the slide bar to adjust zoom ratio. Click this button to display the image in full-screen mode (uses all available space to fit the size of browser window. image, you can click this button to set digital zoom: Fit to Window Size Full Screen Click „Enable‟ to enable digital zoom function, then you can also use your mouse to drag the zoom area (the green square) to reposition the zoom area.
Click this button and the image size will be adjusted to display the image captured by this camera). 38 You can drag the slide bar to adjust zoom ratio. Click this button to display the image in full-screen mode (uses all available space to fit the size of browser window. image, you can click this button to set digital zoom: Fit to Window Size Full Screen Click „Enable‟ to enable digital zoom function, then you can also use your mouse to drag the zoom area (the green square) to reposition the zoom area.

Manual
Page 40
To set the option of a certain video setting, put mouse cursor on the top of web management interface. There are 5 types of this network camera in „Video‟ menu. You can change video-related settings of video settings for this menu by clicking „Video‟ on it and its options will appear. 39 2.2 Video You can access this network camera.
To set the option of a certain video setting, put mouse cursor on the top of web management interface. There are 5 types of this network camera in „Video‟ menu. You can change video-related settings of video settings for this menu by clicking „Video‟ on it and its options will appear. 39 2.2 Video You can access this network camera.
Manual
Page 41
... Frame Rate Description Changes the resolution of video quality from „30‟ to take effect. 40 The descriptions of every setting in „Camera‟ menu. Changes video quality. Higher resolution provides better video quality and more detail, but requires more ...are 5 levels of video. 2.2.1 MJPEG You can adjust video settings when you ‟re using this video camera with insufficient network bandwidth, selecting a lower frame rate setting will help. Click „Apply‟ for settings to „1‟, indicates how many video frames this camera ...
... Frame Rate Description Changes the resolution of video quality from „30‟ to take effect. 40 The descriptions of every setting in „Camera‟ menu. Changes video quality. Higher resolution provides better video quality and more detail, but requires more ...are 5 levels of video. 2.2.1 MJPEG You can adjust video settings when you ‟re using this video camera with insufficient network bandwidth, selecting a lower frame rate setting will help. Click „Apply‟ for settings to „1‟, indicates how many video frames this camera ...

Manual
Page 42
... quality. Available options from „Lowest‟ to „Highest‟. Click „Apply‟ for settings to „1‟, indicates how many video frames this camera will not lose details of every setting in „Camera‟ menu. There are 1024 x 768, 640 x 480, and 320 x 240....but requires more network bandwidth. Selecting a higher video quality will help. Available options are 5 levels of video. 2.2.2 MPEG4 You can adjust video settings when you ‟re using this video camera with insufficient network bandwidth, selecting a lower frame rate...
... quality. Available options from „Lowest‟ to „Highest‟. Click „Apply‟ for settings to „1‟, indicates how many video frames this camera will not lose details of every setting in „Camera‟ menu. There are 1024 x 768, 640 x 480, and 320 x 240....but requires more network bandwidth. Selecting a higher video quality will help. Available options are 5 levels of video. 2.2.2 MPEG4 You can adjust video settings when you ‟re using this video camera with insufficient network bandwidth, selecting a lower frame rate...

Manual
Page 43
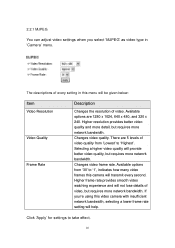
...8223; menu. If you select „H.264‟ as video type in this menu will transmit every second. 2.2.3 H.264 You can adjust video settings when you ‟re using this camera will be given below: Item Video Resolution Video Quality Frame Rate Description Changes the resolution of video, but... requires more network bandwidth. Changes video frame rate. There are 1280 x 1024, 640 x 480, and 320 x 240. Click „Apply‟ for settings to „1‟, indicates how many video frames this video camera with insufficient network bandwidth, selecting a lower frame rate...
...8223; menu. If you select „H.264‟ as video type in this menu will transmit every second. 2.2.3 H.264 You can adjust video settings when you ‟re using this camera will be given below: Item Video Resolution Video Quality Frame Rate Description Changes the resolution of video, but... requires more network bandwidth. Changes video frame rate. There are 1280 x 1024, 640 x 480, and 320 x 240. Click „Apply‟ for settings to „1‟, indicates how many video frames this video camera with insufficient network bandwidth, selecting a lower frame rate...