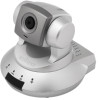
Quick Install Guide
Page 6
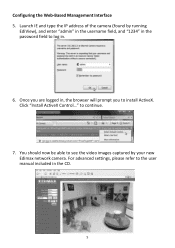
Click "Install ActiveX Control..." You should now be able to see the video images captured by running EdiView), and enter "admin" in the username field, and "1234" in the password field to the user manual included in , the browser will prompt you are logged in the CD. 5 to install ActiveX. For advanced settings, please refer to log in. 6. Once you to continue. 7. Launch IE and type the IP address of the camera (found by your new Edimax network camera. Configuring the Web-Based Management Interface 5.
Click "Install ActiveX Control..." You should now be able to see the video images captured by running EdiView), and enter "admin" in the username field, and "1234" in the password field to the user manual included in , the browser will prompt you are logged in the CD. 5 to install ActiveX. For advanced settings, please refer to log in. 6. Once you to continue. 7. Launch IE and type the IP address of the camera (found by your new Edimax network camera. Configuring the Web-Based Management Interface 5.

Quick Install Guide
Page 8
When myedimax.com loads, enter 1234 as the camera's password to update or install the Java Applet. 7 Please go to www.java.com to see "Java Applet is not supported by your browser and enter "http://Your Cloud ID.myedimax.com" in the address bar. Open your browser..." Note: If you see the video on the Java Applet. Viewing the Camera with a Web Browser 9.
When myedimax.com loads, enter 1234 as the camera's password to update or install the Java Applet. 7 Please go to www.java.com to see "Java Applet is not supported by your browser and enter "http://Your Cloud ID.myedimax.com" in the address bar. Open your browser..." Note: If you see the video on the Java Applet. Viewing the Camera with a Web Browser 9.
Manual
Page 3
... the Camera Admin Software to Locate the Camera 23 1.8 Logging in the Management Interface 30 Chapter II: Using the Management Interface 35 2.1 Camera Settings 35 2.2 Video 39 2.2.1 MJPEG 40 2.2.2 MPEG4 41 2.2.3 H.264 42 2.2.4 OSD 43 2.3 Pan and Tilt 44 2.3.1 Preset Points 44 2.3.2 Guard Tour 46 2.4 Network Settings 49 2.4.1 LAN 50 2.4.2 WLAN...
... the Camera Admin Software to Locate the Camera 23 1.8 Logging in the Management Interface 30 Chapter II: Using the Management Interface 35 2.1 Camera Settings 35 2.2 Video 39 2.2.1 MJPEG 40 2.2.2 MPEG4 41 2.2.3 H.264 42 2.2.4 OSD 43 2.3 Pan and Tilt 44 2.3.1 Preset Points 44 2.3.2 Guard Tour 46 2.4 Network Settings 49 2.4.1 LAN 50 2.4.2 WLAN...
Manual
Page 4
... 3.3.2.4 About 110 3.4 Change Display Layout 112 3.5 Full-screen mode 116 3.6 Scan 117 3.7 Zoom-in / Zoom-out 119 3.8 PTZ 121 3.9 Snapshot 122 3.10 Recording 123 3.11 Video Playback 124 Chapter IV: How to Access the Network Camera Remotely with iPhone & Android Phones 125 4.1 iPhone App Installation 128 4.2 Android App installation 140 4.3 Web...
... 3.3.2.4 About 110 3.4 Change Display Layout 112 3.5 Full-screen mode 116 3.6 Scan 117 3.7 Zoom-in / Zoom-out 119 3.8 PTZ 121 3.9 Snapshot 122 3.10 Recording 123 3.11 Video Playback 124 Chapter IV: How to Access the Network Camera Remotely with iPhone & Android Phones 125 4.1 iPhone App Installation 128 4.2 Android App installation 140 4.3 Web...
Manual
Page 7
...along the path you for all kinds of video surveillance purposes, like home/office safety, kid/pet monitoring, and remote video acquire etc. Besides, Edimax IC-7100 series features high quality and high frame rate video streaming through advanced video compression. You can point the camera to... the position where you wish to achieve the highest video quality, simply select H.264, MPEG4...
...along the path you for all kinds of video surveillance purposes, like home/office safety, kid/pet monitoring, and remote video acquire etc. Besides, Edimax IC-7100 series features high quality and high frame rate video streaming through advanced video compression. You can point the camera to... the position where you wish to achieve the highest video quality, simply select H.264, MPEG4...
Manual
Page 8
... without buying a new camera! Pan & tilt control. Built-in network neighbor automatically. Usage and event logging. 7 Wired and wireless network (IC-7100W only, 802.11b / 802.11g / 802.11n) support Wireless data encryption (WEP / WPA) Supports DHCP and PPPoE protocol, you can... connect up to the camera also. With supplied video surveillance software, you can set different password to least sensitive). Audio function, suitable for applications like brightness and zoom-in / zoom-out....
... without buying a new camera! Pan & tilt control. Built-in network neighbor automatically. Usage and event logging. 7 Wired and wireless network (IC-7100W only, 802.11b / 802.11g / 802.11n) support Wireless data encryption (WEP / WPA) Supports DHCP and PPPoE protocol, you can... connect up to the camera also. With supplied video surveillance software, you can set different password to least sensitive). Audio function, suitable for applications like brightness and zoom-in / zoom-out....
Manual
Page 9
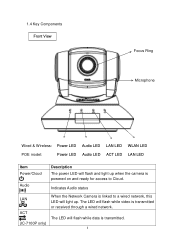
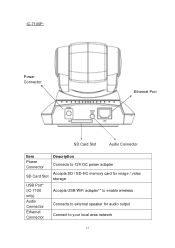
1.4 Key Components Front View Focus Ring Microphone Wired & Wireless: Power LED Audio LED LAN LED WLAN LED POE model: Power LED Audio LED ACT LED LAN LED Item Power/Cloud Audio Description The power LED will flash and light up . The LED will light up when the camera is transmitted or received through a wired network. The LED will flash while data is linked to a wired network, this LED will flash while video is powered on and ready for access to Cloud. Indicates Audio status LAN ACT (IC-7100P only) When the Network Camera is transmitted. 8
1.4 Key Components Front View Focus Ring Microphone Wired & Wireless: Power LED Audio LED LAN LED WLAN LED POE model: Power LED Audio LED ACT LED LAN LED Item Power/Cloud Audio Description The power LED will flash and light up . The LED will light up when the camera is transmitted or received through a wired network. The LED will flash while data is linked to a wired network, this LED will flash while video is powered on and ready for access to Cloud. Indicates Audio status LAN ACT (IC-7100P only) When the Network Camera is transmitted. 8
Manual
Page 10
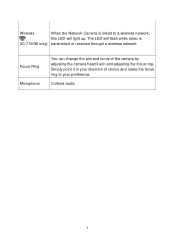
Collects audio 9 Simply point it in your direction of the camera by adjusting the camera head's aim and adjusting the focus ring. Focus Ring Microphone You can change the aim and focus of choice and rotate the focus ring to a wireless network, this LED will flash while video is (IC-7100W only) transmitted or received through a wireless network. Wireless When the Network Camera is linked to your preference. The LED will light up.
Collects audio 9 Simply point it in your direction of the camera by adjusting the camera head's aim and adjusting the focus ring. Focus Ring Microphone You can change the aim and focus of choice and rotate the focus ring to a wireless network, this LED will flash while video is (IC-7100W only) transmitted or received through a wireless network. Wireless When the Network Camera is linked to your preference. The LED will light up.
Manual
Page 13
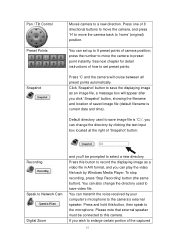
IC-7100P: Power Connector Ethernet Port SD Card Slot Audio Connector Item Power Connector SD Card Slot USB Port* (IC-7100 only) Audio Connector Ethernet Connector Description Connects to 12V DC power adapter Accepts SD / SD-HC memory card for image / video storage Accepts USB WiFi adapter** to enable wireless Connects to external speaker for audio output Connect to your local area network 12
IC-7100P: Power Connector Ethernet Port SD Card Slot Audio Connector Item Power Connector SD Card Slot USB Port* (IC-7100 only) Audio Connector Ethernet Connector Description Connects to 12V DC power adapter Accepts SD / SD-HC memory card for image / video storage Accepts USB WiFi adapter** to enable wireless Connects to external speaker for audio output Connect to your local area network 12

Manual
Page 37
... button to the frequency of electrical power; If you will take effect right away. 36 Different encoding type requires different bandwidth, and provides different video quality. If you don‟t know which one with less flicker. Select 1 to a new direction. NOTE: When you change any setting(s)... listed above, please click 'Apply' button so the change(s) will not be given below: Item Pan/Tilt Speed Video Type Frequency Flip Mode Brightness / Saturation / Sharpness Volume Description Specifies the moving speed when you should use, just try any of them and...
... button to the frequency of electrical power; If you will take effect right away. 36 Different encoding type requires different bandwidth, and provides different video quality. If you don‟t know which one with less flicker. Select 1 to a new direction. NOTE: When you change any setting(s)... listed above, please click 'Apply' button so the change(s) will not be given below: Item Pan/Tilt Speed Video Type Frequency Flip Mode Brightness / Saturation / Sharpness Volume Description Specifies the moving speed when you should use, just try any of them and...
Manual
Page 38
...text input box located at the right of 8 directional buttons to move the camera, and press „H‟ to move the camera to save video file. Press and hold this camera. Press one of „Snapshot‟ button: Recording Speak to Network Cam Digital Zoom and you can ... location of saved image file (default filename is „C:\‟, you wish to the camera‟s external speaker. If you can play the video file back by your computer‟s microphone to enlarge certain portion of camera position; You can transmit the voice received by Windows Media Player....
...text input box located at the right of 8 directional buttons to move the camera, and press „H‟ to move the camera to save video file. Press and hold this camera. Press one of „Snapshot‟ button: Recording Speak to Network Cam Digital Zoom and you can ... location of saved image file (default filename is „C:\‟, you wish to the camera‟s external speaker. If you can play the video file back by your computer‟s microphone to enlarge certain portion of camera position; You can transmit the voice received by Windows Media Player....

Manual
Page 40
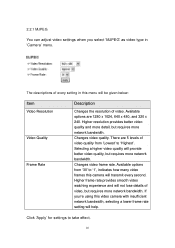
There are 5 types of this network camera in „Video‟ menu. 2.2 Video You can access this menu by clicking „Video‟ on it and its options will appear. 39 To set the option of a certain video setting, put mouse cursor on the top of web management interface. You can change video-related settings of video settings for this network camera.
There are 5 types of this network camera in „Video‟ menu. 2.2 Video You can access this menu by clicking „Video‟ on it and its options will appear. 39 To set the option of a certain video setting, put mouse cursor on the top of web management interface. You can change video-related settings of video settings for this network camera.
Manual
Page 41
... more network bandwidth. If you select „MJPEG‟ as video type in this menu will be given below: Item Video Resolution Video Quality Frame Rate Description Changes the resolution of video. Changes video quality. 2.2.1 MJPEG You can adjust video settings when you ‟re using this video camera with insufficient network bandwidth, selecting a lower frame rate...
... more network bandwidth. If you select „MJPEG‟ as video type in this menu will be given below: Item Video Resolution Video Quality Frame Rate Description Changes the resolution of video. Changes video quality. 2.2.1 MJPEG You can adjust video settings when you ‟re using this video camera with insufficient network bandwidth, selecting a lower frame rate...

Manual
Page 42
...‟ for settings to „Highest‟. 2.2.2 MPEG4 You can adjust video settings when you ‟re using this video camera with insufficient network bandwidth, selecting a lower frame rate setting will provide better video quality, but requires more network bandwidth. The descriptions of video, but requires more network bandwidth. Available options are 5 levels of...
...‟ for settings to „Highest‟. 2.2.2 MPEG4 You can adjust video settings when you ‟re using this video camera with insufficient network bandwidth, selecting a lower frame rate setting will provide better video quality, but requires more network bandwidth. The descriptions of video, but requires more network bandwidth. Available options are 5 levels of...

Manual
Page 43
... help. There are 1280 x 1024, 640 x 480, and 320 x 240. Higher resolution provides better video quality and more detail, but requires more network bandwidth. The descriptions of video. Selecting a higher video quality will be given below: Item Video Resolution Video Quality Frame Rate Description Changes the resolution of every setting in „Camera‟ menu...
... help. There are 1280 x 1024, 640 x 480, and 320 x 240. Higher resolution provides better video quality and more detail, but requires more network bandwidth. The descriptions of video. Selecting a higher video quality will be given below: Item Video Resolution Video Quality Frame Rate Description Changes the resolution of every setting in „Camera‟ menu...

Manual
Page 61
The descriptions of every setting in this function to setup RTSP parameters, so your RTSP-compatible player will be able to receive video data. 2.4.6 RTSP If you want to watch video captured by this network camera by your own RTSP (Real Time Streaming Protocol) media player, you can use this menu will be given below: Item RTSP Port Description Input the port number of RTSP here. Default setting is 554. 60
The descriptions of every setting in this function to setup RTSP parameters, so your RTSP-compatible player will be able to receive video data. 2.4.6 RTSP If you want to watch video captured by this network camera by your own RTSP (Real Time Streaming Protocol) media player, you can use this menu will be given below: Item RTSP Port Description Input the port number of RTSP here. Default setting is 554. 60

Manual
Page 62
MPEG4 RTSP Path H.264 RTSP Path Input the path of H.264 RTSP video file. When you use RTSP-compatible media player to play RTSP stream, please remember to add „.sdp‟ file extension. 61 When you use RTSP-compatible media player to play RTSP stream, please remember to add „.sdp‟ file extension. Input the path of MPEG4 RTSP video file.
MPEG4 RTSP Path H.264 RTSP Path Input the path of H.264 RTSP video file. When you use RTSP-compatible media player to play RTSP stream, please remember to add „.sdp‟ file extension. 61 When you use RTSP-compatible media player to play RTSP stream, please remember to add „.sdp‟ file extension. Input the path of MPEG4 RTSP video file.

Manual
Page 65
..., so this function will take effect (see below ). Available options are not required to configure FTP server parameters in Mbytes. You have to save a motion video clip. You have to write files in „FTP Configuration‟ menu first, so this function will take effect. 64 Click „Apply‟ to...
..., so this function will take effect (see below ). Available options are not required to configure FTP server parameters in Mbytes. You have to save a motion video clip. You have to write files in „FTP Configuration‟ menu first, so this function will take effect. 64 Click „Apply‟ to...

Manual
Page 72
... this box and this box. Click „Apply‟ to lose old image files, do not check this camera will store the saved image or video clip.
... this box and this box. Click „Apply‟ to lose old image files, do not check this camera will store the saved image or video clip.

Manual
Page 78
...the appointed e-mail address, or select‟ Disable‟ to disable this function. You have to adjust the recoding time based on the video resolution and video frame rate settings in „email & FTP‟ menu first, so this function will take effect. This option allows the network camera to...to send one recording file according to disable this function. This option allows you wish. This option allows you to choose to upload each recorded video with different file name composed of date/time, or to choose to configure e-mail settings in „Email‟ menu first, so this...
...the appointed e-mail address, or select‟ Disable‟ to disable this function. You have to adjust the recoding time based on the video resolution and video frame rate settings in „email & FTP‟ menu first, so this function will take effect. This option allows the network camera to...to send one recording file according to disable this function. This option allows you wish. This option allows you to choose to upload each recorded video with different file name composed of date/time, or to choose to configure e-mail settings in „Email‟ menu first, so this...