Quick Install Guide
Page 6
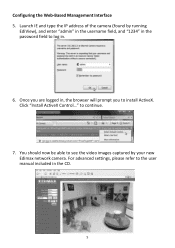
to install ActiveX. Configuring the Web-Based Management Interface 5. You should now be able to see the video images captured by running EdiView), and enter "admin" in the username field, and "1234" in the password field to log in. 6. Once you are logged in the CD. 5 For advanced settings, please refer to the user manual included in , the browser will prompt you to continue. 7. Launch IE and type the IP address of the camera (found by your new Edimax network camera. Click "Install ActiveX Control..."
to install ActiveX. Configuring the Web-Based Management Interface 5. You should now be able to see the video images captured by running EdiView), and enter "admin" in the username field, and "1234" in the password field to log in. 6. Once you are logged in the CD. 5 For advanced settings, please refer to the user manual included in , the browser will prompt you to continue. 7. Launch IE and type the IP address of the camera (found by your new Edimax network camera. Click "Install ActiveX Control..."

Quick Install Guide
Page 14
... the date of this License. For an executable work for all modules it contains, plus any associated interface definition files, plus the scripts used to control compilation and installation of this License. If distribution of executable or object code is not the intent of the executable. These actions are prohibited by... all the notices that refer to this License. Any attempt otherwise to copy, modify, sublicense or distribute the Program is to exercise the right to control the distribution of this License. 3.
... the date of this License. For an executable work for all modules it contains, plus any associated interface definition files, plus the scripts used to control compilation and installation of this License. If distribution of executable or object code is not the intent of the executable. These actions are prohibited by... all the notices that refer to this License. Any attempt otherwise to copy, modify, sublicense or distribute the Program is to exercise the right to control the distribution of this License. 3.
Manual
Page 8
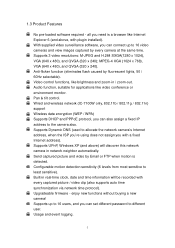
... function, suitable for applications like brightness and zoom-in / zoom-out. 1.3 Product Features No pre-loaded software required - Wired and wireless network (IC-7100W only, 802.11b / 802.11g / 802.11n) support Wireless data encryption (WEP / WPA) Supports DHCP and PPPoE protocol, you can also...can set different password to least sensitive). MPEG-4 XGA (1024 x 768), VGA (640 x 480), and QVGA (320 x 240). Pan & tilt control. Anti-flicker function (eliminates flash caused by Email or FTP when motion is a browser like Internet Explorer 6 (and above ) will discover this network camera...
... function, suitable for applications like brightness and zoom-in / zoom-out. 1.3 Product Features No pre-loaded software required - Wired and wireless network (IC-7100W only, 802.11b / 802.11g / 802.11n) support Wireless data encryption (WEP / WPA) Supports DHCP and PPPoE protocol, you can also...can set different password to least sensitive). MPEG-4 XGA (1024 x 768), VGA (640 x 480), and QVGA (320 x 240). Pan & tilt control. Anti-flicker function (eliminates flash caused by Email or FTP when motion is a browser like Internet Explorer 6 (and above ) will discover this network camera...
Manual
Page 20
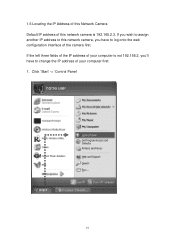
If you wish to assign another IP address to this network camera, you ‟ll have to change the IP address of your computer first: 1. If the left three fields of the IP address of your computer is 192.168.2.3. Click „Start‟ -> „Control Panel‟ 19 1.6 Locating the IP Address of this network camera is not 192.168.2, you have to log onto the web configuration interface of this Network Camera Default IP address of the camera first.
If you wish to assign another IP address to this network camera, you ‟ll have to change the IP address of your computer first: 1. If the left three fields of the IP address of your computer is 192.168.2.3. Click „Start‟ -> „Control Panel‟ 19 1.6 Locating the IP Address of this network camera is not 192.168.2, you have to log onto the web configuration interface of this Network Camera Default IP address of the camera first.

Manual
Page 37
... not putting this camera on the ceiling or wall, you can use this case, you should use pan / tilt function to point the camera to control the movement precisely. For following functions, changes will help improve video quality. Different encoding type requires different bandwidth, and provides different video quality.
... not putting this camera on the ceiling or wall, you can use this case, you should use pan / tilt function to point the camera to control the movement precisely. For following functions, changes will help improve video quality. Different encoding type requires different bandwidth, and provides different video quality.
Manual
Page 38
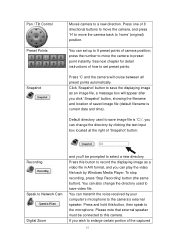
... the right of „Snapshot‟ button: Recording Speak to „home‟ (original) position. Press this button, then speak to a new direction. Pan / Tilt Control Preset Points Snapshot Moves camera to the microphone.
... the right of „Snapshot‟ button: Recording Speak to „home‟ (original) position. Press this button, then speak to a new direction. Pan / Tilt Control Preset Points Snapshot Moves camera to the microphone.

Manual
Page 77
.... You have to FTP server every second. You can use this menu to setup Schedule Snapshot/Recording settings: Item Enable FTP Schedule Time Interval File Control Description Select „Enable‟ to send the Schedule Snapshot to the appointed FTP server, or select ‟Disable‟ to upload the schedule snapshot...
.... You have to FTP server every second. You can use this menu to setup Schedule Snapshot/Recording settings: Item Enable FTP Schedule Time Interval File Control Description Select „Enable‟ to send the Schedule Snapshot to the appointed FTP server, or select ‟Disable‟ to upload the schedule snapshot...

Manual
Page 78
... schedule recording, or select „Disable‟ to E-Mail Note: The available recording time is based on your preference. Send Recording File to FTP File Control Send Recording File to disable this function. You have to adjust the recoding time based on the video resolution and video frame rate settings in...
... schedule recording, or select „Disable‟ to E-Mail Note: The available recording time is based on your preference. Send Recording File to FTP File Control Send Recording File to disable this function. You have to adjust the recoding time based on the video resolution and video frame rate settings in...
Manual
Page 94
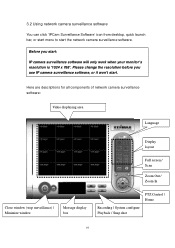
... surveillance software: Video displaying area Language Display layout Full screen / Scan Zoom Out / Zoom In Close window (stop surveillance) / Minimize window Message display box PTZ Control / Home Recording / System configure Playback / Snap shot 93
... surveillance software: Video displaying area Language Display layout Full screen / Scan Zoom Out / Zoom In Close window (stop surveillance) / Minimize window Message display box PTZ Control / Home Recording / System configure Playback / Snap shot 93
Manual
Page 95
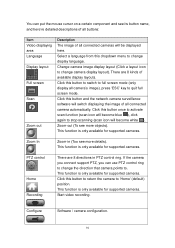
... all camera‟s image), press „ESC‟ key to stop scanning (scan icon will become white ). Zoom In Zoom-in PTZ control ring. This function is only available for supported cameras. Change camera image display layout (Click a layout icon to full screen mode (only display... of all buttons: Item Video displaying area Language Display layout Full screen Scan Zoom out Description The image of available display layouts. PTZ control Home Recording There are 8 kinds of all connected cameras will become blue ), click again to quit full screen mode. This function is...
... all camera‟s image), press „ESC‟ key to stop scanning (scan icon will become white ). Zoom In Zoom-in PTZ control ring. This function is only available for supported cameras. Change camera image display layout (Click a layout icon to full screen mode (only display... of all buttons: Item Video displaying area Language Display layout Full screen Scan Zoom out Description The image of available display layouts. PTZ control Home Recording There are 8 kinds of all connected cameras will become blue ), click again to quit full screen mode. This function is...

Manual
Page 135
Click snapshot picture to „Live‟ menu, if you can click 134 Now you can back to enlarge video view If network camera you connected supports pan/tilt control, you see a snapshot appear, it indicates the network camera is correctly configured.
Click snapshot picture to „Live‟ menu, if you can click 134 Now you can back to enlarge video view If network camera you connected supports pan/tilt control, you see a snapshot appear, it indicates the network camera is correctly configured.
Manual
Page 161
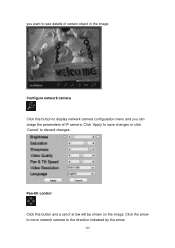
you can chage the parameters of certain object in the image. Click the arrow to move network camera to discard changes. Click „Apply‟ to save changes or click „Cancel‟ to the direction indicated by the arrow. 160 Configure network camera Click this button and a set of arrow will be shown on the image. Pan-tilt control Click this button to display network camera configuration menu and you want to see details of IP camera.
you can chage the parameters of certain object in the image. Click the arrow to move network camera to discard changes. Click „Apply‟ to save changes or click „Cancel‟ to the direction indicated by the arrow. 160 Configure network camera Click this button and a set of arrow will be shown on the image. Pan-tilt control Click this button to display network camera configuration menu and you want to see details of IP camera.
Manual
Page 164
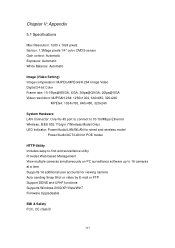
Chapter V: Appendix 5.1 Specifications Max Resolution: 1280 x 1024 pixels Sensor: 1.3Mega pixels 1/4" color CMOS sensor Gain control: Automatic Exposure: Automatic White Balance: Automatic Image (Video Setting) Image compression: MJPEG/MPEG4/H.264 Image Video Digital 24-bit Color Frame rate: 10-15fps@SXGA, ...
Chapter V: Appendix 5.1 Specifications Max Resolution: 1280 x 1024 pixels Sensor: 1.3Mega pixels 1/4" color CMOS sensor Gain control: Automatic Exposure: Automatic White Balance: Automatic Image (Video Setting) Image compression: MJPEG/MPEG4/H.264 Image Video Digital 24-bit Color Frame rate: 10-15fps@SXGA, ...