
User Manual
Page 3
System Requirements...5 I -5. Reset ...8 II. Camera Setup & EdiView Finder 11 III-1. III-2. Network ...28 IV-1-2. Dynamic DNS...36 IV-1-4. Date & Time ...38 IV-1-6. Motion Detection...47 IV-3-2. LED Status ...37 IV-1-5. Night Vision...46 IV-3. Package Contents ...5 I -6. Wireless...30 IV-1-2-1. Video Settings ...43 IV-2-2. Detection Region ...49 3 EdiView Finder Network Camera Setup 11 Windows ...11 Mac ...17 Using EdiView Finder ...20 WPS (Wi-Fi Protected Setup 22 IV. WPS ...35 IV-1-3. Video ...43 IV-2-1. III-1-2. Back Panel...6 I . ...
System Requirements...5 I -5. Reset ...8 II. Camera Setup & EdiView Finder 11 III-1. III-2. Network ...28 IV-1-2. Dynamic DNS...36 IV-1-4. Date & Time ...38 IV-1-6. Motion Detection...47 IV-3-2. LED Status ...37 IV-1-5. Night Vision...46 IV-3. Package Contents ...5 I -6. Wireless...30 IV-1-2-1. Video Settings ...43 IV-2-2. Detection Region ...49 3 EdiView Finder Network Camera Setup 11 Windows ...11 Mac ...17 Using EdiView Finder ...20 WPS (Wi-Fi Protected Setup 22 IV. WPS ...35 IV-1-3. Video ...43 IV-2-1. III-1-2. Back Panel...6 I . ...
User Manual
Page 4
... VI-3-1-4. General Options...82 VI-3-2-1. Full Screen Mode ...93 VI-6. Scheduled Recording 76 VI-3-1-3. About ...89 VI-4. IV-3-4. Scan...94 VI-7. Video Playback...99 VII. EdiView App 100 4 Email Setting ...84 VI-3-2-3.
... VI-3-1-4. General Options...82 VI-3-2-1. Full Screen Mode ...93 VI-6. Scheduled Recording 76 VI-3-1-3. About ...89 VI-4. IV-3-4. Scan...94 VI-7. Video Playback...99 VII. EdiView App 100 4 Email Setting ...84 VI-3-2-3.
User Manual
Page 10
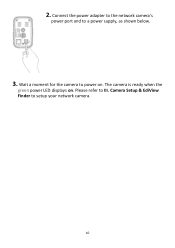
Please refer to setup your network camera. 10 2. Camera Setup & EdiView Finder to III. Connect the power adapter to the network camera's power port and to power on . The camera is ready when the green power LED displays on . Wait a moment for the camera to a power supply, as shown below. 3.
Please refer to setup your network camera. 10 2. Camera Setup & EdiView Finder to III. Connect the power adapter to the network camera's power port and to power on . The camera is ready when the green power LED displays on . Wait a moment for the camera to a power supply, as shown below. 3.
User Manual
Page 11
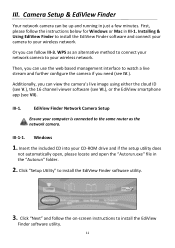
... to your wireless network. Click "Setup Utility" to your wireless network. Camera Setup & EdiView Finder Your network camera can follow III-3. Insert the included CD into your camera to install the EdiView Finder software utility. 3. WPS as the network camera. Windows 1. Click "Next" and... IV.). III-1. III-1-1. Or you can use the web based management interface to install the EdiView Finder software utility. 11 III. Installing & Using EdiView Finder to install the EdiView Finder software and connect your CD-ROM drive and if the setup utility does not automatically open...
... to your wireless network. Click "Setup Utility" to your wireless network. Camera Setup & EdiView Finder Your network camera can follow III-3. Insert the included CD into your camera to install the EdiView Finder software utility. 3. WPS as the network camera. Windows 1. Click "Next" and... IV.). III-1. III-1-1. Or you can use the web based management interface to install the EdiView Finder software utility. 11 III. Installing & Using EdiView Finder to install the EdiView Finder software and connect your CD-ROM drive and if the setup utility does not automatically open...

User Manual
Page 12
EdiView Finder will list all cameras on your local network, along with each camera's name, model, IP address and MAC address. When installation is not displayed. 12 Or double click the "EdiView Finder Utility" icon on your desktop to refresh the list if your camera is complete, select "Launch EdiView Finder Utility" before clicking "Finish". Click the search icon to launch EdiView Finder. 5. 4.
EdiView Finder will list all cameras on your local network, along with each camera's name, model, IP address and MAC address. When installation is not displayed. 12 Or double click the "EdiView Finder Utility" icon on your desktop to refresh the list if your camera is complete, select "Launch EdiView Finder Utility" before clicking "Finish". Click the search icon to launch EdiView Finder. 5. 4.

User Manual
Page 15
9.When the connection is detected as shown below, please click "Next". 10. Enter a name and password for your camera remotely via its cloud ID, web interface or via the EdiView smartphone app. The password will be used later to log in to continue. 15 Click "OK" to your camera.
9.When the connection is detected as shown below, please click "Next". 10. Enter a name and password for your camera remotely via its cloud ID, web interface or via the EdiView smartphone app. The password will be used later to log in to continue. 15 Click "OK" to your camera.
User Manual
Page 17
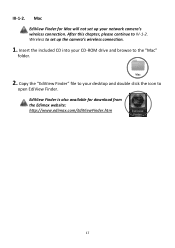
Wireless to IV-1-2. Insert the included CD into your network camera's wireless connection. Mac EdiView Finder for download from the Edimax website: http://www.edimax.com/EdiViewFinder.htm 17 After this chapter, please continue to set up the camera's wireless connection. 1. Copy the "EdiView Finder" file to your desktop and double click the icon to the "Mac" folder. 2. EdiView Finder is also available for Mac will not set up your CD-ROM drive and browse to open EdiView Finder. III-1-2.
Wireless to IV-1-2. Insert the included CD into your network camera's wireless connection. Mac EdiView Finder for download from the Edimax website: http://www.edimax.com/EdiViewFinder.htm 17 After this chapter, please continue to set up the camera's wireless connection. 1. Copy the "EdiView Finder" file to your desktop and double click the icon to the "Mac" folder. 2. EdiView Finder is also available for Mac will not set up your CD-ROM drive and browse to open EdiView Finder. III-1-2.
User Manual
Page 18
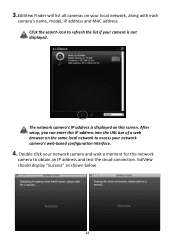
EdiView should display "Success" as shown below. 18 Click the search icon to refresh the list if your camera is displayed on this IP address into ... network camera and wait a moment for the network camera to access your local network, along with each camera's name, model, IP address and MAC address. 3.EdiView Finder will list all cameras on your network camera's web-based configuration interface. 4. The network camera's IP address is not displayed.
EdiView should display "Success" as shown below. 18 Click the search icon to refresh the list if your camera is displayed on this IP address into ... network camera and wait a moment for the network camera to access your local network, along with each camera's name, model, IP address and MAC address. 3.EdiView Finder will list all cameras on your network camera's web-based configuration interface. 4. The network camera's IP address is not displayed.
User Manual
Page 19
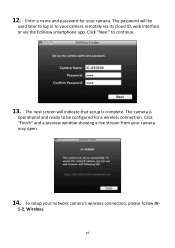
The next screen will be configured for your network camera's wireless connection, please follow IV- 1-2. Enter a name and password for a wireless connection. The camera is complete. To setup your camera. 12. Click "Next" to your camera may open. 14. Click "Finish" and a preview window showing a live stream from your camera remotely via its cloud ID, web interface or via the EdiView smartphone app. The password will indicate that setup is operational and ready to be used later to log in to continue. 13. Wireless. 19
The next screen will be configured for your network camera's wireless connection, please follow IV- 1-2. Enter a name and password for a wireless connection. The camera is complete. To setup your camera. 12. Click "Next" to your camera may open. 14. Click "Finish" and a preview window showing a live stream from your camera remotely via its cloud ID, web interface or via the EdiView smartphone app. The password will indicate that setup is operational and ready to be used later to log in to continue. 13. Wireless. 19
User Manual
Page 20
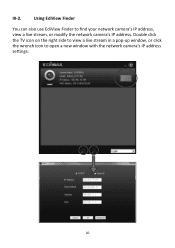
Double click the TV icon on the right side to view a live stream in a pop-up window, or click the wrench icon to find your network camera's IP address, view a live stream, or modify the network camera's IP address. III-2. Using EdiView Finder You can also use EdiView Finder to open a new window with the network camera's IP address settings: 20
Double click the TV icon on the right side to view a live stream in a pop-up window, or click the wrench icon to find your network camera's IP address, view a live stream, or modify the network camera's IP address. III-2. Using EdiView Finder You can also use EdiView Finder to open a new window with the network camera's IP address settings: 20

User Manual
Page 21
If you encounter difficulties, it is recommended that you need. 21 Network) if you use a DHCP server - Static IP users who may be able to locate the network camera with EdiView Finder. EdiView Finder will locate your network camera as long as you can manually set the network camera's IP address using EdiView Finder (above) or using a different IP address subnet to the network camera should still be using the web-based configuration interface (see IV-1-1. though you are on the same local network.
If you encounter difficulties, it is recommended that you need. 21 Network) if you use a DHCP server - Static IP users who may be able to locate the network camera with EdiView Finder. EdiView Finder will locate your network camera as long as you can manually set the network camera's IP address using EdiView Finder (above) or using a different IP address subnet to the network camera should still be using the web-based configuration interface (see IV-1-1. though you are on the same local network.
User Manual
Page 23
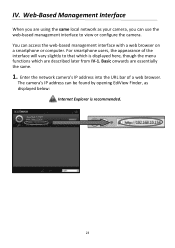
... into the URL bar of the interface will vary slightly to view or configure the camera. The camera's IP address can be found by opening EdiView Finder, as your camera, you are essentially the same. 1. IV. Web-Based Management Interface When you can access the web-based management interface with a web...
... into the URL bar of the interface will vary slightly to view or configure the camera. The camera's IP address can be found by opening EdiView Finder, as your camera, you are essentially the same. 1. IV. Web-Based Management Interface When you can access the web-based management interface with a web...
User Manual
Page 30
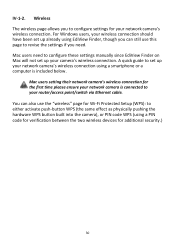
... use the "wireless" page for your camera's wireless connection. For Windows users, your wireless connection should have been set up already using EdiView Finder, though you to configure settings for Wi-Fi Protected Setup (WPS): to either activate push-button WPS (the same effect as physically...WPS button built into the camera), or PIN code WPS (using a smartphone or a computer is connected to configure these settings manually since EdiView Finder on Mac will not set up your network camera's wireless connection. Wireless The wireless page allows you can also use this page ...
... use the "wireless" page for your camera's wireless connection. For Windows users, your wireless connection should have been set up already using EdiView Finder, though you to configure settings for Wi-Fi Protected Setup (WPS): to either activate push-button WPS (the same effect as physically...WPS button built into the camera), or PIN code WPS (using a smartphone or a computer is connected to configure these settings manually since EdiView Finder on Mac will not set up your network camera's wireless connection. Wireless The wireless page allows you can also use this page ...

User Manual
Page 63
... then click "Run Add-on to work. 1. Myedimax.com You can use your network camera's Myedimax.com cloud ID to indicate a successful cloud connection, in EdiView Finder (see I-5.). The cloud ID is recommended. 3. For example, if your cloud ID is 001109010204 then enter 001109010204.myedimax.com into your network camera. 2.Enter...
... then click "Run Add-on to work. 1. Myedimax.com You can use your network camera's Myedimax.com cloud ID to indicate a successful cloud connection, in EdiView Finder (see I-5.). The cloud ID is recommended. 3. For example, if your cloud ID is 001109010204 then enter 001109010204.myedimax.com into your network camera. 2.Enter...
User Manual
Page 66
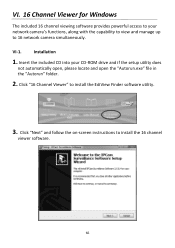
Click "16 Channel Viewer" to install the 16 channel viewer software. 66 Installation 1. VI-1. Click "Next" and follow the on-screen instructions to install the EdiView Finder software utility. 3. Insert the included CD into your network camera's functions, along with the capability to view and manage up to 16 network camera ...
Click "16 Channel Viewer" to install the 16 channel viewer software. 66 Installation 1. VI-1. Click "Next" and follow the on-screen instructions to install the EdiView Finder software utility. 3. Insert the included CD into your network camera's functions, along with the capability to view and manage up to 16 network camera ...
User Manual
Page 100
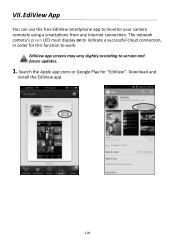
EdiView App You can use the free EdiView smartphone app to work. The network camera's green LED must display on to indicate a successful cloud connection, in order for "EdiView". Download and install the EdiView app. 100 Search the Apple app store or Google Play for this function to monitor your camera remotely using a smartphone from any Internet connection. VII. EdiView app screens may vary slightly according to version and future updates. 1.
EdiView App You can use the free EdiView smartphone app to work. The network camera's green LED must display on to indicate a successful cloud connection, in order for "EdiView". Download and install the EdiView app. 100 Search the Apple app store or Google Play for this function to monitor your camera remotely using a smartphone from any Internet connection. VII. EdiView app screens may vary slightly according to version and future updates. 1.
User Manual
Page 101
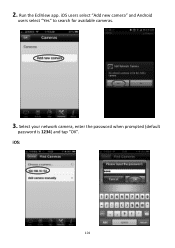
Select your network camera, enter the password when prompted (default password is 1234) and tap "OK". iOS: 101 Run the EdiView app. iOS users select "Add new camera" and Android users select "Yes" to search for available cameras. 3. 2.
Select your network camera, enter the password when prompted (default password is 1234) and tap "OK". iOS: 101 Run the EdiView app. iOS users select "Add new camera" and Android users select "Yes" to search for available cameras. 3. 2.
Installation Guide
Page 3
Smartphone 19 III-3-1-2. Camera Setup 8 III-1. Web-Based Management Interface 17 III-3-1. EdiView App 25 3 Hardware Installation 7 III. Installing & Using EdiView Finder 8 III-1-1. Computer 21 III-4. Mac 13 III-2. Reset 6 II. Package Contents 4 I -4. LED Status 5 I -2. Windows 8 III-1-2. WPS (Wi-Fi Protected Setup 16 III-3. I -5. Product Label 6 I . Wireless Settings 19 III-3-1-1. Back Panel 4 I -1. Product Information 4 I -3. Myedimax.com 23 III-5.
Smartphone 19 III-3-1-2. Camera Setup 8 III-1. Web-Based Management Interface 17 III-3-1. EdiView App 25 3 Hardware Installation 7 III. Installing & Using EdiView Finder 8 III-1-1. Computer 21 III-4. Mac 13 III-2. Reset 6 II. Package Contents 4 I -4. LED Status 5 I -2. Windows 8 III-1-2. WPS (Wi-Fi Protected Setup 16 III-3. I -5. Product Label 6 I . Wireless Settings 19 III-3-1-1. Back Panel 4 I -1. Product Information 4 I -3. Myedimax.com 23 III-5.
Installation Guide
Page 8
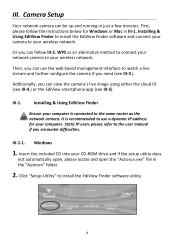
...in the "Autorun" folder. 2. III-1-1. Click "Setup Utility" to watch a live image using either the cloud ID (see III-4.) or the EdiView smartphone app (see III-3.). Additionally, you encounter difficulties. Windows 1. Camera Setup Your network camera can follow the instructions below for your wireless network. ...stream and further configure the camera if you can be up and running in III-1. III. III-1. Installing & Using EdiView Finder to install the EdiView Finder software and connect your camera to the same router as an alternative method to connect your network camera to the...
...in the "Autorun" folder. 2. III-1-1. Click "Setup Utility" to watch a live image using either the cloud ID (see III-4.) or the EdiView smartphone app (see III-3.). Additionally, you encounter difficulties. Windows 1. Camera Setup Your network camera can follow the instructions below for your wireless network. ...stream and further configure the camera if you can be up and running in III-1. III. III-1. Installing & Using EdiView Finder to install the EdiView Finder software and connect your camera to the same router as an alternative method to connect your network camera to the...

Installation Guide
Page 9
Or double click the "EdiView Finder Utility" icon on your local network, along with each camera's name, model, IP address and MAC address. Click "Next" and follow the on your desktop to launch EdiView Finder. 5. EdiView Finder will list all cameras on -screen instructions to refresh the list if your camera is complete, select "Launch EdiView Finder Utility" before clicking "Finish". 3. Click the search icon to install the EdiView Finder software utility. 4. When installation is not displayed. 9
Or double click the "EdiView Finder Utility" icon on your local network, along with each camera's name, model, IP address and MAC address. Click "Next" and follow the on your desktop to launch EdiView Finder. 5. EdiView Finder will list all cameras on -screen instructions to refresh the list if your camera is complete, select "Launch EdiView Finder Utility" before clicking "Finish". 3. Click the search icon to install the EdiView Finder software utility. 4. When installation is not displayed. 9