
User Manual
Page 3
...-Based Management Interface 23 IV-1. Network ...28 IV-1-2. RTSP ...37 IV-1-5. UPnP...41 IV-1-8. Image Appearance ...45 IV-2-3. Hardware Installation 9 II-1. Date & Time ...38 IV-1-6. Reset ...8 II. III-1-2. WPS ...35 IV-1-3. Bonjour ...42 IV-2. Detection Region ...49 3 LED Status ...6 I -2. Mounting Kit ...9 II-2. Video ...43 IV-2-1. Events...47 IV-3-1. Wireless...30 IV...
...-Based Management Interface 23 IV-1. Network ...28 IV-1-2. RTSP ...37 IV-1-5. UPnP...41 IV-1-8. Image Appearance ...45 IV-2-3. Hardware Installation 9 II-1. Date & Time ...38 IV-1-6. Reset ...8 II. III-1-2. WPS ...35 IV-1-3. Bonjour ...42 IV-2. Detection Region ...49 3 LED Status ...6 I -2. Mounting Kit ...9 II-2. Video ...43 IV-2-1. Events...47 IV-3-1. Wireless...30 IV...
User Manual
Page 6
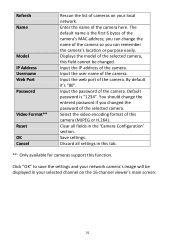
... Green Quick Flashing LAN activity (transferring data). Network camera is on and connected to Internet. Internet Orange On Connected to cloud server. LED Status WPS/Reset Button 12V DC Power Port LED LED Color LED Status Description On Network camera is connected to cloud server. Slow Flashing (1 x per second) Not connected...
... Green Quick Flashing LAN activity (transferring data). Network camera is on and connected to Internet. Internet Orange On Connected to cloud server. LED Status WPS/Reset Button 12V DC Power Port LED LED Color LED Status Description On Network camera is connected to cloud server. Slow Flashing (1 x per second) Not connected...

User Manual
Page 8
I-6. This resets all settings back to its factory default settings. After reset, the green power LED will display slow flashing If the network camera is on the back panel for the network camera to the cloud server. 8 Reset If you experience problems with your network camera, you can reset the camera back to default. 1. Wait for at least 10 seconds 2. Press and hold the WPS/Reset button found on . The camera is ready when the green power LED is unable to connect to restart. Release the button when the green power LED is flashing quickly. 3.
I-6. This resets all settings back to its factory default settings. After reset, the green power LED will display slow flashing If the network camera is on the back panel for the network camera to the cloud server. 8 Reset If you experience problems with your network camera, you can reset the camera back to default. 1. Wait for at least 10 seconds 2. Press and hold the WPS/Reset button found on . The camera is ready when the green power LED is unable to connect to restart. Release the button when the green power LED is flashing quickly. 3.

User Manual
Page 22
Within two minutes, press the WPS/Reset button on your wireless router/access point for how long you need to hold down its WPS. Take care not to hold the WPS button ... activate WPS. Please check the instructions for your wireless router/access point for 2 - 5 seconds to activate WPS. 2. III-3. Press and hold the WPS/Reset button too long and reset your wireless router/access point. 1. WPS (Wi-Fi Protected Setup) The WPS button is a quick and easy method to indicate that WPS is...
Within two minutes, press the WPS/Reset button on your wireless router/access point for how long you need to hold down its WPS. Take care not to hold the WPS button ... activate WPS. Please check the instructions for your wireless router/access point for 2 - 5 seconds to activate WPS. 2. III-3. Press and hold the WPS/Reset button too long and reset your wireless router/access point. 1. WPS (Wi-Fi Protected Setup) The WPS button is a quick and easy method to indicate that WPS is...

User Manual
Page 45
Click to reset all settings back to the network camera's image appearance using the sliders shown below. Image Appearance The "Image Appearance" page allows you to adjust various parameters relating to the default value of 50. Brightness/ Contrast/ Saturation/ Sharpness/ Reset to default Save value Click and drag the blue lever to change the value according to your preference for each category. Save changes. 45 IV-2-2.
Click to reset all settings back to the network camera's image appearance using the sliders shown below. Image Appearance The "Image Appearance" page allows you to adjust various parameters relating to the default value of 50. Brightness/ Contrast/ Saturation/ Sharpness/ Reset to default Save value Click and drag the blue lever to change the value according to your preference for each category. Save changes. 45 IV-2-2.

User Manual
Page 57
... could damage the device. Click "Restart Network Camera" to upgrade the network camera's firmware, backup or restore the network camera's settings, and reset or restart the network camera. Click "Browse" to find a previously saved config.bin file and then click "Upload" to locate the firmware...Restart Click "Browse" to replace your selected file. Advanced The "Advanced" page allows you to restart the network camera. Please check the Edimax website for the latest firmware for network camera to your current settings. Click to upgrade the firmware to boot up after a restart. IV-4-2....
... could damage the device. Click "Restart Network Camera" to upgrade the network camera's firmware, backup or restore the network camera's settings, and reset or restart the network camera. Click "Browse" to find a previously saved config.bin file and then click "Upload" to locate the firmware...Restart Click "Browse" to replace your selected file. Advanced The "Advanced" page allows you to restart the network camera. Please check the Edimax website for the latest firmware for network camera to your current settings. Click to upgrade the firmware to boot up after a restart. IV-4-2....

User Manual
Page 58
"Default Settings" will reset all settings but keep the current network settings. Reset to default Select "Keep Network Settings" or "Default Settings" and then click "Reset to the factory default status. 58 The network camera's IP address will reset all of the camera's settings, including network settings, back to Default". When the camera resets, "Keep Network Settings" will remain the same.
"Default Settings" will reset all settings but keep the current network settings. Reset to default Select "Keep Network Settings" or "Default Settings" and then click "Reset to the factory default status. 58 The network camera's IP address will reset all of the camera's settings, including network settings, back to Default". When the camera resets, "Keep Network Settings" will remain the same.
User Manual
Page 75
Refresh Name Model IP Address Username Web Port Password Video Format** Reset OK Cancel Rescan the list of the camera's MAC address; The default name is "1234". Default password is the first 6 bytes of cameras on the ...
Refresh Name Model IP Address Username Web Port Password Video Format** Reset OK Cancel Rescan the list of the camera's MAC address; The default name is "1234". Default password is the first 6 bytes of cameras on the ...
Installation Guide
Page 3
Product Information 4 I -4. LED Status 5 I -1. Computer 21 III-4. WPS (Wi-Fi Protected Setup 16 III-3. Wireless Settings 19 III-3-1-1. Product Label 6 I -2. Reset 6 II. Windows 8 III-1-2. Package Contents 4 I -5. Mac 13 III-2. Smartphone 19 III-3-1-2. Camera Setup 8 III-1. Myedimax.com 23 III-5. Hardware Installation 7 III. Installing & Using EdiView Finder 8 III-1-1. EdiView App 25 3 I -3. Web-Based Management Interface 17 III-3-1. Back Panel 4 I .
Product Information 4 I -4. LED Status 5 I -1. Computer 21 III-4. WPS (Wi-Fi Protected Setup 16 III-3. Wireless Settings 19 III-3-1-1. Product Label 6 I -2. Reset 6 II. Windows 8 III-1-2. Package Contents 4 I -5. Mac 13 III-2. Smartphone 19 III-3-1-2. Camera Setup 8 III-1. Myedimax.com 23 III-5. Hardware Installation 7 III. Installing & Using EdiView Finder 8 III-1-1. EdiView App 25 3 I -3. Web-Based Management Interface 17 III-3-1. Back Panel 4 I .

Installation Guide
Page 4
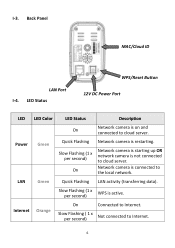
Back Panel Ethernet Cable Mounting Kit MAC/Cloud ID LAN Port WPS/Reset Button 12V DC Power Port 4 Package Contents IC-3116W QIG CD-ROM Power Adapter I . I -2. Product Information I-1.
Back Panel Ethernet Cable Mounting Kit MAC/Cloud ID LAN Port WPS/Reset Button 12V DC Power Port 4 Package Contents IC-3116W QIG CD-ROM Power Adapter I . I -2. Product Information I-1.
Installation Guide
Page 6
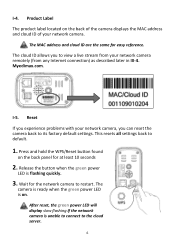
... of the camera displays the MAC address and cloud ID of your network camera remotely (from your network camera. I -4. Press and hold the WPS/Reset button found on . I -5. Release the button when the green power LED is unable to connect to default. 1. The cloud ID allows you can...cloud server. 6 The camera is ready when the green power LED is on the back panel for easy reference. Reset If you experience problems with your network camera, you to restart. After reset, the green power LED will display slow flashing If the network camera is flashing quickly. 3. The MAC address ...
... of the camera displays the MAC address and cloud ID of your network camera remotely (from your network camera. I -4. Press and hold the WPS/Reset button found on . I -5. Release the button when the green power LED is unable to connect to default. 1. The cloud ID allows you can...cloud server. 6 The camera is ready when the green power LED is on the back panel for easy reference. Reset If you experience problems with your network camera, you to restart. After reset, the green power LED will display slow flashing If the network camera is flashing quickly. 3. The MAC address ...

Installation Guide
Page 16
... active. Press and hold the WPS button on the network camera for how long you need to activate WPS. Within two minutes, press the WPS/Reset button on your wireless router/access point for 2 - 5 seconds to hold the WPS...
... active. Press and hold the WPS button on the network camera for how long you need to activate WPS. Within two minutes, press the WPS/Reset button on your wireless router/access point for 2 - 5 seconds to hold the WPS...