Datasheet
Page 1
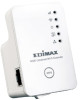
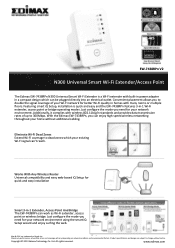
... -1 Wi-Fi extender, access point or bridge operating modes. EW-7438RPn V2 N300 Universal Smart Wi-Fi Extender/Access Point The Edimax EW-7438RPn N300 Universal Smart Wi-Fi Extender is quick and easy and the EW-7438RPn features 3-in homes with many rooms or multiple floors. Featuring smart iQ Setup, installation is a Wi-Fi extender with wireless 802...
... -1 Wi-Fi extender, access point or bridge operating modes. EW-7438RPn V2 N300 Universal Smart Wi-Fi Extender/Access Point The Edimax EW-7438RPn N300 Universal Smart Wi-Fi Extender is quick and easy and the EW-7438RPn features 3-in homes with many rooms or multiple floors. Featuring smart iQ Setup, installation is a Wi-Fi extender with wireless 802...
Datasheet
Page 2
..., and coverage will vary depending on network conditions and environmental factors. www.edimax.com www.edimax.com N300 Universal Smart Wi-Fi Extender/Access Point EW-7438RPn V2 Smart iQ Setup Features user-friendly browser-based iQ Setup for an additional power cable. iQ Setup automatically detects the available Wi-Fi networks nearby and helps you to join...
..., and coverage will vary depending on network conditions and environmental factors. www.edimax.com www.edimax.com N300 Universal Smart Wi-Fi Extender/Access Point EW-7438RPn V2 Smart iQ Setup Features user-friendly browser-based iQ Setup for an additional power cable. iQ Setup automatically detects the available Wi-Fi networks nearby and helps you to join...
Datasheet
Page 3
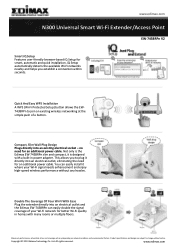
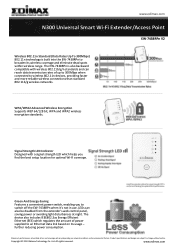
... night. Green And Energy-Saving Features a convenient power switch, enabling you find the best setup location for optimal Wi-Fi coverage. All rights reserved. Copyright © 2013 Edimax Technology Co. The device also includes IEEE802.3az Energy Efficient Ethernet (EEE) which helps you....11n devices, providing faster and more reliable wireless connections than standard 802.11b/g wireless networks. www.edimax.com N300 Universal Smart Wi-Fi Extender/Access Point EW-7438RPn V2 Wireless 802.11n Standard (Data Rates Up To 300Mbps) 802.11n technology is also backward compatible with...
... night. Green And Energy-Saving Features a convenient power switch, enabling you find the best setup location for optimal Wi-Fi coverage. All rights reserved. Copyright © 2013 Edimax Technology Co. The device also includes IEEE802.3az Energy Efficient Ethernet (EEE) which helps you....11n devices, providing faster and more reliable wireless connections than standard 802.11b/g wireless networks. www.edimax.com N300 Universal Smart Wi-Fi Extender/Access Point EW-7438RPn V2 Wireless 802.11n Standard (Data Rates Up To 300Mbps) 802.11n technology is also backward compatible with...
Datasheet
Page 4
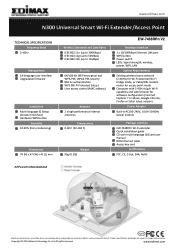
... reserved. Copyright © 2013 Edimax Technology Co. Ltd. www.edimax.com www.edimax.com N300 Universal Smart Wi-Fi Extender/Access Point TECHNICAL SPECIFICATIONS Frequency Band 2.4GHz Management 14-language user interface Upgradable firmware Installation Multi-language iQ Setup (browser interface) Hardware WPS button...PSK security 802.1x authentication WPS (Wi-Fi Protected Setup) User access control (MAC address) Antenna 2 x high performance internal antennas Temperature 0-40°C (32-104°F) Weight 90g (0.2lb) EW-7438RPn V2 Hardware Interface 1 x 10/100Mbps Ethernet LAN port WPS...
... reserved. Copyright © 2013 Edimax Technology Co. Ltd. www.edimax.com www.edimax.com N300 Universal Smart Wi-Fi Extender/Access Point TECHNICAL SPECIFICATIONS Frequency Band 2.4GHz Management 14-language user interface Upgradable firmware Installation Multi-language iQ Setup (browser interface) Hardware WPS button...PSK security 802.1x authentication WPS (Wi-Fi Protected Setup) User access control (MAC address) Antenna 2 x high performance internal antennas Temperature 0-40°C (32-104°F) Weight 90g (0.2lb) EW-7438RPn V2 Hardware Interface 1 x 10/100Mbps Ethernet LAN port WPS...

Quick Install Guide
Page 5
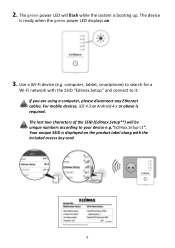
... LED will be unique numbers according to it. If you are using a computer, please disconnect any Ethernet cables. The last two characters of the SSID (Edimax.Setup**) will flash while the system is displayed on . 3. The device is required. 2. Use a Wi-Fi device (e.g. For mobile devices, iOS 4.3 or Android 4.x or above is...
... LED will be unique numbers according to it. If you are using a computer, please disconnect any Ethernet cables. The last two characters of the SSID (Edimax.Setup**) will flash while the system is displayed on . 3. The device is required. 2. Use a Wi-Fi device (e.g. For mobile devices, iOS 4.3 or Android 4.x or above is...
Quick Install Guide
Page 6
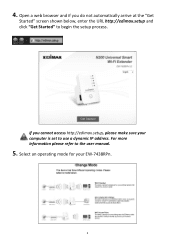
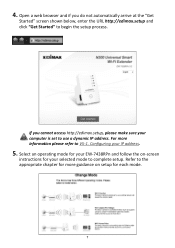
If you do not automatically arrive at the "Get Started" screen shown below, enter the URL http://edimax.setup and click "Get Started" to begin the setup process. For more information please refer to use a dynamic IP address. Select an operating mode for your computer is set to the user manual. 5. 4. Open a web browser and if you cannot access http://edimax.setup, please make sure your EW-7438RPn. 5
If you do not automatically arrive at the "Get Started" screen shown below, enter the URL http://edimax.setup and click "Get Started" to begin the setup process. For more information please refer to use a dynamic IP address. Select an operating mode for your computer is set to the user manual. 5. 4. Open a web browser and if you cannot access http://edimax.setup, please make sure your EW-7438RPn. 5
Quick Install Guide
Page 7
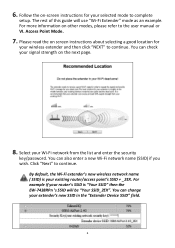
...good location for your extender's new SSID in the "Extender Device SSID" field. 6 You can check your wireless extender and then click "NEXT" to complete setup. Click "Next" to the user manual or VI. The rest of this guide will be "Your SSID_2EX". You can also enter a new Wi-Fi ... Select your existing router/access point's SSID + _2EX. By default, the Wi-Fi extender's new wireless network name ( SSID) is "Your SSID" then the EW-7438RPn 's SSID will use "Wi-Fi Extender" mode as an example. 6. For example if your router's SSID is your Wi-Fi network from the list and...
...good location for your extender's new SSID in the "Extender Device SSID" field. 6 You can check your wireless extender and then click "NEXT" to complete setup. Click "Next" to the user manual or VI. The rest of this guide will be "Your SSID_2EX". You can also enter a new Wi-Fi ... Select your existing router/access point's SSID + _2EX. By default, the Wi-Fi extender's new wireless network name ( SSID) is "Your SSID" then the EW-7438RPn 's SSID will use "Wi-Fi Extender" mode as an example. 6. For example if your router's SSID is your Wi-Fi network from the list and...
Quick Install Guide
Page 9
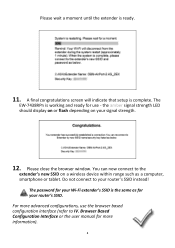
... manual for more advanced configurations, use - A final congratulations screen will indicate that setup is ready. 11. You can now connect to IV. The password for your Wi-Fi extender's SSID is working and ready for your signal strength. 12. The EW-7438RPn is the same as a computer, smartphone or tablet. For more information...
... manual for more advanced configurations, use - A final congratulations screen will indicate that setup is ready. 11. You can now connect to IV. The password for your Wi-Fi extender's SSID is working and ready for your signal strength. 12. The EW-7438RPn is the same as a computer, smartphone or tablet. For more information...
Quick Install Guide
Page 10
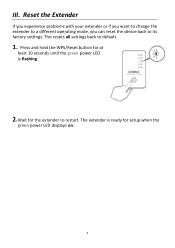
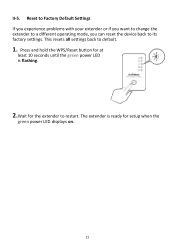
This resets all settings back to its factory settings. The extender is flashing. 2.Wait for setup when the green power LED displays on. 9 Reset the Extender If you experience problems with your extender or if you want to change the extender to a different operating mode, you can reset the device back to default. 1. Press and hold the WPS/Reset button for at least 10 seconds until the green power LED is ready for the extender to restart. III.
This resets all settings back to its factory settings. The extender is flashing. 2.Wait for setup when the green power LED displays on. 9 Reset the Extender If you experience problems with your extender or if you want to change the extender to a different operating mode, you can reset the device back to default. 1. Press and hold the WPS/Reset button for at least 10 seconds until the green power LED is ready for the extender to restart. III.
Quick Install Guide
Page 11
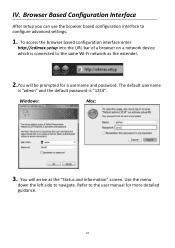
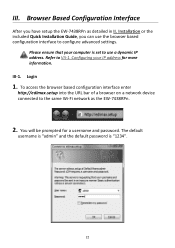
To access the browser based configuration interface enter http://edimax.setup into the URL bar of a browser on a network device which is "1234". You will be prompted for more detailed guidance. 10 IV. Windows: Mac: 3. Use ... settings. 1. The default username is "admin" and the default password is connected to the user manual for a username and password. Browser Based Configuration Interface After setup you can use the browser based configuration interface to navigate. Refer to the same Wi-Fi network as the extender. 2.You will arrive at the...
To access the browser based configuration interface enter http://edimax.setup into the URL bar of a browser on a network device which is "1234". You will be prompted for more detailed guidance. 10 IV. Windows: Mac: 3. Use ... settings. 1. The default username is "admin" and the default password is connected to the user manual for a username and password. Browser Based Configuration Interface After setup you can use the browser based configuration interface to navigate. Refer to the same Wi-Fi network as the extender. 2.You will arrive at the...
Quick Install Guide
Page 12
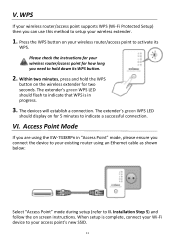
V. Installation Step 5) and follow the on the wireless extender for two seconds. When setup is in "Access Point" mode, please ensure you are using the EW-7438RPn in progress. 3. Within two minutes, press and hold down its WPS. Access Point Mode If you connect the device to your access point's... new SSID. 11 WPS If your wireless router/access point supports WPS (Wi-Fi Protected Setup) then you need to II...
V. Installation Step 5) and follow the on the wireless extender for two seconds. When setup is in "Access Point" mode, please ensure you are using the EW-7438RPn in progress. 3. Within two minutes, press and hold down its WPS. Access Point Mode If you connect the device to your access point's... new SSID. 11 WPS If your wireless router/access point supports WPS (Wi-Fi Protected Setup) then you need to II...
Manual
Page 2
... to Factory Default Settings 21 III. Main Menu ...25 IV. IV-4. Safety Information...4 II. WPS Setup...19 II-5. Save Settings...24 III-3. Home...37 iQ Setup ...39 Wireless Advanced ...40 Administration Utility 41 Configuration Tools...42 VI. Hardware Overview...3 I -2. IV-4-2. ...V-3. iQ Setup ...48 VI-3. Basic Settings ...49 Home...26 iQ Setup ...28 WPS Settings ...29 Wireless Advanced ...30 WLAN 2.4GHz Security 31 Administration Utility 32 Configuration...
... to Factory Default Settings 21 III. Main Menu ...25 IV. IV-4. Safety Information...4 II. WPS Setup...19 II-5. Save Settings...24 III-3. Home...37 iQ Setup ...39 Wireless Advanced ...40 Administration Utility 41 Configuration Tools...42 VI. Hardware Overview...3 I -2. IV-4-2. ...V-3. iQ Setup ...48 VI-3. Basic Settings ...49 Home...26 iQ Setup ...28 WPS Settings ...29 Wireless Advanced ...30 WLAN 2.4GHz Security 31 Administration Utility 32 Configuration...
Manual
Page 9
... devices, iOS 4.3 or Android 4.x or above is ready when the green power LED displays on the product label along with the SSID "Edimax.Setup" and connect to your device e.g."Edimax.Setup c1". The green power LED will be unique numbers according to it. Your unique SSID is booting up. The last two characters of...
... devices, iOS 4.3 or Android 4.x or above is ready when the green power LED displays on the product label along with the SSID "Edimax.Setup" and connect to your device e.g."Edimax.Setup c1". The green power LED will be unique numbers according to it. Your unique SSID is booting up. The last two characters of...
Manual
Page 10
Configuring your computer is set to VII-1. Open a web browser and if you cannot access http://edimax.setup, please make sure your IP address. 5. Refer to the appropriate chapter for more information please refer to use a dynamic IP address. For more guidance on... -screen instructions for each mode. 7 4. If you do not automatically arrive at the "Get Started" screen shown below, enter the URL http://edimax.setup and click "Get Started" to complete setup. Select an operating mode for your EW-7438RPn and follow the on setup for your selected mode to begin the...
Configuring your computer is set to VII-1. Open a web browser and if you cannot access http://edimax.setup, please make sure your IP address. 5. Refer to the appropriate chapter for more information please refer to use a dynamic IP address. For more guidance on... -screen instructions for each mode. 7 4. If you do not automatically arrive at the "Get Started" screen shown below, enter the URL http://edimax.setup and click "Get Started" to complete setup. Select an operating mode for your EW-7438RPn and follow the on setup for your selected mode to begin the...

Manual
Page 13
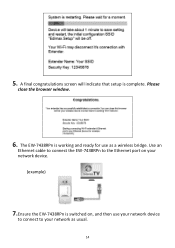
The EW-7438RPn is complete. the amber signal strength LED should display on or flash depending on your signal strength. 10 Please wait a moment until the extender is ready. 6.A final congratulations screen will indicate that setup is working and ready for use - 5.
The EW-7438RPn is complete. the amber signal strength LED should display on or flash depending on your signal strength. 10 Please wait a moment until the extender is ready. 6.A final congratulations screen will indicate that setup is working and ready for use - 5.
Manual
Page 17
5. A final congratulations screen will indicate that setup is working and ready for use your network device to connect to your network as a wireless bridge. The EW-7438RPn is complete. Use an Ethernet cable to connect the EW-7438RPn to the Ethernet port on your network device. (example) 7.Ensure the EW-7438RPn is switched on, and then use as usual. 14 Please close the browser window. 6.
5. A final congratulations screen will indicate that setup is working and ready for use your network device to connect to your network as a wireless bridge. The EW-7438RPn is complete. Use an Ethernet cable to connect the EW-7438RPn to the Ethernet port on your network device. (example) 7.Ensure the EW-7438RPn is switched on, and then use as usual. 14 Please close the browser window. 6.

Manual
Page 21
A final congratulations screen will indicate that setup is working and ready for use. The EW-7438RPn is complete. 7. Please close the browser window. You can now connect to the device's new SSID. 18
A final congratulations screen will indicate that setup is working and ready for use. The EW-7438RPn is complete. 7. Please close the browser window. You can now connect to the device's new SSID. 18
Manual
Page 22
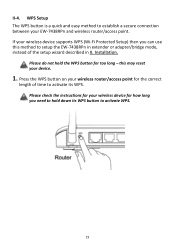
II-4. If your EW-7438RPn and wireless router/access point. this method to activate its WPS button to establish a secure connection between your wireless device supports WPS (Wi-Fi Protected Setup) then you need to hold the WPS button for too long - Installation. Press the WPS button on ... may reset your wireless device for the correct length of the setup wizard described in extender or adapter/bridge mode, instead of time to setup the EW-7438RPn in II. Please check the instructions for your device. 1. WPS Setup The WPS button is a quick and easy method to activate WPS...
II-4. If your EW-7438RPn and wireless router/access point. this method to activate its WPS button to establish a secure connection between your wireless device supports WPS (Wi-Fi Protected Setup) then you need to hold the WPS button for too long - Installation. Press the WPS button on ... may reset your wireless device for the correct length of the setup wizard described in extender or adapter/bridge mode, instead of time to setup the EW-7438RPn in II. Please check the instructions for your device. 1. WPS Setup The WPS button is a quick and easy method to activate WPS...
Manual
Page 24
Reset to Factory Default Settings If you experience problems with your extender or if you want to change the extender to a different operating mode, you can reset the device back to default. 1. II-5. Press and hold the WPS/Reset button for at least 10 seconds until the green power LED is ready for the extender to restart. The extender is flashing. 2.Wait for setup when the green power LED displays on. 21 This resets all settings back to its factory settings.
Reset to Factory Default Settings If you experience problems with your extender or if you want to change the extender to a different operating mode, you can reset the device back to default. 1. II-5. Press and hold the WPS/Reset button for at least 10 seconds until the green power LED is ready for the extender to restart. The extender is flashing. 2.Wait for setup when the green power LED displays on. 21 This resets all settings back to its factory settings.
Manual
Page 25
... interface enter http://edimax.setup into the URL bar of a browser on a network device connected to VII-1. Configuring your computer is "1234". 22 III-1. The default username is "admin" and the default password is set to configure advanced settings. Installation or the included Quick Installation Guide, you have setup the EW-7438RPn as the EW-7438RPn. 2. III.
... interface enter http://edimax.setup into the URL bar of a browser on a network device connected to VII-1. Configuring your computer is "1234". 22 III-1. The default username is "admin" and the default password is set to configure advanced settings. Installation or the included Quick Installation Guide, you have setup the EW-7438RPn as the EW-7438RPn. 2. III.
