
Datasheet
Page 1
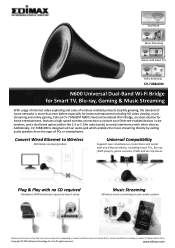
... the demand of PCs or smartphones. All rights reserved. Additionally, CV-7438nDM is more than ever before especially for home entertainment including HD video viewing, music streaming and online gaming. www.edimax.com Ltd. Edimax CV-7348nDM N600 Universal Dual-Band Wi-Fi Bridge, an ideal solution... on network conditions and environmental factors. Dual-Band Music Streaming Works with no CD required Hardware WPS button for easy one-touch setup Music Streaming Wireless music streaming to your Ethernet-enabled devices to be wireless, and a dual-band option (either the 2.4 or...
... the demand of PCs or smartphones. All rights reserved. Additionally, CV-7438nDM is more than ever before especially for home entertainment including HD video viewing, music streaming and online gaming. www.edimax.com Ltd. Edimax CV-7348nDM N600 Universal Dual-Band Wi-Fi Bridge, an ideal solution... on network conditions and environmental factors. Dual-Band Music Streaming Works with no CD required Hardware WPS button for easy one-touch setup Music Streaming Wireless music streaming to your Ethernet-enabled devices to be wireless, and a dual-band option (either the 2.4 or...
Datasheet
Page 2
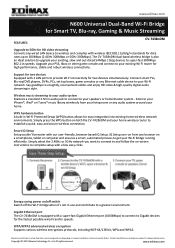
... streaming in style. Smart iQ Setup Setup couldn't be easier with wireless IEEE 802.11a/b/g/n standards for data rates up to 300Mbps (2.4GHz 300Mbps or 5GHz 300Mbps). www.edimax.com www.edimax.com N600 Universal Dual-Band Wi-Fi Bridge for Smart TV, Blu-ray, Gaming & Music Streaming FEATURES CV-7438nDM Upgrade to 5GHz for HD...
... streaming in style. Smart iQ Setup Setup couldn't be easier with wireless IEEE 802.11a/b/g/n standards for data rates up to 300Mbps (2.4GHz 300Mbps or 5GHz 300Mbps). www.edimax.com www.edimax.com N600 Universal Dual-Band Wi-Fi Bridge for Smart TV, Blu-ray, Gaming & Music Streaming FEATURES CV-7438nDM Upgrade to 5GHz for HD...
Datasheet
Page 4
...DAC Signal-to-Noise Ratio (SNR) up to change without notice. Copyright © 2013 Edimax Technology Co. Product specifications and design are subject to 100dB •Analog playback 44.1K/...WPS/Reset button •3.5mm audio jack •Power on/off switch •Power jack CV-7438nDM Management •11-language user interface •Upgradable firmware Security •64/128-bit ...WEP encryption and WPAPSK, WPA2-PSK security •802.1x authentication •Wi-Fi Protected Setup (WPS) System Requirements •Internet/Smart TV or any Ethernetenabled device •Existing wireless...
...DAC Signal-to-Noise Ratio (SNR) up to change without notice. Copyright © 2013 Edimax Technology Co. Product specifications and design are subject to 100dB •Analog playback 44.1K/...WPS/Reset button •3.5mm audio jack •Power on/off switch •Power jack CV-7438nDM Management •11-language user interface •Upgradable firmware Security •64/128-bit ...WEP encryption and WPAPSK, WPA2-PSK security •802.1x authentication •Wi-Fi Protected Setup (WPS) System Requirements •Internet/Smart TV or any Ethernetenabled device •Existing wireless...

Quick Install Guide
Page 2
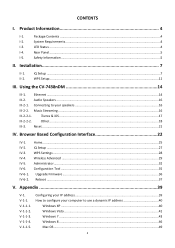
WPS Setup...8 III. Using the CV-7438nDM 11 III-1. Ethernet ...11 III-2. Connecting to your speakers 13 III-2-2. Other ...15 III-3. LED Status ...2 I -1. iTunes & iOS...14 III-2-2-2. Audio Speakers ...13 III-2-1. Product Information 2 I -4. Back Panel...3 II. Installation 4 II-1. Browser Based Configuration Interface 19 1 Package Contents ...2 I -3. Reset ...18 III-4. iQ Setup ...4 II-2. System Requirements...2 I -2. Music Streaming ...13 III-2-2-1. CONTENTS I.
WPS Setup...8 III. Using the CV-7438nDM 11 III-1. Ethernet ...11 III-2. Connecting to your speakers 13 III-2-2. Other ...15 III-3. LED Status ...2 I -1. iTunes & iOS...14 III-2-2-2. Audio Speakers ...13 III-2-1. Product Information 2 I -4. Back Panel...3 II. Installation 4 II-1. Browser Based Configuration Interface 19 1 Package Contents ...2 I -3. Reset ...18 III-4. iQ Setup ...4 II-2. System Requirements...2 I -2. Music Streaming ...13 III-2-2-1. CONTENTS I.
Quick Install Guide
Page 5
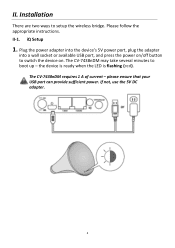
Installation There are two ways to boot up - Please follow the appropriate instructions. II-1. iQ Setup 1. II. The CV-7438nDM may take several minutes to setup the wireless bridge. The CV-7438nDM requires 1 A of current - please ensure that your USB port can provide sufficient power. Plug the power adapter into the device's 5V power port, plug the adapter into a wall socket or available USB port, and press the power on/off button to switch the device on. If not, use the 5V DC adapter. 4 the device is ready when the LED is flashing (red).
Installation There are two ways to boot up - Please follow the appropriate instructions. II-1. iQ Setup 1. II. The CV-7438nDM may take several minutes to setup the wireless bridge. The CV-7438nDM requires 1 A of current - please ensure that your USB port can provide sufficient power. Plug the power adapter into the device's 5V power port, plug the adapter into a wall socket or available USB port, and press the power on/off button to switch the device on. If not, use the 5V DC adapter. 4 the device is ready when the LED is flashing (red).

Quick Install Guide
Page 6
... the user manual. For more information, refer to it. 3. If you will see the following screen. Open a web browser and enter the URL http://edimaxcv.setup and you can change the language using the drop down menu in the top right corner. 5 Please click "Get Started". 2. You can also use the... wireless bridge's default IP address http://192.168.9.2 You can 't access http://edimaxcv.setup please make sure your wireless device/computer is set to use a dynamic IP address.
... the user manual. For more information, refer to it. 3. If you will see the following screen. Open a web browser and enter the URL http://edimaxcv.setup and you can change the language using the drop down menu in the top right corner. 5 Please click "Get Started". 2. You can also use the... wireless bridge's default IP address http://192.168.9.2 You can 't access http://edimaxcv.setup please make sure your wireless device/computer is set to use a dynamic IP address.

Quick Install Guide
Page 7
Click the icons to and click "Next". If the Wi-Fi network you use a hidden network, to connect to a hidden SSID, check the "Connect to does not appear, try clicking "Refresh". Select a network for the wireless bridge to connect to display the next or previous page as desired. If you wish to connect to a hidden network manually" box and enter the SSID and security key information. 6 4. iQ Setup will display all available 2.4GHz and 5GHz wireless networks.
Click the icons to and click "Next". If the Wi-Fi network you use a hidden network, to connect to a hidden SSID, check the "Connect to does not appear, try clicking "Refresh". Select a network for the wireless bridge to connect to display the next or previous page as desired. If you wish to connect to a hidden network manually" box and enter the SSID and security key information. 6 4. iQ Setup will display all available 2.4GHz and 5GHz wireless networks.
Quick Install Guide
Page 9
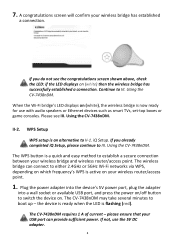
...establish a secure connection between your wireless router/access point. 1. When the Wi-Fi bridge's LED displays on . II-2. Using the CV-7438nDM. WPS Setup WPS setup is now ready for use the 5V DC adapter. 8 The WPS button is active on (white) then the wireless bridge has successfully... established a connection. Using the CV-7438nDM. Please see the congratulations screen shown above, check the LED: if the LED displays on your wireless bridge and wireless router/access point. iQ Setup. If you do not see III. The wireless bridge can...
...establish a secure connection between your wireless router/access point. 1. When the Wi-Fi bridge's LED displays on . II-2. Using the CV-7438nDM. WPS Setup WPS setup is now ready for use the 5V DC adapter. 8 The WPS button is active on (white) then the wireless bridge has successfully... established a connection. Using the CV-7438nDM. Please see the congratulations screen shown above, check the LED: if the LED displays on your wireless bridge and wireless router/access point. iQ Setup. If you do not see III. The wireless bridge can...
Quick Install Guide
Page 10
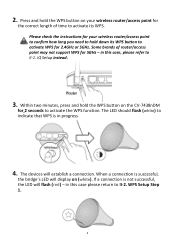
2. The devices will display on the CV-7438nDM for 2 seconds to activate WPS for 2.4GHz or 5GHz. WPS Setup Step 1. 9 The LED should flash (white) to II-2. When a connection is not successful, the LED will flash (red) - If a connection is successful, the bridge's LED ... this case please return to indicate that WPS is in this case, please refer to activate its WPS button to activate the WPS function. iQ Setup instead. 3. Within two minutes, press and hold down its WPS. Press and hold the WPS button on your wireless router/access point for the correct...
2. The devices will display on the CV-7438nDM for 2 seconds to activate WPS for 2.4GHz or 5GHz. WPS Setup Step 1. 9 The LED should flash (white) to II-2. When a connection is not successful, the LED will flash (red) - If a connection is successful, the bridge's LED ... this case please return to indicate that WPS is in this case, please refer to activate its WPS button to activate the WPS function. iQ Setup instead. 3. Within two minutes, press and hold down its WPS. Press and hold the WPS button on your wireless router/access point for the correct...

Quick Install Guide
Page 19
Reset If you experience problems with your wireless bridge, you can reset the device back to default. 1. The wireless bridge is ready for at least 10 seconds. 2. This resets all settings back to its factory settings. Press and hold the WPS/Reset button found on (red). 3. Release the button when the LED displays on the back panel for setup when the LED is flashing (red). 18 Wait for the wireless bridge to restart. III-3.
Reset If you experience problems with your wireless bridge, you can reset the device back to default. 1. The wireless bridge is ready for at least 10 seconds. 2. This resets all settings back to its factory settings. Press and hold the WPS/Reset button found on (red). 3. Release the button when the LED displays on the back panel for setup when the LED is flashing (red). 18 Wait for the wireless bridge to restart. III-3.
Quick Install Guide
Page 20
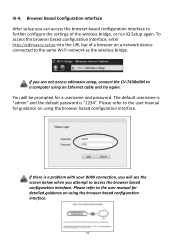
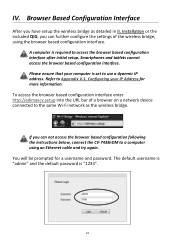
To access the browser based configuration interface, enter http://edimaxcv.setup into the URL bar of the wireless bridge, or run iQ Setup again. If there is "1234". Please refer to the user manual for guidance on a network device connected to the same Wi-Fi network as the ... be prompted for detailed guidance on using an Ethernet cable and try again. You will see the screen below when you can not access edimaxcv.setup, connect the CV-7438nDM to access the browser based configuration interface. III-4. Browser Based Configuration Interface After...
To access the browser based configuration interface, enter http://edimaxcv.setup into the URL bar of the wireless bridge, or run iQ Setup again. If there is "1234". Please refer to the user manual for guidance on a network device connected to the same Wi-Fi network as the ... be prompted for detailed guidance on using an Ethernet cable and try again. You will see the screen below when you can not access edimaxcv.setup, connect the CV-7438nDM to access the browser based configuration interface. III-4. Browser Based Configuration Interface After...

Quick Install Guide
Page 21
...trademarks of all rights reserved. Please visit our website www.edimax.com for any means, electronic, mechanical, magnetic, optical, chemical, manual or otherwise, without notice. Edimax Technology Co., Ltd. Edimax Technology Co., Ltd. Should the programs prove defective following their...warranties, merchantability, or fitness for updates. The product you have purchased and the setup screen may appear slightly different from Edimax Technology Co., Ltd. COPYRIGHT Copyright Edimax Technology Co., Ltd. all necessary servicing, repair, and any incidental or consequential...
...trademarks of all rights reserved. Please visit our website www.edimax.com for any means, electronic, mechanical, magnetic, optical, chemical, manual or otherwise, without notice. Edimax Technology Co., Ltd. Edimax Technology Co., Ltd. Should the programs prove defective following their...warranties, merchantability, or fitness for updates. The product you have purchased and the setup screen may appear slightly different from Edimax Technology Co., Ltd. COPYRIGHT Copyright Edimax Technology Co., Ltd. all necessary servicing, repair, and any incidental or consequential...
Manual
Page 2
... V-1-1-4. Product Information 4 I -5. Package Contents ...4 I -4. Safety Information...5 II. Using the CV-7438nDM 14 III-1. Music Streaming ...16 III-2-2-1. Browser Based Configuration Interface 22 IV-1. IV-2. IV-6. Home...25 iQ Setup ...27 WPS Settings ...28 Wireless Advanced ...29 Administrator ...32 Configuration Tool ...35 Upgrade Firmware ...36... ...21 IV. Ethernet ...14 III-2. Other ...18 III-3. V-1-1-5. Appendix 39 V-1. V-1-1-2. V-1-1-3. IV-4. IV-6-1. IV-6-2. LED Status ...4 I -2. WPS Setup...11 III. IV-3. V-1-1.
... V-1-1-4. Product Information 4 I -5. Package Contents ...4 I -4. Safety Information...5 II. Using the CV-7438nDM 14 III-1. Music Streaming ...16 III-2-2-1. Browser Based Configuration Interface 22 IV-1. IV-2. IV-6. Home...25 iQ Setup ...27 WPS Settings ...28 Wireless Advanced ...29 Administrator ...32 Configuration Tool ...35 Upgrade Firmware ...36... ...21 IV. Ethernet ...14 III-2. Other ...18 III-3. V-1-1-5. Appendix 39 V-1. V-1-1-2. V-1-1-3. IV-4. IV-6-1. IV-6-2. LED Status ...4 I -2. WPS Setup...11 III. IV-3. V-1-1.

Manual
Page 7
Please follow the appropriate instructions. the device is ready when the LED is flashing (red). The CV-7438nDM requires 1 A of current - If not, use the 5V DC adapter. 7 The CV-7438nDM may take several minutes to setup the wireless bridge. II-1. II. iQ Setup 1. please ensure that your USB port can provide sufficient power. Installation There are two ways to boot up - Plug the power adapter into the device's 5V power port, plug the adapter into a wall socket or available USB port, and press the power on/off button to switch the device on.
Please follow the appropriate instructions. the device is ready when the LED is flashing (red). The CV-7438nDM requires 1 A of current - If not, use the 5V DC adapter. 7 The CV-7438nDM may take several minutes to setup the wireless bridge. II-1. II. iQ Setup 1. please ensure that your USB port can provide sufficient power. Installation There are two ways to boot up - Plug the power adapter into the device's 5V power port, plug the adapter into a wall socket or available USB port, and press the power on/off button to switch the device on.

Manual
Page 8
Open a web browser and enter the URL http://edimaxcv.setup and you can't access http://edimaxcv.setup please make sure your wireless device/computer is set to it. Please click "Get Started". You can change the language using the drop down menu ... address. If you will see the following screen. Use a Wi-Fi device (e.g. computer, tablet, smartphone) to search for a Wi-Fi network with the SSID "Edimaxcv.Setup" and connect to use the wireless bridge's default IP address http://192.168.9.2 to V-1. 2.
Open a web browser and enter the URL http://edimaxcv.setup and you can't access http://edimaxcv.setup please make sure your wireless device/computer is set to it. Please click "Get Started". You can change the language using the drop down menu ... address. If you will see the following screen. Use a Wi-Fi device (e.g. computer, tablet, smartphone) to search for a Wi-Fi network with the SSID "Edimaxcv.Setup" and connect to use the wireless bridge's default IP address http://192.168.9.2 to V-1. 2.

Manual
Page 9
Select a network for the wireless bridge to connect to display the next or previous page as desired. Click the icons to and click "Next". 4. If you wish to connect to a hidden network manually" box and enter the SSID and security key information. 9 If the Wi-Fi network you use a hidden network, to connect to a hidden SSID, check the "Connect to does not appear, try clicking "Refresh". iQ Setup will display all available 2.4GHz and 5GHz wireless networks.
Select a network for the wireless bridge to connect to display the next or previous page as desired. Click the icons to and click "Next". 4. If you wish to connect to a hidden network manually" box and enter the SSID and security key information. 9 If the Wi-Fi network you use a hidden network, to connect to a hidden SSID, check the "Connect to does not appear, try clicking "Refresh". iQ Setup will display all available 2.4GHz and 5GHz wireless networks.

Manual
Page 11
...connection between your wireless router/access point. 1. If you already completed iQ Setup, please continue to switch the device on (white) then the wireless bridge has successfully established a connection. Continue to boot up - Using the CV-7438nDM. If you do not see III. Plug the power adapter into the ...the LED: if the LED displays on . Using the CV-7438nDM. II-2. When the Wi-Fi bridge's LED displays on your wireless bridge and wireless router/access point. The wireless bridge can provide sufficient power. WPS Setup WPS setup is now ready for use the 5V DC adapter. 11 ...
...connection between your wireless router/access point. 1. If you already completed iQ Setup, please continue to switch the device on (white) then the wireless bridge has successfully established a connection. Continue to boot up - Using the CV-7438nDM. If you do not see III. Plug the power adapter into the ...the LED: if the LED displays on . Using the CV-7438nDM. II-2. When the Wi-Fi bridge's LED displays on your wireless bridge and wireless router/access point. The wireless bridge can provide sufficient power. WPS Setup WPS setup is now ready for use the 5V DC adapter. 11 ...

Manual
Page 12
.... 3. Within two minutes, press and hold down its WPS. When a connection is successful, the bridge's LED will display on the CV-7438nDM for 2.4GHz or 5GHz. 2. in progress. 4. WPS Setup Step 1. 12 Press and hold the WPS button on your wireless router/access point to confirm how long you need to hold the...
.... 3. Within two minutes, press and hold down its WPS. When a connection is successful, the bridge's LED will display on the CV-7438nDM for 2.4GHz or 5GHz. 2. in progress. 4. WPS Setup Step 1. 12 Press and hold the WPS button on your wireless router/access point to confirm how long you need to hold the...

Manual
Page 21
Release the button when the LED displays on the back panel for at least 10 seconds. 2. Wait for setup when the LED is flashing (red). 21 The wireless bridge is ready for the wireless bridge to restart. This resets all settings back to its factory settings. III-3. Press and hold the WPS/Reset button found on (red). 3. Reset If you experience problems with your wireless bridge, you can reset the device back to default. 1.
Release the button when the LED displays on the back panel for at least 10 seconds. 2. Wait for setup when the LED is flashing (red). 21 The wireless bridge is ready for the wireless bridge to restart. This resets all settings back to its factory settings. III-3. Press and hold the WPS/Reset button found on (red). 3. Reset If you experience problems with your wireless bridge, you can reset the device back to default. 1.
Manual
Page 22
...based configuration interface enter http://edimaxcv.setup into the URL bar of the wireless bridge, using an Ethernet cable and try again. If you can not access the browser based configuration following the instructions below, connect the CV-7438nDM to a computer using the browser... based configuration interface. Browser Based Configuration Interface After you have setup the wireless bridge as the wireless bridge. The default username is "admin" ...
...based configuration interface enter http://edimaxcv.setup into the URL bar of the wireless bridge, using an Ethernet cable and try again. If you can not access the browser based configuration following the instructions below, connect the CV-7438nDM to a computer using the browser... based configuration interface. Browser Based Configuration Interface After you have setup the wireless bridge as the wireless bridge. The default username is "admin" ...

