Datasheet
Page 1
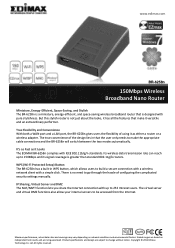
... can reach up to 150Mbps and its signal coverage is greater than standard 802.11g/b routers. Copyright © 2012 Edimax Technology Co. WPS (Wi-Fi Protected Setup) Button The BR-6258n has a built-in that is designed with up to 253 Intranet users. Ltd. The true convenience of using it ... a miniature, energy-efficient, and space-saving wireless broadband router that the user only needs to make it as It Looks The EDIMAX BR-6258n complies with a simple click. Maximum performance, actual data rates and coverage may vary depending on independent test results and are subject to...
... can reach up to 150Mbps and its signal coverage is greater than standard 802.11g/b routers. Copyright © 2012 Edimax Technology Co. WPS (Wi-Fi Protected Setup) Button The BR-6258n has a built-in that is designed with up to 253 Intranet users. Ltd. The true convenience of using it ... a miniature, energy-efficient, and space-saving wireless broadband router that the user only needs to make it as It Looks The EDIMAX BR-6258n complies with a simple click. Maximum performance, actual data rates and coverage may vary depending on independent test results and are subject to...
Datasheet
Page 2
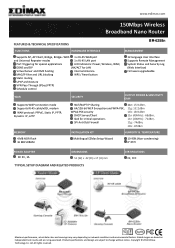
...are based on network conditions and environmental factors. Copyright © 2012 Edimax Technology Co. Ltd. All rights reserved. www.edimax.com 150Mbps Wireless Broadband Nano Router FEATURES & TECHNICAL SPECIFICATIONS BR-6258n FUNCTIONS HARDWARE INTERFACE MANAGEMENT Supports AP, AP Client, Bridge, Bridge+ ... & TEMPERATURE 4 MB NOR Flash 16 MB SDRAM Multilingual EZMax Setup Wizard 10-90% (Non-condensing) 0~45oC POWER ADAPTER DC 5V, 1A DIMENSIONS 51 (W) x 42 (D) x 17 (H) mm TYPICAL SETUP DIAGRAM AND RELATED PRODUCTS CERTIFICATIONS CE, FCC Maximum performance, actual data...
...are based on network conditions and environmental factors. Copyright © 2012 Edimax Technology Co. Ltd. All rights reserved. www.edimax.com 150Mbps Wireless Broadband Nano Router FEATURES & TECHNICAL SPECIFICATIONS BR-6258n FUNCTIONS HARDWARE INTERFACE MANAGEMENT Supports AP, AP Client, Bridge, Bridge+ ... & TEMPERATURE 4 MB NOR Flash 16 MB SDRAM Multilingual EZMax Setup Wizard 10-90% (Non-condensing) 0~45oC POWER ADAPTER DC 5V, 1A DIMENSIONS 51 (W) x 42 (D) x 17 (H) mm TYPICAL SETUP DIAGRAM AND RELATED PRODUCTS CERTIFICATIONS CE, FCC Maximum performance, actual data...
User Manual
Page 2
... are distributed without any person of their respective authors. The product you have purchased and the setup screen may be found under the "Download" page at the Edimax website (www.edimax.com). 1 Please see the GNU (www.gnu.org) website for the terms and conditions of this..., in the contents hereof without the obligation to the contents hereof and specifically disclaims any warranties, merchantability, or fitness for updates. Edimax Technology Co., Ltd. The software and specifications are subject to change without the prior written permission from time to time in any ...
... are distributed without any person of their respective authors. The product you have purchased and the setup screen may be found under the "Download" page at the Edimax website (www.edimax.com). 1 Please see the GNU (www.gnu.org) website for the terms and conditions of this..., in the contents hereof without the obligation to the contents hereof and specifically disclaims any warranties, merchantability, or fitness for updates. Edimax Technology Co., Ltd. The software and specifications are subject to change without the prior written permission from time to time in any ...
User Manual
Page 3
...Requirements ...6 1‐4 Package Contents ...7 1‐5 Getting familiar with your new wireless broadband router 8 CHAPTER II: SYSTEM AND NETWORK SETUP 10 2‐1 Establishing a network connection...10 2‐2 Setting client computers to obtain IP addresses automatically 12 2‐2‐1 Windows 95...;4 Using "PPTP" as broadband connection type 33 2‐4‐5 Using "L2TP" as broadband connection type 35 CHAPTER III: GENERAL SETUP ...37 3‐1 System...38 3‐1‐1 Time Zone ...39 3‐1‐2 Password Settings...40 3‐1‐3 Remote Management......
...Requirements ...6 1‐4 Package Contents ...7 1‐5 Getting familiar with your new wireless broadband router 8 CHAPTER II: SYSTEM AND NETWORK SETUP 10 2‐1 Establishing a network connection...10 2‐2 Setting client computers to obtain IP addresses automatically 12 2‐2‐1 Windows 95...;4 Using "PPTP" as broadband connection type 33 2‐4‐5 Using "L2TP" as broadband connection type 35 CHAPTER III: GENERAL SETUP ...37 3‐1 System...38 3‐1‐1 Time Zone ...39 3‐1‐2 Password Settings...40 3‐1‐3 Remote Management......
User Manual
Page 4
3‐4‐3 MAC Address Filtering ...88 3‐4‐4 WPS (Wi‐Fi Protected Setup) Settings 90 3‐5 Advance Settings...92 3‐5‐1 QoS ...93 3‐5‐2 DDNS...97 3‐5‐3 Port Forwarding...100 3‐5‐4 DMZ ...102 3‐6 NAT ......
3‐4‐3 MAC Address Filtering ...88 3‐4‐4 WPS (Wi‐Fi Protected Setup) Settings 90 3‐5 Advance Settings...92 3‐5‐1 QoS ...93 3‐5‐2 DDNS...97 3‐5‐3 Port Forwarding...100 3‐5‐4 DMZ ...102 3‐6 NAT ......
User Manual
Page 5
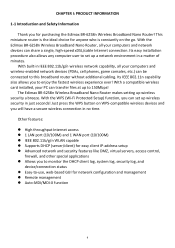
... network devices (PDAs, cell phones, game consoles, etc.) can share a single, high‐speed xDSL/cable Internet connection. The Edimax BR‐6258n Wireless Broadband Nano Router makes setting up to 150Mbps! CHAPTER I: PRODUCT INFORMATION 1‐1 Introduction and Safety Information Thank you to enjoy...log, security log, and device/connection status z Easy‐to‐use, web‐based GUI for easy client IP‐address setup z Advanced network and security features like DMZ, virtual servers, access control, firewall, and other special applications z Allows you can transfer...
... network devices (PDAs, cell phones, game consoles, etc.) can share a single, high‐speed xDSL/cable Internet connection. The Edimax BR‐6258n Wireless Broadband Nano Router makes setting up to 150Mbps! CHAPTER I: PRODUCT INFORMATION 1‐1 Introduction and Safety Information Thank you to enjoy...log, security log, and device/connection status z Easy‐to‐use, web‐based GUI for easy client IP‐address setup z Advanced network and security features like DMZ, virtual servers, access control, firewall, and other special applications z Allows you can transfer...
User Manual
Page 8
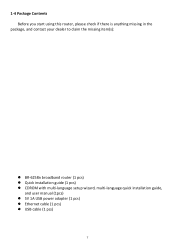
1‐4 Package Contents Before you start using this router, please check if there is anything missing in the package, and contact your dealer to claim the missing item(s): z BR‐6258n broadband router (1 pcs) z Quick installation guide (1 pcs) z CDROM with multi‐language setup wizard, multi‐language quick installation guide, and user manual (1pcs) z 5V 1A USB power adapter (1 pcs) z Ethernet cable (1 pcs) z USB cable (1 pcs) 7
1‐4 Package Contents Before you start using this router, please check if there is anything missing in the package, and contact your dealer to claim the missing item(s): z BR‐6258n broadband router (1 pcs) z Quick installation guide (1 pcs) z CDROM with multi‐language setup wizard, multi‐language quick installation guide, and user manual (1pcs) z 5V 1A USB power adapter (1 pcs) z Ethernet cable (1 pcs) z USB cable (1 pcs) 7
User Manual
Page 11
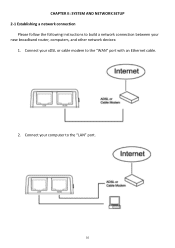
Connect your computer to the "LAN" port. 10 Connect your xDSL or cable modem to build a network connection between your new broadband router, computers, and other network devices: 1. CHAPTER II: SYSTEM AND NETWORK SETUP 2‐1 Establishing a network connection Please follow the following instructions to the "WAN" port with an Ethernet cable. 2.
Connect your computer to the "LAN" port. 10 Connect your xDSL or cable modem to build a network connection between your new broadband router, computers, and other network devices: 1. CHAPTER II: SYSTEM AND NETWORK SETUP 2‐1 Establishing a network connection Please follow the following instructions to the "WAN" port with an Ethernet cable. 2.
User Manual
Page 14
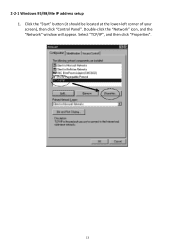
Click the "Start" button (it should be located at the lower‐left corner of your screen), then click "Control Panel". Double‐click the "Network" icon, and the "Network" window will appear. Select "TCP/IP", and then click "Properties". 13 2‐2‐1 Windows 95/98/Me IP address setup 1.
Click the "Start" button (it should be located at the lower‐left corner of your screen), then click "Control Panel". Double‐click the "Network" icon, and the "Network" window will appear. Select "TCP/IP", and then click "Properties". 13 2‐2‐1 Windows 95/98/Me IP address setup 1.
User Manual
Page 16
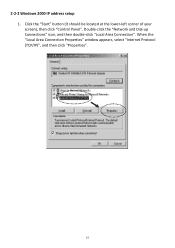
When the "Local Area Connection Properties" window appears, select "Internet Protocol (TCP/IP)", and then click "Properties". 15 Double‐click the "Network and Dial‐up Connections" icon, and then double‐click "Local Area Connection". Click the "Start" button (it should be located at the lower‐left corner of your screen), then click "Control Panel". 2‐2‐2 Windows 2000 IP address setup 1.
When the "Local Area Connection Properties" window appears, select "Internet Protocol (TCP/IP)", and then click "Properties". 15 Double‐click the "Network and Dial‐up Connections" icon, and then double‐click "Local Area Connection". Click the "Start" button (it should be located at the lower‐left corner of your screen), then click "Control Panel". 2‐2‐2 Windows 2000 IP address setup 1.

User Manual
Page 18
When the "Local Area Connection Properties" window appears, click "Properties". 17 Double‐click the "Network and Internet Connections" icon, click "Network Connections", then double‐click "Local Area Connection". Click the "Start" button (it should be located at the lower‐left corner of your screen), then click "Control Panel". 2‐2‐3 Windows XP IP address setup 1.
When the "Local Area Connection Properties" window appears, click "Properties". 17 Double‐click the "Network and Internet Connections" icon, click "Network Connections", then double‐click "Local Area Connection". Click the "Start" button (it should be located at the lower‐left corner of your screen), then click "Control Panel". 2‐2‐3 Windows XP IP address setup 1.
User Manual
Page 20
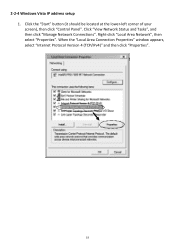
Right‐click "Local Area Network", then select "Properties". Click the "Start" button (it should be located at the lower‐left corner of your screen), then click "Control Panel". 2‐2‐4 Windows Vista IP address setup 1. Click "View Network Status and Tasks", and then click "Manage Network Connections". When the "Local Area Connection Properties" window appears, select "Internet Protocol Version 4 (TCP/IPv4)" and then click "Properties". 19
Right‐click "Local Area Network", then select "Properties". Click the "Start" button (it should be located at the lower‐left corner of your screen), then click "Control Panel". 2‐2‐4 Windows Vista IP address setup 1. Click "View Network Status and Tasks", and then click "Manage Network Connections". When the "Local Area Connection Properties" window appears, select "Internet Protocol Version 4 (TCP/IPv4)" and then click "Properties". 19
User Manual
Page 27
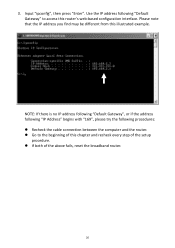
... the address following "IP Address" begins with "169", please try the following "Default Gateway" to the beginning of this illustrated example. z If both of the setup procedure. 3. Use the IP address following procedures: z Recheck the cable connection between the computer and the router. Input "ipconfig", then press "Enter".
... the address following "IP Address" begins with "169", please try the following "Default Gateway" to the beginning of this illustrated example. z If both of the setup procedure. 3. Use the IP address following procedures: z Recheck the cable connection between the computer and the router. Input "ipconfig", then press "Enter".
User Manual
Page 28
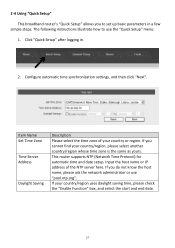
... do not know the host name, please ask the network administrator or use the "Quick Setup" menu: 1. This router supports NTP (Network Time Protocol) for automatic time and date setup. Click "Quick Setup" after logging in a few simple steps. 2‐4 Using "Quick Setup" This broadband router's "Quick Setup" allows you to use "pool.ntp.org".
... do not know the host name, please ask the network administrator or use the "Quick Setup" menu: 1. This router supports NTP (Network Time Protocol) for automatic time and date setup. Click "Quick Setup" after logging in a few simple steps. 2‐4 Using "Quick Setup" This broadband router's "Quick Setup" allows you to use "pool.ntp.org".
User Manual
Page 30
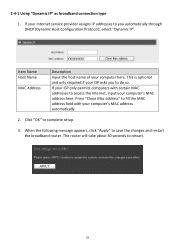
... Configuration Protocol), select "Dynamic IP". Click "OK" to save the changes and restart the broadband router. When the following message appears, click "Apply" to complete setup. 3. The router will take about 30 seconds to do so. 2‐4‐1 Using "Dynamic IP" as broadband connection type 1. Press "Clone Mac address" to fill...
... Configuration Protocol), select "Dynamic IP". Click "OK" to save the changes and restart the broadband router. When the following message appears, click "Apply" to complete setup. 3. The router will take about 30 seconds to do so. 2‐4‐1 Using "Dynamic IP" as broadband connection type 1. Press "Clone Mac address" to fill...
User Manual
Page 31
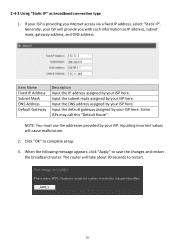
... changes and restart the broadband router. NOTE: You must use the addresses provided by your ISP. When the following message appears, click "Apply" to complete setup. 3. If your ISP here. Item Name Fixed IP Address Subnet Mask DNS Address Default Gateway Description Input the IP address assigned by your ISP is...
... changes and restart the broadband router. NOTE: You must use the addresses provided by your ISP. When the following message appears, click "Apply" to complete setup. 3. If your ISP here. Item Name Fixed IP Address Subnet Mask DNS Address Default Gateway Description Input the IP address assigned by your ISP is...
User Manual
Page 32
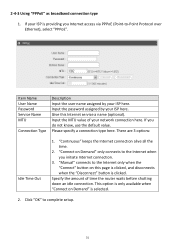
..." is providing you do not know, use the default value. If your network connection here. If you Internet access via PPPoE (Point‐to complete setup. 31
..." is providing you do not know, use the default value. If your network connection here. If you Internet access via PPPoE (Point‐to complete setup. 31
User Manual
Page 34
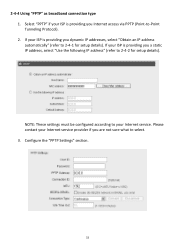
...the following IP address" (refer to select. 3. Select "PPTP" if your ISP is providing you are not sure what to 2‐4‐2 for setup details). Configure the "PPTP Settings" section. 33 If your ISP is providing you Internet access via PPTP (Point‐to 2‐4‐1 for... setup details). If your ISP is providing you dynamic IP addresses, select "Obtain an IP address automatically" (refer to ‐Point Tunneling Protocol). 2. 2&#...
...the following IP address" (refer to select. 3. Select "PPTP" if your ISP is providing you are not sure what to 2‐4‐2 for setup details). Configure the "PPTP Settings" section. 33 If your ISP is providing you Internet access via PPTP (Point‐to 2‐4‐1 for... setup details). If your ISP is providing you dynamic IP addresses, select "Obtain an IP address automatically" (refer to ‐Point Tunneling Protocol). 2. 2&#...

User Manual
Page 35
... MTU BEZEQ‐ISRAEL Connection Type Description Input the user name assigned by your ISP here. "Connect on Demand" is clicked. Click "OK" to complete setup. 5.
... MTU BEZEQ‐ISRAEL Connection Type Description Input the user name assigned by your ISP here. "Connect on Demand" is clicked. Click "OK" to complete setup. 5.
User Manual
Page 36
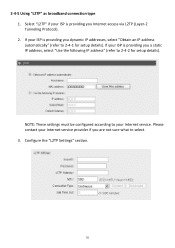
... automatically" (refer to select. 3. If your Internet service. Configure the "L2TP Settings" section. 35 NOTE: These settings must be configured according to 2‐4‐2 for setup details). Select "L2TP" if your ISP is providing you a static IP address, select "Use the following IP address" (refer to your ISP is providing you...
... automatically" (refer to select. 3. If your Internet service. Configure the "L2TP Settings" section. 35 NOTE: These settings must be configured according to 2‐4‐2 for setup details). Select "L2TP" if your ISP is providing you a static IP address, select "Use the following IP address" (refer to your ISP is providing you...
