
User Manual
Page 2
ii Dynex DX-32E250A12 32" LED-LCD TV Contents CHILD SAFETY 1 Important safety instructions 2 Warnings 2 Cautions 2 Installing the stand or wall-mount bracket 4 Installing the stand 4 Installing a wall-mount ...
ii Dynex DX-32E250A12 32" LED-LCD TV Contents CHILD SAFETY 1 Important safety instructions 2 Warnings 2 Cautions 2 Installing the stand or wall-mount bracket 4 Installing the stand 4 Installing a wall-mount ...
User Manual
Page 6
... doctor. When installing an outside antenna system should be taken to keep from the type of power source indicated on the back of your TV. 2 DX-32E250A12 Important safety instructions Important safety instructions This symbol indicates that produce heat. 9 Do not defeat the safety purpose of the polarized or grounding-type plug...
... doctor. When installing an outside antenna system should be taken to keep from the type of power source indicated on the back of your TV. 2 DX-32E250A12 Important safety instructions Important safety instructions This symbol indicates that produce heat. 9 Do not defeat the safety purpose of the polarized or grounding-type plug...
User Manual
Page 7
Important safety instructions DX-32E250A12 3 • If your TV does not operate normally by a qualified technician to restore your TV to provide some protection against voltage surges and built-up ...
Important safety instructions DX-32E250A12 3 • If your TV does not operate normally by a qualified technician to restore your TV to provide some protection against voltage surges and built-up ...
User Manual
Page 8
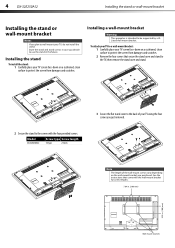
...that came with the four provided screws. Installing the stand To install the stand: 1 Carefully place your TV, do not install the stand. Model DX-32E250A12 Screw type Screw length T4 type 25 mm 3 Secure the flat stand cover to be supported by a UL Listed wall mount bracket. Note The length..., clean surface to the screen with the wall-mount bracket for screw lengths. 7.84 in. (200 mm) 3.92 in. (100) mm) Wall mount brackets 4 DX-32E250A12 Installing the stand or wall-mount bracket Installing the stand or wall-mount bracket Notes If you plan to use the stand in the future.
...that came with the four provided screws. Installing the stand To install the stand: 1 Carefully place your TV, do not install the stand. Model DX-32E250A12 Screw type Screw length T4 type 25 mm 3 Secure the flat stand cover to be supported by a UL Listed wall mount bracket. Note The length..., clean surface to the screen with the wall-mount bracket for screw lengths. 7.84 in. (200 mm) 3.92 in. (100) mm) Wall mount brackets 4 DX-32E250A12 Installing the stand or wall-mount bracket Installing the stand or wall-mount bracket Notes If you plan to use the stand in the future.
User Manual
Page 9
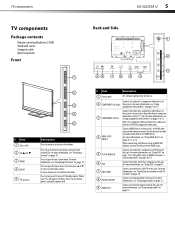
... to turn your TV is off (Standby mode). Note: The composite video jack shares the audio jacks with screws Composite cable Quick Setup Guide Front DX-32E250A12 5 Back and Side # Item 1 VOL+/VOL- 2 CH /CH 3 MENU 4 INPUT 5 (power) Description Press to increase or decrease the volume. For more information, see "Using digital...
... to turn your TV is off (Standby mode). Note: The composite video jack shares the audio jacks with screws Composite cable Quick Setup Guide Front DX-32E250A12 5 Back and Side # Item 1 VOL+/VOL- 2 CH /CH 3 MENU 4 INPUT 5 (power) Description Press to increase or decrease the volume. For more information, see "Using digital...
User Manual
Page 10
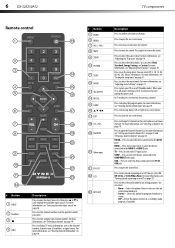
... program guide. For more information, see "Selecting a channel" on or off (Standby mode). You can select CC Off, CC On, or CC On When Mute. 6 DX-32E250A12 TV components Remote control # Button 5 ENTER 6 MENU 7 VOL +/VOL - 8 MUTE 9 ZOOM 10 PICTURE 11 SLEEP 12 AUDIO 13 (power) 14 RECALL 15 GUIDE 16 17...
... program guide. For more information, see "Selecting a channel" on or off (Standby mode). You can select CC Off, CC On, or CC On When Mute. 6 DX-32E250A12 TV components Remote control # Button 5 ENTER 6 MENU 7 VOL +/VOL - 8 MUTE 9 ZOOM 10 PICTURE 11 SLEEP 12 AUDIO 13 (power) 14 RECALL 15 GUIDE 16 17...
User Manual
Page 11
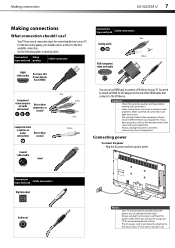
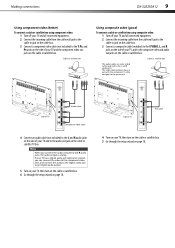
... making any connections. • Loose connections can use ? If you should I use an HDMI jack to connect a DVI device to the DVI device. Making connections DX-32E250A12 7 Making connections What connection should connect a device to pull it out. Connection type and jack Cable connectors Digital output Audio out Notes • • •...
... making any connections. • Loose connections can use ? If you should I use an HDMI jack to connect a DVI device to the DVI device. Making connections DX-32E250A12 7 Making connections What connection should connect a device to pull it out. Connection type and jack Cable connectors Digital output Audio out Notes • • •...
User Manual
Page 12
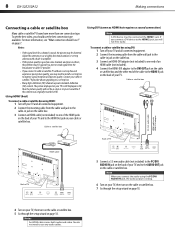
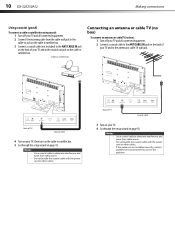
... connected equipment. 2 Connect the incoming cable from the cable wall jack to the cable-in HD. Notes An HDMI cable carries both audio and video. 8 DX-32E250A12 Making connections Connecting a cable or satellite box Many cable or satellite TV boxes have more information, see "What connection should use any audio cables. Contact...
... connected equipment. 2 Connect the incoming cable from the cable wall jack to the cable-in HD. Notes An HDMI cable carries both audio and video. 8 DX-32E250A12 Making connections Connecting a cable or satellite box Many cable or satellite TV boxes have more information, see "What connection should use any audio cables. Contact...
User Manual
Page 13
... can connect the video to the component video jacks and connect the audio to the digital audio jack to the L and R audio jacks. Making connections DX-32E250A12 9 Using component video (better) To connect a cable or satellite box using component video: 1 Turn off your TV and all connected equipment. 2 Connect the incoming cable...
... can connect the video to the component video jacks and connect the audio to the digital audio jack to the L and R audio jacks. Making connections DX-32E250A12 9 Using component video (better) To connect a cable or satellite box using component video: 1 Turn off your TV and all connected equipment. 2 Connect the incoming cable...
User Manual
Page 14
... to eliminate interference and noise from radio waves. Back of your TV and to the coaxial out jack on the cable or satellite box. 10 DX-32E250A12 Making connections Using coaxial (good) To connect a cable or satellite box using coaxial: 1 Turn off your TV and all connected equipment. 2 Connect the incoming cable...
... to eliminate interference and noise from radio waves. Back of your TV and to the coaxial out jack on the cable or satellite box. 10 DX-32E250A12 Making connections Using coaxial (good) To connect a cable or satellite box using coaxial: 1 Turn off your TV and all connected equipment. 2 Connect the incoming cable...
User Manual
Page 15
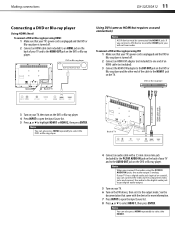
Making connections DX-32E250A12 11 Connecting a DVD or Blu-ray player Using HDMI (best) To connect a DVD or Blu-ray player using HDMI: 1 Make sure that your TV's power ...
Making connections DX-32E250A12 11 Connecting a DVD or Blu-ray player Using HDMI (best) To connect a DVD or Blu-ray player using HDMI: 1 Make sure that your TV's power ...
User Manual
Page 16
... the DVD or Blu-ray player. Notes • • • You can also press COMP to select the component DVD or Blu-ray player. 12 DX-32E250A12 Making connections Using component video (better) To connect a DVD or Blu-ray player using component video: 1 Make sure that your TV's power cord is unplugged...
... the DVD or Blu-ray player. Notes • • • You can also press COMP to select the component DVD or Blu-ray player. 12 DX-32E250A12 Making connections Using component video (better) To connect a DVD or Blu-ray player using component video: 1 Make sure that your TV's power cord is unplugged...
User Manual
Page 17
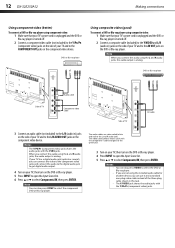
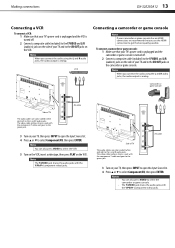
Making connections DX-32E250A12 13 Connecting a VCR To connect a VCR: 1 Make sure that your TV's power cord is unplugged and the VCR is turned off . 2 Connect a composite cable (included) ...
Making connections DX-32E250A12 13 Connecting a VCR To connect a VCR: 1 Make sure that your TV's power cord is unplugged and the VCR is turned off . 2 Connect a composite cable (included) ...
User Manual
Page 18
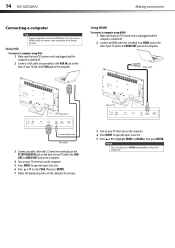
14 DX-32E250A12 Making connections Connecting a computer Tip Some computers have an HDMI jack. HDMI cable Back of TV 3.5 mm audio cable VGA cable 3 Connect an audio cable ...
14 DX-32E250A12 Making connections Connecting a computer Tip Some computers have an HDMI jack. HDMI cable Back of TV 3.5 mm audio cable VGA cable 3 Connect an audio cable ...
User Manual
Page 19
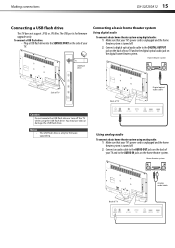
... to the AUDIO OUT jacks on the back of your TV and to the DIGITAL OUTPUT jack on the digital home theater system. Making connections DX-32E250A12 15 Connecting a USB flash drive This TV does not support .JPEG or .JPG files. Connecting a basic home theater system Using digital audio To connect a basic...
... to the AUDIO OUT jacks on the back of your TV and to the DIGITAL OUTPUT jack on the digital home theater system. Making connections DX-32E250A12 15 Connecting a USB flash drive This TV does not support .JPEG or .JPG files. Connecting a basic home theater system Using digital audio To connect a basic...
User Manual
Page 20
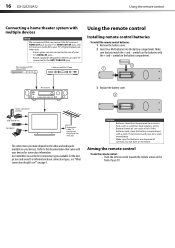
... ANT/ CABLE IN jack. Refer to the documentation that came with your skin, wash immediately. • Make sure that batteries are disposed of correctly. 16 DX-32E250A12 Using the remote control Connecting a home theater system with multiple devices Note We recommend that you connect the AV receiver's HDMI OUT jack to your...
... ANT/ CABLE IN jack. Refer to the documentation that came with your skin, wash immediately. • Make sure that batteries are disposed of correctly. 16 DX-32E250A12 Using the remote control Connecting a home theater system with multiple devices Note We recommend that you connect the AV receiver's HDMI OUT jack to your...

User Manual
Page 21
Turning on your TV for the first time DX-32E250A12 17 Turning on your TV for the first time The first time you turn on your TV, the Setup Wizard opens. The Setup Wizard guides ...
Turning on your TV for the first time DX-32E250A12 17 Turning on your TV for the first time The first time you turn on your TV, the Setup Wizard opens. The Setup Wizard guides ...
User Manual
Page 22
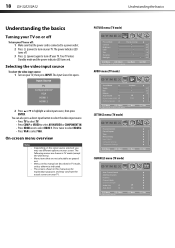
...; Press COMP or VIDEO to select AV IN VIDEO or COMPONENT IN. • Press HDMI once to highlight a video input source, then press ENTER. 18 DX-32E250A12 Understanding the basics Understanding the basics Turning your TV on or off To turn on your TV, then press INPUT.
...; Press COMP or VIDEO to select AV IN VIDEO or COMPONENT IN. • Press HDMI once to highlight a video input source, then press ENTER. 18 DX-32E250A12 Understanding the basics Understanding the basics Turning your TV on or off To turn on your TV, then press INPUT.
User Manual
Page 23
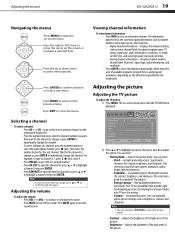
Adjusting the picture DX-32E250A12 19 Navigating the menus Press MENU to open the favorite channel list, press or to move the cursor on the information provided by the broadcaster. ...
Adjusting the picture DX-32E250A12 19 Navigating the menus Press MENU to open the favorite channel list, press or to move the cursor on the information provided by the broadcaster. ...
User Manual
Page 24
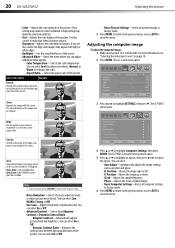
... can select On or Off. Use this control to On. Position-Moves the image right or left and right hand side of the picture. 20 DX-32E250A12 Adjusting the picture • Color-Adjusts the color intensity of the picture. Note: Auto is in the center. You can also press ZOOM to select...
... can select On or Off. Use this control to On. Position-Moves the image right or left and right hand side of the picture. 20 DX-32E250A12 Adjusting the picture • Color-Adjusts the color intensity of the picture. Note: Auto is in the center. You can also press ZOOM to select...


