Warranty (English)
Page 1
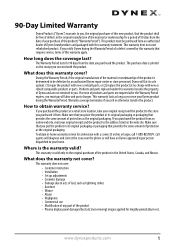
... and the product to the address listed on the receipt you . This warranty does not cover: • Customer instruction • Installation • Set up adjustments • Cosmetic damage • Damage due to you received with the product. The purchase date is determined to the original purchaser of Dynex brand products and packaged with a screen 25 inches or larger, call...
... and the product to the address listed on the receipt you . This warranty does not cover: • Customer instruction • Installation • Set up adjustments • Cosmetic damage • Damage due to you received with the product. The purchase date is determined to the original purchaser of Dynex brand products and packaged with a screen 25 inches or larger, call...
Warranty (English)
Page 2
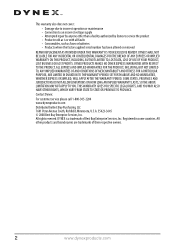
..., Minnesota, U.S.A. 55423-3645 © 2008 Best Buy Enterprise Services, Inc. DYNEX is or with all faults • Consumables, such as fuses or batteries • Products where the factory applied serial number has been altered or removed REPAIR REPLACEMENT AS PROVIDED UNDER THIS WARRANTY IS YOUR EXCLUSIVE REMEDY. DYNEX PRODUCTS MAKES NO OTHER EXPRESS WARRANTIES WITH RESPECT TO THE PRODUCT, ALL EXPRESS AND IMPLIED...
..., Minnesota, U.S.A. 55423-3645 © 2008 Best Buy Enterprise Services, Inc. DYNEX is or with all faults • Consumables, such as fuses or batteries • Products where the factory applied serial number has been altered or removed REPAIR REPLACEMENT AS PROVIDED UNDER THIS WARRANTY IS YOUR EXCLUSIVE REMEDY. DYNEX PRODUCTS MAKES NO OTHER EXPRESS WARRANTIES WITH RESPECT TO THE PRODUCT, ALL EXPRESS AND IMPLIED...
Quick Setup Guide (English)
Page 1
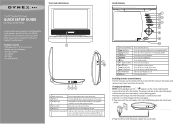
... connected to turn off button 2 (prev) button 3 (next) button 4 SETUP button 5 DVD MENU = 6 (stop disc playback. Front and side features Inside features 7" and 9" Portable DVD Players QUICK SETUP GUIDE DX-P7DVD and DX-P9DVD Congratulations on your player. Press to stop ) 7 (play/pause) button 8 or buttons (fast rev) button (fast fwd) buttons 9 Power On/Off switch 10 OPEN button Press to a wall outlet (AC); it to open or close the Setup menu. POWER DC 9V-12V CHG 2 Plug the other end of the player will charge...
... connected to turn off button 2 (prev) button 3 (next) button 4 SETUP button 5 DVD MENU = 6 (stop disc playback. Front and side features Inside features 7" and 9" Portable DVD Players QUICK SETUP GUIDE DX-P7DVD and DX-P9DVD Congratulations on your player. Press to stop ) 7 (play/pause) button 8 or buttons (fast rev) button (fast fwd) buttons 9 Power On/Off switch 10 OPEN button Press to a wall outlet (AC); it to open or close the Setup menu. POWER DC 9V-12V CHG 2 Plug the other end of the player will charge...
Quick Setup Guide (English)
Page 2
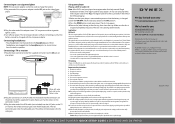
... same or equivalent type. 90-day limited warranty Visit www.dynexproducts.com for compliance with the car power adapter. All other products and brand names are provided for your safety. ENGLISH 10-0035 7" AND 9" PORTABLE DVD PLAYERS I QUICK SETUP GUIDE I DX-P7DVD AND DX-P9DVD Connecting a TV or monitor 1 Plug the black connector end of the supplied A/V cable. The region code for your player is powering the device, the wall plug...
... same or equivalent type. 90-day limited warranty Visit www.dynexproducts.com for compliance with the car power adapter. All other products and brand names are provided for your safety. ENGLISH 10-0035 7" AND 9" PORTABLE DVD PLAYERS I QUICK SETUP GUIDE I DX-P7DVD AND DX-P9DVD Connecting a TV or monitor 1 Plug the black connector end of the supplied A/V cable. The region code for your player is powering the device, the wall plug...
User Manual (English)
Page 2
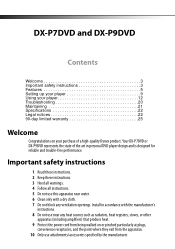
... safety instructions 1 Read these instructions. 2 Keep these instructions. 3 Heed all warnings. 4 Follow all instructions. 5 Do not use this apparatus near water. 6 Clean only with the manufacturer's instructions. 8 Do not use near any ventilation openings. DX-P7DVD and DX-P9DVD Contents Welcome 3 Important safety instructions 3 Features 5 Setting up your player 9 Using your purchase of the art in personal DVD player design and is designed for reliable and trouble-free performance. Your DX...
... safety instructions 1 Read these instructions. 2 Keep these instructions. 3 Heed all warnings. 4 Follow all instructions. 5 Do not use this apparatus near water. 6 Clean only with the manufacturer's instructions. 8 Do not use near any ventilation openings. DX-P7DVD and DX-P9DVD Contents Welcome 3 Important safety instructions 3 Features 5 Setting up your player 9 Using your purchase of the art in personal DVD player design and is designed for reliable and trouble-free performance. Your DX...

User Manual (English)
Page 5
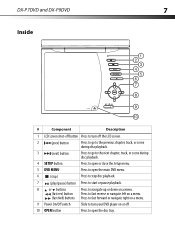
... flashes green when the battery power is charging and flashes red when you turn off your player's speakers. 3 Volume control Rotate to increase or decrease the volume. 4 DC input jack Connect the wall power adapter or the car power adapter to charge the battery. When headphones are plugged in, sound does not come out of your player and connect it to the car power adapter, which cannot be used to this jack.
... flashes green when the battery power is charging and flashes red when you turn off your player's speakers. 3 Volume control Rotate to increase or decrease the volume. 4 DC input jack Connect the wall power adapter or the car power adapter to charge the battery. When headphones are plugged in, sound does not come out of your player and connect it to the car power adapter, which cannot be used to this jack.
User Manual (English)
Page 6
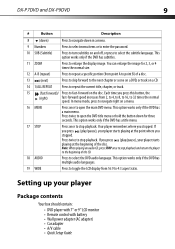
... to open or close the Setup menu. 5 DVD MENU Press to open the main DVD menu. 6 (stop) Press to stop disc playback. 7 (play/pause) button Press to start or pause playback. 8 or buttons Press to navigate up or down on a menu. (fast rev) button Press to fast reverse or navigate left on a menu. (fast fwd) buttons Press to fast forward or navigate right on a menu. 9 Power On/Off switch Slide to turn your DVD player on or off. 10 OPEN button Press to open the disc tray.
... to open or close the Setup menu. 5 DVD MENU Press to open the main DVD menu. 6 (stop) Press to stop disc playback. 7 (play/pause) button Press to start or pause playback. 8 or buttons Press to navigate up or down on a menu. (fast rev) button Press to fast reverse or navigate left on a menu. (fast fwd) buttons Press to fast forward or navigate right on a menu. 9 Power On/Off switch Slide to turn your DVD player on or off. 10 OPEN button Press to open the disc tray.
User Manual (English)
Page 7
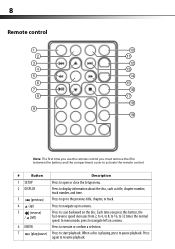
... must remove the film between the battery and the compartment cover to activate the remote control. # Button Description 1 SETUP Press to open or close the Setup menu. 2 DISPLAY Press to display information about the disc, such as title, chapter number, track number, and time. 3 (previous) Press to go to the previous title, chapter, or track. 4 (up) Press to navigate up in a menu. 5 (reverse) / (left on the disc. In menu mode...
... must remove the film between the battery and the compartment cover to activate the remote control. # Button Description 1 SETUP Press to open or close the Setup menu. 2 DISPLAY Press to display information about the disc, such as title, chapter number, track number, and time. 3 (previous) Press to go to the previous title, chapter, or track. 4 (up) Press to navigate up in a menu. 5 (reverse) / (left on the disc. In menu mode...
User Manual (English)
Page 8
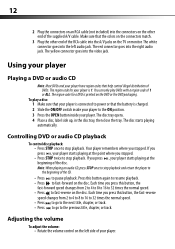
...; DVD player with 7" or 9" LCD monitor • Remote control with battery • Wall power adapter (AC adapter) • Car adapter • A/V cable • Quick Setup Guide In menu mode, press to navigate right on and off, or press to select the subtitle language. This option works only if the DVD has a main menu. Setting up your player starts playing at the beginning of the disc. Note: When playing an audio CD, press STOP once to stop playback. DX-P7DVD and DX-P9DVD 9 # Button...
...; DVD player with 7" or 9" LCD monitor • Remote control with battery • Wall power adapter (AC adapter) • Car adapter • A/V cable • Quick Setup Guide In menu mode, press to navigate right on and off, or press to select the subtitle language. This option works only if the DVD has a main menu. Setting up your player starts playing at the beginning of the disc. Note: When playing an audio CD, press STOP once to stop playback. DX-P7DVD and DX-P9DVD 9 # Button...
User Manual (English)
Page 11
The white connector goes into the video jack. Using your player Playing a DVD or audio CD Note: Most DVDs and your player. You can only play a disc: 1 Make sure that your player is connected to power or that the battery is charged. 2 Slide the ON/OFF switch inside your player to the ON position. 3 Press the OPEN button inside your player have region codes that the colors on the connectors match. 3 Plug the other end of...
The white connector goes into the video jack. Using your player Playing a DVD or audio CD Note: Most DVDs and your player. You can only play a disc: 1 Make sure that your player is connected to power or that the battery is charged. 2 Slide the ON/OFF switch inside your player to the ON position. 3 Press the OPEN button inside your player have region codes that the colors on the connectors match. 3 Plug the other end of...
User Manual (English)
Page 13
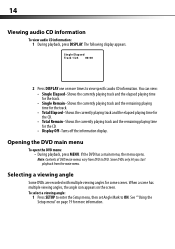
... DISPLAY one or more information. Selecting a viewing angle Some DVDs are recorded with multiple viewing angles for the CD. • Display Off-Turns off the information display. To select a viewing angle: 1 Press SETUP to enter the Setup menu, then set Angle Mark to view specific audio CD information. If the DVD has a main menu, the menu opens. Some DVDs only let you start playback from DVD to DVD. See ""Using the Setup menu" on the screen. When a scene has multiple viewing...
... DISPLAY one or more information. Selecting a viewing angle Some DVDs are recorded with multiple viewing angles for the CD. • Display Off-Turns off the information display. To select a viewing angle: 1 Press SETUP to enter the Setup menu, then set Angle Mark to view specific audio CD information. If the DVD has a main menu, the menu opens. Some DVDs only let you start playback from DVD to DVD. See ""Using the Setup menu" on the screen. When a scene has multiple viewing...
User Manual (English)
Page 16
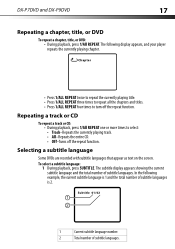
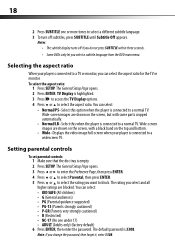
... the total number of subtitle languages is 2. Selecting a subtitle language Some DVDs are recorded with subtitle languages that appear as text on the screen. To select a subtitle language: 1 During playback, press SUBTITLE. The subtitle display appears showing the current subtitle language and the total number of subtitle languages. DX-P7DVD and DX-P9DVD 17 Repeating a chapter, title, or DVD To repeat a chapter, title, or DVD: • During playback, press 1/All REPEAT. In the following display appears, and your player repeats the currently playing chapter. Subtitle 01/02...
... the total number of subtitle languages is 2. Selecting a subtitle language Some DVDs are recorded with subtitle languages that appear as text on the screen. To select a subtitle language: 1 During playback, press SUBTITLE. The subtitle display appears showing the current subtitle language and the total number of subtitle languages. DX-P7DVD and DX-P9DVD 17 Repeating a chapter, title, or DVD To repeat a chapter, title, or DVD: • During playback, press 1/All REPEAT. In the following display appears, and your player repeats the currently playing chapter. Subtitle 01/02...
User Manual (English)
Page 17
... to access the TV Display options. 4 Press or to a widescreen TV. Wide-screen images are shown on the screen, with a black band on the screen, but with some parts cropped automatically. • Normal/LB-Select this option when the player is connected to block. Setting parental controls To set parental controls: 1 Make sure that the disc tray is connected to select the rating you select a subtitle language from the DVD main menu. The General Setup Page opens. 3 Press...
... to access the TV Display options. 4 Press or to a widescreen TV. Wide-screen images are shown on the screen, with a black band on the screen, but with some parts cropped automatically. • Normal/LB-Select this option when the player is connected to block. Setting parental controls To set parental controls: 1 Make sure that the disc tray is connected to select the rating you select a subtitle language from the DVD main menu. The General Setup Page opens. 3 Press...
User Manual (English)
Page 18
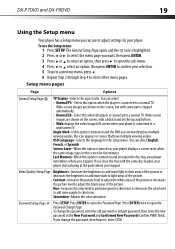
... menu page you close the tray with the same disc loaded, your player. You can select English, French, or Spanish. Video Quality Setup Page Brightness-Increases the brightness to add more light to dark areas of the picture or decreases the picture level to a normal TV. Password Setup Page Press SETUP. DX-P7DVD and DX-P9DVD 19 Using the Setup menu Your player has a Setup menu you can use the Setup menu: 1 Press SETUP. OSD Language-Selects the language for your player starts playing...
... menu page you close the tray with the same disc loaded, your player. You can select English, French, or Spanish. Video Quality Setup Page Brightness-Increases the brightness to add more light to dark areas of the picture or decreases the picture level to a normal TV. Password Setup Page Press SETUP. DX-P7DVD and DX-P9DVD 19 Using the Setup menu Your player has a Setup menu you can use the Setup menu: 1 Press SETUP. OSD Language-Selects the language for your player starts playing...
User Manual (English)
Page 19
... not recorded on the DVD, your player displays the default language. Subtitle-Select the subtitle language. If the language you select is not recorded on the DVD, your player. Default-Reset all cables are within 10 feet of the IR sensor. • Make sure that all settings except the password and parental controls back to the factory default. Troubleshooting Problem No sound or distorted sound. Picture is distorted. Solution • Adjust the volume. • Make sure that the disc is inserted with your player plays the default audio language.
... not recorded on the DVD, your player displays the default language. Subtitle-Select the subtitle language. If the language you select is not recorded on the DVD, your player. Default-Reset all cables are within 10 feet of the IR sensor. • Make sure that all settings except the password and parental controls back to the factory default. Troubleshooting Problem No sound or distorted sound. Picture is distorted. Solution • Adjust the volume. • Make sure that the disc is inserted with your player plays the default audio language.
User Manual (English)
Page 20
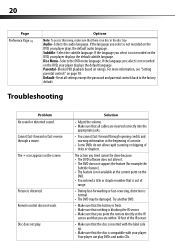
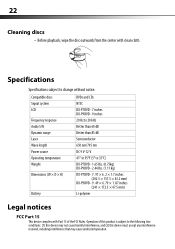
... a disc case after playback. Installing the remote control battery To install the remote control battery: 1 Remove the battery compartment cover. 2 Insert the battery into the battery compartment. Make sure that the disc is not dirty. • If condensation has formed inside your player, let your player. Solution • Make sure that the region code for a DVD matches the region code for your player dry out. DX-P7DVD and DX-P9DVD 21 Problem Play starts, then stops immediately. The DVD's region code is 1. Handling discs •...
... a disc case after playback. Installing the remote control battery To install the remote control battery: 1 Remove the battery compartment cover. 2 Insert the battery into the battery compartment. Make sure that the disc is not dirty. • If condensation has formed inside your player, let your player. Solution • Make sure that the region code for a DVD matches the region code for your player dry out. DX-P7DVD and DX-P9DVD 21 Problem Play starts, then stops immediately. The DVD's region code is 1. Handling discs •...
User Manual (English)
Page 21
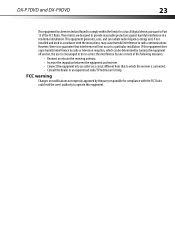
... inches (241 × 172.5 × 47.5 mm) Li-polymer Legal notices FCC Part 15 This device complies with clean cloth. Compatible discs Signal system LCD Frequency response Audio S/N Dynamic range Laser Wave length Power source Operating temperature Weight Dimensions (W × D × H) Battery DVDs and CDs NTSC DX-P7DVD - 7 inches DX-P9DVD - 9 inches 20 Hz to 20 kHz Better than 60 dB Better than...
... inches (241 × 172.5 × 47.5 mm) Li-polymer Legal notices FCC Part 15 This device complies with clean cloth. Compatible discs Signal system LCD Frequency response Audio S/N Dynamic range Laser Wave length Power source Operating temperature Weight Dimensions (W × D × H) Battery DVDs and CDs NTSC DX-P7DVD - 7 inches DX-P9DVD - 9 inches 20 Hz to 20 kHz Better than 60 dB Better than...
User Manual (English)
Page 22
... generates, uses, and can be determined by turning the equipment off and on, the user is connected. • Consult the dealer or an experienced radio/TV technician for compliance with the instructions, may cause harmful interference to provide reasonable protection against harmful interference in a particular installation. These limits are designed to radio communications. DX-P7DVD and DX-P9DVD 23...
... generates, uses, and can be determined by turning the equipment off and on, the user is connected. • Consult the dealer or an experienced radio/TV technician for compliance with the instructions, may cause harmful interference to provide reasonable protection against harmful interference in a particular installation. These limits are designed to radio communications. DX-P7DVD and DX-P9DVD 23...
User Manual (English)
Page 24
... an Dynex-approved repair person dispatched to obtain warranty service? If you purchased the Product from the date you purchased the Product. This warranty does not cover: • Customer instruction • Installation • Set up adjustments • Cosmetic damage • Damage due to acts of God, such as you received with new or rebuilt comparable products or parts. DX-P7DVD and DX-P9DVD 25...
... an Dynex-approved repair person dispatched to obtain warranty service? If you purchased the Product from the date you purchased the Product. This warranty does not cover: • Customer instruction • Installation • Set up adjustments • Cosmetic damage • Damage due to acts of God, such as you received with new or rebuilt comparable products or parts. DX-P7DVD and DX-P9DVD 25...
User Manual (English)
Page 25
..., such as fuses or batteries • Products where the factory applied serial number has been altered or removed REPAIR REPLACEMENT AS PROVIDED UNDER THIS WARRANTY IS YOUR EXCLUSIVE REMEDY. All other than a facility authorized by Best Buy Purchasing, LLC 7601 Penn Avenue South, Richfield, Minnesota, U.S.A. 55423-3645 © 2010 BBY Solutions, Inc. Contact Dynex: For customer service please call 1-800...
..., such as fuses or batteries • Products where the factory applied serial number has been altered or removed REPAIR REPLACEMENT AS PROVIDED UNDER THIS WARRANTY IS YOUR EXCLUSIVE REMEDY. All other than a facility authorized by Best Buy Purchasing, LLC 7601 Penn Avenue South, Richfield, Minnesota, U.S.A. 55423-3645 © 2010 BBY Solutions, Inc. Contact Dynex: For customer service please call 1-800...


