
User Guide
Page 2
... Web camera has been exposed to moisture • The Web camera has been dropped and damaged. • The Web camera has obvious signs of breakage. • The Web camera is not covered by a service technician if any kind to open the Web camera. Place the Web camera on a flat, stable surface before setting it for future reference. 2 Contents Dynex DX-DTCAM Web Camera Contents Important safety instructions 2 Web camera components 3 Setting up the Web camera 4 Using the Web camera...
... Web camera has been exposed to moisture • The Web camera has been dropped and damaged. • The Web camera has obvious signs of breakage. • The Web camera is not covered by a service technician if any kind to open the Web camera. Place the Web camera on a flat, stable surface before setting it for future reference. 2 Contents Dynex DX-DTCAM Web Camera Contents Important safety instructions 2 Web camera components 3 Setting up the Web camera 4 Using the Web camera...

User Guide
Page 3
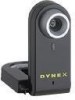
Turns on when the Web camera is connected. Web camera components 3 Web camera components 1 2 3 4 Item Description 1 Lens 2 LED indicator 3 Microphone 4 Adjustable base Function Provides the image to provide the view you want. Adjusts to the Web camera. Provides sound reception for the Web camera. Adjust the focus by turning the lens.
Turns on when the Web camera is connected. Web camera components 3 Web camera components 1 2 3 4 Item Description 1 Lens 2 LED indicator 3 Microphone 4 Adjustable base Function Provides the image to provide the view you want. Adjusts to the Web camera. Provides sound reception for the Web camera. Adjust the focus by turning the lens.
User Guide
Page 4
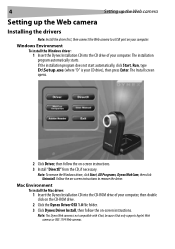
... -screen instructions. Windows Environment To install the Windows driver: 1 Insert the Dynex Installation CD into the CD-ROM drive of your computer. If the installation program does not start automatically, click Start, Run, type D:\Setup.exe (where "D" is not compatible with iChat, because iChat only supports Apple's Web cameras or IEEE 1394 Web cameras. Follow the on your computer. 4 Setting up the Web camera Setting up the Web camera Installing the drivers Note: Install the driver first, then connect the Web camera to a USB port on -screen instructions...
... -screen instructions. Windows Environment To install the Windows driver: 1 Insert the Dynex Installation CD into the CD-ROM drive of your computer. If the installation program does not start automatically, click Start, Run, type D:\Setup.exe (where "D" is not compatible with iChat, because iChat only supports Apple's Web cameras or IEEE 1394 Web cameras. Follow the on your computer. 4 Setting up the Web camera Setting up the Web camera Installing the drivers Note: Install the driver first, then connect the Web camera to a USB port on -screen instructions...

User Guide
Page 5
... CD-ROM drive. 2 Click the Dynex Driver OSX 1.0 file folder. 3 Click Dynex Driver Uninstall, then follow the on page14. Note: After installing the Dynex Windows driver, the system automatically creates a folder (C:\My Documents\WebCam Center)to capture real-time images, record images, or execute the security function. For more information on video chat software, see "Video chat" on -screen instructions. Third-party software You can use the Dynex Web camera interface (provided) to save the images you . You can also start the program by...
... CD-ROM drive. 2 Click the Dynex Driver OSX 1.0 file folder. 3 Click Dynex Driver Uninstall, then follow the on page14. Note: After installing the Dynex Windows driver, the system automatically creates a folder (C:\My Documents\WebCam Center)to capture real-time images, record images, or execute the security function. For more information on video chat software, see "Video chat" on -screen instructions. Third-party software You can use the Dynex Web camera interface (provided) to save the images you . You can also start the program by...

User Guide
Page 6
6 Using the Web camera The main interface screen The following interface screen (in Preview mode) opens when you want: Icon Description Preview mode Snapshot mode Video Clip mode Security Monitoring mode Exit Camera control Click the icon to enter the mode you start the application: Interface screen icons The following icons appear on the interface screen.
6 Using the Web camera The main interface screen The following interface screen (in Preview mode) opens when you want: Icon Description Preview mode Snapshot mode Video Clip mode Security Monitoring mode Exit Camera control Click the icon to enter the mode you start the application: Interface screen icons The following icons appear on the interface screen.

User Guide
Page 7
...: The file sizes of five resolutions. Zoom out from the subject. Move the image to the left. Select the resolution. Move the image up. Choose between RGB24 and I420, then select one of I420 images are in Preview mode: Button Description Zoom in on the subject. Move the image to the right. Using the Web camera 7 Preview mode The following Preview mode screen opens when you first open the program, or...
...: The file sizes of five resolutions. Zoom out from the subject. Move the image to the left. Select the resolution. Move the image up. Choose between RGB24 and I420, then select one of I420 images are in Preview mode: Button Description Zoom in on the subject. Move the image to the right. Using the Web camera 7 Preview mode The following Preview mode screen opens when you first open the program, or...

User Guide
Page 8
Shows the choice you are in Preview mode. SnapShot mode control buttons The following SnapShot mode screen opens when you click the SnapShot mode icon : Use the SnapShot mode to Preview mode and make the change there. Note: To change the resolution, go back to take one or more pictures. Shoot continuously. 8 Using the Web camera SnapShot mode The following buttons are available when you made in SnapShot mode: Button Description Send the photo by e-mail.
Shows the choice you are in Preview mode. SnapShot mode control buttons The following SnapShot mode screen opens when you click the SnapShot mode icon : Use the SnapShot mode to Preview mode and make the change there. Note: To change the resolution, go back to take one or more pictures. Shoot continuously. 8 Using the Web camera SnapShot mode The following buttons are available when you made in SnapShot mode: Button Description Send the photo by e-mail.

User Guide
Page 9
... to stop animation. 3 Press to return to MPEG-1 format Start recording Stop recording Exit the Video Clip mode Shows the choice you made in Preview mode. Using the Web camera 9 Video Clip mode The following Video Clip mode screen opens when you click the Video Clip mode icon : Video Clip mode control buttons The following buttons are available when you are in Video Clip mode: Button Description Send a video clip by e-mail Convert AVI files to the Video Clip mode.
... to stop animation. 3 Press to return to MPEG-1 format Start recording Stop recording Exit the Video Clip mode Shows the choice you made in Preview mode. Using the Web camera 9 Video Clip mode The following Video Clip mode screen opens when you click the Video Clip mode icon : Video Clip mode control buttons The following buttons are available when you are in Video Clip mode: Button Description Send a video clip by e-mail Convert AVI files to the Video Clip mode.

User Guide
Page 10
...in the Security Monitoring mode. To change the resolution, go back to Preview mode and make the change there. 10 Using the Web camera Security Monitoring mode The following Security Monitoring mode screen opens when you click the Security Monitoring mode icon : Security Monitoring mode control buttons The following buttons are available when you . Note: You can use any image resolution in Security Monitoring mode: Button Description Start recording. Set the degree of variance for every second of the security monitoring system. Set up time parameters of image recording...
...in the Security Monitoring mode. To change the resolution, go back to Preview mode and make the change there. 10 Using the Web camera Security Monitoring mode The following Security Monitoring mode screen opens when you click the Security Monitoring mode icon : Security Monitoring mode control buttons The following buttons are available when you . Note: You can use any image resolution in Security Monitoring mode: Button Description Start recording. Set the degree of variance for every second of the security monitoring system. Set up time parameters of image recording...

User Guide
Page 11
Using the Web camera 11 Camera control mode In Camera Control mode you can personalize your Web camera is located. Click to remove the check in Auto to adjust. 5 Click Reset to return to get a black-and-white photo effect. B/W Mode-Select to the manufacturer's settings. Click Restore to return to 1280 × 960. 4 Adjust the white balance in low light situations. 2 Adjust the picture elements to select Indoor...
Using the Web camera 11 Camera control mode In Camera Control mode you can personalize your Web camera is located. Click to remove the check in Auto to adjust. 5 Click Reset to return to get a black-and-white photo effect. B/W Mode-Select to the manufacturer's settings. Click Restore to return to 1280 × 960. 4 Adjust the white balance in low light situations. 2 Adjust the picture elements to select Indoor...

User Guide
Page 12
... video effects and frames. Note: The image area of the frame must be Pantone 255 and the frame size must be applied to video chat software, such as MSN Messenger. Also, you can directly connect to this Effects page from the video chat software. 2 Customized Frame-You can also be 640 × 480. 3 Auto Change-Select this box. 12 Effects tab 1 Using the Web camera 2 3 Setting...
... video effects and frames. Note: The image area of the frame must be Pantone 255 and the frame size must be applied to video chat software, such as MSN Messenger. Also, you can directly connect to this Effects page from the video chat software. 2 Customized Frame-You can also be 640 × 480. 3 Auto Change-Select this box. 12 Effects tab 1 Using the Web camera 2 3 Setting...

User Guide
Page 13
... of functions designed and optimized for Webcam use the built-in or zoom out. 3 Click the direction arrows to know more about WebCam Companion, use . Using the Web camera 13 Zoom tab Use this screen to automatically record movement detected by pressing F1. You can access it to launch a video chat client or to enable the zoom function and control the image. ArcSoft WebCam Companion This program offers a broad range of any...
... of functions designed and optimized for Webcam use the built-in or zoom out. 3 Click the direction arrows to know more about WebCam Companion, use . Using the Web camera 13 Zoom tab Use this screen to automatically record movement detected by pressing F1. You can access it to launch a video chat client or to enable the zoom function and control the image. ArcSoft WebCam Companion This program offers a broad range of any...
User Guide
Page 14
..., download, and install the software, sign on to the Yahoo Messenger service. 3 From the main window, click Tools, then select Start My Webcam. 4 Right-click on a friend's name in your Messenger List, then choose View Webcam. Video chat using Yahoo Messenger To use Yahoo Messenger: 1 If you don't have Yahoo Messenger, go to http://messenger.yahoo.com to download it. 2 After you download and install the software, sign...
..., download, and install the software, sign on to the Yahoo Messenger service. 3 From the main window, click Tools, then select Start My Webcam. 4 Right-click on a friend's name in your Messenger List, then choose View Webcam. Video chat using Yahoo Messenger To use Yahoo Messenger: 1 If you don't have Yahoo Messenger, go to http://messenger.yahoo.com to download it. 2 After you download and install the software, sign...

User Guide
Page 15
DYNEX and the DYNEX logo are trademarks of their respective holders. Legal notices 15 ICES-003 Statement: This Class B digital apparatus complies with Canadian ICES-003. Other brands and ... (2) this device must accept any interference, including interference that may cause undesired operation of the device. RSS Statement: Operation is subject to change without notice or obligation. Specifications and features are trademarks or registered trademarks of Best Buy Enterprise Services, Inc. Copyright © 2006 Dynex. Cet appareil numérique de la classe B est conforme à...
DYNEX and the DYNEX logo are trademarks of their respective holders. Legal notices 15 ICES-003 Statement: This Class B digital apparatus complies with Canadian ICES-003. Other brands and ... (2) this device must accept any interference, including interference that may cause undesired operation of the device. RSS Statement: Operation is subject to change without notice or obligation. Specifications and features are trademarks or registered trademarks of Best Buy Enterprise Services, Inc. Copyright © 2006 Dynex. Cet appareil numérique de la classe B est conforme à...


