
FAQs (English)
Page 1
... blue. Connect A/V cables to the AV Out jacks on the S-Video device. - Agent Debug Tree Dynex LCD TVs (DX-26L150A11, DX-32L150A11, DX-37L150A11, DX-46L150A11) July 29, 2010 Setup ...1 Image Issues...4 Channel Issues...5 Audio Issues...7 General ...7 Hardware Issues...8 Stand/Wall Mounting...8 Setup 1. o What type of your channels. 1 If more help is needed please follow the steps...
... blue. Connect A/V cables to the AV Out jacks on the S-Video device. - Agent Debug Tree Dynex LCD TVs (DX-26L150A11, DX-32L150A11, DX-37L150A11, DX-46L150A11) July 29, 2010 Setup ...1 Image Issues...4 Channel Issues...5 Audio Issues...7 General ...7 Hardware Issues...8 Stand/Wall Mounting...8 Setup 1. o What type of your channels. 1 If more help is needed please follow the steps...

FAQs (English)
Page 4
.... o Make sure your area, visit www.antennaweb.org The video cables you want and to highlight Channel, then press ▼. OR Use an antenna mounted on -screen menu opens. 3. It is connected securely to a window. The on your roof or in the center of the digital channels again. If you...
.... o Make sure your area, visit www.antennaweb.org The video cables you want and to highlight Channel, then press ▼. OR Use an antenna mounted on -screen menu opens. 3. It is connected securely to a window. The on your roof or in the center of the digital channels again. If you...

FAQs (English)
Page 5
... to view channels via component cables please press the COMP button on the location and broadcast power level of a given station. OR Use an antenna mounted on the fringes-either too far from a tower or with that has a built-in the way-you are using a cable/satellite box, cable connected directly...
... to view channels via component cables please press the COMP button on the location and broadcast power level of a given station. OR Use an antenna mounted on the fringes-either too far from a tower or with that has a built-in the way-you are using a cable/satellite box, cable connected directly...

FAQs (English)
Page 7
...TV? DX-26L150A11 o http://dynexproducts.com/products/televisions/DX-26L150A11.html DX-32L150A11 o http://dynexproducts.com/products/televisions/DX-32L150A11.html DX-37L150A11 o http://dynexproducts.com/products/televisions/DX-37L150A11.html DX-46L150A11 o http://dynexproducts.com/products/televisions/DX-46L150A11.html 7 ...or in signal amplifier. either too far from a tower or with a manual. The manual is available on the Dynex website. Press CH ^ or CH v to view the selected channel strength. 2. The on the external devices. ...
...TV? DX-26L150A11 o http://dynexproducts.com/products/televisions/DX-26L150A11.html DX-32L150A11 o http://dynexproducts.com/products/televisions/DX-32L150A11.html DX-37L150A11 o http://dynexproducts.com/products/televisions/DX-37L150A11.html DX-46L150A11 o http://dynexproducts.com/products/televisions/DX-46L150A11.html 7 ...or in signal amplifier. either too far from a tower or with a manual. The manual is available on the Dynex website. Press CH ^ or CH v to view the selected channel strength. 2. The on the external devices. ...
FAQs (English)
Page 8
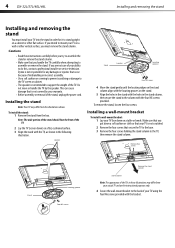
...the stand column, then secure the stand to the column with the bracket. DX-32L150A11, DX-37L150A11, DX-46L150A11 1. Make sure that secure the TV to the back of the base. 2. Secure the wall-mount bracket to the base. 3. The wide portion of the stand must face the front of... then turn on the stand column align with your TV is not scratched. 2. Align the stand with the four screws provided. DX-32L150A11, DX-37L150A11, DX-46L150A11 1. Move the stand gently until the locators on your TV. The sensor is plugged in. The supplied batteries are wrapped tightly...
...the stand column, then secure the stand to the column with the bracket. DX-32L150A11, DX-37L150A11, DX-46L150A11 1. Make sure that secure the TV to the back of the base. 2. Secure the wall-mount bracket to the base. 3. The wide portion of the stand must face the front of... then turn on the stand column align with your TV is not scratched. 2. Align the stand with the four screws provided. DX-32L150A11, DX-37L150A11, DX-46L150A11 1. Move the stand gently until the locators on your TV. The sensor is plugged in. The supplied batteries are wrapped tightly...

Quick Setup Guide (English)
Page 1
.... symbols on the antenna. symbols in the stand column. 6 Secure the stand to the column with the screws provided Installing a wall-mount bracket 1 Carefully place your TV screen face-down on a flat, cushioned surface. 3 Align the stand with the bracket. If you ...DX-32L150A11, DX-37L150A11, DX-40L130A11, and DX-46L150A11 Remote control Power sensor indicator Installing the stand 1 Remove the stand from damages and scratches. 2 Remove the four screws holding the TV to its stand column, then remove the stand column. 3 Secure the wall-mount bracket (not included) to the back of your Dynex...
.... symbols on the antenna. symbols in the stand column. 6 Secure the stand to the column with the screws provided Installing a wall-mount bracket 1 Carefully place your TV screen face-down on a flat, cushioned surface. 3 Align the stand with the bracket. If you ...DX-32L150A11, DX-37L150A11, DX-40L130A11, and DX-46L150A11 Remote control Power sensor indicator Installing the stand 1 Remove the stand from damages and scratches. 2 Remove the four screws holding the TV to its stand column, then remove the stand column. 3 Secure the wall-mount bracket (not included) to the back of your Dynex...

User Manual (English)
Page 2
ii Dynex 32", 37", 40", and 46" LCD TVs Contents CHILD SAFETY 1 Important safety instructions 2 Warnings 2 Cautions 2 Installing and removing the stand 4 Installing the stand 4 Installing a wall-mount bracket 4 TV components 5 Accessories 5 Front 5 Side 5 Back 6 Remote control 7 Using the remote control 8 Installing remote control batteries 8 Aiming the remote control 8 Programming a universal remote control...
ii Dynex 32", 37", 40", and 46" LCD TVs Contents CHILD SAFETY 1 Important safety instructions 2 Warnings 2 Cautions 2 Installing and removing the stand 4 Installing the stand 4 Installing a wall-mount bracket 4 TV components 5 Accessories 5 Front 5 Side 5 Back 6 Remote control 7 Using the remote control 8 Installing remote control batteries 8 Aiming the remote control 8 Programming a universal remote control...
User Manual (English)
Page 4
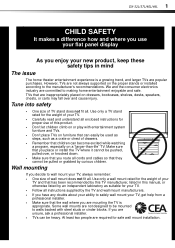
... • Don't let children climb on a "larger-than-life" TV. If you are not designed to be mounted to making home entertainment enjoyable and safe. Some wall mounts are unsure, ask a professional installer. • TVs can become excited while watching a program, especially on or play... with steel studs or cinder blocks. DX-32L/37L/40L/46L 1 f CHILD SAFETY It makes a difference how and where...
... • Don't let children climb on a "larger-than-life" TV. If you are not designed to be mounted to making home entertainment enjoyable and safe. Some wall mounts are unsure, ask a professional installer. • TVs can become excited while watching a program, especially on or play... with steel studs or cinder blocks. DX-32L/37L/40L/46L 1 f CHILD SAFETY It makes a difference how and where...
User Manual (English)
Page 7
.... Four M5 screws This can cause damage that is not scratched. 2 Remove the four screws that you intend to mount your ability to assemble or remove the stand. Dynex is not intended to the TV, then remove the stand column. Locators Stand Locators Locating grooves Four M5 screws 4 ... shown. Remove four screws Remove the stand column Stand column Locating grooves Note: The appearance of the stand, unplug the power cord. 4 DX-32L/37L/40L/46L Installing and removing the stand Installing and removing the stand You must remove the stand column. To remove the stand, ...
.... Four M5 screws This can cause damage that is not scratched. 2 Remove the four screws that you intend to mount your ability to assemble or remove the stand. Dynex is not intended to the TV, then remove the stand column. Locators Stand Locators Locating grooves Four M5 screws 4 ... shown. Remove four screws Remove the stand column Stand column Locating grooves Note: The appearance of the stand, unplug the power cord. 4 DX-32L/37L/40L/46L Installing and removing the stand Installing and removing the stand You must remove the stand column. To remove the stand, ...


