User Manual (English)
Page 2
ii Dynex DX-32L130A10 32" LCD TV Contents CHILD SAFETY 1 Important safety instructions 2 Warnings 2 Cautions 3 Installing and removing the stand 4 Installing the stand 4 Removing the stand 4 Installing a wall-mount bracket 4 TV components 5 Front and side controls 5 Back connections 5 Side connections 6 Remote control 6 Using the remote control 7 Installing remote control batteries 7 Aiming the remote control 7 Programming a universal remote control to work with your TV 8 Making connections 8 Connecting the power 8 Connecting an antenna, cable TV, or satellite TV box 9 ...
ii Dynex DX-32L130A10 32" LCD TV Contents CHILD SAFETY 1 Important safety instructions 2 Warnings 2 Cautions 3 Installing and removing the stand 4 Installing the stand 4 Removing the stand 4 Installing a wall-mount bracket 4 TV components 5 Front and side controls 5 Back connections 5 Side connections 6 Remote control 6 Using the remote control 7 Installing remote control batteries 7 Aiming the remote control 7 Programming a universal remote control to work with your TV 8 Making connections 8 Connecting the power 8 Connecting an antenna, cable TV, or satellite TV box 9 ...

User Manual (English)
Page 4
... for safe wall mount installation. However, TVs are popular purchases. Use only a TV stand rated for proper use your flat panel display As you place or install the TV where it cannot be pushed, pulled over and cause injury. Wall mounting If you are mounting the TV is a growing trend, and larger TVs are not always supported on dressers, bookcases, shelves, desks, speakers, chests, or...
... for safe wall mount installation. However, TVs are popular purchases. Use only a TV stand rated for proper use your flat panel display As you place or install the TV where it cannot be pushed, pulled over and cause injury. Wall mounting If you are mounting the TV is a growing trend, and larger TVs are not always supported on dressers, bookcases, shelves, desks, speakers, chests, or...
User Manual (English)
Page 5
... not remove any heat sources such as radiators, heat registers, stoves, or other . Refer servicing to rain or moisture, does not operate normally, or has been dropped. 15 The wall plug is used, use this Class I apparatus, which needs to be taken to prevent possible electric shock. Replacement parts When replacement parts are provided for replacement of time. 14 Refer all instructions. 5 Do not use caution...
... not remove any heat sources such as radiators, heat registers, stoves, or other . Refer servicing to rain or moisture, does not operate normally, or has been dropped. 15 The wall plug is used, use this Class I apparatus, which needs to be taken to prevent possible electric shock. Replacement parts When replacement parts are provided for replacement of time. 14 Refer all instructions. 5 Do not use caution...
User Manual (English)
Page 6
... controls may result in your cordless and cellular telephones away from the type of cable entry as the original part. Occasionally, a few non-active pixels may be recycled and reused. Outdoor antenna grounding If an outside antenna or cable system is connected to restore your local power company. Important safety instructions DX-32L130A10 3 characteristics as practical. In such cases, change in any service or repair...
... controls may result in your cordless and cellular telephones away from the type of cable entry as the original part. Occasionally, a few non-active pixels may be recycled and reused. Outdoor antenna grounding If an outside antenna or cable system is connected to restore your local power company. Important safety instructions DX-32L130A10 3 characteristics as practical. In such cases, change in any service or repair...

User Manual (English)
Page 7
... four M5XL 14 mm screws securing the base to mishandling or improper assembly. 4 DX-32L130A10 Installing and removing the stand Installing and removing the stand You must remove the stand column. To reduce the risk of hazards, do not perform any damages or injuries that is not scratched. 3 Align the base with the bottom of your TV to a wall-mount bracket: Warning: These servicing instructions are qualified to...
... four M5XL 14 mm screws securing the base to mishandling or improper assembly. 4 DX-32L130A10 Installing and removing the stand Installing and removing the stand You must remove the stand column. To reduce the risk of hazards, do not perform any damages or injuries that is not scratched. 3 Align the base with the bottom of your TV to a wall-mount bracket: Warning: These servicing instructions are qualified to...

User Manual (English)
Page 8
... a cable box or DVD player, to jacks connectors. For more information, see "Connecting an HDMI device" on page 10. 2 VGA AUDIO IN jack 3 PC VGA jack Connect the mini plug from a computer to this jack. Cables are often color-coded to make an audio connection. An HDMI cable carries both video and audio, so you do not need to jacks connectors. Connect a 15-pin VGA cable from your computer's sound card output to an external audio amplifier or receiver. For more information, see "Connecting a component video...
... a cable box or DVD player, to jacks connectors. For more information, see "Connecting an HDMI device" on page 10. 2 VGA AUDIO IN jack 3 PC VGA jack Connect the mini plug from a computer to this jack. Cables are often color-coded to make an audio connection. An HDMI cable carries both video and audio, so you do not need to jacks connectors. Connect a 15-pin VGA cable from your computer's sound card output to an external audio amplifier or receiver. For more information, see "Connecting a component video...
User Manual (English)
Page 9
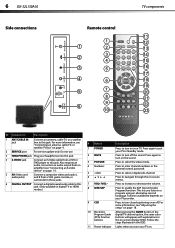
... setup" on page 18. 10 Electronic Program Guide (EPG) function buttons After pressing the GUIDE button in the digital TV channel option, the same color buttons will appear with explanations in digital TV or HDMI modes.) # Button Description 1 POWER Press to turn closed captioning on . Do not use. 3 HEADPHONE jack Plug your headphones into this jack. 4 S-VIDEO jack Connect an S-Video cable from a VCR or DVD player to navigate through the on page 9. 2 SERVICE port For service update only. Press again to turn on the sound. 3 PICTURE Press to select...
... setup" on page 18. 10 Electronic Program Guide (EPG) function buttons After pressing the GUIDE button in the digital TV channel option, the same color buttons will appear with explanations in digital TV or HDMI modes.) # Button Description 1 POWER Press to turn closed captioning on . Do not use. 3 HEADPHONE jack Plug your headphones into this jack. 4 S-VIDEO jack Connect an S-Video cable from a VCR or DVD player to navigate through the on page 9. 2 SERVICE port For service update only. Press again to turn on the sound. 3 PICTURE Press to select...

User Manual (English)
Page 10
.... Using the remote control DX-32L130A10 7 # Button 12 INPUT 13 ZOOM 14 AUDIO 15 GUIDE 16 INFO 17 EXIT 18 MENU 19 RECALL 20 ENTER 21 CH+/CH- 22 TIME 23 SLEEP Description Press to open the on-screen menu. You can cause a rash. Press to select the sound mode. Press to select the video display format. Press to open the INPUT SOURCE menu, then press or to the next or previous channel in...
.... Using the remote control DX-32L130A10 7 # Button 12 INPUT 13 ZOOM 14 AUDIO 15 GUIDE 16 INFO 17 EXIT 18 MENU 19 RECALL 20 ENTER 21 CH+/CH- 22 TIME 23 SLEEP Description Press to open the on-screen menu. You can cause a rash. Press to select the sound mode. Press to select the video display format. Press to open the INPUT SOURCE menu, then press or to the next or previous channel in...
User Manual (English)
Page 11
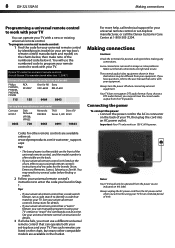
... turn the power off when connecting external equipment. If you choose a DTS audio format, you may need to try codes for your universal remote control by identifying its model (or your set -top box and your TV. Notes: Your TV should only be different from the TV speakers. See your universal remote control's instructions for details. • If your universal remote control has a "Learn" feature, you must use the numbered code to program your remote control to work with...
... turn the power off when connecting external equipment. If you choose a DTS audio format, you may need to try codes for your universal remote control by identifying its model (or your set -top box and your TV. Notes: Your TV should only be different from the TV speakers. See your universal remote control's instructions for details. • If your universal remote control has a "Learn" feature, you must use the numbered code to program your remote control to work with...
User Manual (English)
Page 13
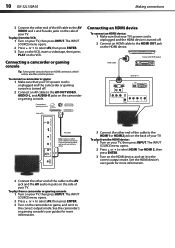
... gaming console Connecting an HDMI device To connect an HDMI device: 1 Make sure that your TV, then press INPUT. The INPUT SOURCE menu opens. 2 Press or to select HDMI 1 or HDMI 2, then press ENTER. 3 Turn on the HDMI device, and set it to the AV OUT VIDEO, AUDIO-L, and AUDIO-R jacks on your TV's power cord is unplugged and the camcorder or gaming console is turned off . 2 Connect an AV cable to the correct output mode. Connecting...
... gaming console Connecting an HDMI device To connect an HDMI device: 1 Make sure that your TV, then press INPUT. The INPUT SOURCE menu opens. 2 Press or to select HDMI 1 or HDMI 2, then press ENTER. 3 Turn on the HDMI device, and set it to the AV OUT VIDEO, AUDIO-L, and AUDIO-R jacks on your TV's power cord is unplugged and the camcorder or gaming console is turned off . 2 Connect an AV cable to the correct output mode. Connecting...

User Manual (English)
Page 14
... S-VIDEO jack on the side of your TV's power cord is unplugged and the component video device is turned off . 2 Connect an S-Video cable to the correct output mode. Making connections DX-32L130A10 11 Connecting a component video device A component (Y, Pb, Pr) picture can be displayed only when a 480i, 480P, 720P, or 1080i signal is turned off . 2 Connect a component video cable to the correct output mode. See the S-video device's user guide for more information. Y = Green cable Pb = Blue cable Pr = Red cable Connecting an S-video device To connect an S-video...
... S-VIDEO jack on the side of your TV's power cord is unplugged and the component video device is turned off . 2 Connect an S-Video cable to the correct output mode. Making connections DX-32L130A10 11 Connecting a component video device A component (Y, Pb, Pr) picture can be displayed only when a 480i, 480P, 720P, or 1080i signal is turned off . 2 Connect a component video cable to the correct output mode. See the S-video device's user guide for more information. Y = Green cable Pb = Blue cable Pr = Red cable Connecting an S-video device To connect an S-video...
User Manual (English)
Page 15
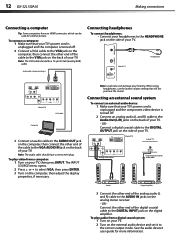
... DIGITAL INPUT jack on the analog stereo receiver. - Connect a digital coaxial cable to the Audio Out (L/R) jacks on the side of your TV. Connecting an external sound system To connect an external audio device: 1 Make sure that your TV's power cord is unplugged and the component video device is turned off . 2 Connect an analog audio (L and R) cable to the DIGITAL OUTPUT jack on the back of your TV. Audio cable (stereo mini plugs) ḤḤR Connecting headphones To connect headphones: • Connect your headphones to the VGA jack...
... DIGITAL INPUT jack on the analog stereo receiver. - Connect a digital coaxial cable to the Audio Out (L/R) jacks on the side of your TV. Connecting an external sound system To connect an external audio device: 1 Make sure that your TV's power cord is unplugged and the component video device is turned off . 2 Connect an analog audio (L and R) cable to the DIGITAL OUTPUT jack on the back of your TV. Audio cable (stereo mini plugs) ḤḤR Connecting headphones To connect headphones: • Connect your headphones to the VGA jack...

User Manual (English)
Page 16
... you turn on your TV, you must select the TV signal source. Selecting the video input source The first time you turn off your TV. The Channel Scan screen opens. 6 Press or to highlight the video source, then press ENTER. Warning: When your TV is in the remote control, connected the antenna, cable, or cable box to turn off your TV, it goes into standby mode. The Tuner screen opens. Your TV turns on...
... you turn on your TV, you must select the TV signal source. Selecting the video input source The first time you turn off your TV. The Channel Scan screen opens. 6 Press or to highlight the video source, then press ENTER. Warning: When your TV is in the remote control, connected the antenna, cable, or cable box to turn off your TV, it goes into standby mode. The Tuner screen opens. Your TV turns on...
User Manual (English)
Page 17
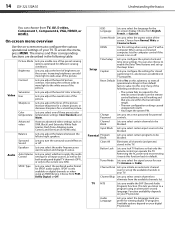
..., Dolby Digital, or Off. Channel Scan Lets you set up the sleep timer. To access the menu, press MENU. Increasing brightness can choose from TV, AV, S-video, Component 1, Component 2, VGA, HDMI1,or HDMI2. Hue Lets you adjust the focus of the picture. Sharpness Lets you adjust the overall color of the picture. SPDIF is on digital channels or when using an alternative second language. Time Setup Setup Caption Lets you select the aspect ration of the screen. Change Password Lets...
..., Dolby Digital, or Off. Channel Scan Lets you set up the sleep timer. To access the menu, press MENU. Increasing brightness can choose from TV, AV, S-video, Component 1, Component 2, VGA, HDMI1,or HDMI2. Hue Lets you adjust the focus of the picture. Sharpness Lets you adjust the overall color of the picture. SPDIF is on digital channels or when using an alternative second language. Time Setup Setup Caption Lets you select the aspect ration of the screen. Change Password Lets...

User Manual (English)
Page 18
... as channel number, video input source, and resolution. • Digital mode information-Displays channel number, station name, channel label (if preset), broadcast program name, TV rating, signal type, audio information, resolution, CC mode, current time, and current program start and end times. • Analog mode information-Displays channel number, channel label (if preset), signal type, audio information, and resolution. • Press GUIDE to adjust selected items, or move the on the memorized channel list. • Press the number buttons to enter the analog or digital (main) channel...
... as channel number, video input source, and resolution. • Digital mode information-Displays channel number, station name, channel label (if preset), broadcast program name, TV rating, signal type, audio information, resolution, CC mode, current time, and current program start and end times. • Analog mode information-Displays channel number, channel label (if preset), signal type, audio information, and resolution. • Press GUIDE to adjust selected items, or move the on the memorized channel list. • Press the number buttons to enter the analog or digital (main) channel...

User Manual (English)
Page 19
... change the color temperature. You can select PCM, Dolby Digital, or Off. Increase the contrast to adjust the white areas of the picture or decrease the contrast to cover the entire screen. • Wide-Picture uses a widescreen aspect ratio. • Cinema-Picture is activated. The option keeps the audio in a preset range to adjust and change the channel settings: 1 Press MENU. 16 DX-32L130A10 Adjusting the sound • Contrast-Lets you select the sound mode...
... change the color temperature. You can select PCM, Dolby Digital, or Off. Increase the contrast to adjust the white areas of the picture or decrease the contrast to cover the entire screen. • Wide-Picture uses a widescreen aspect ratio. • Cinema-Picture is activated. The option keeps the audio in a preset range to adjust and change the channel settings: 1 Press MENU. 16 DX-32L130A10 Adjusting the sound • Contrast-Lets you select the sound mode...
User Manual (English)
Page 20
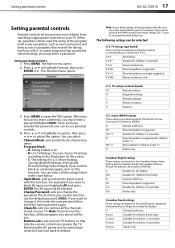
...) Ratings follow Step B. The first time you use the default password (0000). X Adults only. C Suitable for U.S. You can select: • Channel Block-Lets you block any channel you select. • Program Block- • A-Rating Enable is on your TV. The Parental menu opens. 3 Press MENU to programs that only the remote control can be blocked. • Change Password-Lets you change the password. Canadian French ratings These ratings are...
...) Ratings follow Step B. The first time you use the default password (0000). X Adults only. C Suitable for U.S. You can select: • Channel Block-Lets you block any channel you select. • Program Block- • A-Rating Enable is on your TV. The Parental menu opens. 3 Press MENU to programs that only the remote control can be blocked. • Change Password-Lets you change the password. Canadian French ratings These ratings are...
User Manual (English)
Page 21
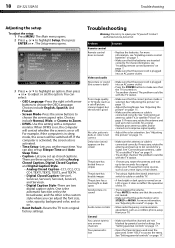
... channels • Make sure that the channels are two digital caption styles. You cannot tune to adjust or set the exact time. See "Setting parental controls" on page 16. You can adjust the font size, color, opacity, background color, and so on page 17. Problem Solution Remote control Remote control does not work Video and audio • Replace the batteries. The problem could be with the TV station. No color, picture is dark, or color is selected. The Setup menu...
... channels • Make sure that the channels are two digital caption styles. You cannot tune to adjust or set the exact time. See "Setting parental controls" on page 16. You can adjust the font size, color, opacity, background color, and so on page 17. Problem Solution Remote control Remote control does not work Video and audio • Replace the batteries. The problem could be with the TV station. No color, picture is dark, or color is selected. The Setup menu...

User Manual (English)
Page 22
.... TV model TV type TV panel TV system DX-32L130A10 LCD 31.5-inch TFT LCD NTSC-M, ATSC Channels Audio output Power requirement Power consumption Dimensions Weight Audio/video input terminals Audio/video output terminals VHF: 2-13 UHF:-14-69 CATV: 1-125 CADTV: 1-135 DTV: 2-69 Audio multiplex BTSC system 6 w x 2 AC 120 V~60 Hz 117 W 40 x 8.7 x 25.7 inches (100.5 x 22 x 65.3 cm) 35.3 lbs. (16 kg) Composite video/left and right audio (1) S-Video (1) Component video/left and right audio (2) HDMI (2) VGA/audio (1) ANT/CABLE in...
.... TV model TV type TV panel TV system DX-32L130A10 LCD 31.5-inch TFT LCD NTSC-M, ATSC Channels Audio output Power requirement Power consumption Dimensions Weight Audio/video input terminals Audio/video output terminals VHF: 2-13 UHF:-14-69 CATV: 1-125 CADTV: 1-135 DTV: 2-69 Audio multiplex BTSC system 6 w x 2 AC 120 V~60 Hz 117 W 40 x 8.7 x 25.7 inches (100.5 x 22 x 65.3 cm) 35.3 lbs. (16 kg) Composite video/left and right audio (1) S-Video (1) Component video/left and right audio (2) HDMI (2) VGA/audio (1) ANT/CABLE in...

User Manual (English)
Page 24
... received with the Product. DYNEX is the warranty valid? This warranty does not cover: • Customer instruction • Installation • Set up adjustments • Cosmetic damage • Damage due to service the Product • Products sold as fuses or batteries • Products where the factory applied serial number has been altered or removed DX-32L130A10 21 REPAIR REPLACEMENT AS PROVIDED UNDER THIS WARRANTY IS YOUR EXCLUSIVE REMEDY...
... received with the Product. DYNEX is the warranty valid? This warranty does not cover: • Customer instruction • Installation • Set up adjustments • Cosmetic damage • Damage due to service the Product • Products sold as fuses or batteries • Products where the factory applied serial number has been altered or removed DX-32L130A10 21 REPAIR REPLACEMENT AS PROVIDED UNDER THIS WARRANTY IS YOUR EXCLUSIVE REMEDY...


