User Manual (English)
Page 2
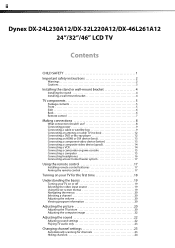
ii Dynex DX-24L230A12/DX-32L220A12/DX-46L261A12 24"/32"/46" LCD TV Contents CHILD SAFETY 1 Important safety instructions 2 Warnings 2 Cautions 3 Installing the stand or wall-mount bracket 4 Installing the stand 4 Installing a wall-mount bracket 4 TV components 5 Package contents 5 Front 5 Side 6 Back 6 Remote control 7 Making ...connections 8 What connection should I use 8 Connecting power 9 Connecting a cable or satellite box 9 Connecting an antenna or cable TV (no box 12 Connecting a DVD or Blu-ray player 12 Connecting an HDMI or DVI device (best 13 Connecting a component ...
ii Dynex DX-24L230A12/DX-32L220A12/DX-46L261A12 24"/32"/46" LCD TV Contents CHILD SAFETY 1 Important safety instructions 2 Warnings 2 Cautions 3 Installing the stand or wall-mount bracket 4 Installing the stand 4 Installing a wall-mount bracket 4 TV components 5 Package contents 5 Front 5 Side 6 Back 6 Remote control 7 Making ...connections 8 What connection should I use 8 Connecting power 9 Connecting a cable or satellite box 9 Connecting an antenna or cable TV (no box 12 Connecting a DVD or Blu-ray player 12 Connecting an HDMI or DVI device (best 13 Connecting a component ...
User Manual (English)
Page 3
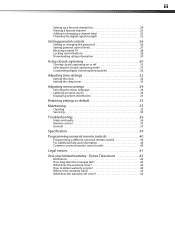
...Checking the digital signal strength 25 Setting parental controls 26 Setting or changing the password 26 Setting parental control levels 27 Blocking unrated TV 28 Locking control buttons 29 Downloading rating information 30 Using closed captioning 30 Turning closed captioning on or off 31 Selecting the ...system information 35 Restoring settings to obtain warranty service 43 Where is the warranty valid 43 What does the warranty not cover 43 Dynex Televisions 43 Definitions 43 How long does the coverage last 43 What does this warranty cover 43 How to default 35 Maintaining 35...
...Checking the digital signal strength 25 Setting parental controls 26 Setting or changing the password 26 Setting parental control levels 27 Blocking unrated TV 28 Locking control buttons 29 Downloading rating information 30 Using closed captioning 30 Turning closed captioning on or off 31 Selecting the ...system information 35 Restoring settings to obtain warranty service 43 Where is the warranty valid 43 What does the warranty not cover 43 Dynex Televisions 43 Definitions 43 How long does the coverage last 43 What does this warranty cover 43 How to default 35 Maintaining 35...
User Manual (English)
Page 5
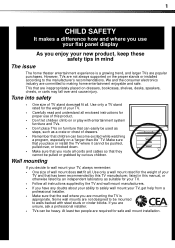
...• One size of drawers. • Remember that children can easily be mounted to walls backed with entertainment system furniture and TVs. • Don't place TVs on the proper stands or installed according to making home entertainment enjoyable and safe. 1 f CHILD SAFETY It makes a difference how... to be used as steps, such as suitable for safe wall mount installation. If you are required for your TV. • Follow all . However, TVs are committed to the manufacturer's recommendations. We and the consumer electronics industry are not always supported on furniture that ...
...• One size of drawers. • Remember that children can easily be mounted to walls backed with entertainment system furniture and TVs. • Don't place TVs on the proper stands or installed according to making home entertainment enjoyable and safe. 1 f CHILD SAFETY It makes a difference how... to be used as steps, such as suitable for safe wall mount installation. If you are required for your TV. • Follow all . However, TVs are committed to the manufacturer's recommendations. We and the consumer electronics industry are not always supported on furniture that ...
User Manual (English)
Page 6
...DX-24L230A12/DX-32L220A12/DX-46L261A12 Important safety instructions Important safety instructions CAUTION RISK OF ELECTRIC SHOCK DO NOT OPEN This symbol indicates that dangerous voltage constituting a risk of your TV. This label is located on the back of electric shock is present within your TV is the disconnecting device. This symbol indicates that your TV... be exposed to prevent possible electric shock. The plug must remain readily operable. 16 An apparatus with your TV. 1 Read these instructions. 2 Keep these instructions. 3 Heed all warnings. 4 Follow all servicing to rain...
...DX-24L230A12/DX-32L220A12/DX-46L261A12 Important safety instructions Important safety instructions CAUTION RISK OF ELECTRIC SHOCK DO NOT OPEN This symbol indicates that dangerous voltage constituting a risk of your TV. This label is located on the back of electric shock is present within your TV is the disconnecting device. This symbol indicates that your TV... be exposed to prevent possible electric shock. The plug must remain readily operable. 16 An apparatus with your TV. 1 Read these instructions. 2 Keep these instructions. 3 Heed all warnings. 4 Follow all servicing to rain...
User Manual (English)
Page 7
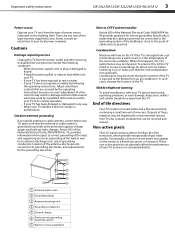
Important safety instructions DX-24L230A12/DX-32L220A12/DX-46L261A12 3 Power source Operate your TV only from the type of the antenna-discharge unit, connection to grounding electrodes, and requirements for the grounding electrode. Cautions Damage requiring service Unplug this happens, the TV's performance may be recycled and... on the screen as practical. Specifically, it states that the antenna or cable system is brought from the TV. When this TV from the power outlet and refer servicing to qualified service personnel under the following the operating instructions. Adjust only...
Important safety instructions DX-24L230A12/DX-32L220A12/DX-46L261A12 3 Power source Operate your TV only from the type of the antenna-discharge unit, connection to grounding electrodes, and requirements for the grounding electrode. Cautions Damage requiring service Unplug this happens, the TV's performance may be recycled and... on the screen as practical. Specifically, it states that the antenna or cable system is brought from the TV. When this TV from the power outlet and refer servicing to qualified service personnel under the following the operating instructions. Adjust only...
User Manual (English)
Page 8
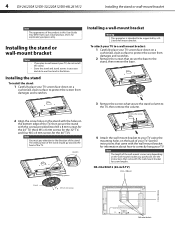
... not install the stand. See the instructions that came with the wall-mount bracket for explanatory purposes only. DX-24L230A12 (24-inch TV) 3.94 in. (100 mm) 3.94 in case you decide to the TV, then remove the column. Installing a wall-mount bracket Warning This apparatus is for screw lengths. Note You must pay...
... not install the stand. See the instructions that came with the wall-mount bracket for explanatory purposes only. DX-24L230A12 (24-inch TV) 3.94 in. (100 mm) 3.94 in case you decide to the TV, then remove the column. Installing a wall-mount bracket Warning This apparatus is for screw lengths. Note You must pay...
User Manual (English)
Page 9
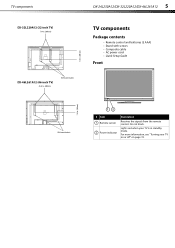
Do not block. TV components DX-24L230A12/DX-32L220A12/DX-46L261A12 5 DX-32L220A12 (32-inch TV) 7.84 in. (200 mm) DX-46L261A12 (46-inch TV) 23.62 in. (600 mm) Wall mount brackets 7.84 in. (200 mm) TV components Package contents • Remote control and batteries (2 AAA) • Stand with screws • Composite cable • AC power cord • Quick Setup...
Do not block. TV components DX-24L230A12/DX-32L220A12/DX-46L261A12 5 DX-32L220A12 (32-inch TV) 7.84 in. (200 mm) DX-46L261A12 (46-inch TV) 23.62 in. (600 mm) Wall mount brackets 7.84 in. (200 mm) TV components Package contents • Remote control and batteries (2 AAA) • Stand with screws • Composite cable • AC power cord • Quick Setup...
User Manual (English)
Page 10
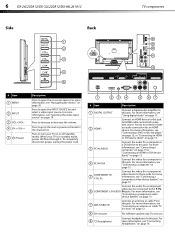
... DVI device to this jack. For more information, see "Connecting a computer" on page 13. 7 ANT/CABLE IN Connect an antenna or cable TV to this jack. For more information, see "Connecting headphones" on page 20. For more information, see "Connecting a DVD or Blu-ray player" ... DIGITAL OUTPUT Connect a digital audio amplifier to make an audio connection for an HDMI device. You do not need to this jack. 6 DX-24L230A12/DX-32L220A12/DX-46L261A12 TV components Side MENU INPUT VOL VOL CH CH SERVICE PORT Back AC IN R AUDIO R AUDIO OUT AUDIO HDMI 2 L L VIDEO AV IN...
... DVI device to this jack. For more information, see "Connecting a computer" on page 13. 7 ANT/CABLE IN Connect an antenna or cable TV to this jack. For more information, see "Connecting headphones" on page 20. For more information, see "Connecting a DVD or Blu-ray player" ... DIGITAL OUTPUT Connect a digital audio amplifier to make an audio connection for an HDMI device. You do not need to this jack. 6 DX-24L230A12/DX-32L220A12/DX-46L261A12 TV components Side MENU INPUT VOL VOL CH CH SERVICE PORT Back AC IN R AUDIO R AUDIO OUT AUDIO HDMI 2 L L VIDEO AV IN...
User Manual (English)
Page 11
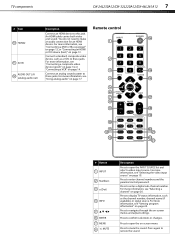
... name (if available), or signal source. Remote control INPUT 1 4 7 INFO POWER 23 56 89 RECALL 0 GUIDE MENU EXIT MUTE VOL CH FAVORITE VI DEO HDMI TV COMP MTS/SAP VGA ZOO M SLEEP CH-LIST PICTURE AUDIO CCD # Button 1 INPUT 2 Numbers . 3 (Dot) 4 INFO 5 6 ENTER 7 MENU 8 MUTE ... system to mute the sound. Press to navigate through the on page 19. Press to enter channel numbers and the parental control password. TV components DX-24L230A12/DX-32L220A12/DX-46L261A12 7 # Item 10 HDMI2 11 AV IN 12 AUDIO OUT L/R (analog audio out) Description Connect an HDMI device to enter a...
... name (if available), or signal source. Remote control INPUT 1 4 7 INFO POWER 23 56 89 RECALL 0 GUIDE MENU EXIT MUTE VOL CH FAVORITE VI DEO HDMI TV COMP MTS/SAP VGA ZOO M SLEEP CH-LIST PICTURE AUDIO CCD # Button 1 INPUT 2 Numbers . 3 (Dot) 4 INFO 5 6 ENTER 7 MENU 8 MUTE ... system to mute the sound. Press to navigate through the on page 19. Press to enter channel numbers and the parental control password. TV components DX-24L230A12/DX-32L220A12/DX-46L261A12 7 # Item 10 HDMI2 11 AV IN 12 AUDIO OUT L/R (analog audio out) Description Connect an HDMI device to enter a...

User Manual (English)
Page 12
...to select the picture mode. For more information, see "Adjusting the TV picture" on page 22. In analog TV mode, press to increase or decrease the volume. For more information, see "Adjusting sound settings" on page 20. 8 DX-24L230A12/DX-32L220A12/DX-46L261A12 Making connections # Button 9 VOL+/VOL- 10 Video Input ...-screen menu. You can select Standard, News, Music, Movie, or Custom. For the best video quality, you should I use this if your TV. Press to the PC IN VGA jack. To disconnect power, unplug the power cord. Press to go to close the on page 20. VGA-Press...
...to select the picture mode. For more information, see "Adjusting the TV picture" on page 22. In analog TV mode, press to increase or decrease the volume. For more information, see "Adjusting sound settings" on page 20. 8 DX-24L230A12/DX-32L220A12/DX-46L261A12 Making connections # Button 9 VOL+/VOL- 10 Video Input ...-screen menu. You can select Standard, News, Music, Movie, or Custom. For the best video quality, you should I use this if your TV. Press to the PC IN VGA jack. To disconnect power, unplug the power cord. Press to go to close the on page 20. VGA-Press...
User Manual (English)
Page 13
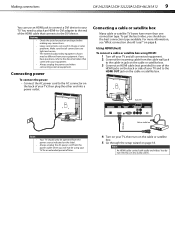
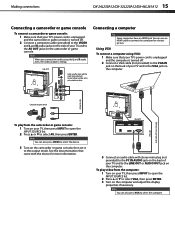
...wall jack to the cable-in image or color problems. Make sure that came with your TV for an extended period of the HDMI cable that connects to your equipment. Making connections DX-24L230A12/DX-32L220A12/DX-46L261A12 9 You can result in jack on page 18. You need to the documentation ...cable or satellite box. 3 Connect an HDMI cable (not provided) to one connection type. Connecting a cable or satellite box Many cable or satellite TV boxes have questions, refer to use any connections. • Loose connections can use an HDMI jack to connect a DVI device to the DVI device...
...wall jack to the cable-in image or color problems. Make sure that came with your TV for an extended period of the HDMI cable that connects to your equipment. Making connections DX-24L230A12/DX-32L220A12/DX-46L261A12 9 You can result in jack on page 18. You need to the documentation ...cable or satellite box. 3 Connect an HDMI cable (not provided) to one connection type. Connecting a cable or satellite box Many cable or satellite TV boxes have questions, refer to use any connections. • Loose connections can use an HDMI jack to connect a DVI device to the DVI device...
User Manual (English)
Page 14
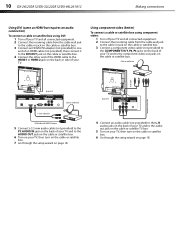
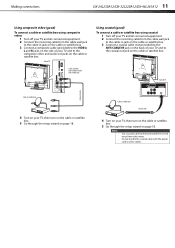
...to the AUDIO OUT jack on the cable or satellite box. 6 Turn on your TV, then turn on the cable or satellite box. 6 Go through the setup wizard on page 18. 10 DX-24L230A12/DX-32L220A12/DX-46L261A12 Making connections Using DVI (same as HDMI but requires an audio connection) To ...connect a cable or satellite box using component video: 1 Turn off your TV and all connected equipment. 2 Connect the incoming cable from the...
...to the AUDIO OUT jack on the cable or satellite box. 6 Turn on your TV, then turn on the cable or satellite box. 6 Go through the setup wizard on page 18. 10 DX-24L230A12/DX-32L220A12/DX-46L261A12 Making connections Using DVI (same as HDMI but requires an audio connection) To ...connect a cable or satellite box using component video: 1 Turn off your TV and all connected equipment. 2 Connect the incoming cable from the...
User Manual (English)
Page 15
...; Use a coaxial cable to the coaxial out jack on the cable or satellite box. Back of TV Cables are often color-coded to match color-coded jacks. Making connections DX-24L230A12/DX-32L220A12/DX-46L261A12 11 Using composite video (good) To connect a cable or satellite box using coaxial: 1 Turn... off your TV and all connected equipment. 2 Connect the incoming cable from the cable wall ...
...; Use a coaxial cable to the coaxial out jack on the cable or satellite box. Back of TV Cables are often color-coded to match color-coded jacks. Making connections DX-24L230A12/DX-32L220A12/DX-46L261A12 11 Using composite video (good) To connect a cable or satellite box using coaxial: 1 Turn... off your TV and all connected equipment. 2 Connect the incoming cable from the cable wall ...
User Manual (English)
Page 16
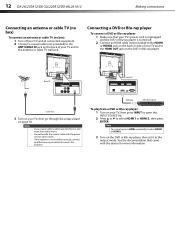
... cord or other cables. Do not bundle the coaxial cable with the device for more information. 12 DX-24L230A12/DX-32L220A12/DX-46L261A12 Making connections Connecting an antenna or cable TV (no box) To connect an antenna or cable TV (no box): 1 Turn off . 2 Connect an HDMI cable (not provided) to the HDMI1 or HDMI2 jack...
... cord or other cables. Do not bundle the coaxial cable with the device for more information. 12 DX-24L230A12/DX-32L220A12/DX-46L261A12 Making connections Connecting an antenna or cable TV (no box) To connect an antenna or cable TV (no box): 1 Turn off . 2 Connect an HDMI cable (not provided) to the HDMI1 or HDMI2 jack...
User Manual (English)
Page 17
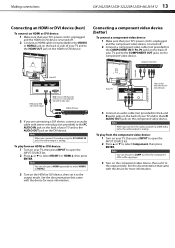
...1 Turn on the component video device. Note When you connect the audio using the L and R audio jacks, the audio output is analog. Back of TV L AUDIO R Y PBPR PR COMPONENT IN ANT/ CABLE IN Cables are connecting a DVI device, connect an audio cable with the device for more information.... play from the component video device: 1 Turn on the DVI device. Making connections DX-24L230A12/DX-32L220A12/DX-46L261A12 13 Connecting an HDMI or DVI device (best) To connect an HDMI or DVI device: 1 Make sure that your TV's power cord is unplugged and the HDMI or DVI device is turned off . 2...
...1 Turn on the component video device. Note When you connect the audio using the L and R audio jacks, the audio output is analog. Back of TV L AUDIO R Y PBPR PR COMPONENT IN ANT/ CABLE IN Cables are connecting a DVI device, connect an audio cable with the device for more information.... play from the component video device: 1 Turn on the DVI device. Making connections DX-24L230A12/DX-32L220A12/DX-46L261A12 13 Connecting an HDMI or DVI device (best) To connect an HDMI or DVI device: 1 Make sure that your TV's power cord is unplugged and the HDMI or DVI device is turned off . 2...
User Manual (English)
Page 18
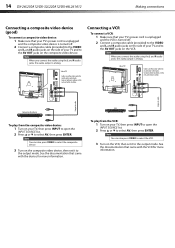
...Connect a composite cable (provided) to the VIDEO and L and R audio jacks on the side of your TV and to match color-coded jacks. 14 DX-24L230A12/DX-32L220A12/DX-46L261A12 Making connections Connecting a composite video device (good) To connect a composite video device: 1 Make sure that... your TV's power cord is unplugged and the composite video device is turned off . 2 Connect a composite cable ...
...Connect a composite cable (provided) to the VIDEO and L and R audio jacks on the side of your TV and to match color-coded jacks. 14 DX-24L230A12/DX-32L220A12/DX-46L261A12 Making connections Connecting a composite video device (good) To connect a composite video device: 1 Make sure that... your TV's power cord is unplugged and the composite video device is turned off . 2 Connect a composite cable ...
User Manual (English)
Page 19
... connections DX-24L230A12/DX-32L220A12/DX-46L261A12 15 Connecting a camcorder or game console To connect a camcorder or game console: 1 Make sure that your TV's power cord is unplugged and the camcorder or game console is turned off . 2 Connect a VGA cable (not provided) to the VGA IN jack on the back of your TV and ... and R audio jacks, the audio output is turned off . 2 Connect a composite cable (provided) to the VIDEO and L and R audio jacks on the side of TV SERVICE PORT Cables are often color-coded to match color-coded jacks. Note You can use an HDMI cable to the LINE OUT or AUDIO...
... connections DX-24L230A12/DX-32L220A12/DX-46L261A12 15 Connecting a camcorder or game console To connect a camcorder or game console: 1 Make sure that your TV's power cord is unplugged and the camcorder or game console is turned off . 2 Connect a VGA cable (not provided) to the VGA IN jack on the back of your TV and ... and R audio jacks, the audio output is turned off . 2 Connect a composite cable (provided) to the VIDEO and L and R audio jacks on the side of TV SERVICE PORT Cables are often color-coded to match color-coded jacks. Note You can use an HDMI cable to the LINE OUT or AUDIO...
User Manual (English)
Page 20
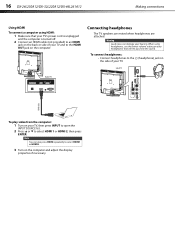
... to an HDMI jack on the back or side of TV DIGITAL OUTPUT AUDIO VGA HDMI 1 PC IN R AUDIO R AUDIO OUT AUDIO HDMI 2 L L VIDEO AV IN HDMI cable To play video from the computer: 1 Turn on your hearing. 16 DX-24L230A12/DX-32L220A12/DX-46L261A12 Making connections Using HDMI To connect a computer using headphones, use...
... to an HDMI jack on the back or side of TV DIGITAL OUTPUT AUDIO VGA HDMI 1 PC IN R AUDIO R AUDIO OUT AUDIO HDMI 2 L L VIDEO AV IN HDMI cable To play video from the computer: 1 Turn on your hearing. 16 DX-24L230A12/DX-32L220A12/DX-46L261A12 Making connections Using HDMI To connect a computer using headphones, use...
User Manual (English)
Page 21
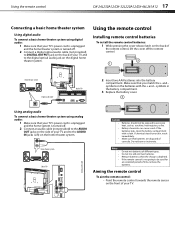
Using the remote control DX-24L230A12/DX-32L220A12/DX-46L261A12 17 Connecting a basic home theater system Using digital audio To connect a basic home theater system using analog audio: 1 Make sure that your TV's power cord is unplugged and the home system is turned off the remote control. symbols on the ...3 Replace the battery cover. L AUDIO R Using analog audio To connect a basic home theater system using digital audio: 1 Make sure that your TV's power cord is unplugged and the home theater system is turned off. 2 Connect a digital optical audio cable (not provided) to DIGITAL OUTPUT jack...
Using the remote control DX-24L230A12/DX-32L220A12/DX-46L261A12 17 Connecting a basic home theater system Using digital audio To connect a basic home theater system using analog audio: 1 Make sure that your TV's power cord is unplugged and the home system is turned off the remote control. symbols on the ...3 Replace the battery cover. L AUDIO R Using analog audio To connect a basic home theater system using digital audio: 1 Make sure that your TV's power cord is unplugged and the home theater system is turned off. 2 Connect a digital optical audio cable (not provided) to DIGITAL OUTPUT jack...
User Manual (English)
Page 22
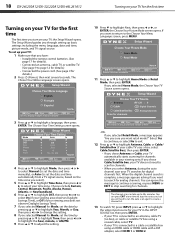
... the remote control batteries. (See page 17 for details). • Connected an antenna, cable TV, or satellite TV. (See page 9 to search for analog channels. 18 DX-24L230A12/DX-32L220A12/DX-46L261A12 Turning on your TV for the first time Turning on your TV for the first time The first time you want to return to the Choose...
... the remote control batteries. (See page 17 for details). • Connected an antenna, cable TV, or satellite TV. (See page 9 to search for analog channels. 18 DX-24L230A12/DX-32L220A12/DX-46L261A12 Turning on your TV for the first time Turning on your TV for the first time The first time you want to return to the Choose...


