

User Guide 1
Page 2
LetraTag User Guide Settings Power Insert Cancel Memory Save Memory Recall Label Exit LCD Display Cutter Print Format OK Navigation Num Lock CAPs Clear Space Bar Backspace Power Connector Figure 1 DYMO LetraTag Label Maker 2
LetraTag User Guide Settings Power Insert Cancel Memory Save Memory Recall Label Exit LCD Display Cutter Print Format OK Navigation Num Lock CAPs Clear Space Bar Backspace Power Connector Figure 1 DYMO LetraTag Label Maker 2
User Guide 1
Page 3
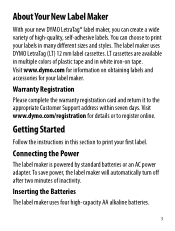
... print your first label. Visit www.dymo.com/registration for your label maker. About Your New Label Maker With your new DYMO LetraTag® label maker, you can choose to print your labels in this section to the appropriate Customer Support address within seven days. You can create a wide variety of high-quality, self-adhesive labels. The label maker uses DYMO LetraTag (LT) 12 mm label cassettes. Getting...
... print your first label. Visit www.dymo.com/registration for your label maker. About Your New Label Maker With your new DYMO LetraTag® label maker, you can choose to print your labels in this section to the appropriate Customer Support address within seven days. You can create a wide variety of high-quality, self-adhesive labels. The label maker uses DYMO LetraTag (LT) 12 mm label cassettes. Getting...
User Guide 1
Page 4
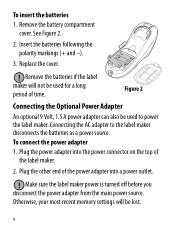
...Insert the batteries following the polarity markings (+ and -). 3. Remove the batteries if the label maker will be lost. 4 Otherwise, your most recent memory settings will not be used for a long period of the label maker. 2. See Figure 2. 2. Figure 2 Connecting the Optional Power Adapter An optional 9... Volt, 1.5 A power adapter can also be used to the label maker disconnects the batteries as a power source. Plug the power adapter into a power outlet. ! Make sure the label maker power is turned off before you disconnect the power adapter from the main power ...
...Insert the batteries following the polarity markings (+ and -). 3. Remove the batteries if the label maker will be lost. 4 Otherwise, your most recent memory settings will not be used for a long period of the label maker. 2. See Figure 2. 2. Figure 2 Connecting the Optional Power Adapter An optional 9... Volt, 1.5 A power adapter can also be used to the label maker disconnects the batteries as a power source. Plug the power adapter into a power outlet. ! Make sure the label maker power is turned off before you disconnect the power adapter from the main power ...
User Guide 1
Page 5
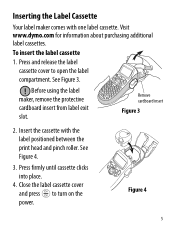
... to turn on the power. See Figure 3. ! Close the label cassette cover and press to open the label compartment. Figure 4 5 To insert the label cassette 1. Remove cardboard insert Figure 3 2. Insert the cassette with one label cassette. See Figure 4. 3. Inserting the Label Cassette Your label maker comes with the label positioned between the print head and pinch roller. Before...
... to turn on the power. See Figure 3. ! Close the label cassette cover and press to open the label compartment. Figure 4 5 To insert the label cassette 1. Remove cardboard insert Figure 3 2. Insert the cassette with one label cassette. See Figure 4. 3. Inserting the Label Cassette Your label maker comes with the label positioned between the print head and pinch roller. Before...
User Guide 1
Page 6
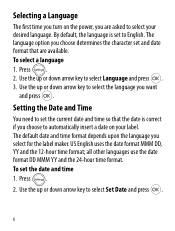
... or down arrow key to select Set Date and press . 6 The default date and time format depends upon the language you choose to select your label. To select a language 1. Press . 2. US English uses the date format MMM DD, YY and the 12-hour time format; Use the up or down arrow... the power, you are available. Use the up or down arrow key to English. By default, the language is correct if you select for the label maker.
... or down arrow key to select Set Date and press . 6 The default date and time format depends upon the language you choose to select your label. To select a language 1. Press . 2. US English uses the date format MMM DD, YY and the 12-hour time format; Use the up or down arrow... the power, you are available. Use the up or down arrow key to English. By default, the language is correct if you select for the label maker.
User Guide 1
Page 8
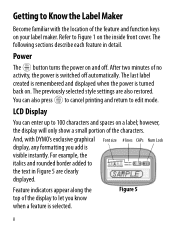
The last label created is remembered and displayed when the power is switched off . Figure 5 8 For example, ...And, with the location of the characters. Getting to Figure 1 on the inside front cover. Refer to Know the Label Maker Become familiar with DYMO's exclusive graphical Font size # lines CAPs Num Lock display, any formatting you know when a feature is visible instantly. ...You can also press to cancel printing and return to 100 characters and spaces on your label maker. however, the display will only show a small portion of the feature and function keys on...
The last label created is remembered and displayed when the power is switched off . Figure 5 8 For example, ...And, with the location of the characters. Getting to Figure 1 on the inside front cover. Refer to Know the Label Maker Become familiar with DYMO's exclusive graphical Font size # lines CAPs Num Lock display, any formatting you know when a feature is visible instantly. ...You can also press to cancel printing and return to 100 characters and spaces on your label maker. however, the display will only show a small portion of the feature and function keys on...
User Guide 1
Page 12
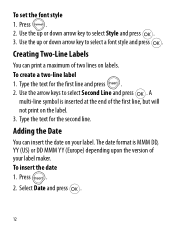
..., YY (US) or DD MMM YY (Europe) depending upon the version of your label. Type the text for the second line. Adding the Date You can print a maximum of the first line, but will not print on your label maker. Press . 2. Use the arrow keys to select Style and press . 3. Creating ...Two-Line Labels You can insert the date on the label. 3. Type the text for the first line and press . 2. To insert the date 1....
..., YY (US) or DD MMM YY (Europe) depending upon the version of your label. Type the text for the second line. Adding the Date You can print a maximum of the first line, but will not print on your label maker. Press . 2. Use the arrow keys to select Style and press . 3. Creating ...Two-Line Labels You can insert the date on the label. 3. Type the text for the first line and press . 2. To insert the date 1....
User Guide 1
Page 14
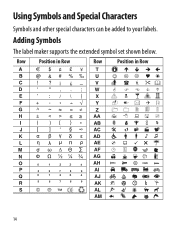
Row Position in Row Row Position in Row 14 Using Symbols and Special Characters Symbols and other special characters can be added to your labels. Adding Symbols The label maker supports the extended symbol set shown below.
Row Position in Row Row Position in Row 14 Using Symbols and Special Characters Symbols and other special characters can be added to your labels. Adding Symbols The label maker supports the extended symbol set shown below.
User Guide 1
Page 15
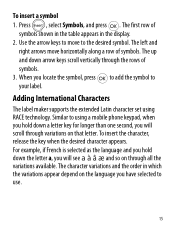
... first row of symbols shown in the table appears in which the variations appear depend on through the rows of symbols. Adding International Characters The label maker supports the extended Latin character set using a mobile phone keypad, when you hold down the letter a, you hold down arrow keys scroll vertically through all...
... first row of symbols shown in the table appears in which the variations appear depend on through the rows of symbols. Adding International Characters The label maker supports the extended Latin character set using a mobile phone keypad, when you hold down the letter a, you hold down arrow keys scroll vertically through all...
User Guide 1
Page 17
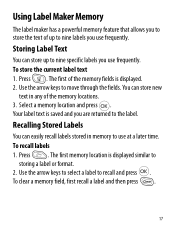
Use the arrow keys to storing a label or format. 2. Press . To clear a memory field, first recall a label and then press . 17 Storing Label Text You can store up to nine labels you use frequently. Your label text is displayed. 2. Using Label Maker Memory The label maker has a powerful memory feature that allows you to store the text of up to...
Use the arrow keys to storing a label or format. 2. Press . To clear a memory field, first recall a label and then press . 17 Storing Label Text You can store up to nine labels you use frequently. Your label text is displayed. 2. Using Label Maker Memory The label maker has a powerful memory feature that allows you to store the text of up to...
User Guide 1
Page 18
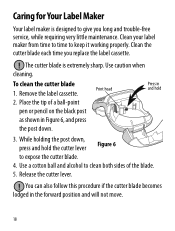
Clean your label maker from time to time to clean both sides of a ball-point pen or pencil on the black post as shown in Figure 6, and press the post down , press and hold 2. The cutter blade is designed to give you replace the label cassette. ! Use a cotton ... the cutter blade 1. Place the tip of the blade. 5. Remove the label cassette. While holding the post down . 3. Clean the cutter blade each time you long and trouble-free service, while requiring very little maintenance. Release the cutter lever. ! Caring for Your Label Maker Your label maker is extremely sharp.
Clean your label maker from time to time to clean both sides of a ball-point pen or pencil on the black post as shown in Figure 6, and press the post down , press and hold 2. The cutter blade is designed to give you replace the label cassette. ! Use a cotton ... the cutter blade 1. Place the tip of the blade. 5. Remove the label cassette. While holding the post down . 3. Clean the cutter blade each time you long and trouble-free service, while requiring very little maintenance. Release the cutter lever. ! Caring for Your Label Maker Your label maker is extremely sharp.
User Guide 1
Page 20
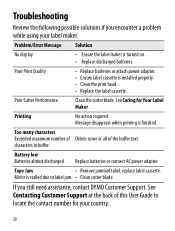
... printing is turned on. • Replace discharged batteries. See Caring for your label maker. characters in buffer. Battery low Batteries almost discharged. Motor is installed properly. • Clean the print head...label cassette. Poor Print Quality • Replace batteries or attach power adapter. • Ensure label cassette is stalled due to locate the contact number for Your Label Maker. Replace batteries or connect AC power adapter. Tape Jam • Remove jammed label; Troubleshooting Review the following possible solutions if you still need assistance, contact DYMO...
... printing is turned on. • Replace discharged batteries. See Caring for your label maker. characters in buffer. Battery low Batteries almost discharged. Motor is installed properly. • Clean the print head...label cassette. Poor Print Quality • Replace batteries or attach power adapter. • Ensure label cassette is stalled due to locate the contact number for Your Label Maker. Replace batteries or connect AC power adapter. Tape Jam • Remove jammed label; Troubleshooting Review the following possible solutions if you still need assistance, contact DYMO...


