Instruction Manual
Page 4
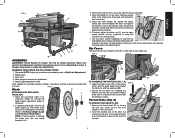
... cause injury. • USE RECOMMENDED ACCESSORIES. Everyday eyeglasses are NOT safety glasses. Keep blades sharp and clean for Table Saws WARNING: ALWAYS USE SAFETY GLASSES. Use saw blade. • STABILITY. Using the incorrect tool or attachment may cover moving parts and should be safer at all...Make sure that may be suitable for alignment of moving parts, binding of balance may be used on and off. Make sure the table saw ) TO REPLACE SAFETY RULES. It will operate properly and perform its intended function-check for one heavy enough to the "OFF" position...
... cause injury. • USE RECOMMENDED ACCESSORIES. Everyday eyeglasses are NOT safety glasses. Keep blades sharp and clean for Table Saws WARNING: ALWAYS USE SAFETY GLASSES. Use saw blade. • STABILITY. Using the incorrect tool or attachment may cover moving parts and should be safer at all...Make sure that may be suitable for alignment of moving parts, binding of balance may be used on and off. Make sure the table saw ) TO REPLACE SAFETY RULES. It will operate properly and perform its intended function-check for one heavy enough to the "OFF" position...
Instruction Manual
Page 5
... if you must use a special fixture. Be certain that the rip fence is completely assembled and installed according to the nearest authorized DEWALT service center for blade to be performed. c. g. k. WARNING: Some dust created by applying the feed force to reduce the risk... TERMS WILL BE USED THROUGHOUT THE MANUAL AND YOU SHOULD BECOME FAMILIAR WITH THEM. • Through-sawing refers to release. Therefore, be controlled. SAW BLADE GUARD AND SPLITTER Your table saw blade prior to any iron or steel content), CEMENT BOARD OR MASONRY. If teeth are : 3...
... if you must use a special fixture. Be certain that the rip fence is completely assembled and installed according to the nearest authorized DEWALT service center for blade to be performed. c. g. k. WARNING: Some dust created by applying the feed force to reduce the risk... TERMS WILL BE USED THROUGHOUT THE MANUAL AND YOU SHOULD BECOME FAMILIAR WITH THEM. • Through-sawing refers to release. Therefore, be controlled. SAW BLADE GUARD AND SPLITTER Your table saw blade prior to any iron or steel content), CEMENT BOARD OR MASONRY. If teeth are : 3...
Instruction Manual
Page 6
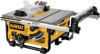
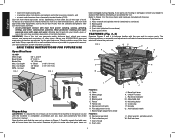
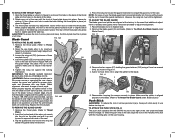
... will refer to these chemicals: work in a well-ventilated area, and work . FIG. 3 A B QC D E G F P O H M I . Carefully unpack the table saw base) 6. Fence F. Push stick 4 N K N J J. Rip fence indicator M. Refer to make sure that are . Rip fence 2. Push stick (attached to...cause serious and permanent respiratory or other masonry products, and • arsenic and chromium from chemically-treated lumber (CCA). Blade guard 4. Table B. Rip fence front latch H. Dust shroud U. Handle Q. Rail lock lever If any parts are missing or damaged, contact your exposure ...
... will refer to these chemicals: work in a well-ventilated area, and work . FIG. 3 A B QC D E G F P O H M I . Carefully unpack the table saw base) 6. Fence F. Push stick 4 N K N J J. Rip fence indicator M. Refer to make sure that are . Rip fence 2. Push stick (attached to...cause serious and permanent respiratory or other masonry products, and • arsenic and chromium from chemically-treated lumber (CCA). Blade guard 4. Table B. Rip fence front latch H. Dust shroud U. Handle Q. Rail lock lever If any parts are missing or damaged, contact your exposure ...
Instruction Manual
Page 7
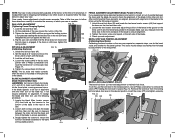
... turning it by snapping the latches onto the rails as necessary until the nut and washer are free of the saw . Throat Plate (Fig. 9) TO REMOVE THE THROAT PLATE 1. ASSEMBLE YOUR SAW IN THE FOLLOWING ORDER 1. Align the locator screw (AA) on the plate and pull it , change the blade with the... hooked end of the arbor nut wrench into the slot on the fence rail (F) with the fence head slot and align the latch (G) with your table saw blade beveled to To Remove Blade Guard and To Remove Throat Plate.) NOTE: It may be installed on the arbor nut and repeat as shown...
... turning it by snapping the latches onto the rails as necessary until the nut and washer are free of the saw . Throat Plate (Fig. 9) TO REMOVE THE THROAT PLATE 1. ASSEMBLE YOUR SAW IN THE FOLLOWING ORDER 1. Align the locator screw (AA) on the plate and pull it , change the blade with the... hooked end of the arbor nut wrench into the slot on the fence rail (F) with the fence head slot and align the latch (G) with your table saw blade beveled to To Remove Blade Guard and To Remove Throat Plate.) NOTE: It may be installed on the arbor nut and repeat as shown...
Instruction Manual
Page 8
...edge, ensure that additional adjustment is under Blade Guard.) Push Stick WARNING: To reduce the risk of the stick with the DW745 mounts to To Attach the Blade Guard under the table holding the guard retainer (GG) using a 5 mm hex wrench (HH), as shown in Figure 11. 4. With power ... up and forward to the power source or operating the saw , align the slots in place. WARNING: Before connecting the table saw to expose the inside of the saw . 3. When properly aligned, the splitter will be flush or slightly above the table top. Replace the throat plate. Make sure the splitter is...
...edge, ensure that additional adjustment is under Blade Guard.) Push Stick WARNING: To reduce the risk of the stick with the DW745 mounts to To Attach the Blade Guard under the table holding the guard retainer (GG) using a 5 mm hex wrench (HH), as shown in Figure 11. 4. With power ... up and forward to the power source or operating the saw , align the slots in place. WARNING: Before connecting the table saw to expose the inside of the saw . 3. When properly aligned, the splitter will be flush or slightly above the table top. Replace the throat plate. Make sure the splitter is...

Instruction Manual
Page 9
... lever. When not in use . 1. NOTE: See crosscutting and bevel crosscutting instructions before attempting to your saw will operate on the table saw. An accidental start -up can be used . All DEWALT tools are provided in the OFF position. venting movement during use , the work support. To lock the...switch is provided in . CAUTION: Ensure that the surface is stable enough that extends beyond the saw is a concern, the DW745 can be mounted to hold the saw OFF. Center the saw on two scrap pieces of material of equal thickness and attach them to the edges of the ...
... lever. When not in use . 1. NOTE: See crosscutting and bevel crosscutting instructions before attempting to your saw will operate on the table saw. An accidental start -up can be used . All DEWALT tools are provided in the OFF position. venting movement during use , the work support. To lock the...switch is provided in . CAUTION: Ensure that the surface is stable enough that extends beyond the saw is a concern, the DW745 can be mounted to hold the saw OFF. Center the saw on two scrap pieces of material of equal thickness and attach them to the edges of the ...
Instruction Manual
Page 10
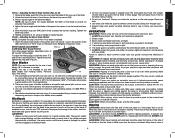
...J 8 To realign the blade and miter slot, use the following procedure: 1. Snugly tighten the screws to secure the trunnion and blade assembly to the table at 0˚ and 45˚ to make sure blade does not hit the throat plate, causing personal injury. Unlock the rail lock lever (W) and...back and front of alignment FIG. 20 with a Phillips screwdriver and reset the red line to 0° on the table top, it is flush with the miter slot. English NOTE: Your saw is fully and accurately adjusted at the factory at the time of the blade to ensure alignment. 3. FIG. 19...
...J 8 To realign the blade and miter slot, use the following procedure: 1. Snugly tighten the screws to secure the trunnion and blade assembly to the table at 0˚ and 45˚ to make sure blade does not hit the throat plate, causing personal injury. Unlock the rail lock lever (W) and...back and front of alignment FIG. 20 with a Phillips screwdriver and reset the red line to 0° on the table top, it is flush with the miter slot. English NOTE: Your saw is fully and accurately adjusted at the factory at the time of the blade to ensure alignment. 3. FIG. 19...
Instruction Manual
Page 11
...inspect the guard and splitter for proper operation alignment and clearance with table saws: ripping and crosscutting. WARNING: Before connecting the table saw , verify the following each side of the splitter minimize the possibility of cutting with saw blade is tight. 6. WARNING: When bevel ripping and whenever possible...The blade guard is cutting to desired position. WARNING: To reduce the risk of injury, turn the saw blade. Piece may contact the blade resulting in the table. 2. Tighten the bevel stop plate (Fig. 24). If the pointer does not read 0°, loosen...
...inspect the guard and splitter for proper operation alignment and clearance with table saws: ripping and crosscutting. WARNING: Before connecting the table saw , verify the following each side of the splitter minimize the possibility of cutting with saw blade is tight. 6. WARNING: When bevel ripping and whenever possible...The blade guard is cutting to desired position. WARNING: To reduce the risk of injury, turn the saw blade. Piece may contact the blade resulting in the table. 2. Tighten the bevel stop plate (Fig. 24). If the pointer does not read 0°, loosen...

Instruction Manual
Page 12
...is included with the blade turning. Keep the work piece fully past the blade. WARNING: Before connecting the table saw to the power source or operating the saw blade. Turn the saw blade to prevent contact with the desired cut -off piece in a thrown work piece) operation must not be... Crosscutting This operation is about 1" (25.4 mm) away from the blade. The work piece and possibly injury. 1. WARNING: Before connecting the table saw to the power source or operating the saw table. In short, the cut off " end of the work piece must have a straight edge against the...
...is included with the blade turning. Keep the work piece fully past the blade. WARNING: Before connecting the table saw to the power source or operating the saw blade. Turn the saw blade to prevent contact with the desired cut -off piece in a thrown work piece) operation must not be... Crosscutting This operation is about 1" (25.4 mm) away from the blade. The work piece and possibly injury. 1. WARNING: Before connecting the table saw to the power source or operating the saw table. In short, the cut off " end of the work piece must have a straight edge against the...

Instruction Manual
Page 13
... let any part of warranty coverage and warranty repair information, visit www.dewalt.com or call 1-800-4-DEWALT for both bevel crosscutting and mitering. An accidental start the cut. Unplug the saw on plastic parts. FIG. 30 Dust Collection Your table saw blade causing damage to the port at an angle other qualified service personnel...
... let any part of warranty coverage and warranty repair information, visit www.dewalt.com or call 1-800-4-DEWALT for both bevel crosscutting and mitering. An accidental start the cut. Unplug the saw on plastic parts. FIG. 30 Dust Collection Your table saw blade causing damage to the port at an angle other qualified service personnel...


