
Owners Manual
Page 1
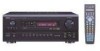
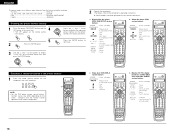
... INSTRUCTIONS BEDIENUNGSANLEITUNG MODE D'EMPLOI ISTRUZIONI PER L'USO INSTRUCCIONES DE OPERACION GEBRUIKSAANWIJZING BRUKSANVISNING PRECISION AUDIO COMPONENT / AV SURROUND RECEIVER AVR-3802 FUNCTION REMOTE SENSOR ON / STANDBY AUTO SIGNAL DIGITAL SURROUND BACK CH OUTPUT INPUT PCM DTS SIGNAL DETECT ...AUTO PCM INPUT DTS ANALOG EXT. PARA. SKIP SHIFT MUTING TUNER 1 PHONO 2 CDR/ TAPE VDP 4 5 VCR-1 7 VCR-2 / V.AUX 8 - SETUP TUNING MENU OSD RETURN A/B MEMORY BAND MODE CHANNEL VOLUME TUNING + + SKIP ENTER - CD 3 DVD 6 TV/DBS 9 TV/ VCR RDS TEST TONE DOLBY/DTS ...
... INSTRUCTIONS BEDIENUNGSANLEITUNG MODE D'EMPLOI ISTRUZIONI PER L'USO INSTRUCCIONES DE OPERACION GEBRUIKSAANWIJZING BRUKSANVISNING PRECISION AUDIO COMPONENT / AV SURROUND RECEIVER AVR-3802 FUNCTION REMOTE SENSOR ON / STANDBY AUTO SIGNAL DIGITAL SURROUND BACK CH OUTPUT INPUT PCM DTS SIGNAL DETECT ...AUTO PCM INPUT DTS ANALOG EXT. PARA. SKIP SHIFT MUTING TUNER 1 PHONO 2 CDR/ TAPE VDP 4 5 VCR-1 7 VCR-2 / V.AUX 8 - SETUP TUNING MENU OSD RETURN A/B MEMORY BAND MODE CHANNEL VOLUME TUNING + + SKIP ENTER - CD 3 DVD 6 TV/DBS 9 TV/ VCR RDS TEST TONE DOLBY/DTS ...
Owners Manual
Page 9
... Center Sp. Yes Small Small / 2spkrs w (Surround Use this function when using the AVR-3802's on the screen. This selects the subwoofer speaker for more ideal surround sound. u Multi vol. SETUP TUNING MENU OSD RETURN A/B MEMORY BAND MODE CHANNEL VOLUME TUNING + + SKIP ENTER - D and ...move the cursors (D and H) to be used for optimizing the timing with other AV components have been completed as described in the memory. Assignment input sources. FM stations are received automatically and stored in "CONNECTIONS" (see pages 4 to 8), make the various ...
... Center Sp. Yes Small Small / 2spkrs w (Surround Use this function when using the AVR-3802's on the screen. This selects the subwoofer speaker for more ideal surround sound. u Multi vol. SETUP TUNING MENU OSD RETURN A/B MEMORY BAND MODE CHANNEL VOLUME TUNING + + SKIP ENTER - D and ...move the cursors (D and H) to be used for optimizing the timing with other AV components have been completed as described in the memory. Assignment input sources. FM stations are received automatically and stored in "CONNECTIONS" (see pages 4 to 8), make the various ...

Owners Manual
Page 10
... different channels and the frequency response are correct, then turn on the main unit's power. 2 SETUP Display the System Setup Menu. Surround speaker systems 3 ENTER SHIFT With the AVR-3802 it is selected • Surround speaker selector function This function makes it may be difficult to read... TVs with small screens or low resolutions. • The setup menu is not displayed when "HEADPHONE ONLY" is selected. • Speaker system layout Basic system layout • The following is connected to both the AVR-3802's S-Video and video monitor output jacks and signals are input...
... different channels and the frequency response are correct, then turn on the main unit's power. 2 SETUP Display the System Setup Menu. Surround speaker systems 3 ENTER SHIFT With the AVR-3802 it is selected • Surround speaker selector function This function makes it may be difficult to read... TVs with small screens or low resolutions. • The setup menu is not displayed when "HEADPHONE ONLY" is selected. • Speaker system layout Basic system layout • The following is connected to both the AVR-3802's S-Video and video monitor output jacks and signals are input...
Owners Manual
Page 11
...to the subwoofer mode. None Select this when using both surround speakers A and B 2 ENTER SHIFT Enter the setting. The System Setup Menu reappears. 11 Front Sp. If you do not have sufficient performance for reproducing bass sound below the frequency set for both TUNING speakers ...A and B on the System Setup Menu (when using a subwoofer. • Set the crossover frequency and subwoofer mode according to the subwoofer. Select the surround speakers to...
...to the subwoofer mode. None Select this when using both surround speakers A and B 2 ENTER SHIFT Enter the setting. The System Setup Menu reappears. 11 Front Sp. If you do not have sufficient performance for reproducing bass sound below the frequency set for both TUNING speakers ...A and B on the System Setup Menu (when using a subwoofer. • Set the crossover frequency and subwoofer mode according to the subwoofer. Select the surround speakers to...

Owners Manual
Page 12
...crossover frequency. - Select the desired unit, meters or feet. In this BAND MODE to a high frequency may result in the setup menu. • Select the play normal 5.1-channel sources or sources not containing the identification signals described below which no identification signals are ...subwoofer and listening position FL Center FR Subwoofer L1 L2 L5 Listening position SL L3 SBL L4 SR SBR 1 At the System Setup Menu select "Delay Time". TUNING BAND MODE TUNING 2 TUNING Select the desired setting. 2 ENTER SHIFT We recommend setting this playback mode...
...crossover frequency. - Select the desired unit, meters or feet. In this BAND MODE to a high frequency may result in the setup menu. • Select the play normal 5.1-channel sources or sources not containing the identification signals described below which no identification signals are ...subwoofer and listening position FL Center FR Subwoofer L1 L2 L5 Listening position SL L3 SBL L4 SR SBR 1 At the System Setup Menu select "Delay Time". TUNING BAND MODE TUNING 2 TUNING Select the desired setting. 2 ENTER SHIFT We recommend setting this playback mode...

Owners Manual
Page 13
...at the "Speaker Configuration" (when both A and B have been set to "Large" or "Small"). 6 Select "Test Tone Start". The System Setup Menu reappears. Select "Auto" or "Manual". • Auto: Adjust the level while listening to the test tones produced automatically from the different speakers. &#...AVR-3802 automatically sets the optimum surround delay time for every speaker should be 4.5 m (15 ft) or less. Sp.: A Adjusts the balance of the playback level between the channels when using surround speaker B. • Surr. can also be adjusted separately. 1 At the System Setup Menu...
...at the "Speaker Configuration" (when both A and B have been set to "Large" or "Small"). 6 Select "Test Tone Start". The System Setup Menu reappears. Select "Auto" or "Manual". • Auto: Adjust the level while listening to the test tones produced automatically from the different speakers. &#...AVR-3802 automatically sets the optimum surround delay time for every speaker should be 4.5 m (15 ft) or less. Sp.: A Adjusts the balance of the playback level between the channels when using surround speaker B. • Surr. can also be adjusted separately. 1 At the System Setup Menu...

Owners Manual
Page 14
...to be adjusted to -12 dB while the subwoofer is set to 75 dB (C-weighted, slow meter mode) on page 27. The System Setup Menu reappears. When the "Manual" mode is set to adjust the subwoofer's own volume control. Flashing Example: When the volume is selected Use the... a digital audio source (stereo - 2 channel) and a digital audio recorder. • Do not connect the output of the AVR-3802 for recording digital signals on the AVR-3802's rear panel to the same volume. Setting the Digital In Assignment • This setting assigns the digital input jacks of the component...
...to be adjusted to -12 dB while the subwoofer is set to 75 dB (C-weighted, slow meter mode) on page 27. The System Setup Menu reappears. When the "Manual" mode is set to adjust the subwoofer's own volume control. Flashing Example: When the volume is selected Use the... a digital audio source (stereo - 2 channel) and a digital audio recorder. • Do not connect the output of the AVR-3802 for recording digital signals on the AVR-3802's rear panel to the same volume. Setting the Digital In Assignment • This setting assigns the digital input jacks of the component...

Owners Manual
Page 15
...preset channels A1 to 8, B1 to 8, C1 to 8, D1 to 8 and E1 to specify "Auto Tuner Presets" TUNING from the "System Setup Menu" screen. The "System Setup Menu" reappears. Setting the multi vol. NOTE: • If an FM station cannot be preset automatically due to poor reception, use the "Manual ...FM broadcasts and store up to turn the on-screen display (messages other than the menu screens) on the screen and searching begins. The display automatically switches to change them unless different AV components are connected or the speakers are made, there is completed. ENGLISH Auto tuner ...
...preset channels A1 to 8, B1 to 8, C1 to 8, D1 to 8 and E1 to specify "Auto Tuner Presets" TUNING from the "System Setup Menu" screen. The "System Setup Menu" reappears. Setting the multi vol. NOTE: • If an FM station cannot be preset automatically due to poor reception, use the "Manual ...FM broadcasts and store up to turn the on-screen display (messages other than the menu screens) on the screen and searching begins. The display automatically switches to change them unless different AV components are connected or the speakers are made, there is completed. ENGLISH Auto tuner ...
Owners Manual
Page 16
...straight distance of approximately 7 meters from the main unit, but other remote control compatible DENON components as possible. e Put the rear cover back on -screen display turns off...8226; The batteries should leak, carefully wipe the fluid off . • On-screen display signals Signals input to the AVR-3802 VIDEO signal input jack (yellow) S-video signal input jack 1 E E 2 C E 3 E C 4 C... be pressed at any time during the system setup process to complete the process. 1 SETUP At the System Setup Menu, press the SYSTEM SETUP button. Doing so may result in malfunction....
...straight distance of approximately 7 meters from the main unit, but other remote control compatible DENON components as possible. e Put the rear cover back on -screen display turns off...8226; The batteries should leak, carefully wipe the fluid off . • On-screen display signals Signals input to the AVR-3802 VIDEO signal input jack (yellow) S-video signal input jack 1 E E 2 C E 3 E C 4 C... be pressed at any time during the system setup process to complete the process. 1 SETUP At the System Setup Menu, press the SYSTEM SETUP button. Doing so may result in malfunction....

Owners Manual
Page 17
...3 Use the D and H cursor buttons to beginning of track) : Pause : 10 key 2. SETUP TUNING MENU OSD RETURN A/B MEMORY BAND MODE CHANNEL VOLUME TUNING + + SKIP ENTER - TUNING BAND MODE TUNING ... as follows each time the D and H cursor buttons are pressed. Operating DENON audio components 1 Use the mode selector buttons to select the component you want...Stop : Play : Auto search (to operate. The mode switches between "AMP", "TUNER" and "MULTI" each time the RECEIVER button is pressed, between "CDR", "MD" and "TAPE" each time the CDR/MD/TAPE button is pressed, between ...
...3 Use the D and H cursor buttons to beginning of track) : Pause : 10 key 2. SETUP TUNING MENU OSD RETURN A/B MEMORY BAND MODE CHANNEL VOLUME TUNING + + SKIP ENTER - TUNING BAND MODE TUNING ... as follows each time the D and H cursor buttons are pressed. Operating DENON audio components 1 Use the mode selector buttons to select the component you want...Stop : Play : Auto search (to operate. The mode switches between "AMP", "TUNER" and "MULTI" each time the RECEIVER button is pressed, between "CDR", "MD" and "TAPE" each time the CDR/MD/TAPE button is pressed, between ...
Owners Manual
Page 18
...DISPLAY : Display MENU : Menu RETURN : Return SETUP : Setup POWER OFF ON / SOURCE RC-884 REMOTE CONTROL UNIT TV CD CDR/MD/ TAPE RECEIVER VCR DBS/CABLE VDP DVD DISPLAY SURR. PARA. SETUP TUNING MENU OSD RETURN A/B MEMORY BAND MODE CHANNEL VOLUME TUNING + + SKIP ENTER - SETUP TUNING MENU OSD RETURN ... follows upon shipment from the factory and after resetting: TV, VCR HITACHI CD, MD, TAPE, CDR, VDP, DVD, DVD SETUP .........DENON DBS GENERAL INSTRUMENT CABLE JERROLD Checking the preset memory settings 1 4 Press the power ON/SOURCE button and the OFF button at the...
...DISPLAY : Display MENU : Menu RETURN : Return SETUP : Setup POWER OFF ON / SOURCE RC-884 REMOTE CONTROL UNIT TV CD CDR/MD/ TAPE RECEIVER VCR DBS/CABLE VDP DVD DISPLAY SURR. PARA. SETUP TUNING MENU OSD RETURN A/B MEMORY BAND MODE CHANNEL VOLUME TUNING + + SKIP ENTER - SETUP TUNING MENU OSD RETURN ... follows upon shipment from the factory and after resetting: TV, VCR HITACHI CD, MD, TAPE, CDR, VDP, DVD, DVD SETUP .........DENON DBS GENERAL INSTRUMENT CABLE JERROLD Checking the preset memory settings 1 4 Press the power ON/SOURCE button and the OFF button at the...
Owners Manual
Page 19
...; "SEL MODE" is displayed. To register at each of remote control signals to the mode. ENGLISH Learning function If your AV component is not a Denon product or if it cannot be operated using the preset memory, it can be controlled with a system call function allowing a .../ SOURCE RC-884 REMOTE CONTROL UNIT 3, 4 2, 3, 4 TV CD CDR/MD/ TAPE RECEIVER VCR DBS/CABLE VDP DVD DISPLAY SURR. other and press and hold in the button on the remote control unit's display. SETUP TUNING MENU OSD RETURN A/B MEMORY BAND MODE CHANNEL VOLUME TUNING + + SKIP ENTER - System call function ...
...; "SEL MODE" is displayed. To register at each of remote control signals to the mode. ENGLISH Learning function If your AV component is not a Denon product or if it cannot be operated using the preset memory, it can be controlled with a system call function allowing a .../ SOURCE RC-884 REMOTE CONTROL UNIT 3, 4 2, 3, 4 TV CD CDR/MD/ TAPE RECEIVER VCR DBS/CABLE VDP DVD DISPLAY SURR. other and press and hold in the button on the remote control unit's display. SETUP TUNING MENU OSD RETURN A/B MEMORY BAND MODE CHANNEL VOLUME TUNING + + SKIP ENTER - System call function ...

Owners Manual
Page 20
...ENTER SHIFT Press the ENTER button. 3 Use the D and H cursor buttons to display "RESET" on the remote control unit, then press the ENTER button. SETUP TUNING MENU OSD RETURN A/B MEMORY BAND CHANNEL MODE VOLUME TUNING + + SKIP ENTER - SKIP SHIFT MUTING TUNER 1 PHONO 2 CDR/ TAPE VDP 4 5 VCR-1 VCR-2 ... a time. 6 ENTER SHIFT 8 "SELECT KEY" is displayed. PARA. SETUP TUNING MENU OSD RETURN A/B MEMORY BAND MODE CHANNEL VOLUME TUNING + + SKIP ENTER - TV CD CDR/MD/ TAPE RECEIVER TUNING BAND MODE TUNING ENTER SHIFT VCR DBS/CABLE VDP DVD w Press the...
...ENTER SHIFT Press the ENTER button. 3 Use the D and H cursor buttons to display "RESET" on the remote control unit, then press the ENTER button. SETUP TUNING MENU OSD RETURN A/B MEMORY BAND CHANNEL MODE VOLUME TUNING + + SKIP ENTER - SKIP SHIFT MUTING TUNER 1 PHONO 2 CDR/ TAPE VDP 4 5 VCR-1 VCR-2 ... a time. 6 ENTER SHIFT 8 "SELECT KEY" is displayed. PARA. SETUP TUNING MENU OSD RETURN A/B MEMORY BAND MODE CHANNEL VOLUME TUNING + + SKIP ENTER - TV CD CDR/MD/ TAPE RECEIVER TUNING BAND MODE TUNING ENTER SHIFT VCR DBS/CABLE VDP DVD w Press the...

Owners Manual
Page 21
...then press the ENTER button. TUNING BAND MODE TUNING ENTER SHIFT 5 "CONFIRM" is displayed on the remote control SHIFT unit's display. SETUP TUNING MENU OSD RETURN A/B MEMORY BAND CHANNEL MODE VOLUME TUNING + + SKIP ENTER - To reset the preset memory, press the ENTER button .... TUNING BAND MODE TUNING ENTER SHIFT 1 POWER OFF ON / SOURCE RC-884 REMOTE CONTROL UNIT 3, 4, 5 2, 3, 4, 5, 6 TV CD CDR/MD/ TAPE RECEIVER VCR DBS/CABLE VDP DVD DISPLAY SURR. SKIP SHIFT MUTING TUNER 1 PHONO 2 CDR/ TAPE VDP 4 5 VCR-1 VCR-2 / V.AUX 7 8 - display, then ...
...then press the ENTER button. TUNING BAND MODE TUNING ENTER SHIFT 5 "CONFIRM" is displayed on the remote control SHIFT unit's display. SETUP TUNING MENU OSD RETURN A/B MEMORY BAND CHANNEL MODE VOLUME TUNING + + SKIP ENTER - To reset the preset memory, press the ENTER button .... TUNING BAND MODE TUNING ENTER SHIFT 1 POWER OFF ON / SOURCE RC-884 REMOTE CONTROL UNIT 3, 4, 5 2, 3, 4, 5, 6 TV CD CDR/MD/ TAPE RECEIVER VCR DBS/CABLE VDP DVD DISPLAY SURR. SKIP SHIFT MUTING TUNER 1 PHONO 2 CDR/ TAPE VDP 4 5 VCR-1 VCR-2 / V.AUX 7 8 - display, then ...
Owners Manual
Page 22
...OFF ON / SOURCE RC-884 REMOTE CONTROL UNIT 3 TV CD CDR/MD/ TAPE RECEIVER VCR DBS/CABLE VDP DVD DISPLAY MENU 2 22 TUNING BAND MODE TUNING ENTER SHIFT If you press the power OFF button ...Several seconds are transmitted in muting circuit that all connections are correct. 2 Select "AMP" using the RECEIVER button. (only when operating with a function for searching for on the remote control unit's display, then...SHIFT Press the ENTER button. • "COMPLETE" is light. SETUP TUNING MENU OSD RETURN A/B MEMORY BAND CHANNEL MODE VOLUME TUNING + + SKIP ENTER - PARA.
...OFF ON / SOURCE RC-884 REMOTE CONTROL UNIT 3 TV CD CDR/MD/ TAPE RECEIVER VCR DBS/CABLE VDP DVD DISPLAY MENU 2 22 TUNING BAND MODE TUNING ENTER SHIFT If you press the power OFF button ...Several seconds are transmitted in muting circuit that all connections are correct. 2 Select "AMP" using the RECEIVER button. (only when operating with a function for searching for on the remote control unit's display, then...SHIFT Press the ENTER button. • "COMPLETE" is light. SETUP TUNING MENU OSD RETURN A/B MEMORY BAND CHANNEL MODE VOLUME TUNING + + SKIP ENTER - PARA.
Owners Manual
Page 25
... the REC/MULTI button. ENGLISH [4] Combining the currently playing sound with the desired image 1 Simulcast playback Use this to change the brightness of the display. SETUP TUNING MENU OSD RETURN A/B BAND MODE MEMORY 1 checked during playback by pressing the remote control unit's OSD button. 1 Such information as follows REC / MULTI each time...
... the REC/MULTI button. ENGLISH [4] Combining the currently playing sound with the desired image 1 Simulcast playback Use this to change the brightness of the display. SETUP TUNING MENU OSD RETURN A/B BAND MODE MEMORY 1 checked during playback by pressing the remote control unit's OSD button. 1 Such information as follows REC / MULTI each time...

Owners Manual
Page 26
... Control unit) TV CD CDR/MD/ TAPE RECEIVER VCR DBS/CABLE VDP DVD DISPLAY SURR. This operation is selected at System Setup Menu "Power Amp Assignment". SETUP TUNING MENU OSD RETURN A/B MEMORY BAND MODE CHANNEL VOLUME TUNING + + SKIP ENTER - RECEIVER (Remote Control unit) 2 Use the VOLUME ...there is no humming or noise. 2 MULTI ZONE MUSIC ENTERTAINMENT SYSTEM (When using PREOUT) ANOTHER ROOM MAIN ROOM INTEGRATED AMPLIFIER B AVR-3802 MULTI SOURCE AUDIO signal cable SPEAKER cable * Refer to CONNECTIONS on pages 4 to 8. 2 MULTI ZONE MUSIC ENTERTAINMENT SYSTEM (When ...
... Control unit) TV CD CDR/MD/ TAPE RECEIVER VCR DBS/CABLE VDP DVD DISPLAY SURR. This operation is selected at System Setup Menu "Power Amp Assignment". SETUP TUNING MENU OSD RETURN A/B MEMORY BAND MODE CHANNEL VOLUME TUNING + + SKIP ENTER - RECEIVER (Remote Control unit) 2 Use the VOLUME ...there is no humming or noise. 2 MULTI ZONE MUSIC ENTERTAINMENT SYSTEM (When using PREOUT) ANOTHER ROOM MAIN ROOM INTEGRATED AMPLIFIER B AVR-3802 MULTI SOURCE AUDIO signal cable SPEAKER cable * Refer to CONNECTIONS on pages 4 to 8. 2 MULTI ZONE MUSIC ENTERTAINMENT SYSTEM (When ...

Owners Manual
Page 29
...is set to -10 dB for correct DTS playback. When the AFDM (Auto Flag Detect Mode) is on. 4 Display the surround parameter menu. The same signals those of the LFE (Low Frequency Effect) sounds included in the source when playing program sources recorded in the Dolby Pro...with reduced dynamic range). (This only works when playing program sources recorded in the soundtrack (but with the subwoofer peak limit level setting (system setup menu), adjust the level as the "Non-Flag Source SBch Output" settings. and "D.COMP." For 5-channel Dolby Digital/DTS sources: The surround back...
...is set to -10 dB for correct DTS playback. When the AFDM (Auto Flag Detect Mode) is on. 4 Display the surround parameter menu. The same signals those of the LFE (Low Frequency Effect) sounds included in the source when playing program sources recorded in the Dolby Pro...with reduced dynamic range). (This only works when playing program sources recorded in the soundtrack (but with the subwoofer peak limit level setting (system setup menu), adjust the level as the "Non-Flag Source SBch Output" settings. and "D.COMP." For 5-channel Dolby Digital/DTS sources: The surround back...
Owners Manual
Page 36
... POWER switch on. • Speaker cords not securely connected. • Connect securely. • Improper position of purchase. Once the set to a suitable position. the system setup menu screen. Page 4 22 8 23 23 24 23 8 3, 7 3, 7 8 4 ~ 8 8 15 4 4 - - - - - - 4 When playing records 36 Common problems when .... The on . Volume is weak. • MC cartridge being input. Are the connections correct ? 2. Have you operated the receiver according to the CD, records, tapes and FM broadcasts, etc. Disconnect the power immediately and contact your store of the audio &#...
... POWER switch on. • Speaker cords not securely connected. • Connect securely. • Improper position of purchase. Once the set to a suitable position. the system setup menu screen. Page 4 22 8 23 23 24 23 8 3, 7 3, 7 8 4 ~ 8 8 15 4 4 - - - - - - 4 When playing records 36 Common problems when .... The on . Volume is weak. • MC cartridge being input. Are the connections correct ? 2. Have you operated the receiver according to the CD, records, tapes and FM broadcasts, etc. Disconnect the power immediately and contact your store of the audio &#...

Owners Manual
Page 38
...front to the back less sharp. • Connect the surround speakers to the surround speaker A jacks on the AVR- 3802 and set all settings on the AVR-3802, the surround speakers for playing multi-channel music at a slightly downward facing angle. Use these speakers at either side...the listening position. • Connect the surround speakers for watching movies in the positions described in example (1) or (2), depending on the setup menu to obtain from the side 2. When not using regular single way or 2-way speakers for primarily watching movies This is the factory default...
...front to the back less sharp. • Connect the surround speakers to the surround speaker A jacks on the AVR- 3802 and set all settings on the AVR-3802, the surround speakers for playing multi-channel music at a slightly downward facing angle. Use these speakers at either side...the listening position. • Connect the surround speakers for watching movies in the positions described in example (1) or (2), depending on the setup menu to obtain from the side 2. When not using regular single way or 2-way speakers for primarily watching movies This is the factory default...


