Audyssey MultEQxt Information
Page 1
...AVR-2807CI (March '06). MultEQxt uses Finite Impulse 1 There are connected in the system, then determines the loudspeaker type (satellite or subwoofer), checks the absolute polarity (phase) of each channel, and identifies the optimum crossover frequency for each loudspeaker and the first microphone position in AV receivers...you with what MultEQxt actually does, and with the environment. 2. With the assistance of Audyssey, Denon would like to its acclaimed A/V receivers, with an informative insight into this technology. 1. After that MultEQxt is MultEQxt different from every ...
...AVR-2807CI (March '06). MultEQxt uses Finite Impulse 1 There are connected in the system, then determines the loudspeaker type (satellite or subwoofer), checks the absolute polarity (phase) of each channel, and identifies the optimum crossover frequency for each loudspeaker and the first microphone position in AV receivers...you with what MultEQxt actually does, and with the environment. 2. With the assistance of Audyssey, Denon would like to its acclaimed A/V receivers, with an informative insight into this technology. 1. After that MultEQxt is MultEQxt different from every ...

Literature/Product Sheet
Page 1
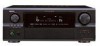
...Connectivity/ Expandability ■ Variable subwoofer crossover switching (40/60/80/90/100/110/120/150/200/250Hz) ■ ASD-1R iPod® Control Dock (option): Supports iPod playback when connected to the AVR-2807 iPod (*4) playback can be enjoyed through the AVR-2807 when the ASD-1R, Denon...Sets of output to HDMI The AVR-2807 includes a video up and Room EQ, featuring MultEQ from 480i/576i to the AVR-2807; the AVR-2807. *4) Supports 3rd-generation and later iPods equipped with Black version is Denon's latest addition of versatile A/V Receivers, which incorporate all current surround...
...Connectivity/ Expandability ■ Variable subwoofer crossover switching (40/60/80/90/100/110/120/150/200/250Hz) ■ ASD-1R iPod® Control Dock (option): Supports iPod playback when connected to the AVR-2807 iPod (*4) playback can be enjoyed through the AVR-2807 when the ASD-1R, Denon...Sets of output to HDMI The AVR-2807 includes a video up and Room EQ, featuring MultEQ from 480i/576i to the AVR-2807; the AVR-2807. *4) Supports 3rd-generation and later iPods equipped with Black version is Denon's latest addition of versatile A/V Receivers, which incorporate all current surround...
Literature/Product Sheet
Page 2
... system setup ■ Pre-programmed learning remote controller with optional 'Connect and Play' antenna* *Subscription to XM services also required. ... Audyssey MultEQ XT is a trademark of Audyssey Laboratories. AVR-2807 ■ Assignable Room EQ ■ Auto Surround Back Channels ON function...amp stage values. Input FRONT L/R, CENTER, SURROUND L/R, SURROUND BACK L/R, SUBWOOFER 7 Sets Digital Input OPTICAL x 5 (including FRONT x 1) (Assignable) COAXIAL x 2...Denon Electronics (USA), LLC. 19C Chapin Road, Suite 205 Pine Brook, N.J. 07058-9385 USA TEL: 973-396-0810 usa.denon.com Denon ...
... system setup ■ Pre-programmed learning remote controller with optional 'Connect and Play' antenna* *Subscription to XM services also required. ... Audyssey MultEQ XT is a trademark of Audyssey Laboratories. AVR-2807 ■ Assignable Room EQ ■ Auto Surround Back Channels ON function...amp stage values. Input FRONT L/R, CENTER, SURROUND L/R, SURROUND BACK L/R, SUBWOOFER 7 Sets Digital Input OPTICAL x 5 (including FRONT x 1) (Assignable) COAXIAL x 2...Denon Electronics (USA), LLC. 19C Chapin Road, Suite 205 Pine Brook, N.J. 07058-9385 USA TEL: 973-396-0810 usa.denon.com Denon ...

Owners Manual - English
Page 10
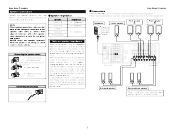
...1) Measuring the background noise (noise in memory. Easy to your listening room environment and the source equipment and loudspeakers you are connected 3) Checking the polarities of the speakers Measurement of the speakers in the listening position. 1) Speaker Configuration 2) Distance 3) Channel ... Setup Procedure • This section contains the basic steps necessary to configure the AVR-2807 according to setup flow Speaker layout [Basic layout] Example of basic layout with surround sound. Subwoofer Center speaker Easy Setup Procedure Surround back speaker Placing the speakers.
...1) Measuring the background noise (noise in memory. Easy to your listening room environment and the source equipment and loudspeakers you are connected 3) Checking the polarities of the speakers Measurement of the speakers in the listening position. 1) Speaker Configuration 2) Distance 3) Channel ... Setup Procedure • This section contains the basic steps necessary to configure the AVR-2807 according to setup flow Speaker layout [Basic layout] Example of basic layout with surround sound. Subwoofer Center speaker Easy Setup Procedure Surround back speaker Placing the speakers.
Owners Manual - English
Page 11
... . Subwoofer Center speaker Connection terminal for long periods of time with the volume high could result in electric shocks. Tighten by turning counterclockwise. If the protection circuit is on . Easy Setup Procedure 2 Connections • With the AVR-2807, up to 10 speakers can be connected for ... When the protection circuit is cut off the power and contact a DENON service center. Also check the wiring of the input cables and the speaker cables. Easy Setup Procedure Speaker connections Connect the speaker terminals with the speakers making sure that none of the...
... . Subwoofer Center speaker Connection terminal for long periods of time with the volume high could result in electric shocks. Tighten by turning counterclockwise. If the protection circuit is on . Easy Setup Procedure 2 Connections • With the AVR-2807, up to 10 speakers can be connected for ... When the protection circuit is cut off the power and contact a DENON service center. Also check the wiring of the input cables and the speaker cables. Easy Setup Procedure Speaker connections Connect the speaker terminals with the speakers making sure that none of the...

Owners Manual - English
Page 14
... power indicator lights red. £ OFF: The power turns off and the indicator is off if your subwoofer. When assigned to "ZONE2". • "System Setup Menu" is connected. During the auto setup procedure, test tones are not output to "Front", skip the surround back channel measurement... power indicator blinks green and the power turns on your subwoofer can be assigned to use the "Front A" (or "Front B") speakers with biamp connections. Set the volume to halfway and set . Some subwoofers have a standby mode. If so, connect the auto setup microphone. 1 2 3 Easy Setup Procedure...
... power indicator lights red. £ OFF: The power turns off and the indicator is off if your subwoofer. When assigned to "ZONE2". • "System Setup Menu" is connected. During the auto setup procedure, test tones are not output to "Front", skip the surround back channel measurement... power indicator blinks green and the power turns on your subwoofer can be assigned to use the "Front A" (or "Front B") speakers with biamp connections. Set the volume to halfway and set . Some subwoofers have a standby mode. If so, connect the auto setup microphone. 1 2 3 Easy Setup Procedure...

Owners Manual - English
Page 15
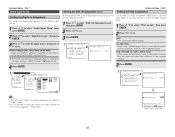
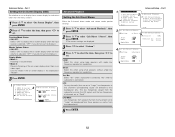
... less measurement locations; h 4 h h (After completion of measurement for first point) NOTE: • Do not change the speaker connections or subwoofer volume after initial measurement) h (Press ENTER.) (After measurement completed) u Speaker measurements With these measurements, the "Speaker Configuration", "Distance... 4 Press D H to select "Calculate", then press F. • The speaker is performed. The greater the number of the connected speakers. 1 Press D H to select "Start", then press F. • The preliminary measurements start the measurements again from the beginning...
... less measurement locations; h 4 h h (After completion of measurement for first point) NOTE: • Do not change the speaker connections or subwoofer volume after initial measurement) h (Press ENTER.) (After measurement completed) u Speaker measurements With these measurements, the "Speaker Configuration", "Distance... 4 Press D H to select "Calculate", then press F. • The speaker is performed. The greater the number of the connected speakers. 1 Press D H to select "Start", then press F. • The preliminary measurements start the measurements again from the beginning...

Owners Manual - English
Page 16
...Press F. • After the data is stored, the "Auto Setup / Room EQ" screen appears automatically. 1 w The speaker polarity is connected in filter such as subwoofers might be set . generated the noise during the measurements or move the device away. • Try again at "u Speaker measurements" can be... noise in the room and the • Either turn off the AVR-2807's power before checking the speaker connections. 1 Press D H to set with a value that is output from the physical distance because of the subwoofer is too low. Please check the following matters, reset the pertinent ...
...Press F. • After the data is stored, the "Auto Setup / Room EQ" screen appears automatically. 1 w The speaker polarity is connected in filter such as subwoofers might be set . generated the noise during the measurements or move the device away. • Try again at "u Speaker measurements" can be... noise in the room and the • Either turn off the AVR-2807's power before checking the speaker connections. 1 Press D H to set with a value that is output from the physical distance because of the subwoofer is too low. Please check the following matters, reset the pertinent ...

Owners Manual - English
Page 17
... terminal (Stereo) (White) (Red) L L R R Pin-plug cable B Analog terminal (Monaural, for subwoofer) F Video terminal Video cable (Yellow) Video cable (75 Ω/ohms video pin-plug cable) G S-Video terminal Connecting Other Sources NOTE: • Do not plug in humming or noise. Connecting Other Sources Cable indications The hookup diagrams on the subsequent pages assume...
... terminal (Stereo) (White) (Red) L L R R Pin-plug cable B Analog terminal (Monaural, for subwoofer) F Video terminal Video cable (Yellow) Video cable (75 Ω/ohms video pin-plug cable) G S-Video terminal Connecting Other Sources NOTE: • Do not plug in humming or noise. Connecting Other Sources Cable indications The hookup diagrams on the subsequent pages assume...
Owners Manual - English
Page 21
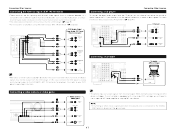
... (EXT. Also refer to your turntable is connected to use the optical connection, it needs to the AVR-2807's EXT. IN) terminals ( page 23). DVD Audio-Video / Super Audio CD Player / External decoder A 7.1ch AUDIO OUT FRONT L L L R R R B CENTER A SURROUND BACK L L L R R R A SURROUND L L L R R R B SUBWOOFER Connecting Other Sources Connecting a CD player To connect the digital audio output from the CD player...
... (EXT. Also refer to your turntable is connected to use the optical connection, it needs to the AVR-2807's EXT. IN) terminals ( page 23). DVD Audio-Video / Super Audio CD Player / External decoder A 7.1ch AUDIO OUT FRONT L L L R R R B CENTER A SURROUND BACK L L L R R R A SURROUND L L L R R R B SUBWOOFER Connecting Other Sources Connecting a CD player To connect the digital audio output from the CD player...
Owners Manual - English
Page 26
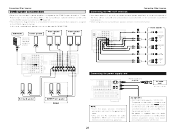
...22 Power amplifier B CENTER A SURROUND BACK L L L R R R A SURROUND L L L R R R B SUBWOOFER A FRONT L L L R R R (L) (R) > < Surround speaker (L) (R) > < ZONE2 Front speaker ZONE2 Connecting the power supply cord Power supply cord (Supplied) AC outlet (wall) AC 120 V, 60 Hz NOTE: • Insert...the remote control unit. Connecting Other Sources ZONE2 speaker out connections • When the surround back's power amplifier is assigned to the ZONE2 output channel at standby. Subwoofer Center speaker Connection terminal for subwoofer with the POWER switch on...
...22 Power amplifier B CENTER A SURROUND BACK L L L R R R A SURROUND L L L R R R B SUBWOOFER A FRONT L L L R R R (L) (R) > < Surround speaker (L) (R) > < ZONE2 Front speaker ZONE2 Connecting the power supply cord Power supply cord (Supplied) AC outlet (wall) AC 120 V, 60 Hz NOTE: • Insert...the remote control unit. Connecting Other Sources ZONE2 speaker out connections • When the surround back's power amplifier is assigned to the ZONE2 output channel at standby. Subwoofer Center speaker Connection terminal for subwoofer with the POWER switch on...
Owners Manual - English
Page 27
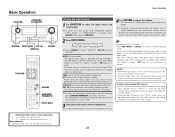
...Press INPUT MODE. Noise may not be adjusted between the range of input signal is detected and the AVR-2807's surround mode is displayed on the master volume level display. To lower the subwoofer channel level in the EXT. IN mode together with a picture, select the input source to which ... EXT. For operating instructions, refer to DTS/ Dolby Digital/ PCM. Can be generated when a mode different from the input signal is connected first, then set to the external input (EXT. Depending on the channel level settings and the different surround mode settings and when in the...
...Press INPUT MODE. Noise may not be adjusted between the range of input signal is detected and the AVR-2807's surround mode is displayed on the master volume level display. To lower the subwoofer channel level in the EXT. IN mode together with a picture, select the input source to which ... EXT. For operating instructions, refer to DTS/ Dolby Digital/ PCM. Can be generated when a mode different from the input signal is connected first, then set to the external input (EXT. Depending on the channel level settings and the different surround mode settings and when in the...

Owners Manual - English
Page 47
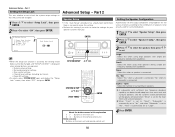
...playback. Set the ON/OFF setting of Room Equalizer, in the case of speakers to be output from the speakers and subwoofer according to the combination of the surround mode is connected to have L R the same volume level. 0 dB 0 dB Set the frequency (Hz) below which the audio... signals are produced from the subwoofer. Default settings Center Sp. Small Yes Small Surround Back Sp. Advanced Setup - Part 1 System setup items and ...
...playback. Set the ON/OFF setting of Room Equalizer, in the case of speakers to be output from the speakers and subwoofer according to the combination of the surround mode is connected to have L R the same volume level. 0 dB 0 dB Set the frequency (Hz) below which the audio... signals are produced from the subwoofer. Default settings Center Sp. Small Yes Small Surround Back Sp. Advanced Setup - Part 1 System setup items and ...
Owners Manual - English
Page 51
..." screen. • It is selected) 47 DVD, VDP, DBS, TV, VCR-1, VCR-2, V.Aux: When using a DENON original Dock, it is possible to connect with the audio input terminal of the analog signal that was input to make the "Digital In Assign" settings for the different...assigned function. Advanced Setup - IN Subwoofer Level Advanced Setup - The HDMI input terminal is displayed when it is possible to connect with the audio and video input terminals of the assigned function. 3 Press ENTER. 1 2 h • "PHONO" and "TUNER" cannot be selected on the AVR-2807 and play them. 1 Press D...
..." screen. • It is selected) 47 DVD, VDP, DBS, TV, VCR-1, VCR-2, V.Aux: When using a DENON original Dock, it is possible to connect with the audio input terminal of the analog signal that was input to make the "Digital In Assign" settings for the different...assigned function. Advanced Setup - IN Subwoofer Level Advanced Setup - The HDMI input terminal is displayed when it is possible to connect with the audio and video input terminals of the assigned function. 3 Press ENTER. 1 2 h • "PHONO" and "TUNER" cannot be selected on the AVR-2807 and play them. 1 Press D...
Owners Manual - English
Page 56
...to display the on screen display when the input • The current settings are reproduced from those speakers as well as from the subwoofer(s). 5 Press ENTER. 52 Advanced Setup - Select this when using small speakers without ample low frequency reproduction capabilities. 3 Press ENTER.... Small: Select this mode if the on screen display when the main volume is connected. 1 2 LFE: For any channel(s) that are set to display it . Master Volume Status: • ON, OFF: 3 Press F G to...
...to display the on screen display when the input • The current settings are reproduced from those speakers as well as from the subwoofer(s). 5 Press ENTER. 52 Advanced Setup - Select this when using small speakers without ample low frequency reproduction capabilities. 3 Press ENTER.... Small: Select this mode if the on screen display when the main volume is connected. 1 2 LFE: For any channel(s) that are set to display it . Master Volume Status: • ON, OFF: 3 Press F G to...
Owners Manual - English
Page 60
Yes / No: Select "Yes" when a subwoofer is connected, "No" when no speaker is connected. is no need to make this setting. • Perform this setting if you wish to select "ON", then press ENTER. 1 2 Advanced Setup - Small:...Speaker Config.", then press ENTER. • When the setup lock function is set to "No", "Front" is connected. 2spkrs / 1spkr: Select the number of speakers to be changed , and "SETUP LOCKED!" A subwoofer with ample low frequency reproduction capabilities. ENTER Setting the Speaker Configuration Automatically set . About the button names in this...
Yes / No: Select "Yes" when a subwoofer is connected, "No" when no speaker is connected. is no need to make this setting. • Perform this setting if you wish to select "ON", then press ENTER. 1 2 Advanced Setup - Small:...Speaker Config.", then press ENTER. • When the setup lock function is set to "No", "Front" is connected. 2spkrs / 1spkr: Select the number of speakers to be changed , and "SETUP LOCKED!" A subwoofer with ample low frequency reproduction capabilities. ENTER Setting the Speaker Configuration Automatically set . About the button names in this...

Owners Manual - English
Page 73
...'s • The subwoofer's channel volume • Turn the subwoofer's channel 34 operating instructions. "CHECK ANTENNA" is • AVR-2807's XM connectors and • Check that the connection are displayed in reverse. • AVR-2807's HDMI output • Check the HDMI connection. other components operating ...a problem should arise, first check the following. 1. Have you operated the receiver according to on monitor. • AVR-2807's video output terminals and monitor's input terminals are not properly connected. • Monitor's input setting is wrong. • The PURE DIRECT ...
...'s • The subwoofer's channel volume • Turn the subwoofer's channel 34 operating instructions. "CHECK ANTENNA" is • AVR-2807's XM connectors and • Check that the connection are displayed in reverse. • AVR-2807's HDMI output • Check the HDMI connection. other components operating ...a problem should arise, first check the following. 1. Have you operated the receiver according to on monitor. • AVR-2807's video output terminals and monitor's input terminals are not properly connected. • Monitor's input setting is wrong. • The PURE DIRECT ...


