Literature/Product Sheet
Page 1
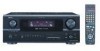
...Assignable) • Remote In/Out Ports With the accompanying microphone placed at the Dubbing Stage. • Finest DSP employed for faster processing better sound quality AVR-2805 features latest generation 32bit floating point DSP to the main room. s DENON's Latest Surround Technology... signals and also processing room equalization. NEW MODEL I N F O R M A T I O N A/V Surround Receiver AVR-2805 The AVR-2805 is Denon's latest addition of versatile A/V Receivers, which undoubtedly assures never-before-experienced high quality. • Various Decoding DTS 96/24 Decoding for DVD-Video/ DTS-...
...Assignable) • Remote In/Out Ports With the accompanying microphone placed at the Dubbing Stage. • Finest DSP employed for faster processing better sound quality AVR-2805 features latest generation 32bit floating point DSP to the main room. s DENON's Latest Surround Technology... signals and also processing room equalization. NEW MODEL I N F O R M A T I O N A/V Surround Receiver AVR-2805 The AVR-2805 is Denon's latest addition of versatile A/V Receivers, which undoubtedly assures never-before-experienced high quality. • Various Decoding DTS 96/24 Decoding for DVD-Video/ DTS-...
Literature/Product Sheet
Page 2
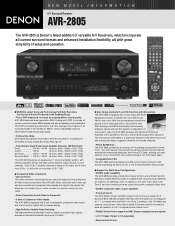
Depending on Movie mode: On DENON A/V receivers, this design allows the AVR-2805 to achieve high output power of 100 W for those who want the ultimate in sonic quality from their audio sources. Finer adjustments are power amp...channels. • Audio Delay Function The Audio Delay function corrects slight lags between front speakers • Pre-programmed remote controller with learning feature s Designed for high sound quality • Pure Direct and AL24 Processing DENON's Pure Direct mode was developed for front A/V input (Silver version is available) s Input/Output Terminals For ...
Depending on Movie mode: On DENON A/V receivers, this design allows the AVR-2805 to achieve high output power of 100 W for those who want the ultimate in sonic quality from their audio sources. Finer adjustments are power amp...channels. • Audio Delay Function The Audio Delay function corrects slight lags between front speakers • Pre-programmed remote controller with learning feature s Designed for high sound quality • Pure Direct and AL24 Processing DENON's Pure Direct mode was developed for front A/V input (Silver version is available) s Input/Output Terminals For ...
Owners Manual
Page 4
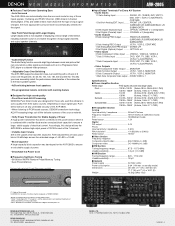
.... 4 inch/10 cm or more 4 inch/10 cm or more Wall 4 2 INTRODUCTION Thank you for North America model only 1 e Service station list 1 r Remote control unit t R6P/AA batteries 3 y AM loop antenna 1 u FM indoor antenna...1 i Omnidirectional microphone.......1 (RC-974 1 r t y u i 1 BEFORE ...; Note that the illustrations in addition to the main unit: q Operating instructions.......1 w Warranty ( for choosing the DENON AVR-2805/985 Digital A / V Surround Receiver. As this unit and the wall or other electronic equipment using outdoor antennas and 75 Ω/ohms coaxial cables.
.... 4 inch/10 cm or more 4 inch/10 cm or more Wall 4 2 INTRODUCTION Thank you for North America model only 1 e Service station list 1 r Remote control unit t R6P/AA batteries 3 y AM loop antenna 1 u FM indoor antenna...1 i Omnidirectional microphone.......1 (RC-974 1 r t y u i 1 BEFORE ...; Note that the illustrations in addition to the main unit: q Operating instructions.......1 w Warranty ( for choosing the DENON AVR-2805/985 Digital A / V Surround Receiver. As this unit and the wall or other electronic equipment using outdoor antennas and 75 Ω/ohms coaxial cables.
Owners Manual
Page 6
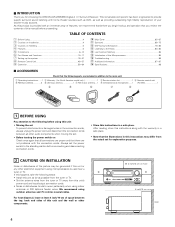
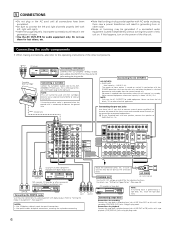
... connected, disconnect the ground wire. If humming or other noise is generated when the ground wire is at standby. No power is supplied from the remote control unit. R RL R RR R R L L R RL CD player or other component equipped with digital output jacks DIGITAL AUDIO OPTICAL COAXIAL OUTPUT MD recorder, CD recorder or...
... connected, disconnect the ground wire. If humming or other noise is generated when the ground wire is at standby. No power is supplied from the remote control unit. R RL R RR R R L L R RL CD player or other component equipped with digital output jacks DIGITAL AUDIO OPTICAL COAXIAL OUTPUT MD recorder, CD recorder or...

Owners Manual
Page 15
... 60, 63, 69 ~ 74, 78, 80) !8 TONE DEFEAT button 63) !9 TONE CONTROL button 63, 80) @0 MASTER VOLUME control 60) @1 MASTER VOLUME indicator 60) @2 Display @3 Remote control sensor (REMOTE SENSOR 48) @4 FUNCTION knob 59, 67, 72, 74, 83, 85) @5 VIDEO SELECT button 63) @6 ZONE2/REC SELECT button 64, 67) @7 TUNING PRESET button 85...
... 60, 63, 69 ~ 74, 78, 80) !8 TONE DEFEAT button 63) !9 TONE CONTROL button 63, 80) @0 MASTER VOLUME control 60) @1 MASTER VOLUME indicator 60) @2 Display @3 Remote control sensor (REMOTE SENSOR 48) @4 FUNCTION knob 59, 67, 72, 74, 83, 85) @5 VIDEO SELECT button 63) @6 ZONE2/REC SELECT button 64, 67) @7 TUNING PRESET button 85...
Owners Manual
Page 17
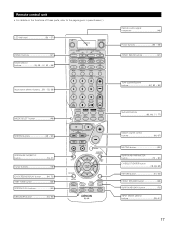
... given in parentheses ( ). LED (indicator 50 ~ 57) ZONE 2 buttons 67) Mode selector buttons 18, 49 ~ 51, 53 ~ 58) Input source selector buttons....(50 ~ 52, 59) Remote control signal transmitter 48) Power buttons 50 ~ 58) ZONE1 (MAIN) buttons 67) Tuner system/System buttons 67, 83 ~ 85) MODE SELECT button 49) SYSTEM buttons...
... given in parentheses ( ). LED (indicator 50 ~ 57) ZONE 2 buttons 67) Mode selector buttons 18, 49 ~ 51, 53 ~ 58) Input source selector buttons....(50 ~ 52, 59) Remote control signal transmitter 48) Power buttons 50 ~ 58) ZONE1 (MAIN) buttons 67) Tuner system/System buttons 67, 83 ~ 85) MODE SELECT button 49) SYSTEM buttons...
Owners Manual
Page 18
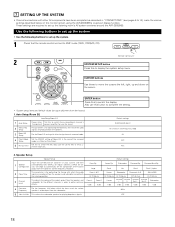
... pages 6 to 14), make the various settings described below which the audio signals are required to set up the listening room's AV system centered around the AVR-2805/985. Speaker Setup Speaker Setup Input the combination of speakers in Direct or Pure Direct. 5 Mic Input Select Set this to display... Use the following buttons to set up the system • Use the following buttons to set to AMP mode.(TAPE, CDR/MD, CD) (Remote control unit) 2 SYSTEM SETUP button Press this to switch the surround back channel's Assignment power amplifier for use for each surround mode. 4 Direct...
... pages 6 to 14), make the various settings described below which the audio signals are required to set up the listening room's AV system centered around the AVR-2805/985. Speaker Setup Speaker Setup Input the combination of speakers in Direct or Pure Direct. 5 Mic Input Select Set this to display... Use the following buttons to set up the system • Use the following buttons to set to AMP mode.(TAPE, CDR/MD, CD) (Remote control unit) 2 SYSTEM SETUP button Press this to switch the surround back channel's Assignment power amplifier for use for each surround mode. 4 Direct...

Owners Manual
Page 19
... of attenuation at Option Setup "Power Amp Assign". On Screen Display = ON / Mode 1 Setup Lock = OFF NOTES: • The on the remote control unit or main unit are output with priority to display the on-screen display that they cannot be changed. A1 ~ A8 B1 ~B8 C1...details, see page 49.) • The AVR-2805/985's on-screen display function is designed for use for use with small screens or low resolutions. • The setup menu is connected to both the AVR-2805/985's S-Video and video monitor output jacks and signals are received automatically and stored in the memory.
... of attenuation at Option Setup "Power Amp Assign". On Screen Display = ON / Mode 1 Setup Lock = OFF NOTES: • The on the remote control unit or main unit are output with priority to display the on-screen display that they cannot be changed. A1 ~ A8 B1 ~B8 C1...details, see page 49.) • The AVR-2805/985's on-screen display function is designed for use for use with small screens or low resolutions. • The setup menu is connected to both the AVR-2805/985's S-Video and video monitor output jacks and signals are received automatically and stored in the memory.

Owners Manual
Page 20
... tables of Pages 18 and 19. • Wherever your position in . Therefore, please cancel the mode or reverse the condition. 2 Display the System Setup Menu. (Remote control unit) *System Setup Auto Set/RoomEQ NOTES: • The System Setup menu composition is of a layered design that all the connections are plugged in...
... tables of Pages 18 and 19. • Wherever your position in . Therefore, please cancel the mode or reverse the condition. 2 Display the System Setup Menu. (Remote control unit) *System Setup Auto Set/RoomEQ NOTES: • The System Setup menu composition is of a layered design that all the connections are plugged in...

Owners Manual
Page 21
... unit) *System Setup Auto Set/RoomEQ 2 Display the Auto Setup / Room EQ menu. (Remote control unit) 21 Use a tripod or level surface at this unit performs an analysis of the speaker system and measures the acoustic characteristics of your ...
... unit) *System Setup Auto Set/RoomEQ 2 Display the Auto Setup / Room EQ menu. (Remote control unit) 21 Use a tripod or level surface at this unit performs an analysis of the speaker system and measures the acoustic characteristics of your ...

Owners Manual
Page 22
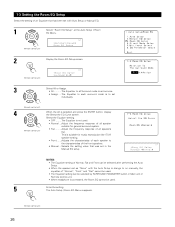
...in "5-1.Power Amp Assign". 22 w Select "Surround Back" or "ZONE2". (Remote control unit) *Auto Setup P.Amp: SB 4 q Select the "Start". (Remote control unit) *Auto Setup Start w Press the Cursor left button. (Remote control unit) (Remote control unit) NOTE: • When "ZONE2" is selected at the Auto ...Setup / Room EQ Menu. (Remote control unit) *AutoSet/RoomEQ Auto Setup 2 Display the Auto Setup screen. (Remote control unit) 3 Check the "Power Amp Assign" setting. • When "Surround Back" is selected, the ...
...in "5-1.Power Amp Assign". 22 w Select "Surround Back" or "ZONE2". (Remote control unit) *Auto Setup P.Amp: SB 4 q Select the "Start". (Remote control unit) *Auto Setup Start w Press the Cursor left button. (Remote control unit) (Remote control unit) NOTE: • When "ZONE2" is selected at the Auto ...Setup / Room EQ Menu. (Remote control unit) *AutoSet/RoomEQ Auto Setup 2 Display the Auto Setup screen. (Remote control unit) 3 Check the "Power Amp Assign" setting. • When "Surround Back" is selected, the ...

Owners Manual
Page 24
... verification screen. Check] [Delay Time Check] [Channel Level Check] 3 If the check ends, press the ENTER button again. (Remote control unit) 4 Select from the following three items based on the measurement results. • Set with a value that differs from the physical...checked measurement value. • Perform the measurement again. • Cancel the checked measurement value. (Remote control unit) *Auto Setup Store 5 When the "Store" is selected, it measures again. (Remote control unit) 24 When the "Retry" is selected, all parameters are stored up . Check of...
... verification screen. Check] [Delay Time Check] [Channel Level Check] 3 If the check ends, press the ENTER button again. (Remote control unit) 4 Select from the following three items based on the measurement results. • Set with a value that differs from the physical...checked measurement value. • Perform the measurement again. • Cancel the checked measurement value. (Remote control unit) *Auto Setup Store 5 When the "Store" is selected, it measures again. (Remote control unit) 24 When the "Retry" is selected, all parameters are stored up . Check of...
Owners Manual
Page 25
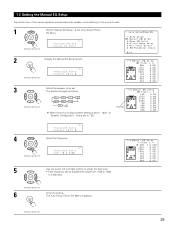
... Channel : FL 3 Select the speaker to be adjusted the range from -6dB to "SB". Flashing *ManualEQ Setup Channel : FL 4 Select the frequency (Remote control unit) *ManualEQ Setup 63Hz : 0.0dB 5 Use the cursor left and right buttons to adjust the Gain level. • Each frequency can be set.... The Auto Setup / Room EQ Menu reappears. (Remote control unit) 25 1-2 Setting the Manual EQ Setup Adjust the tone of the various speakers except subwoofer speaker while listening to the sound (music)....
... Channel : FL 3 Select the speaker to be adjusted the range from -6dB to "SB". Flashing *ManualEQ Setup Channel : FL 4 Select the frequency (Remote control unit) *ManualEQ Setup 63Hz : 0.0dB 5 Use the cursor left and right buttons to adjust the Gain level. • Each frequency can be set.... The Auto Setup / Room EQ Menu reappears. (Remote control unit) 25 1-2 Setting the Manual EQ Setup Adjust the tone of the various speakers except subwoofer speaker while listening to the sound (music)....
Owners Manual
Page 26
... EQ Setup SurMode:ALL 3 Select All or Assign. • All The Equalizer to all speakers flat. This is suitable for general surround system. (Remote control unit) • Flat ..........Adjust the frequency response of all Surround mode is set as once. • Assign .....The Equalizer to each surround ...be selected after performing the Auto Setup. • When the speaker set as "None" with the Auto Setup is change to set individually. (Remote control unit) 4 When the All is selected and press the ENTER button, display the Select the EQ Curve screen. 1-3 Setting the Room EQ...
... EQ Setup SurMode:ALL 3 Select All or Assign. • All The Equalizer to all speakers flat. This is suitable for general surround system. (Remote control unit) • Flat ..........Adjust the frequency response of all Surround mode is set as once. • Assign .....The Equalizer to each surround ...be selected after performing the Auto Setup. • When the speaker set as "None" with the Auto Setup is change to set individually. (Remote control unit) 4 When the All is selected and press the ENTER button, display the Select the EQ Curve screen. 1-3 Setting the Room EQ...

Owners Manual
Page 27
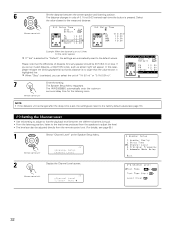
The Auto Setup / Room EQ Menu reappears. (Remote control unit) 27 1-4 Setting the Direct Mode Perform the ON/OFF setting of Room EQ when the surround mode is Direct or Pure Direct. 1 Select "Direct Mode Setup" at the Auto Setup / Room EQ Menu. (Remote control unit) *AutoSet/RoomEQ Direct Mode 2 Display the Direct Mode Setup screen. (Remote control unit) *Direct Mode Room EQ : OFF 3 Select ON or OFF. (Remote control unit) 4 Enter the setting .
The Auto Setup / Room EQ Menu reappears. (Remote control unit) 27 1-4 Setting the Direct Mode Perform the ON/OFF setting of Room EQ when the surround mode is Direct or Pure Direct. 1 Select "Direct Mode Setup" at the Auto Setup / Room EQ Menu. (Remote control unit) *AutoSet/RoomEQ Direct Mode 2 Display the Direct Mode Setup screen. (Remote control unit) *Direct Mode Room EQ : OFF 3 Select ON or OFF. (Remote control unit) 4 Enter the setting .
Owners Manual
Page 28
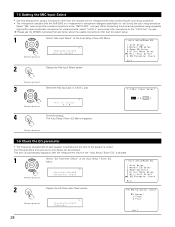
...procedure using a microphone other than the included one for measurements when performing the auto setup procedure. • The microphone included with the AVR-2805 is a measurement microphone designed specifically for measurements, select "V.AUX L" and connect the microphone to the "SETUP MIC" mini-jack. 1-5... Setup / Room EQ" is unified. Please ask the DENON Authorized Service Center about the usable microphone other than the option setup. 1 Select "Mic Input Select" at the Auto Setup / Room EQ Menu. (Remote control unit) *AutoSet/RoomEQ Parameter Check 2 Display the EQ...
...procedure using a microphone other than the included one for measurements when performing the auto setup procedure. • The microphone included with the AVR-2805 is a measurement microphone designed specifically for measurements, select "V.AUX L" and connect the microphone to the "SETUP MIC" mini-jack. 1-5... Setup / Room EQ" is unified. Please ask the DENON Authorized Service Center about the usable microphone other than the option setup. 1 Select "Mic Input Select" at the Auto Setup / Room EQ Menu. (Remote control unit) *AutoSet/RoomEQ Parameter Check 2 Display the EQ...

Owners Manual
Page 29
...using a subwoofer. 1 Select "Speaker Setup" at the Auto Setup / Room EQ Menu screen. The Auto Setup / Room EQ Menu reappears. (Remote control unit) (Remote control unit) 8 Select "Exit" and press the ENTER button at the System Setup Menu... . (Remote control unit) *System Setup Speaker Setup 2 Display the Speaker Setup Menu screen. (Remote control unit) 29 3 Select the Equalizer curve. (Remote control unit) 4 Display the parameter screen. (Remote control unit) 5 Select the speaker channel. 7 If the check ends, ...
...using a subwoofer. 1 Select "Speaker Setup" at the Auto Setup / Room EQ Menu screen. The Auto Setup / Room EQ Menu reappears. (Remote control unit) (Remote control unit) 8 Select "Exit" and press the ENTER button at the System Setup Menu... . (Remote control unit) *System Setup Speaker Setup 2 Display the Speaker Setup Menu screen. (Remote control unit) 29 3 Select the Equalizer curve. (Remote control unit) 4 Display the parameter screen. (Remote control unit) 5 Select the speaker channel. 7 If the check ends, ...
Owners Manual
Page 30
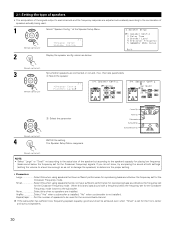
... know, try comparing the sound at the Speaker Setup Menu. (Remote control unit) *Speaker Setup Speaker Config. 2 Display the speaker config. q Select the speaker (Remote control unit) *Speaker Config FrontSp: Large w Select the parameter (Remote control unit) 4 ENTER the setting. Surround back Sp. (Remote control unit) NOTE: • Select "Large" or "Small" not ...reproducing bass sound below the frequency set for the Crossover Frequency mode. at both settings (setting the volume to a level low enough so as below. (Remote control unit) 3 Set whether speakers are installed.
... know, try comparing the sound at the Speaker Setup Menu. (Remote control unit) *Speaker Setup Speaker Config. 2 Display the speaker config. q Select the speaker (Remote control unit) *Speaker Config FrontSp: Large w Select the parameter (Remote control unit) 4 ENTER the setting. Surround back Sp. (Remote control unit) NOTE: • Select "Large" or "Small" not ...reproducing bass sound below the frequency set for the Crossover Frequency mode. at both settings (setting the volume to a level low enough so as below. (Remote control unit) 3 Set whether speakers are installed.

Owners Manual
Page 31
... L5 Listening position SL L3 L4 SR SBL SBR (Remote control unit) *Speaker Setup Delay Time 2 Display the Delay Time screen. (Remote control unit) *Delay Time Meters : Feet 3 Select the desired unit, meters or feet. (Remote control unit) 4 Once "Meters" or "Feet" is selected (Remote control unit) 31 The picture of the speaker selected...
... L5 Listening position SL L3 L4 SR SBL SBR (Remote control unit) *Speaker Setup Delay Time 2 Display the Delay Time screen. (Remote control unit) *Delay Time Meters : Feet 3 Select the desired unit, meters or feet. (Remote control unit) 4 Once "Meters" or "Feet" is selected (Remote control unit) 31 The picture of the speaker selected...
Owners Manual
Page 32
...Select "Channel Level" at the Speaker Setup Menu. (Remote control unit) *Speaker Setup Channel Level 2 Display the Channel Level screen. (Remote control unit) *Channel Level T.Tone: Auto 32 If you can also be 20 ft (6.0 m) or less. The AVR-2805/985 automatically sets the optimum surround delay time for ...the listening room. (Remote control unit) NOTE: • If the distance unit is changed after the delay time is set, the...
...Select "Channel Level" at the Speaker Setup Menu. (Remote control unit) *Speaker Setup Channel Level 2 Display the Channel Level screen. (Remote control unit) *Channel Level T.Tone: Auto 32 If you can also be 20 ft (6.0 m) or less. The AVR-2805/985 automatically sets the optimum surround delay time for ...the listening room. (Remote control unit) NOTE: • If the distance unit is changed after the delay time is set, the...


