
Operating Instructions
Page 1
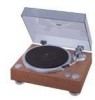
DIRECT DRIVE MANUAL TURNTABLE SYSTEM DP-500M OPERATING INSTRUCTIONS SERIAL NO. PLEASE RECORD UNIT SERIAL NUMBER ATTACHED TO THE REAR OF THE CABINET FOR FUTURE REFERENCE
DIRECT DRIVE MANUAL TURNTABLE SYSTEM DP-500M OPERATING INSTRUCTIONS SERIAL NO. PLEASE RECORD UNIT SERIAL NUMBER ATTACHED TO THE REAR OF THE CABINET FOR FUTURE REFERENCE
Operating Instructions
Page 2
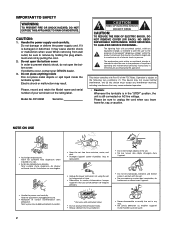
Do not damage or deform the power supply cord. DP-500M Serial No. The lightning flash with ventilation holes) • Do not obstruct the ventilation holes. • Ne...foreign objects in the set in any interference received, including interference that may cause undesired operation. • Caution: Whenever the turntable is in the "STOP" position, the unit is intended to alert the user to the presence of the FCC Rules. .... Electric shock or malfunction may be of sufficient magnitude to constitute a risk of your DENON dealer. 3. NO USERSERVICEABLE PARTS INSIDE.
Do not damage or deform the power supply cord. DP-500M Serial No. The lightning flash with ventilation holes) • Do not obstruct the ventilation holes. • Ne...foreign objects in the set in any interference received, including interference that may cause undesired operation. • Caution: Whenever the turntable is in the "STOP" position, the unit is intended to alert the user to the presence of the FCC Rules. .... Electric shock or malfunction may be of sufficient magnitude to constitute a risk of your DENON dealer. 3. NO USERSERVICEABLE PARTS INSIDE.
Operating Instructions
Page 3
... Finely Finished Wooden Cabinet The large-sized wooden cabinet incorporates the latest technology in the carton: (1) Operating instructions (these instructions 1 (2) Turntable 1 (3) Turntable sheet 1 (4) Counterweight 1 (5) 45 rpm record adapter 1 (6) Head shell 1 (7) Hinge 2 (8) Dust cover 1 (9) Connecting cord...etc. 2. ASSEMBLY 4 3. TABLE OF CONTENTS FEATURES 3 1. ADJUSTMENTS 5 4. Thank you very much for purchasing the DENON direct drive manual turntable system. PART NAMES AND FUNCTIONS 3 2. TROUBLESHOOTING 7 7. x Speed selector button (33-1/3: Orange LED lights up. 45...
... Finely Finished Wooden Cabinet The large-sized wooden cabinet incorporates the latest technology in the carton: (1) Operating instructions (these instructions 1 (2) Turntable 1 (3) Turntable sheet 1 (4) Counterweight 1 (5) 45 rpm record adapter 1 (6) Head shell 1 (7) Hinge 2 (8) Dust cover 1 (9) Connecting cord...etc. 2. ASSEMBLY 4 3. TABLE OF CONTENTS FEATURES 3 1. ADJUSTMENTS 5 4. Thank you very much for purchasing the DENON direct drive manual turntable system. PART NAMES AND FUNCTIONS 3 2. TROUBLESHOOTING 7 7. x Speed selector button (33-1/3: Orange LED lights up. 45...
Operating Instructions
Page 4
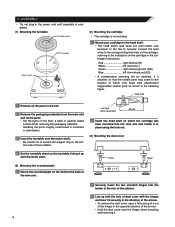
...the shaft at the back of the tone arm. Handling the parts roughly could result in the power cord until assembly is completed. (1) Mounting the turntable Turntable sheet Turntable Motor shaft (3) Mounting the cartridge • The cartridge is not included. 1 Mount your cartridge on the bottom side of the cabinet. 2 ... it in the opposite direction of the hinges in place using the lock nut. (4) Mounting the dust cover 4 Set the turntable sheet on the cartridge or the cartridge's instructions. 2. Use tweezers or the like to securely connect the lead wires to the corresponding...
...the shaft at the back of the tone arm. Handling the parts roughly could result in the power cord until assembly is completed. (1) Mounting the turntable Turntable sheet Turntable Motor shaft (3) Mounting the cartridge • The cartridge is not included. 1 Mount your cartridge on the bottom side of the cabinet. 2 ... it in the opposite direction of the hinges in place using the lock nut. (4) Mounting the dust cover 4 Set the turntable sheet on the cartridge or the cartridge's instructions. 2. Use tweezers or the like to securely connect the lead wires to the corresponding...
Operating Instructions
Page 5
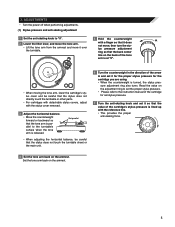
...tone arm back on the armrest. Set parallel • When adjusting the horizontal balance, be careful that the stylus does not directly touch the turntable or other parts. • For cartridges with detachable stylus covers, adjust with the stylus cover removed. 3 Adjust the horizontal balance. •...2.5 2.0 0 3.5 0.5 1.0 1.5 • When moving the tone arm, lower the cartridge's stylus cover and be careful that the stylus does not touch the turntable sheet or the main unit. 6 Turn the counterweight in the direction of the arrow A and set it so that the tone arm is parallel to...
...tone arm back on the armrest. Set parallel • When adjusting the horizontal balance, be careful that the stylus does not directly touch the turntable or other parts. • For cartridges with detachable stylus covers, adjust with the stylus cover removed. 3 Adjust the horizontal balance. •...2.5 2.0 0 3.5 0.5 1.0 1.5 • When moving the tone arm, lower the cartridge's stylus cover and be careful that the stylus does not touch the turntable sheet or the main unit. 6 Turn the counterweight in the direction of the arrow A and set it so that the tone arm is parallel to...
Operating Instructions
Page 6
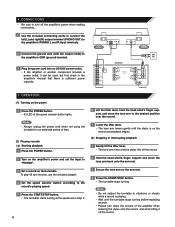
...position over the record. 7 Lower the lifter lever. • The tone arm lowers gently until the stylus is playing. • Wait until the turntable stops turning before replacing records. • Please turn off the amplifier's power when making connections. 1 Use the included connecting cords to ...tone arm rises and the stylus lifts off the record. OPERATION (1) Turning on the arm rest. 4 Press the START/STOP button. • The turntable stops turning. CONNECTIONS • Be sure to turn down the volume of the amplifier when lowering the stylus onto the record and when...
...position over the record. 7 Lower the lifter lever. • The tone arm lowers gently until the stylus is playing. • Wait until the turntable stops turning before replacing records. • Please turn off the amplifier's power when making connections. 1 Use the included connecting cords to ...tone arm rises and the stylus lifts off the record. OPERATION (1) Turning on the arm rest. 4 Press the START/STOP button. • The turntable stops turning. CONNECTIONS • Be sure to turn down the volume of the amplifier when lowering the stylus onto the record and when...
Operating Instructions
Page 7
If the turntable system still does not function properly, check it plays at stylus pressure of 80 g Within ʶ 0.003% ˙ General Power supply: Power consumption: Dimensions: Weight:...pipe 246 mm 15 mm Within 3˃ 0 g to 4.0 g (1 scale = 0.25 g) 5.0 g to the check list, please contact your DENON dealer. See page 5 5 4 6 6 4 4 5 - - 7. MAIN SPECIFICATIONS ˙ Turntable Drive method: Turning speed: Wow/flutter: S/N ratio: Rotation stability: Turntable: Motor : Speed control: Load characteristics: Speed deviation: Servo type direct drive 33-1/3 and 45 rpm 0.1% wrms or...
If the turntable system still does not function properly, check it plays at stylus pressure of 80 g Within ʶ 0.003% ˙ General Power supply: Power consumption: Dimensions: Weight:...pipe 246 mm 15 mm Within 3˃ 0 g to 4.0 g (1 scale = 0.25 g) 5.0 g to the check list, please contact your DENON dealer. See page 5 5 4 6 6 4 4 5 - - 7. MAIN SPECIFICATIONS ˙ Turntable Drive method: Turning speed: Wow/flutter: S/N ratio: Rotation stability: Turntable: Motor : Speed control: Load characteristics: Speed deviation: Servo type direct drive 33-1/3 and 45 rpm 0.1% wrms or...


