Owner's Manual
Page 4
... Using Blank CD, DVD, and BD Media 41 Helpful Tips 42 Using Dell Media Experience and Dell MediaDirect 42 If the computer is turned on or in standby mode 43 If the computer is turned off or in hibernate mode 43 Dell MediaDirect and Dell Media Experience Help 43 Using Your Computer With a TV or Audio...
... Using Blank CD, DVD, and BD Media 41 Helpful Tips 42 Using Dell Media Experience and Dell MediaDirect 42 If the computer is turned on or in standby mode 43 If the computer is turned off or in hibernate mode 43 Dell MediaDirect and Dell Media Experience Help 43 Using Your Computer With a TV or Audio...
Owner's Manual
Page 9
... Is a Driver 119 Identifying Drivers 119 Reinstalling Drivers and Utilities 120 Resolving Software and Hardware Incompatibilities 122 Restoring Your Operating System 122 Using Microsoft Windows XP System Restore 122 Using the Operating System Installation Media 124 14 Adding and Replacing Parts 127 Before You Begin 127 Recommended Tools 127...
... Is a Driver 119 Identifying Drivers 119 Reinstalling Drivers and Utilities 120 Resolving Software and Hardware Incompatibilities 122 Restoring Your Operating System 122 Using Microsoft Windows XP System Restore 122 Using the Operating System Installation Media 124 14 Adding and Replacing Parts 127 Before You Begin 127 Recommended Tools 127...
Owner's Manual
Page 16
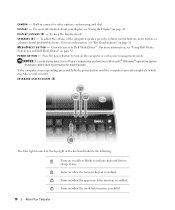
... function is enabled. 16 About Your Computer For more information, see "Using Dell Media Experience and Dell MediaDirect" on the computer or exit a power management mode. If the computer stops responding, press and hold the power button until the computer turns off your display, see "Using the Display" on when the numeric keypad...
... function is enabled. 16 About Your Computer For more information, see "Using Dell Media Experience and Dell MediaDirect" on the computer or exit a power management mode. If the computer stops responding, press and hold the power button until the computer turns off your display, see "Using the Display" on when the numeric keypad...
Owner's Manual
Page 17
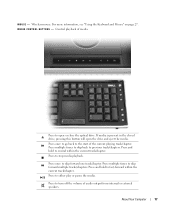
... go back to previous track/chapters. Press multiple times to skip back to the start of the current playing track/chapter. Press and hold to turn off the volume of media. Wireless mouse. M O U S E -
... go back to previous track/chapters. Press multiple times to skip back to the start of the current playing track/chapter. Press and hold to turn off the volume of media. Wireless mouse. M O U S E -
Owner's Manual
Page 18
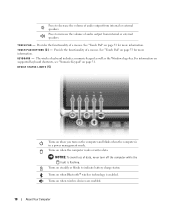
...avoid loss of audio output from internal or external speakers. T O U C H P A D - See "Touch Pad" on page 33 for more information. Turns on when you turn off the computer while the light is enabled. Provide the functionality of audio output from internal or external speakers. K E Y B O A R D - ...DEVICE STATUS LIGHTS (5) Turns on steadily or blinks to increase the volume of a mouse. Turns on when the computer reads or writes data. The wireless keyboard includes a numeric keypad as well as the Windows logo...
...avoid loss of audio output from internal or external speakers. T O U C H P A D - See "Touch Pad" on page 33 for more information. Turns on when you turn off the computer while the light is enabled. Provide the functionality of audio output from internal or external speakers. K E Y B O A R D - ...DEVICE STATUS LIGHTS (5) Turns on steadily or blinks to increase the volume of a mouse. Turns on when the computer reads or writes data. The wireless keyboard includes a numeric keypad as well as the Windows logo...

Owner's Manual
Page 19
... technology) 3 microphone connector 6 display latch release S E C U R I V E - Used to control your Media Center PC from up to charge the battery). Flashing orange: The battery charge is turned off). - Off: The battery is adequately charged (or external power is not available to 20 feet away with the standard remote control. I N F R A R E D S E N S O R - About Your Computer...
... technology) 3 microphone connector 6 display latch release S E C U R I V E - Used to control your Media Center PC from up to charge the battery). Flashing orange: The battery charge is turned off). - Off: The battery is adequately charged (or external power is not available to 20 feet away with the standard remote control. I N F R A R E D S E N S O R - About Your Computer...

Owner's Manual
Page 23
... outlets worldwide. A C A D A P T E R C O N N E C T O R - See "Using Your Computer With a TV or Audio Device" on page 44. About Your Computer 23 S-VIDEO TV-OUT CONNECTOR Connects your computer turned either on page 45. With an adapter cable, you can be used by the computer. However, power connectors and power strips vary among countries. Using...
... outlets worldwide. A C A D A P T E R C O N N E C T O R - See "Using Your Computer With a TV or Audio Device" on page 44. About Your Computer 23 S-VIDEO TV-OUT CONNECTOR Connects your computer turned either on page 45. With an adapter cable, you can be used by the computer. However, power connectors and power strips vary among countries. Using...

Owner's Manual
Page 24
... 5 subwoofer cover 24 About Your Computer 3 3 battery charge gauge 6 fan air vents A I R V E N T S ( 3 ) - Restricting the airflow can damage the computer or cause a fire. NOTE: The computer turns on the AC adapter to avoid damaging the cable. CAUTION: Do not block, push objects into, or allow dust to keep the computer within proper...
... 5 subwoofer cover 24 About Your Computer 3 3 battery charge gauge 6 fan air vents A I R V E N T S ( 3 ) - Restricting the airflow can damage the computer or cause a fire. NOTE: The computer turns on the AC adapter to avoid damaging the cable. CAUTION: Do not block, push objects into, or allow dust to keep the computer within proper...

Owner's Manual
Page 25
... the secondary memory module. The computer uses an internal fan to accumulate in the air vents. See "Charge Gauge" on page 129. S U B W O O F E R C O V E R - NOTE: The computer turns on page 55. When a battery is normal and does not indicate a problem with the fan or the computer. Identifies the amount of charge remaining in...
... the secondary memory module. The computer uses an internal fan to accumulate in the air vents. See "Charge Gauge" on page 129. S U B W O O F E R C O V E R - NOTE: The computer turns on page 55. When a battery is normal and does not indicate a problem with the fan or the computer. Identifies the amount of charge remaining in...
Owner's Manual
Page 28
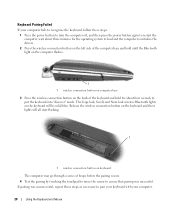
..., repeat these steps as necessary to pair your keyboard with your computer fails to recognize the keyboard, follow these steps: 1 Press the power button to turn the computer off, and then press the power button again to put the keyboard into "discover" mode. Keyboard Pairing Failed If your computer. 28 Using...
..., repeat these steps as necessary to pair your keyboard with your computer fails to recognize the keyboard, follow these steps: 1 Press the power button to turn the computer off, and then press the power button again to put the keyboard into "discover" mode. Keyboard Pairing Failed If your computer. 28 Using...
Owner's Manual
Page 29
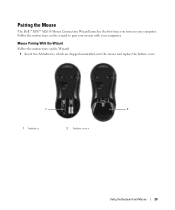
Pairing the Mouse The Dell™ XPS™ M2010 Mouse Connection Wizard launches the first time you turn on your computer. Follow the instructions on the Wizard: 1 Insert two AA batteries, which are shipped uninstalled, into the mouse and replace the battery cover. 1 2 1 batteries 2 battery cover Using the Keyboard and Mouse 29 Mouse Pairing With the Wizard Follow the instructions on the wizard to pair your mouse with your computer.
Pairing the Mouse The Dell™ XPS™ M2010 Mouse Connection Wizard launches the first time you turn on your computer. Follow the instructions on the Wizard: 1 Insert two AA batteries, which are shipped uninstalled, into the mouse and replace the battery cover. 1 2 1 batteries 2 battery cover Using the Keyboard and Mouse 29 Mouse Pairing With the Wizard Follow the instructions on the wizard to pair your mouse with your computer.
Owner's Manual
Page 31
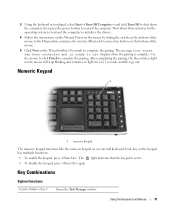
... 2 to initialize the drivers. 4 Follow the instructions on the Wizard within 30 seconds to complete the pairing. 3 Using the keyboard or touchpad, select Start→ Turn Off Computer→ and click Turn Off to shut down the computer, then press the power button to use displays when the pairing is complete.
... 2 to initialize the drivers. 4 Follow the instructions on the Wizard within 30 seconds to complete the pairing. 3 Using the keyboard or touchpad, select Start→ Turn Off Computer→ and click Turn Off to shut down the computer, then press the power button to use displays when the pairing is complete.
Owner's Manual
Page 35
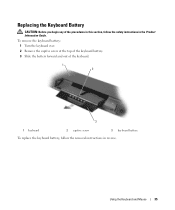
To remove the keyboard battery: 1 Turn the keyboard over. 2 Remove the captive screw at the top of the keyboard battery. 3 Slide the battery forward and out of the procedures in this section, follow the removal instructions in the Product Information Guide. Replacing the Keyboard Battery CAUTION: Before you begin any of the keyboard. 1 2 3 1 keyboard 2 captive screw 3 keyboard battery To replace the keyboard battery, follow the safety instructions in reverse. Using the Keyboard and Mouse 35
To remove the keyboard battery: 1 Turn the keyboard over. 2 Remove the captive screw at the top of the keyboard battery. 3 Slide the battery forward and out of the procedures in this section, follow the removal instructions in the Product Information Guide. Replacing the Keyboard Battery CAUTION: Before you begin any of the keyboard. 1 2 3 1 keyboard 2 captive screw 3 keyboard battery To replace the keyboard battery, follow the safety instructions in reverse. Using the Keyboard and Mouse 35

Owner's Manual
Page 39
... 2 Volume Meter 3 mute icon For more information about QuickSet, right-click the icon in the Volume Control column and slide it up or down to turn off the volume of audio output from internal or external speakers. In addition to using the media control buttons to adjust the volume, you do...
... 2 Volume Meter 3 mute icon For more information about QuickSet, right-click the icon in the Volume Control column and slide it up or down to turn off the volume of audio output from internal or external speakers. In addition to using the media control buttons to adjust the volume, you do...
Owner's Manual
Page 43
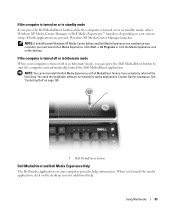
... standby mode If you press the Dell MediaDirect button while the computer is turned off or in standby mode, either Windows XP Media Center Manager or Dell Media Experience™ launches, depending on your system setup. If the computer is turned off or in hibernate mode When your computer is turned on or in hibernate mode...
... standby mode If you press the Dell MediaDirect button while the computer is turned off or in standby mode, either Windows XP Media Center Manager or Dell Media Experience™ launches, depending on your system setup. If the computer is turned off or in hibernate mode When your computer is turned on or in hibernate mode...
Owner's Manual
Page 50
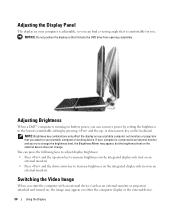
... that is running on battery power, you can press the following keys to adjust display brightness: • Press and the up - Adjusting Brightness When a Dell™ computer is comfortable for you start the computer with an external device (such as an external monitor or projector) attached and... turned on, the image may appear, but the brightness level on the external device does not change the brightness level, the Brightness Meter may appear ...
... that is running on battery power, you can press the following keys to adjust display brightness: • Press and the up - Adjusting Brightness When a Dell™ computer is comfortable for you start the computer with an external device (such as an external monitor or projector) attached and... turned on, the image may appear, but the brightness level on the external device does not change the brightness level, the Brightness Meter may appear ...
Owner's Manual
Page 53
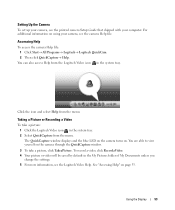
... Documents unless you change the settings. 5 For more information, see the camera Help file. The QuickCapture window displays and the blue LED on the camera turns on using your computer. For additional information on . To record a video, click RecordaVideo. 4 Your picture or video will be saved by default in the system...
... Documents unless you change the settings. 5 For more information, see the camera Help file. The QuickCapture window displays and the blue LED on the camera turns on using your computer. For additional information on . To record a video, click RecordaVideo. 4 Your picture or video will be saved by default in the system...

Owner's Manual
Page 55
Do not use a battery from other external cables from the wall connector and computer, and remove any other computers with your Dell™ computer. Inserting the Battery 1 Ensure the keyboard is securely attached and the display is located inside the battery compartment of fire ... the computer upside down on a clean flat surface. 2 Push the latch release button (#1) on page 49. CAUTION: Before performing these procedures, turn off the computer, disconnect the AC adapter from the electrical outlet and the computer, disconnect the modem from the computer. NOTE: The Service Tag label...
Do not use a battery from other external cables from the wall connector and computer, and remove any other computers with your Dell™ computer. Inserting the Battery 1 Ensure the keyboard is securely attached and the display is located inside the battery compartment of fire ... the computer upside down on a clean flat surface. 2 Push the latch release button (#1) on page 49. CAUTION: Before performing these procedures, turn off the computer, disconnect the AC adapter from the electrical outlet and the computer, disconnect the modem from the computer. NOTE: The Service Tag label...

Owner's Manual
Page 57
5 Close the battery access door by pushing it down with your finger. The battery access door will pop up. 1 1 battery access door Using a Battery 57 Removing the Battery 1 Ensure that the computer is turned off. 2 Slide the battery latch release on the bottom of the computer in the direction of the #1 arrow.
5 Close the battery access door by pushing it down with your finger. The battery access door will pop up. 1 1 battery access door Using a Battery 57 Removing the Battery 1 Ensure that the computer is turned off. 2 Slide the battery latch release on the bottom of the computer in the direction of the #1 arrow.
Owner's Manual
Page 61
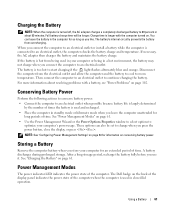
... or being used in your computer's power usage. See "Charging the Battery" on page 63 for an extended period of the computer. The Dell badge on the back of the display panel indicates the power state of the computer when the computer is longer with a battery, see "Power... largely determined by the number of time. Charging the Battery NOTE: When the computer is turned off, the AC adapter charges a completely discharged battery to 80 percent in about resolving problems with the computer turned on. You can also be longer. After a long storage period, recharge the battery fully...
... or being used in your computer's power usage. See "Charging the Battery" on page 63 for an extended period of the computer. The Dell badge on the back of the display panel indicates the power state of the computer when the computer is longer with a battery, see "Power... largely determined by the number of time. Charging the Battery NOTE: When the computer is turned off, the AC adapter charges a completely discharged battery to 80 percent in about resolving problems with the computer turned on. You can also be longer. After a long storage period, recharge the battery fully...


