
Setup Guide
Page 5
Contents Setting Up Your XPS Laptop 7 Before Setting Up Your Computer 7 Connect the AC Adapter 8 Connect the Network Cable (Optional 9 Press the Power Button 10 Set Up Microsoft Windows...Wireless Display (Optional 18 Set Up the TV Tuner (Optional 19 Connect to the Internet (Optional 20 Using Your XPS Laptop 22 Right View Features 22 Left View Features 26 Back View Features 28 Computer Base and Keyboard...Screen Gestures (Optional 46 Removing and Replacing the Battery 48 Software Features 50 Dell DataSafe Online Backup 51 NVIDIA Optimus Technology 52 Free Fall Sensor 53 3
Contents Setting Up Your XPS Laptop 7 Before Setting Up Your Computer 7 Connect the AC Adapter 8 Connect the Network Cable (Optional 9 Press the Power Button 10 Set Up Microsoft Windows...Wireless Display (Optional 18 Set Up the TV Tuner (Optional 19 Connect to the Internet (Optional 20 Using Your XPS Laptop 22 Right View Features 22 Left View Features 26 Back View Features 28 Computer Base and Keyboard...Screen Gestures (Optional 46 Removing and Replacing the Battery 48 Software Features 50 Dell DataSafe Online Backup 51 NVIDIA Optimus Technology 52 Free Fall Sensor 53 3
Setup Guide
Page 10
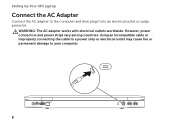
Setting Up Your XPS Laptop Connect the AC Adapter Connect the AC adapter to your computer. 8 However, power connectors and power strips vary among countries. WARNING: The AC adapter works with electrical outlets worldwide. Using an incompatible cable or improperly connecting the cable to a power strip or electrical outlet may cause fire or permanent damage to the computer and then plug it into an electrical outlet or surge protector.
Setting Up Your XPS Laptop Connect the AC Adapter Connect the AC adapter to your computer. 8 However, power connectors and power strips vary among countries. WARNING: The AC adapter works with electrical outlets worldwide. Using an incompatible cable or improperly connecting the cable to a power strip or electrical outlet may cause fire or permanent damage to the computer and then plug it into an electrical outlet or surge protector.
Setup Guide
Page 15
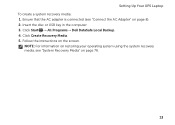
Insert the disc or USB key in the computer. 3. Click Create Recovery Media. 5. Ensure that the AC adapter is connected (see "System Recovery Media" on page 76. 13 Click Start → All Programs→ Dell DataSafe Local Backup. 4. Setting Up Your XPS Laptop To create a system recovery media: 1. Follow the instructions on page 8). 2. NOTE: For information on restoring your operating system using the system recovery media, see "Connect the AC Adapter" on the screen.
Insert the disc or USB key in the computer. 3. Click Create Recovery Media. 5. Ensure that the AC adapter is connected (see "System Recovery Media" on page 76. 13 Click Start → All Programs→ Dell DataSafe Local Backup. 4. Setting Up Your XPS Laptop To create a system recovery media: 1. Follow the instructions on page 8). 2. NOTE: For information on restoring your operating system using the system recovery media, see "Connect the AC Adapter" on the screen.
Setup Guide
Page 31
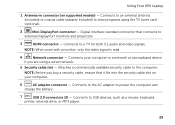
... cable to power the computer and charge the battery. 7 USB 3.0 connectors (2) - Connects your computer. 6 AC adapter connector - Connects to an external antenna (included) or coaxial cable (adapter included) to a TV for both 5.1 audio and video signals. Using Your XPS Laptop 1 Antenna-in connector (on your computer to a network or a broadband device if you buy...
... cable to power the computer and charge the battery. 7 USB 3.0 connectors (2) - Connects your computer. 6 AC adapter connector - Connects to an external antenna (included) or coaxial cable (adapter included) to a TV for both 5.1 audio and video signals. Using Your XPS Laptop 1 Antenna-in connector (on your computer to a network or a broadband device if you buy...

Setup Guide
Page 36
Using Your XPS Laptop Status Lights and Indicators Battery Status Light AC adapter Battery Indicator light status solid white off solid amber off Computer state(s) on/standby/off/ hibernate on/standby/off/ hibernate on/standby on/standby/off/ hibernate off/hibernate Battery charge status charging fully charged low battery (
Using Your XPS Laptop Status Lights and Indicators Battery Status Light AC adapter Battery Indicator light status solid white off solid amber off Computer state(s) on/standby/off/ hibernate on/standby/off/ hibernate on/standby on/standby/off/ hibernate off/hibernate Battery charge status charging fully charged low battery (
Setup Guide
Page 43
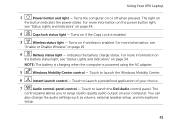
Turns on or off when pressed. Touch to launch the Dell Audio control panel. Turns the computer on if the Caps Lock is enabled. 3 Wireless status light - For more information on the battery status light, see ".... Touch to launch a predefined application of your computer. Using Your XPS Laptop 1 Power button and light - The light on page 34. For more information on the power button light, see "Enable or Disable Wireless" on if wireless is powered using the AC adapter. 5 Windows Mobility Center control - The control panel allows you to...
Turns on or off when pressed. Touch to launch the Dell Audio control panel. Turns the computer on if the Caps Lock is enabled. 3 Wireless status light - For more information on the battery status light, see ".... Touch to launch a predefined application of your computer. Using Your XPS Laptop 1 Power button and light - The light on page 34. For more information on the power button light, see "Enable or Disable Wireless" on if wireless is powered using the AC adapter. 5 Windows Mobility Center control - The control panel allows you to...
Setup Guide
Page 50
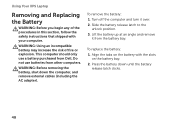
This computer should only use batteries from Dell. Turn off the computer and turn it from the battery bay. Do not use a battery purchased from other computers. WARNING: Using an incompatible battery may ... and remove it over. 2. To remove the battery: 1. Using Your XPS Laptop Removing and Replacing the Battery WARNING: Before you begin any of fire or explosion. To replace the battery: 1. Press the battery down the computer, and remove external cables (including the AC adapter). Slide the battery release latch to the unlock position. 3.
This computer should only use batteries from Dell. Turn off the computer and turn it from the battery bay. Do not use a battery purchased from other computers. WARNING: Using an incompatible battery may ... and remove it over. 2. To remove the battery: 1. Using Your XPS Laptop Removing and Replacing the Battery WARNING: Before you begin any of fire or explosion. To replace the battery: 1. Press the battery down the computer, and remove external cables (including the AC adapter). Slide the battery release latch to the unlock position. 3.

Setup Guide
Page 60
... not be disabled. If you choose to wipe the touch screen. 3. If the touch screen starts losing its sensitivity - Turn off the computer. 2. Disconnect the AC adapter from the wall outlet. To remove these particles: 1. CAUTION: Do not use water or a cleaning liquid to calibrate the touch screen, click Start → Control...
... not be disabled. If you choose to wipe the touch screen. 3. If the touch screen starts losing its sensitivity - Turn off the computer. 2. Disconnect the AC adapter from the wall outlet. To remove these particles: 1. CAUTION: Do not use water or a cleaning liquid to calibrate the touch screen, click Start → Control...
Setup Guide
Page 62
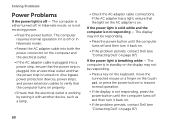
... the computer turns off and then turn it back on. • If the problem persists, contact Dell (see "Contacting Dell" on page 87). If the power light is not responding - If the AC adapter has a light, ensure that the computer turns on . The display may not be responding. •...; Press the power button until the computer turns off and then turn it back on. • If the problem persists, contact Dell (see "Contacting Dell" on . Solving Problems...
... the computer turns off and then turn it back on. • If the problem persists, contact Dell (see "Contacting Dell" on page 87). If the power light is not responding - If the AC adapter has a light, ensure that the computer turns on . The display may not be responding. •...; Press the power button until the computer turns off and then turn it back on. • If the problem persists, contact Dell (see "Contacting Dell" on . Solving Problems...
Setup Guide
Page 64
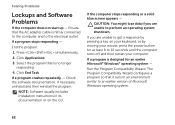
... of Microsoft Windows operating system. 62 If the computer stops responding or a solid blue screen appears - The Program Compatibility Wizard configures a program so that the AC adapter cable is no longer responding 4. Press simultaneously. 2. Click Applications. 3. If necessary, uninstall and then reinstall the program. NOTE: Software usually includes installation instructions in an...
... of Microsoft Windows operating system. 62 If the computer stops responding or a solid blue screen appears - The Program Compatibility Wizard configures a program so that the AC adapter cable is no longer responding 4. Press simultaneously. 2. Click Applications. 3. If necessary, uninstall and then reinstall the program. NOTE: Software usually includes installation instructions in an...

Setup Guide
Page 76
... in when you to: • Backup and restore your computer. NOTE: Do not disconnect the AC adapter. Restoring Your Operating System Dell DataSafe Local Backup CAUTION: Using Dell DataSafe Local Backup to restore your operating system permanently removes any newly added internal hardware. Dell DataSafe Local Backup allows you purchased your data files before using...
... in when you to: • Backup and restore your computer. NOTE: Do not disconnect the AC adapter. Restoring Your Operating System Dell DataSafe Local Backup CAUTION: Using Dell DataSafe Local Backup to restore your operating system permanently removes any newly added internal hardware. Dell DataSafe Local Backup allows you purchased your data files before using...
Setup Guide
Page 85
... be included with the item(s) being returned, whether for repair or credit, as CDs and media cards. Dell is for credit. 83 Remove any and all items being returned (AC adapter cable, software, guides, and so on) if the return is not responsible for any of the Diagnostics ...Checklist (see "Diagnostic Checklist" on page 86), indicating the tests that you have run and any error messages reported by Dell Diagnostics (see "Contacting Dell" on page 67)....
... be included with the item(s) being returned, whether for repair or credit, as CDs and media cards. Dell is for credit. 83 Remove any and all items being returned (AC adapter cable, software, guides, and so on) if the return is not responsible for any of the Diagnostics ...Checklist (see "Diagnostic Checklist" on page 86), indicating the tests that you have run and any error messages reported by Dell Diagnostics (see "Contacting Dell" on page 67)....

Setup Guide
Page 96
... time 4 hours (when the (approximate) computer is turned off) Battery Operating time battery operating time varies depending on operating conditions Coin-cell battery CR-2032 AC Adapter NOTE: Use only AC adapters specified for use with your computer. See the safety information that shipped with your computer.
... time 4 hours (when the (approximate) computer is turned off) Battery Operating time battery operating time varies depending on operating conditions Coin-cell battery CR-2032 AC Adapter NOTE: Use only AC adapters specified for use with your computer. See the safety information that shipped with your computer.

Setup Guide
Page 97
....5 mm (1.29 inches to 1.51 inches) 414.9 mm (16.33 inches) 287.3 mm (11.31 inches) configurable to 158°F) Keyboard Number of keys 102 (U.S. AC Adapter Output current: 130 W 6.70 A (continuous) 150 W 7.70 A (continuous) Rated output voltage Operating temperature Storage temperature 19.5 VDC 0° to 40°C (32° to 104...
....5 mm (1.29 inches to 1.51 inches) 414.9 mm (16.33 inches) 287.3 mm (11.31 inches) configurable to 158°F) Keyboard Number of keys 102 (U.S. AC Adapter Output current: 130 W 6.70 A (continuous) 150 W 7.70 A (continuous) Rated output voltage Operating temperature Storage temperature 19.5 VDC 0° to 40°C (32° to 104...


