
Owner's Manual
Page 23
...connection: 1 Save and close any open files, and exit any open programs. 2 Double-click the MSN Explorer or AOL icon on the Windows® desktop. 3 Follow the instructions on your local cable TV line. Setting Up and Using Your Computer 23 With a DSL connection, you need a modem or ...Click Checklist for setup instructions. NOTE: Selecting the connection method This computer connects directly to the Internet enables the integrated firewall provided with Windows XP. 4 Complete the checklist and required preparations. 5 Return to the Internet NOTE: ISPs and ISP offerings vary by country.
...connection: 1 Save and close any open files, and exit any open programs. 2 Double-click the MSN Explorer or AOL icon on the Windows® desktop. 3 Follow the instructions on your local cable TV line. Setting Up and Using Your Computer 23 With a DSL connection, you need a modem or ...Click Checklist for setup instructions. NOTE: Selecting the connection method This computer connects directly to the Internet enables the integrated firewall provided with Windows XP. 4 Complete the checklist and required preparations. 5 Return to the Internet NOTE: ISPs and ISP offerings vary by country.
Owner's Manual
Page 24
... your ISP. 6 Click the appropriate option under How do you cannot connect to complete the setup. www.dell.com | support.dell.com If you do not have an MSN Explorer or AOL icon on your desktop or if you have a CD, click Use the CD I got from an ISP. 5 Click Next. The New...
... your ISP. 6 Click the appropriate option under How do you cannot connect to complete the setup. www.dell.com | support.dell.com If you do not have an MSN Explorer or AOL icon on your desktop or if you have a CD, click Use the CD I got from an ISP. 5 Click Next. The New...

Owner's Manual
Page 58
... message stating that tell you do contact Dell, the test results can result in "Solving Problems" (see page 59). Then shut down (see the Windows desktop. Running the Dell Diagnostics may help information that describes the ...tests and devices • Receive status messages that no diagnostics utility partition has been found, run the Dell Diagnostics before you contact Dell for Dell's service and support personnel. www.dell.com | support.dell.com Dell Diagnostics When to Use the Dell...
... message stating that tell you do contact Dell, the test results can result in "Solving Problems" (see page 59). Then shut down (see the Windows desktop. Running the Dell Diagnostics may help information that describes the ...tests and devices • Receive status messages that no diagnostics utility partition has been found, run the Dell Diagnostics before you contact Dell for Dell's service and support personnel. www.dell.com | support.dell.com Dell Diagnostics When to Use the Dell...
Owner's Manual
Page 59
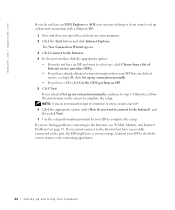
... long and the Windows logo appears, continue to start the Dell Diagnostics. 8 Select Run the 32 Bit Dell Diagnostics from the menu that appears. 6 Type 1 to start the ResourceCD menu. 7 Type 2 to wait until you see the Windows desktop. Advanced Troubleshooting 59 On the next start-up, the computer...the CD boot menu. 5 Select the Boot from CD-ROM option from the numbered list. Starting the Dell Diagnostics From the ResourceCD 1 Insert the ResourceCD. 2 Shut down your computer. 9 When the Dell Diagnostics Main Menu appears, select the test you want to run (see page 60). When the...
... long and the Windows logo appears, continue to start the Dell Diagnostics. 8 Select Run the 32 Bit Dell Diagnostics from the menu that appears. 6 Type 1 to start the ResourceCD menu. 7 Type 2 to wait until you see the Windows desktop. Advanced Troubleshooting 59 On the next start-up, the computer...the CD boot menu. 5 Select the Boot from CD-ROM option from the numbered list. Starting the Dell Diagnostics From the ResourceCD 1 Insert the ResourceCD. 2 Shut down your computer. 9 When the Dell Diagnostics Main Menu appears, select the test you want to run (see page 60). When the...
Owner's Manual
Page 62
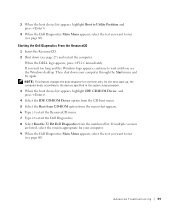
...installation program starts, follow the prompts on your computer after you install drivers obtained from the ResourceCD. 1 With the Windows desktop displayed, insert the ResourceCD. www.dell.com | support.dell.com 5 Click Device Manager. 6 Scroll down the list to see if any device has an exclamation point (a yellow circle...If Device Driver Rollback does not resolve the problem, then use System Restore (see page 63) to return your first time to use Windows XP Device Driver Rollback to the device name, you installed the new driver. If this is next to replace the driver with a [!]) on ...
...installation program starts, follow the prompts on your computer after you install drivers obtained from the ResourceCD. 1 With the Windows desktop displayed, insert the ResourceCD. www.dell.com | support.dell.com 5 Click Device Manager. 6 Scroll down the list to see if any device has an exclamation point (a yellow circle...If Device Driver Rollback does not resolve the problem, then use System Restore (see page 63) to return your first time to use Windows XP Device Driver Rollback to the device name, you installed the new driver. If this is next to replace the driver with a [!]) on ...
Owner's Manual
Page 63
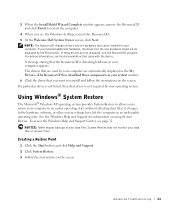
... left the computer in your data files or recover them. If you see the Windows desktop, reinsert the ResourceCD. 5 At the Welcome Dell System Owner screen, click Next. Using Windows® System Restore The Microsoft® Windows XP operating system provides System Restore to allow you want to reinstall and follow the instructions...
... left the computer in your data files or recover them. If you see the Windows desktop, reinsert the ResourceCD. 5 At the Welcome Dell System Owner screen, click Next. Using Windows® System Restore The Microsoft® Windows XP operating system provides System Restore to allow you want to reinstall and follow the instructions...
Owner's Manual
Page 67
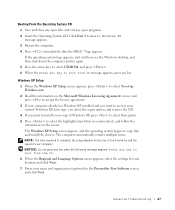
...immediately after the DELL™ logo appears. The computer automatically restarts multiple times. If the operating system logo appears, wait until you want to recover your current Windows XP data, type r to select the repair option, and remove the CD. 4 If you see the Windows desktop, and then... the Operating System CD 1 Save and close any open programs. 2 Insert the Operating System CD. Advanced Troubleshooting 67 Windows XP Setup 1 When the Windows XP Setup screen appears, press to select To set up Windows now. 2 Read the information on the Microsoft Windows Licensing Agreement ...
...immediately after the DELL™ logo appears. The computer automatically restarts multiple times. If the operating system logo appears, wait until you want to recover your current Windows XP data, type r to select the repair option, and remove the CD. 4 If you see the Windows desktop, and then... the Operating System CD 1 Save and close any open programs. 2 Insert the Operating System CD. Advanced Troubleshooting 67 Windows XP Setup 1 When the Windows XP Setup screen appears, press to select To set up Windows now. 2 Read the information on the Microsoft Windows Licensing Agreement ...

Owner's Manual
Page 107
..., and security features. A line of boxes across the bottom of all screens that you see the Microsoft® Windows® desktop. Appendix 107 System Setup Screens The system setup program screens display the current configuration information for devices. A scrollable box listing options... that display your computer. 2 When the blue DELL™ logo appears, press immediately. Boot Sequence This feature allows you to wait until you cannot change (because they are set...
..., and security features. A line of boxes across the bottom of all screens that you see the Microsoft® Windows® desktop. Appendix 107 System Setup Screens The system setup program screens display the current configuration information for devices. A scrollable box listing options... that display your computer. 2 When the blue DELL™ logo appears, press immediately. Boot Sequence This feature allows you to wait until you cannot change (because they are set...
Owner's Manual
Page 108
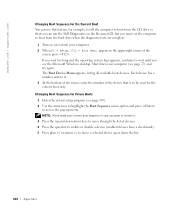
... Current Boot You can use this feature, for example, to tell the computer to boot from the CD drive so that you can run the Dell Diagnostics on the ResourceCD, but you must set the computer to boot from the hard drive when the diagnostic tests are complete. 1 Turn on (or... and the operating system logo appears, continue to wait until you want to access the pop-up or down your computer (see the Microsoft Windows desktop.
... Current Boot You can use this feature, for example, to tell the computer to boot from the CD drive so that you can run the Dell Diagnostics on the ResourceCD, but you must set the computer to boot from the hard drive when the diagnostic tests are complete. 1 Turn on (or... and the operating system logo appears, continue to wait until you want to access the pop-up or down your computer (see the Microsoft Windows desktop.
Owner's Manual
Page 117
... or Service Area, Website and E-Mail Address Website: support.euro.dell.com E-mail: czech_dell@dell.com Technical Support Customer Care Fax TechFax Switchboard Website: support.euro.dell.com E-mail Support (portable computers): den_nbk_support@dell.com E-mail Support (desktop computers): den_support@dell.com E-mail Support (servers): Nordic_server_support@dell.com Technical Support Customer Care (Relational) Home/Small Business Customer...
... or Service Area, Website and E-Mail Address Website: support.euro.dell.com E-mail: czech_dell@dell.com Technical Support Customer Care Fax TechFax Switchboard Website: support.euro.dell.com E-mail Support (portable computers): den_nbk_support@dell.com E-mail Support (desktop computers): den_support@dell.com E-mail Support (servers): Nordic_server_support@dell.com Technical Support Customer Care (Relational) Home/Small Business Customer...

Owner's Manual
Page 125
... Government and Business Sales Fax Nicaragua General Support Norway (Lysaker) Website: support.euro.dell.com International Access Code: 00 E-mail Support (portable computers): Country Code: 47 nor_nbk_support@dell.com E-mail Support (desktop computers): nor_support@dell.com E-mail Support (servers): nordic_server_support@dell.com Technical Support Relational Customer Care Home/Small Business Customer Care Switchboard Fax Switchboard...
... Government and Business Sales Fax Nicaragua General Support Norway (Lysaker) Website: support.euro.dell.com International Access Code: 00 E-mail Support (portable computers): Country Code: 47 nor_nbk_support@dell.com E-mail Support (desktop computers): nor_support@dell.com E-mail Support (servers): nordic_server_support@dell.com Technical Support Relational Customer Care Home/Small Business Customer Care Switchboard Fax Switchboard...

Owner's Manual
Page 128
...Islands Department Name or Service Area, Website and E-Mail Address Website: support.euro.dell.com E-mail: swisstech@dell.com E-mail for French-speaking HSB and Corporate Customers: support.euro.dell.com/ch/fr/emaildell/ Technical Support (Home and Small Business) Technical Support (...Corporate) Customer Care (Home and Small Business) Customer Care (Corporate) Fax Switchboard Technical Support (portable and desktop computers) Technical Support (servers) Transaction ...
...Islands Department Name or Service Area, Website and E-Mail Address Website: support.euro.dell.com E-mail: swisstech@dell.com E-mail for French-speaking HSB and Corporate Customers: support.euro.dell.com/ch/fr/emaildell/ Technical Support (Home and Small Business) Technical Support (...Corporate) Customer Care (Home and Small Business) Customer Care (Corporate) Fax Switchboard Technical Support (portable and desktop computers) Technical Support (servers) Transaction ...

Owner's Manual
Page 130
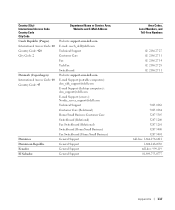
...dell.com | support.dell.com Country (City) International Access Code Country Code City Code Department Name or Service Area, Website and E-Mail Address Area Codes, Local Numbers, and Toll-Free Numbers U.S.A. (Austin, Texas) Automated Order-Status Service toll-free: 1-800-433-9014 International Access Code: 011 AutoTech (portable and desktop... Services website: www.dellfinancialservices.com Financial Services (lease/loans) toll-free: 1-877-577-3355 Financial Services (Dell Preferred Accounts [DPA]) toll-free: 1-800-283-2210 Business Customer Service and Technical Support toll-free: ...
...dell.com | support.dell.com Country (City) International Access Code Country Code City Code Department Name or Service Area, Website and E-Mail Address Area Codes, Local Numbers, and Toll-Free Numbers U.S.A. (Austin, Texas) Automated Order-Status Service toll-free: 1-800-433-9014 International Access Code: 011 AutoTech (portable and desktop... Services website: www.dellfinancialservices.com Financial Services (lease/loans) toll-free: 1-877-577-3355 Financial Services (Dell Preferred Accounts [DPA]) toll-free: 1-800-283-2210 Business Customer Service and Technical Support toll-free: ...

Setup Guide
Page 5
Contents Setting Up Your XPS Desktop 5 Lifting Your Computer 6 Before Setting Up Your Computer 7 Connect the Display 8 Connect the Keyboard and Mouse 10 Connect the Network Cable (Optional 11 Connect the ... Up the TV Tuner (Optional 15 Connect to the Internet (Optional 15 Using Your XPS Desktop 18 Front View Features 18 Top View Features 20 Back View Features 24 Back Panel Connectors 26 Software Features 28 Dell Dock 29 Dell DataSafe Online Backup 30 Solving Problems 31 Beep Codes 31 Network Problems 32 Power...
Contents Setting Up Your XPS Desktop 5 Lifting Your Computer 6 Before Setting Up Your Computer 7 Connect the Display 8 Connect the Keyboard and Mouse 10 Connect the Network Cable (Optional 11 Connect the ... Up the TV Tuner (Optional 15 Connect to the Internet (Optional 15 Using Your XPS Desktop 18 Front View Features 18 Top View Features 20 Back View Features 24 Back Panel Connectors 26 Software Features 28 Dell Dock 29 Dell DataSafe Online Backup 30 Solving Problems 31 Beep Codes 31 Network Problems 32 Power...
Setup Guide
Page 7
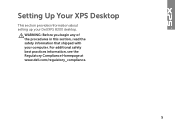
For additional safety best practices information, see the Regulatory Compliance Homepage at www.dell.com/regulatory_compliance. 5 Setting Up Your XPS Desktop This section provides information about setting up your computer. WARNING: Before you begin any of the procedures in this section, read the safety information that shipped with your Dell XPS 8300 desktop.
For additional safety best practices information, see the Regulatory Compliance Homepage at www.dell.com/regulatory_compliance. 5 Setting Up Your XPS Desktop This section provides information about setting up your computer. WARNING: Before you begin any of the procedures in this section, read the safety information that shipped with your Dell XPS 8300 desktop.

Setup Guide
Page 8
Setting Up Your XPS Desktop Lifting Your Computer To ensure safety and to avoid any damage to your computer, lift it by holding the lift points in the front and back of your computer. 6
Setting Up Your XPS Desktop Lifting Your Computer To ensure safety and to avoid any damage to your computer, lift it by holding the lift points in the front and back of your computer. 6

Setup Guide
Page 9
Restricting airflow around your computer may cause it is powered on all other sides. You should never place your computer in an enclosed space, such as a cabinet or a drawer when it to place your computer. To prevent overheating ensure that you leave at least 10.2 cm (4 inches) at the back of the computer and a minimum of 5.1 cm (2 inches) on . 7 Setting Up Your XPS Desktop Before Setting Up Your Computer When positioning your computer, ensure that you allow easy access to a power source, adequate ventilation, and a level surface to overheat.
Restricting airflow around your computer may cause it is powered on all other sides. You should never place your computer in an enclosed space, such as a cabinet or a drawer when it to place your computer. To prevent overheating ensure that you leave at least 10.2 cm (4 inches) at the back of the computer and a minimum of 5.1 cm (2 inches) on . 7 Setting Up Your XPS Desktop Before Setting Up Your Computer When positioning your computer, ensure that you allow easy access to a power source, adequate ventilation, and a level surface to overheat.
Setup Guide
Page 10
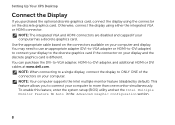
Setting Up Your XPS Desktop Connect the Display If you to connect your computer has a discrete graphics card. You may need to use an appropriate adapter (DVI-to-VGA adapter ... feature, enter the system setup (BIOS) utility and set the Intel Multiple Monitor Feature to -DVI adapter, and additional HDMI or DVI cables at www.dell.com. NOTE: Your computer supports the Intel multiple monitor feature (disabled by default). NOTE: The integrated VGA and HDMI connectors are disabled and capped if...
Setting Up Your XPS Desktop Connect the Display If you to connect your computer has a discrete graphics card. You may need to use an appropriate adapter (DVI-to-VGA adapter ... feature, enter the system setup (BIOS) utility and set the Intel Multiple Monitor Feature to -DVI adapter, and additional HDMI or DVI cables at www.dell.com. NOTE: Your computer supports the Intel multiple monitor feature (disabled by default). NOTE: The integrated VGA and HDMI connectors are disabled and capped if...

Setup Guide
Page 11
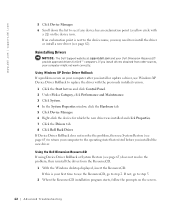
Setting Up Your XPS Desktop See the following table to -DVI adapter + DVI cable) 9 Connection Type VGA-to-VGA (VGA cable) Computer Cable Display DVI-to-DVI (DVI cable) DVI-to-VGA (DVI-to-VGA adapter + VGA cable) HDMI-to-HDMI (HDMI cable) HDMI-to-DVI (HDMI-to identify the connectors on your computer and display.
Setting Up Your XPS Desktop See the following table to -DVI adapter + DVI cable) 9 Connection Type VGA-to-VGA (VGA cable) Computer Cable Display DVI-to-DVI (DVI cable) DVI-to-VGA (DVI-to-VGA adapter + VGA cable) HDMI-to-HDMI (HDMI cable) HDMI-to-DVI (HDMI-to identify the connectors on your computer and display.

Setup Guide
Page 12
Setting Up Your XPS Desktop Connect the Keyboard and Mouse Connect the USB keyboard and mouse to the USB connectors on the back panel of your computer. 10
Setting Up Your XPS Desktop Connect the Keyboard and Mouse Connect the USB keyboard and mouse to the USB connectors on the back panel of your computer. 10


