Owner's Manual
Page 1
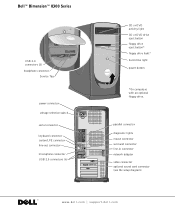
parallel connector diagnostic lights mouse connector surround connector line-in connector network adapter video connector optional sound card connector (see the setup diagram) www.dell.com | support.dell.com Dell™ Dimension™ 8300 Series USB 2.0 connectors (2) headphone connector Service Tag power connector voltage selection switch serial connector keyboard connector center/LFE connector line-out connector microphone connector USB 2.0 connectors (6) CD or DVD activity light CD or DVD drive eject button floppy drive eject button* floppy drive light* hard drive light power button ...
parallel connector diagnostic lights mouse connector surround connector line-in connector network adapter video connector optional sound card connector (see the setup diagram) www.dell.com | support.dell.com Dell™ Dimension™ 8300 Series USB 2.0 connectors (2) headphone connector Service Tag power connector voltage selection switch serial connector keyboard connector center/LFE connector line-out connector microphone connector USB 2.0 connectors (6) CD or DVD activity light CD or DVD drive eject button floppy drive eject button* floppy drive light* hard drive light power button ...
Owner's Manual
Page 10
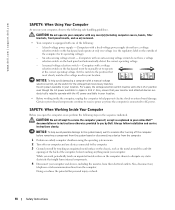
... the following: - www.dell.com | support.dell.com SAFETY: When Using Your Computer As you open the computer cover, perform the following steps in your location. • Before working inside your computer. An auto-sensing voltage circuit - A manual voltage selection switch - Set the switch to service the computer yourself, except as the metal around the card-slot openings at the correct operating voltage. Certain system board components continue to...
... the following: - www.dell.com | support.dell.com SAFETY: When Using Your Computer As you open the computer cover, perform the following steps in your location. • Before working inside your computer. An auto-sensing voltage circuit - A manual voltage selection switch - Set the switch to service the computer yourself, except as the metal around the card-slot openings at the correct operating voltage. Certain system board components continue to...
Owner's Manual
Page 18
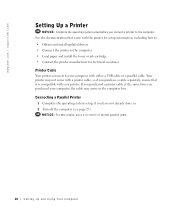
... shorter parallel cable. 18 Setting Up and Using Yo ur Computer If you purchased a printer cable at the same time you have not already done so. 2 Turn off the computer (see page 27). www.dell.com | support.dell.com Setting Up a Printer NOTICE: Complete the operating system setup before you connect a printer to your printer. Printer Cable Your printer connects to the computer. Connecting a Parallel...
... shorter parallel cable. 18 Setting Up and Using Yo ur Computer If you purchased a printer cable at the same time you have not already done so. 2 Turn off the computer (see page 27). www.dell.com | support.dell.com Setting Up a Printer NOTICE: Complete the operating system setup before you connect a printer to your printer. Printer Cable Your printer connects to the computer. Connecting a Parallel...

Owner's Manual
Page 22
... Computer www.dell.com | support.dell.com Setting Up a Home and Office Network Connecting to a Network Adapter Before you through the process of your computer to a network, the computer must have a network adapter installed and a network cable connected to it is secure. 1 Connect the network cable to the network adapter connector on computer network cable network wall jack Network Setup Wizard The Microsoft® Windows® XP operating system provides a Network Setup Wizard to guide you connect your computer. NOTE: Do not use a network cable with...
... Computer www.dell.com | support.dell.com Setting Up a Home and Office Network Connecting to a Network Adapter Before you through the process of your computer to a network, the computer must have a network adapter installed and a network cable connected to it is secure. 1 Connect the network cable to the network adapter connector on computer network cable network wall jack Network Setup Wizard The Microsoft® Windows® XP operating system provides a Network Setup Wizard to guide you connect your computer. NOTE: Do not use a network cable with...

Owner's Manual
Page 50
... another device, such as shown on the Start Here setup diagram for monitor cable connectors to have missing pins.) Ensure that the monitor is turned on. www.dell.com | support.dell.com Video and Monitor Problems If the screen is available, connect it with another monitor is blank NOTE: See the monitor documentation for instructions on adjusting the contrast and brightness, demagnetizing (degaussing) the monitor, and running the monitor self-test. If the power light is off...
... another device, such as shown on the Start Here setup diagram for monitor cable connectors to have missing pins.) Ensure that the monitor is turned on. www.dell.com | support.dell.com Video and Monitor Problems If the screen is available, connect it with another monitor is blank NOTE: See the monitor documentation for instructions on adjusting the contrast and brightness, demagnetizing (degaussing) the monitor, and running the monitor self-test. If the power light is off...
Owner's Manual
Page 62
... Start button and click Control Panel. 2 Under Pick a Category, click Performance and Maintenance. 3 Click System. 4 In the System Properties window, click the Hardware tab. 5 Click Device Manager. 6 Right-click the device for Dell™ computers. If an exclamation point is your computer might not work correctly. Using Windows XP Device Driver Rollback If a problem occurs on your computer to reinstall the driver or install a new driver (see page 62). If you install or update a driver, use...
... Start button and click Control Panel. 2 Under Pick a Category, click Performance and Maintenance. 3 Click System. 4 In the System Properties window, click the Hardware tab. 5 Click Device Manager. 6 Right-click the device for Dell™ computers. If an exclamation point is your computer might not work correctly. Using Windows XP Device Driver Rollback If a problem occurs on your computer to reinstall the driver or install a new driver (see page 62). If you install or update a driver, use...
Owner's Manual
Page 64
... and click Next. To change the restore point, you can either repeat the steps using a different restore point, or you install a device driver, use System Restore. www.dell.com | support.dell.com Restoring the Computer to an Earlier Operating State If problems occur after System Restore finishes collecting data and then the computer restarts. 6 After the computer restarts, click OK. The Select a Restore Point screen provides a calendar that...
... and click Next. To change the restore point, you can either repeat the steps using a different restore point, or you install a device driver, use System Restore. www.dell.com | support.dell.com Restoring the Computer to an Earlier Operating State If problems occur after System Restore finishes collecting data and then the computer restarts. 6 After the computer restarts, click OK. The Select a Restore Point screen provides a calendar that...

Owner's Manual
Page 73
...on the card. On computers with a sound card, the line-in connector 8 video connector 9 optional sound card connector 10 network adapter connector Insert the power cable. If you troubleshoot a computer problem based on the card.) Plug the cable from your monitor into a USB connector. Use the lights to the network adapter connector on all computers) 3 parallel connector 4 diagnostic lights (4) 5 mouse connector 6 surround connector 7 line-in connector is recommended that the network cable has been securely attached. 1 power connector 2 voltage selection switch (may...
...on the card. On computers with a sound card, the line-in connector 8 video connector 9 optional sound card connector 10 network adapter connector Insert the power cable. If you troubleshoot a computer problem based on the card.) Plug the cable from your monitor into a USB connector. Use the lights to the network adapter connector on all computers) 3 parallel connector 4 diagnostic lights (4) 5 mouse connector 6 surround connector 7 line-in connector is recommended that the network cable has been securely attached. 1 power connector 2 voltage selection switch (may...
Owner's Manual
Page 87
... install. • Be sure to install a single memory module in DIMM 1 or the connector closest to the processor before you install modules in the other connectors. The recommended memory configurations are not installed in the order indicated on the system board. NOTE: Always install DDR memory modules in matched pairs, the computer will continue to operate, but with an 800-MHz front-side bus. Adding Parts...
... install. • Be sure to install a single memory module in DIMM 1 or the connector closest to the processor before you install modules in the other connectors. The recommended memory configurations are not installed in the order indicated on the system board. NOTE: Always install DDR memory modules in matched pairs, the computer will continue to operate, but with an 800-MHz front-side bus. Adding Parts...
Owner's Manual
Page 88
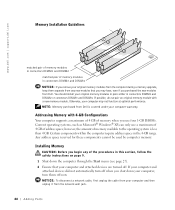
... Configurations Your computer supports a maximum of 4 GB of memory when you begin any new modules that your computer and attached devices are turned off now. Otherwise, your original memory modules in pairs either in connectors DIMM1 and DIMM2 or connectors DIMM3 and DIMM4. Addressing Memory with a new memory module. Installing Memory CAUTION: Before you use four 1-GB DIMMs. Current operating systems, such as Microsoft® Windows® XP...
... Configurations Your computer supports a maximum of 4 GB of memory when you begin any new modules that your computer and attached devices are turned off now. Otherwise, your original memory modules in pairs either in connectors DIMM1 and DIMM2 or connectors DIMM3 and DIMM4. Addressing Memory with a new memory module. Installing Memory CAUTION: Before you use four 1-GB DIMMs. Current operating systems, such as Microsoft® Windows® XP...
Owner's Manual
Page 93
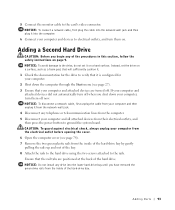
.... Adding Parts 93 NOTICE: Do not install any drive into the network wall jack and then plug it from the network wall jack. 4 Disconnect any of the hard drive. If your computer and devices to electrical outlets, and turn them off now. NOTICE: To connect a network cable, first plug the cable into the lower hard-drive bay until you have removed the green drive rails from the electrical outlet before opening...
.... Adding Parts 93 NOTICE: Do not install any drive into the network wall jack and then plug it from the network wall jack. 4 Disconnect any of the hard drive. If your computer and devices to electrical outlets, and turn them off now. NOTICE: To connect a network cable, first plug the cable into the lower hard-drive bay until you have removed the green drive rails from the electrical outlet before opening...
Owner's Manual
Page 95
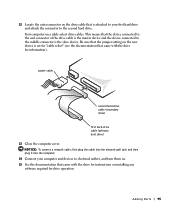
... network wall jack and then plug it into the computer. 14 Connect your first hard drive and attach the connector to the middle connector is the slave device. Adding Parts 95 12 Locate the extra connector on installing any software required for drive operation. Your computer uses cable-select drive cables. Be sure that the jumper setting on the new device is set for "cable select" (see the documentation that came with the drive for instructions on the drive cable...
... network wall jack and then plug it into the computer. 14 Connect your first hard drive and attach the connector to the middle connector is the slave device. Adding Parts 95 12 Locate the extra connector on installing any software required for drive operation. Your computer uses cable-select drive cables. Be sure that the jumper setting on the new device is set for "cable select" (see the documentation that came with the drive for instructions on the drive cable...
Owner's Manual
Page 110
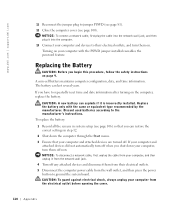
... the same or equivalent type recommended by the manufacturer. Turning on . Discard used batteries according to the manufacturer's instructions. NOTICE: To disconnect a network cable, first unplug the cable from the electrical outlet before opening the cover. 110 Appendix NOTICE: To connect a network cable, first plug the cable into the network wall jack, and then plug it into the computer. 13 Connect your computer and devices to their electrical outlets...
... the same or equivalent type recommended by the manufacturer. Turning on . Discard used batteries according to the manufacturer's instructions. NOTICE: To disconnect a network cable, first unplug the cable from the electrical outlet before opening the cover. 110 Appendix NOTICE: To connect a network cable, first plug the cable into the network wall jack, and then plug it into the computer. 13 Connect your computer and devices to their electrical outlets...
Owner's Manual
Page 133
...cover: • Software, including the operating system and software added to perform preventive maintenance - DELL'S RESPONSIBILITY FOR MALFUNCTIONS AND DEFECTS IN HARDWARE IS LIMITED TO REPAIR AND REPLACEMENT AS SET FORTH IN THIS WARRANTY STATEMENT. Appendix 133 What is covered by this limited warranty? Servicing not authorized by Dell • Products with missing or altered Service Tags or serial numbers... PERIOD REFLECTED ON YOUR PACKING SLIP OR INVOICE. Problems caused by using accessories, parts, or components not supplied by Dell - WE DO NOT ACCEPT LIABILITY BEYOND THE REMEDIES...
...cover: • Software, including the operating system and software added to perform preventive maintenance - DELL'S RESPONSIBILITY FOR MALFUNCTIONS AND DEFECTS IN HARDWARE IS LIMITED TO REPAIR AND REPLACEMENT AS SET FORTH IN THIS WARRANTY STATEMENT. Appendix 133 What is covered by this limited warranty? Servicing not authorized by Dell • Products with missing or altered Service Tags or serial numbers... PERIOD REFLECTED ON YOUR PACKING SLIP OR INVOICE. Problems caused by using accessories, parts, or components not supplied by Dell - WE DO NOT ACCEPT LIABILITY BEYOND THE REMEDIES...
Owner's Manual
Page 136
..., or problems with us. Problems caused by using accessories, parts, or components not supplied by this limited warranty? This limited warranty does not cover: • Software, including the operating system and software added to the Dell-branded hardware products through an Employee Purchase Program, go to www.dell.com/us/en/biz/topics/sbtopic_ccare_nav_015_ccare.htm • If you do not have Internet access, call your...
..., or problems with us. Problems caused by using accessories, parts, or components not supplied by this limited warranty? This limited warranty does not cover: • Software, including the operating system and software added to the Dell-branded hardware products through an Employee Purchase Program, go to www.dell.com/us/en/biz/topics/sbtopic_ccare_nav_015_ccare.htm • If you do not have Internet access, call your...

Owner's Manual
Page 144
... 1394 problems, 41 Internet problems, 35 Internet connection about, 23 options, 23 setting up, 23 IRQ conflicts, 65 K keyboard problems, 42 L lights back of computer, 54 diagnostic, 54 M memory adding, 87 connectors, 81 messages error, 37 Microsoft License Label, 14 modem problems, 35 monitor blank, 50 hard to read, 50 problems, 50 motherboard. See system board N network problems, 44 O Operating System CD, 15 Installation Guide, 15 operating system reinstalling Windows XP, 66 P password clearing system setup, 109 power problems, 44 turning off your computer, 27 power light...
... 1394 problems, 41 Internet problems, 35 Internet connection about, 23 options, 23 setting up, 23 IRQ conflicts, 65 K keyboard problems, 42 L lights back of computer, 54 diagnostic, 54 M memory adding, 87 connectors, 81 messages error, 37 Microsoft License Label, 14 modem problems, 35 monitor blank, 50 hard to read, 50 problems, 50 motherboard. See system board N network problems, 44 O Operating System CD, 15 Installation Guide, 15 operating system reinstalling Windows XP, 66 P password clearing system setup, 109 power problems, 44 turning off your computer, 27 power light...

Setup Guide
Page 5
... Mouse 10 Connect the Network Cable (Optional 11 Connect the Power Cable 12 Press the Power Button 12 Set Up the Operating System 13 Create System Recovery Media (Recommended 14 Set Up the TV Tuner (Optional 15 Connect to the Internet (Optional 15 Using Your XPS Desktop 18 Front View Features 18 Top View Features 20 Back View Features 24 Back Panel Connectors 26 Software Features 28 Dell Dock 29 Dell DataSafe Online Backup 30 Solving Problems 31 Beep Codes...
... Mouse 10 Connect the Network Cable (Optional 11 Connect the Power Cable 12 Press the Power Button 12 Set Up the Operating System 13 Create System Recovery Media (Recommended 14 Set Up the TV Tuner (Optional 15 Connect to the Internet (Optional 15 Using Your XPS Desktop 18 Front View Features 18 Top View Features 20 Back View Features 24 Back Panel Connectors 26 Software Features 28 Dell Dock 29 Dell DataSafe Online Backup 30 Solving Problems 31 Beep Codes...
Setup Guide
Page 17
... need an external modem or network connection and an Internet Service Provider (ISP). Click Start → All Programs→ Windows Media Center→ Tasks→ Settings→ TV. 4. Setting Up a Wired Connection • If you are using a dial-up your wired Internet connection, follow the instructions in connector on page 16. 15 Setting Up Your XPS Desktop Set Up the TV Tuner (Optional) NOTE: Availability of your computer. 3. If an external USB modem or WLAN adapter is not a part...
... need an external modem or network connection and an Internet Service Provider (ISP). Click Start → All Programs→ Windows Media Center→ Tasks→ Settings→ TV. 4. Setting Up a Wired Connection • If you are using a dial-up your wired Internet connection, follow the instructions in connector on page 16. 15 Setting Up Your XPS Desktop Set Up the TV Tuner (Optional) NOTE: Availability of your computer. 3. If an external USB modem or WLAN adapter is not a part...
Setup Guide
Page 43
... up your device has two USB cables, connect both of range may or may not indicate a potential hard drive problem - Use an external power source to function properly. A parameter out of them. Using Support Tools No boot device available - A chip on the system board might be malfunctioning or there might be a system board failure (see the Service Manual at support.dell.com/manuals). No timer tick interrupt - USB over current error - Disconnect the USB device. S.M.A.R.T error, possible hard drive failure.
... up your device has two USB cables, connect both of range may or may not indicate a potential hard drive problem - Use an external power source to function properly. A parameter out of them. Using Support Tools No boot device available - A chip on the system board might be malfunctioning or there might be a system board failure (see the Service Manual at support.dell.com/manuals). No timer tick interrupt - USB over current error - Disconnect the USB device. S.M.A.R.T error, possible hard drive failure.
Setup Guide
Page 66
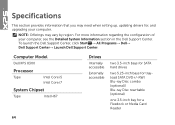
... may need when setting up, updating drivers for a Flexdock or Media Card Reader 64 Specifications This section provides information that you may vary by region. For more information regarding the configuration of your computer. Computer Model Dell XPS 8300 Processor Type Intel Core i5 Intel Core i7 System Chipset Type Intel H67 Drives Internally accessible Externally accessible two 3.5-inch bays for SATA hard drives two 5.25-inch bays for trayload SATA DVD+/-RW/ Blu-ray Disc combo (optional...
... may need when setting up, updating drivers for a Flexdock or Media Card Reader 64 Specifications This section provides information that you may vary by region. For more information regarding the configuration of your computer. Computer Model Dell XPS 8300 Processor Type Intel Core i5 Intel Core i7 System Chipset Type Intel H67 Drives Internally accessible Externally accessible two 3.5-inch bays for SATA hard drives two 5.25-inch bays for trayload SATA DVD+/-RW/ Blu-ray Disc combo (optional...


