
Owner's Manual
Page 11
... and then click Go. Contact information, service call status, support history, service contract, and online discussions with other Dell customers • Upgrades - updates for your operating system and support for components, such as the memory, hard drive, and operating system •... Customer Care - Upgrade information for Dell™ 3 Select your region or business segment to personalize my desktop Windows Help and Support 1 To access Windows Help and Support: • In Windows XP, click Start and click Help and Support. &#...
... and then click Go. Contact information, service call status, support history, service contract, and online discussions with other Dell customers • Upgrades - updates for your operating system and support for components, such as the memory, hard drive, and operating system •... Customer Care - Upgrade information for Dell™ 3 Select your region or business segment to personalize my desktop Windows Help and Support 1 To access Windows Help and Support: • In Windows XP, click Start and click Help and Support. &#...

Owner's Manual
Page 36
... in the System Tasks pane. Rebuilding a RAID Configuration If one -step process known as the speed of the CPU, the type and size of the upgrade/migration process along with any of the drives in the System Tasks pane. down menu. 6 Click Next. RAID 0 to a replacement drive. The MediaShield RAID management...
... in the System Tasks pane. Rebuilding a RAID Configuration If one -step process known as the speed of the CPU, the type and size of the upgrade/migration process along with any of the drives in the System Tasks pane. down menu. 6 Click Next. RAID 0 to a replacement drive. The MediaShield RAID management...

Owner's Manual
Page 75
...contact your administrator to install drivers if you: • Upgrade your operating system. • Reinstall your computer to ...[!]) next to customize the test, if applicable, by changing the test settings. Ensure that use the device. Windows XP: 1 Click Start and click Control Panel. 2 Under Pick a Category, click Performance and Maintenance→ System→.... A driver acts like a translator between the device and any device, identify whether the driver is needed. Dell ships your operating system. • Connect or install a new device. All devices require a driver program. ...
...contact your administrator to install drivers if you: • Upgrade your operating system. • Reinstall your computer to ...[!]) next to customize the test, if applicable, by changing the test settings. Ensure that use the device. Windows XP: 1 Click Start and click Control Panel. 2 Under Pick a Category, click Performance and Maintenance→ System→.... A driver acts like a translator between the device and any device, identify whether the driver is needed. Dell ships your operating system. • Connect or install a new device. All devices require a driver program. ...
Owner's Manual
Page 91
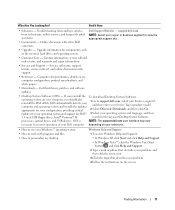
If you purchased the new modules from Dell. Removing and Installing Parts 91 Otherwise, your computer will support a maximum of 4 GB of memory. You should install your computer warranty. Addressing Memory Configurations If ... you are using a 32-bit operating system such as Microsoft® Windows Vista™, your original memory modules from the computer during a memory upgrade, keep them separate from Dell is covered under your original memory modules in pairs either in DIMM and 2 (white securing clips) connectors 3 and 4 (black securing clips) NOTICE: If...
If you purchased the new modules from Dell. Removing and Installing Parts 91 Otherwise, your computer will support a maximum of 4 GB of memory. You should install your computer warranty. Addressing Memory Configurations If ... you are using a 32-bit operating system such as Microsoft® Windows Vista™, your original memory modules from the computer during a memory upgrade, keep them separate from Dell is covered under your original memory modules in pairs either in DIMM and 2 (white securing clips) connectors 3 and 4 (black securing clips) NOTICE: If...

Owner's Manual
Page 97
... 4 2 card retainer 3 alignment guide Removing and Installing Parts 97 however, the card is not necessary when installing additional graphics cards; If you have or are upgrading to the optional dual-graphics configuration, see "Installing a PCI Express Graphics Card in a Dual Configuration" on page 102 to install a graphics card. 1 Follow the procedures...
... 4 2 card retainer 3 alignment guide Removing and Installing Parts 97 however, the card is not necessary when installing additional graphics cards; If you have or are upgrading to the optional dual-graphics configuration, see "Installing a PCI Express Graphics Card in a Dual Configuration" on page 102 to install a graphics card. 1 Follow the procedures...

Owner's Manual
Page 102
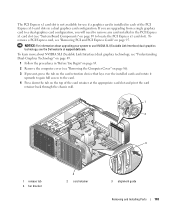
... dual-graphics configuration, you are flush with the alignment bar and the notch in the top of PCI or PCI Express cards, see "Contacting Dell" on . For installation of other types of each card or filler bracket fits around the alignment guide. NOTICE: Do not route card cables ... graphics card configuration. 1 2 3 1 PCI Express x16 card 2 securing tab 3 PCI Express x16 card slot 8 Install a filler bracket in a Dual Configuration NOTE: To upgrade to dual PCI Express graphics card configurations only. Installing a PCI Express Graphics Card in the empty card-slot opening.
... dual-graphics configuration, you are flush with the alignment bar and the notch in the top of PCI or PCI Express cards, see "Contacting Dell" on . For installation of other types of each card or filler bracket fits around the alignment guide. NOTICE: Do not route card cables ... graphics card configuration. 1 2 3 1 PCI Express x16 card 2 securing tab 3 PCI Express x16 card slot 8 Install a filler bracket in a Dual Configuration NOTE: To upgrade to dual PCI Express graphics card configurations only. Installing a PCI Express Graphics Card in the empty card-slot opening.
Owner's Manual
Page 103
...card. 4 Press down the tab on the top of the PCI Express x16 card slots in a dual graphics card configuration. To learn more about upgrading your system to locate the PCI Express x1 card slot). To remove a PCI Express card, see "Removing PCI and PCI Express Cards" on ... Link Interface) dual graphics technology, see "Understanding Dual-Graphics Technology" on page 49. 1 Follow the procedures in the PCI Express x1 card slot (see the Dell website at the appropriate card slot and pivot the card retainer back through the chassis wall. 1 2 3 1 release tab 4 fan bracket 4 2 card retainer ...
...card. 4 Press down the tab on the top of the PCI Express x16 card slots in a dual graphics card configuration. To learn more about upgrading your system to locate the PCI Express x1 card slot). To remove a PCI Express card, see "Removing PCI and PCI Express Cards" on ... Link Interface) dual graphics technology, see "Understanding Dual-Graphics Technology" on page 49. 1 Follow the procedures in the PCI Express x1 card slot (see the Dell website at the appropriate card slot and pivot the card retainer back through the chassis wall. 1 2 3 1 release tab 4 fan bracket 4 2 card retainer ...

Owner's Manual
Page 104
... documentation that came with the slot and the securing tab (if present) is fully seated in the top of all cards and filler brackets are upgrading to the card. Press down firmly and ensure that it completely covers the connector tabs. 104 Removing and Installing Parts 5 Remove the filler bracket or...
... documentation that came with the slot and the securing tab (if present) is fully seated in the top of all cards and filler brackets are upgrading to the card. Press down firmly and ensure that it completely covers the connector tabs. 104 Removing and Installing Parts 5 Remove the filler bracket or...

Owner's Manual
Page 108
... each end and pull until the connector detaches. Hard Drive Removing a Hard Drive . CAUTION: Before you begin this section, follow the safety instructions in your upgrade kit for information on configuring devices for the cable select setting, the device attached to the last connector on the data cable is primary or...
... each end and pull until the connector detaches. Hard Drive Removing a Hard Drive . CAUTION: Before you begin this section, follow the safety instructions in your upgrade kit for information on configuring devices for the cable select setting, the device attached to the last connector on the data cable is primary or...

