
Owner's Manual
Page 3
... . . . . . 28 About Your RAID Configuration 29 RAID Level 0 Configuration 29 RAID Level 1 Configuration 30 RAID Level 0+1 Configuration 30 RAID Level 5 Configuration 32 Configuring Your Hard Drives for RAID 32 Setting Your Computer to RAID-Enabled Mode 33 Using the NVIDIA MediaShield ROM Utility 33 Using NVIDIA MediaShield 34 Using Multimedia 37...
... . . . . . 28 About Your RAID Configuration 29 RAID Level 0 Configuration 29 RAID Level 1 Configuration 30 RAID Level 0+1 Configuration 30 RAID Level 5 Configuration 32 Configuring Your Hard Drives for RAID 32 Setting Your Computer to RAID-Enabled Mode 33 Using the NVIDIA MediaShield ROM Utility 33 Using NVIDIA MediaShield 34 Using Multimedia 37...
Owner's Manual
Page 4
Transferring Information to a New Computer 43 Power Management Options in Windows XP 44 Standby Mode 44 Hibernate Mode 45 Power Options Properties 45 Power Management Options in Windows Vista 47 Sleep Mode 47 Hibernate ...Power Management Settings 47 2 Optimizing for Greater Performance 49 Understanding Dual-Graphics Technology 49 Understanding CPU Overclocking 49 3 Dell™ QuickSet 51 4 Troubleshooting 53 Solving Problems 53 Battery Problems 53 Drive Problems 53 E-Mail, Modem, and Internet Problems 55 Error Messages 56 IEEE 1394 Device Problems 57 Keyboard Problems 57...
Transferring Information to a New Computer 43 Power Management Options in Windows XP 44 Standby Mode 44 Hibernate Mode 45 Power Options Properties 45 Power Management Options in Windows Vista 47 Sleep Mode 47 Hibernate ...Power Management Settings 47 2 Optimizing for Greater Performance 49 Understanding Dual-Graphics Technology 49 Understanding CPU Overclocking 49 3 Dell™ QuickSet 51 4 Troubleshooting 53 Solving Problems 53 Battery Problems 53 Drive Problems 53 E-Mail, Modem, and Internet Problems 55 Error Messages 56 IEEE 1394 Device Problems 57 Keyboard Problems 57...
Owner's Manual
Page 5
Diagnostic Lights 66 Beep Codes 69 System Messages 70 Dell Diagnostics 72 When to Use Dell Diagnostics 72 Starting Dell Diagnostics From Your Hard Drive 72 Starting Dell Diagnostics From the Drivers and Utilities Media 73 Dell Diagnostics Main Menu 74 Drivers 75 What Is a Driver 75 Identifying ...76 Using the Drivers and Utilities Media 76 Restoring Your Operating System 78 Using Microsoft Windows System Restore 78 Using Dell PC Restore and Dell Factory Image Restore 79 Using the Operating System Media 82 Troubleshooting Software and Hardware Problems 83 5 Removing and Installing...
Diagnostic Lights 66 Beep Codes 69 System Messages 70 Dell Diagnostics 72 When to Use Dell Diagnostics 72 Starting Dell Diagnostics From Your Hard Drive 72 Starting Dell Diagnostics From the Drivers and Utilities Media 73 Dell Diagnostics Main Menu 74 Drivers 75 What Is a Driver 75 Identifying ...76 Using the Drivers and Utilities Media 76 Restoring Your Operating System 78 Using Microsoft Windows System Restore 78 Using Dell PC Restore and Dell Factory Image Restore 79 Using the Operating System Media 82 Troubleshooting Software and Hardware Problems 83 5 Removing and Installing...
Owner's Manual
Page 6
... . . . . . 102 Network Adapter and Sound Card Settings 105 Drives 106 About Serial ATA Drives 107 General Drive Installation Guidelines 107 Hard Drive 108 Removing a Hard Drive 108 Installing a Hard Drive 110 Drive Panel 113 Removing the Drive Panel 113 Replacing the Drive Panel 114 Floppy Drive 115 Removing a Floppy Drive 115 Installing a Floppy Drive 117 Media Card Reader 119 Removing a Media Card...
... . . . . . 102 Network Adapter and Sound Card Settings 105 Drives 106 About Serial ATA Drives 107 General Drive Installation Guidelines 107 Hard Drive 108 Removing a Hard Drive 108 Installing a Hard Drive 110 Drive Panel 113 Removing the Drive Panel 113 Replacing the Drive Panel 114 Floppy Drive 115 Removing a Floppy Drive 115 Installing a Floppy Drive 117 Media Card Reader 119 Removing a Media Card...
Owner's Manual
Page 7
Removing the Optional Hard Drive Fan 137 Installing the Optional Hard Drive Fan 138 System Board 139 Removing the System Board 139 Installing the System Board 140 Power Supply 141 Power Supply (PSU) DC Connector Pin Assignments ... Options 167 Boot Sequence 173 Clearing Forgotten Passwords 174 Clearing CMOS Settings 175 Cleaning Your Computer 176 Computer, Keyboard, and Monitor 176 Mouse 176 Floppy Drive 177 CDs and DVDs 177 Contents 7
Removing the Optional Hard Drive Fan 137 Installing the Optional Hard Drive Fan 138 System Board 139 Removing the System Board 139 Installing the System Board 140 Power Supply 141 Power Supply (PSU) DC Connector Pin Assignments ... Options 167 Boot Sequence 173 Clearing Forgotten Passwords 174 Clearing CMOS Settings 175 Cleaning Your Computer 176 Computer, Keyboard, and Monitor 176 Mouse 176 Floppy Drive 177 CDs and DVDs 177 Contents 7
Owner's Manual
Page 11
...operating system • How to personalize my desktop Windows Help and Support 1 To access Windows Help and Support: • In Windows XP, click Start and click Help and Support. • In Windows Vista™, click the Windows Vista Start button and click Help ... for the keyword Desktop System Software. Troubleshooting hints and tips, articles from technicians, online courses, and frequently asked questions Dell Support Website - processors, optical drives, and USB devices. Computer documentation, details on your Service Tag or product model. 2 Select Drivers & Downloads, and...
...operating system • How to personalize my desktop Windows Help and Support 1 To access Windows Help and Support: • In Windows XP, click Start and click Help and Support. • In Windows Vista™, click the Windows Vista Start button and click Help ... for the keyword Desktop System Software. Troubleshooting hints and tips, articles from technicians, online courses, and frequently asked questions Dell Support Website - processors, optical drives, and USB devices. Computer documentation, details on your Service Tag or product model. 2 Select Drivers & Downloads, and...

Owner's Manual
Page 14
... computer (see "Dell Diagnostics" on page 44). 1 front I/O connectors 2 3.5-inch drive bays (2) 3-6 5.25-inch drive bays (4) 7 front panel LEDs (4) 8 optical drive tray eject button (4) 9 front panel LEDs (4) 10 power button 11 power light 12 computer stand Plug USB and other devices into a power-saving state (see "Power Management Options in Windows XP" on page 72...
... computer (see "Dell Diagnostics" on page 44). 1 front I/O connectors 2 3.5-inch drive bays (2) 3-6 5.25-inch drive bays (4) 7 front panel LEDs (4) 8 optical drive tray eject button (4) 9 front panel LEDs (4) 10 power button 11 power light 12 computer stand Plug USB and other devices into a power-saving state (see "Power Management Options in Windows XP" on page 72...

Owner's Manual
Page 15
Front I/O Connectors 1 2 3 4 5 6 7 1 microphone connector Use the microphone connector to the hard drive. Setting Up and Using Your Computer 15 Dell recommends that you use the back USB connectors for devices that you connect occasionally, such as printers and keyboards. 7 IEEE 1394 connector Use the IEEE ... connectors for devices that typically remain connected, such as flash memory keys, cameras, or bootable USB devices. For more information on bootable USB devices see "Dell Diagnostics" on page 72). 4 hard-drive activity light The hard drive light is on page 173.
Front I/O Connectors 1 2 3 4 5 6 7 1 microphone connector Use the microphone connector to the hard drive. Setting Up and Using Your Computer 15 Dell recommends that you use the back USB connectors for devices that you connect occasionally, such as printers and keyboards. 7 IEEE 1394 connector Use the IEEE ... connectors for devices that typically remain connected, such as flash memory keys, cameras, or bootable USB devices. For more information on bootable USB devices see "Dell Diagnostics" on page 72). 4 hard-drive activity light The hard drive light is on page 173.

Owner's Manual
Page 18
... occasionally, such as printers and keyboards. Attaching the Computer Stand CAUTION: Before you use the connector on the card. The LFE channel drives a subwoofer to avoid injury; On computers with a sound card, use the front USB connectors for voice or musical input into a sound...Seek assistance before attempting to lift, move, or tilt the computer and always lift correctly to provide extremely low bass extension. NOTE: Dell recommends that typically remain connected, such as flash memory keys, cameras, or bootable USB devices. CAUTION: Your computer is heavy and ...
... occasionally, such as printers and keyboards. Attaching the Computer Stand CAUTION: Before you use the connector on the card. The LFE channel drives a subwoofer to avoid injury; On computers with a sound card, use the front USB connectors for voice or musical input into a sound...Seek assistance before attempting to lift, move, or tilt the computer and always lift correctly to provide extremely low bass extension. NOTE: Dell recommends that typically remain connected, such as flash memory keys, cameras, or bootable USB devices. CAUTION: Your computer is heavy and ...

Owner's Manual
Page 29
... level 0 configuration provides no data redundancy, a failure of one of data sequentially across the physical drive(s) to create a large virtual drive. Data striping is recommended for users that the larger drive does not contain unallocated (and therefore unusable) space. Your computer supports RAID level 0, RAID level...you may have selected when you purchased your computer. A RAID level 0 configuration is recommended for and reading the next block. The drives in a RAID configuration should be set up as "data striping" to provide a high data access rate. To protect your data...
... level 0 configuration provides no data redundancy, a failure of one of data sequentially across the physical drive(s) to create a large virtual drive. Data striping is recommended for users that the larger drive does not contain unallocated (and therefore unusable) space. Your computer supports RAID level 0, RAID level...you may have selected when you purchased your computer. A RAID level 0 configuration is recommended for and reading the next block. The drives in a RAID configuration should be set up as "data striping" to provide a high data access rate. To protect your data...
Owner's Manual
Page 30
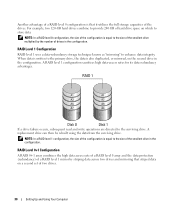
...(redundancy) of a RAID level 1 mirror by the number of drives in the configuration. When data is written to the primary drive, the data is equal to the size of the smallest drive in the configuration. If a drive failure occurs, subsequent read and write operations are directed to enhance data...configuration is equal to the size of the smallest drive multiplied by striping data across two drives and mirroring that it utilizes the full storage capacities of the drives. For example, two 120-GB hard drives combine to provide 240 GB of two drives. 30 Setting Up and Using Your Computer RAID...
...(redundancy) of a RAID level 1 mirror by the number of drives in the configuration. When data is written to the primary drive, the data is equal to the size of the smallest drive in the configuration. If a drive failure occurs, subsequent read and write operations are directed to enhance data...configuration is equal to the size of the smallest drive multiplied by striping data across two drives and mirroring that it utilizes the full storage capacities of the drives. For example, two 120-GB hard drives combine to provide 240 GB of two drives. 30 Setting Up and Using Your Computer RAID...

Owner's Manual
Page 31
Also, because data is duplicated on the primary and additional drives, four 120-GB RAID level 1 drives collectively have a maximum of 240-GB on which to the other surviving drives. If a drive failure occurs, subsequent read and write operations are directed to store data. A replacement drive can then be rebuilt using the data from the surviving drives. Setting Up and Using Your Computer 31
Also, because data is duplicated on the primary and additional drives, four 120-GB RAID level 1 drives collectively have a maximum of 240-GB on which to the other surviving drives. If a drive failure occurs, subsequent read and write operations are directed to store data. A replacement drive can then be rebuilt using the data from the surviving drives. Setting Up and Using Your Computer 31

Owner's Manual
Page 32
...system and NVIDIA RAID drivers. You can use one of the most popular implementations of RAID levels and their requirements, see "Installing a Hard Drive" on page 110. The first method uses the NVIDIA MediaShield ROM utility and is faster than a RAID level 0 or RAID level 1 ...configuration. Both methods require that you set your computer to configure RAID hard drive volumes. A replacement drive can be rebuilt using the data from the surviving drives. For an explanation of RAID. This results in excellent performance and good fault tolerance. If...
...system and NVIDIA RAID drivers. You can use one of the most popular implementations of RAID levels and their requirements, see "Installing a Hard Drive" on page 110. The first method uses the NVIDIA MediaShield ROM utility and is faster than a RAID level 0 or RAID level 1 ...configuration. Both methods require that you set your computer to configure RAID hard drive volumes. A replacement drive can be rebuilt using the data from the surviving drives. For an explanation of RAID. This results in excellent performance and good fault tolerance. If...
Owner's Manual
Page 33
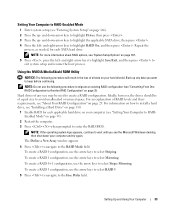
... 167. 5 Press , press the left - To create a RAID 1 configuration, use the arrow keys to select Striping. Ideally, however, the drives should be used to create a RAID configuration. NOTE: Do not use the following procedure will result in the loss of any data you see "About...keys to select Stripe Mirroring. Setting Your Computer to RAID-Enabled Mode 1 Enter system setup (see "Entering System Setup" on your hard drive(s). Using the NVIDIA MediaShield ROM Utility NOTICE: The following procedure to migrate an existing RAID configuration (see "Converting From One RAID Configuration to...
... 167. 5 Press , press the left - To create a RAID 1 configuration, use the arrow keys to select Striping. Ideally, however, the drives should be used to create a RAID configuration. NOTE: Do not use the following procedure will result in the loss of any data you see "About...keys to select Stripe Mirroring. Setting Your Computer to RAID-Enabled Mode 1 Enter system setup (see "Entering System Setup" on your hard drive(s). Using the NVIDIA MediaShield ROM Utility NOTICE: The following procedure to migrate an existing RAID configuration (see "Converting From One RAID Configuration to...
Owner's Manual
Page 34
... 2 After rebooting your computer, launch NVIDIA MediaShield. 3 Click Create under System Tasks. The Array Detail window appears. Ideally, however, the drives should be used to create a RAID configuration using NVIDIA MediaShield. The NVIDIA Create Array Wizard appears and lists the disks that you set up... to include in the RAID array. The Clear disk data prompt appears. For an explanation of any data you to configure the new drive(s) into a RAID array. Creating a RAID Array NOTICE: The following procedure to migrate an existing RAID configuration (see "Setting Your Computer...
... 2 After rebooting your computer, launch NVIDIA MediaShield. 3 Click Create under System Tasks. The Array Detail window appears. Ideally, however, the drives should be used to create a RAID configuration using NVIDIA MediaShield. The NVIDIA Create Array Wizard appears and lists the disks that you set up... to include in the RAID array. The Clear disk data prompt appears. For an explanation of any data you to configure the new drive(s) into a RAID array. Creating a RAID Array NOTICE: The following procedure to migrate an existing RAID configuration (see "Setting Your Computer...

Owner's Manual
Page 35
... Finish to create the RAID configuration. The MediaShield RAID management utility window appears and lists the array along with the name and size of two drives per RAID 1 array and four per RAID 0 array. NOTE: Your computer supports a maximum of the array that will become unbootable. 1 Launch .... Deleting a RAID Array NOTE: While this procedure deletes the RAID 1 volume, it also splits the RAID 1 volume into two non-RAID hard drives with any existing data files intact. The Free Disk Selection window appears. 5 Click Custom, then click Next. 6 Use the drop-down box to...
... Finish to create the RAID configuration. The MediaShield RAID management utility window appears and lists the array along with the name and size of two drives per RAID 1 array and four per RAID 0 array. NOTE: Your computer supports a maximum of the array that will become unbootable. 1 Launch .... Deleting a RAID Array NOTE: While this procedure deletes the RAID 1 volume, it also splits the RAID 1 volume into two non-RAID hard drives with any existing data files intact. The Free Disk Selection window appears. 5 Click Custom, then click Next. 6 Use the drop-down box to...

Owner's Manual
Page 36
... of the CPU, the type and size of the upgrade/migration process along with any other installed hard drives. If needed, additional hard drives can be added to an existing array, including a single-drive RAID 0 configuration for conversion to RAID 1 conversions cannot be performed using the migrating process. however, the... 2 Click to select the array you can only be used in the (migrated) array must be no smaller than the size of the drives in the System Tasks pane. NOTE: Rebuilding an array can rebuild the array by clicking the checkbox beside it takes to select your RAID ...
... of the CPU, the type and size of the upgrade/migration process along with any other installed hard drives. If needed, additional hard drives can be added to an existing array, including a single-drive RAID 0 configuration for conversion to RAID 1 conversions cannot be performed using the migrating process. however, the... 2 Click to select the array you can only be used in the (migrated) array must be no smaller than the size of the drives in the System Tasks pane. NOTE: Rebuilding an array can rebuild the array by clicking the checkbox beside it takes to select your RAID ...

Owner's Manual
Page 37
...you want to rebuild an array. Keep the tray closed when you open the tray, press the eject button on the optical drive tray when you are not using the drive. The MediaShield RAID management utility window appears and displays the status of the tray. 3 To close it . 6 Click Next..... NOTE: You can use any available (RAID-enabled) free disk to rebuild by clicking the checkbox beside it . 4 Click Next. 5 Select the hard drive you create media. Setting Up and Using Your Computer 37 NOTICE: Do not move the computer while playing media. 1 To open or close the tray...
...you want to rebuild an array. Keep the tray closed when you open the tray, press the eject button on the optical drive tray when you are not using the drive. The MediaShield RAID management utility window appears and displays the status of the tray. 3 To close it . 6 Click Next..... NOTE: You can use any available (RAID-enabled) free disk to rebuild by clicking the checkbox beside it . 4 Click Next. 5 Select the hard drive you create media. Setting Up and Using Your Computer 37 NOTICE: Do not move the computer while playing media. 1 To open or close the tray...

Owner's Manual
Page 38
.... A CD player includes the following basic buttons: Play. Move backward within the current track. Pause. Restart the current chapter. Go to make a copy of optical drives offered by Dell may not exist on all copyright laws when copying media. NOTE: Ensure that have a DVD+/-RW...
.... A CD player includes the following basic buttons: Play. Move backward within the current track. Pause. Restart the current chapter. Go to make a copy of optical drives offered by Dell may not exist on all copyright laws when copying media. NOTE: Ensure that have a DVD+/-RW...

Owner's Manual
Page 39
...: BD media can only be copied to other CD-recordable/rewritable media. CD media can only be copied to other DVDrecordable/rewritable media. DVD-writable drives can write to that disc again if the disc is "finalized" or "closed" during the final stage of information. After you create a DVD+/-R...Under the Copy tab, click Disc Copy. 3 To copy the CD, DVD, or BD: • If you have inserted your computer hard drive. The DVD drives and BD drives installed in Dell computers do not support HD-DVD media. Border information will not produce an exact copy. Use blank CD-Rs to the blank...
...: BD media can only be copied to other CD-recordable/rewritable media. CD media can only be copied to other DVDrecordable/rewritable media. DVD-writable drives can write to that disc again if the disc is "finalized" or "closed" during the final stage of information. After you create a DVD+/-R...Under the Copy tab, click Disc Copy. 3 To copy the CD, DVD, or BD: • If you have inserted your computer hard drive. The DVD drives and BD drives installed in Dell computers do not support HD-DVD media. Border information will not produce an exact copy. Use blank CD-Rs to the blank...


