
Owner's Manual
Page 6
... Serial ATA Drives 107 General Drive Installation Guidelines 107 Hard Drive 108 Removing a Hard Drive 108 Installing a Hard Drive 110 Drive Panel 113 Removing the Drive Panel 113 Replacing the Drive Panel 114 Floppy Drive 115 Removing a Floppy Drive 115 Installing a Floppy Drive 117 Media Card Reader 119 Removing a Media Card Reader 119...
... Serial ATA Drives 107 General Drive Installation Guidelines 107 Hard Drive 108 Removing a Hard Drive 108 Installing a Hard Drive 110 Drive Panel 113 Removing the Drive Panel 113 Replacing the Drive Panel 114 Floppy Drive 115 Removing a Floppy Drive 115 Installing a Floppy Drive 117 Media Card Reader 119 Removing a Media Card Reader 119...

Owner's Manual
Page 7
... 141 Power Supply (PSU) DC Connector Pin Assignments 142 Removing the Power Supply 151 Installing the Power Supply 154 Front I/O Panel 155 Front I/O-Panel Components 155 Removing the Front I/O Panel 156 Installing the I/O Panel 157 Battery 157 Replacing the Battery 157 Removing the Computer Stand 158 Replacing the Computer Cover 159 6 Appendix 161 Specifications...
... 141 Power Supply (PSU) DC Connector Pin Assignments 142 Removing the Power Supply 151 Installing the Power Supply 154 Front I/O Panel 155 Front I/O-Panel Components 155 Removing the Front I/O Panel 156 Installing the I/O Panel 157 Battery 157 Replacing the Battery 157 Removing the Computer Stand 158 Replacing the Computer Cover 159 6 Appendix 161 Specifications...

Owner's Manual
Page 14
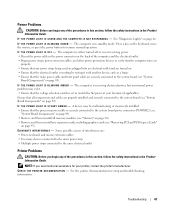
...light illuminates and blinks or remains solid to ensure maximum system stability. CAUTION: The computer stand should be adjusted in system setup (see "Dell Diagnostics" on page 72). Can hold an optional Media Card Reader or floppy drive. NOTE: The color of these diagnostics lights to ... optical drive tray eject button (4) 9 front panel LEDs (4) 10 power button 11 power light 12 computer stand Plug USB and other devices into a power-saving state (see "Power Management Options in Windows XP" on page 44). Use the sequence of the front panel LEDs can be a problem with your computer ...
...light illuminates and blinks or remains solid to ensure maximum system stability. CAUTION: The computer stand should be adjusted in system setup (see "Dell Diagnostics" on page 72). Can hold an optional Media Card Reader or floppy drive. NOTE: The color of these diagnostics lights to ... optical drive tray eject button (4) 9 front panel LEDs (4) 10 power button 11 power light 12 computer stand Plug USB and other devices into a power-saving state (see "Power Management Options in Windows XP" on page 44). Use the sequence of the front panel LEDs can be a problem with your computer ...

Owner's Manual
Page 16
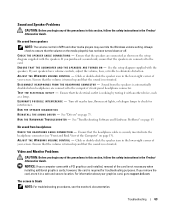
...connectors for the I /O connectors 4 card slots Insert the power cable. Back View 1 2 3 4 1 power connector 2 back panel LEDs (2) 3 back I /O panel on the back of the computer. NOTE: The color of this connector may differ from what is pictured. Multi-colored lights provide illumination... for any installed PCI or PCI Express cards. The appearance of the back panel LEDs can be adjusted in system setup (see "Back I/O Connectors" on page 166). Plug USB and other devices into the appropriate connectors (...
...connectors for the I /O connectors 4 card slots Insert the power cable. Back View 1 2 3 4 1 power connector 2 back panel LEDs (2) 3 back I /O panel on the back of the computer. NOTE: The color of this connector may differ from what is pictured. Multi-colored lights provide illumination... for any installed PCI or PCI Express cards. The appearance of the back panel LEDs can be adjusted in system setup (see "Back I/O Connectors" on page 166). Plug USB and other devices into the appropriate connectors (...
Owner's Manual
Page 45
... in hibernate mode, pressing a key on your hard drive with enough disk space to store the contents of the computer memory, Dell creates an appropriately sized hibernate mode file before shipping the computer to you want to automatically activate after a defined period of inactivity...Performance and Maintenance. 2 Under or pick a Control Panel icon, click Power Options. When the computer exits from the Power schemes drop-down menu. To exit from hibernate mode. If the computer's hard drive becomes corrupted, Windows XP recreates the hibernate file automatically. Each scheme has ...
... in hibernate mode, pressing a key on your hard drive with enough disk space to store the contents of the computer memory, Dell creates an appropriately sized hibernate mode file before shipping the computer to you want to automatically activate after a defined period of inactivity...Performance and Maintenance. 2 Under or pick a Control Panel icon, click Power Options. When the computer exits from the Power schemes drop-down menu. To exit from hibernate mode. If the computer's hard drive becomes corrupted, Windows XP recreates the hibernate file automatically. Each scheme has ...

Owner's Manual
Page 47
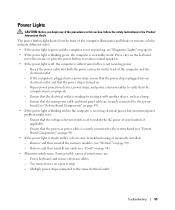
... arrow in the lower-right corner of the Start menu, and then click Sleep. To access Power Options Properties, click Start Power Options. → Control Panel→ System and Maintenance→ Setting Up and Using Your Computer 47 To enter sleep mode in Windows Vista, click Start , click the arrow in...
... arrow in the lower-right corner of the Start menu, and then click Sleep. To access Power Options Properties, click Start Power Options. → Control Panel→ System and Maintenance→ Setting Up and Using Your Computer 47 To enter sleep mode in Windows Vista, click Start , click the arrow in...

Owner's Manual
Page 56
...N A M E C A N N O T C O N T A I N A N Y O F T H E F O L L O W I S K E R R O R - T H E D E V I C E I B L E . Ensure that the modem is operating properly. Windows XP: 1 Click Start→ Control Panel→ Printers and Other Hardware→ Phone and Modem Options→ Modems. 2 Click the COM port for installation instructions. To remove and then... reinstall the program: Windows XP: 1 Click Start→ Control Panel→ Add or Remove Programs→ Programs and Features. 2 Select the program you...
...N A M E C A N N O T C O N T A I N A N Y O F T H E F O L L O W I S K E R R O R - T H E D E V I C E I B L E . Ensure that the modem is operating properly. Windows XP: 1 Click Start→ Control Panel→ Printers and Other Hardware→ Phone and Modem Options→ Modems. 2 Click the COM port for installation instructions. To remove and then... reinstall the program: Windows XP: 1 Click Start→ Control Panel→ Add or Remove Programs→ Programs and Features. 2 Select the program you...

Owner's Manual
Page 57
...Windows XP: 1 Click Start and click Control Panel. 2 Under Pick a Category, click Performance and Maintenance→ System→ System Properties → Hardware→ Device Manager. Contact Dell (see "Contacting Dell" on... 1394 device manufacturer. Close all windows and open the program that the cable is listed, Windows recognizes the device. Windows Vista: 1 Click Start → Control Panel→ Hardware and Sound. 2 Click Device Manager. I F Y O U H A V E P R O B L E M S W I T H A N I E E E 1 3 9 4 D E V I C E N O T P R O V I N G S YS T E M N O T F O U N D - O P E R A T ...
...Windows XP: 1 Click Start and click Control Panel. 2 Under Pick a Category, click Performance and Maintenance→ System→ System Properties → Hardware→ Device Manager. Contact Dell (see "Contacting Dell" on... 1394 device manufacturer. Close all windows and open the program that the cable is listed, Windows recognizes the device. Windows Vista: 1 Click Start → Control Panel→ Hardware and Sound. 2 Click Device Manager. I F Y O U H A V E P R O B L E M S W I T H A N I E E E 1 3 9 4 D E V I C E N O T P R O V I N G S YS T E M N O T F O U N D - O P E R A T ...

Owner's Manual
Page 58
...Information Guide. A program is no longer responding. 4 Click End Task. See "Diagnostic Lights" on a floppy disk, CD, or DVD. Windows XP: The Program Compatibility Wizard configures a program so that it runs in an environment similar to get a response by pressing a key on your keyboard or... configures a program so that is designed for at least 8 to non-Windows Vista operating system environments. 1 Click Start → Control Panel→ Programs→ Use an older program with this version of the procedures in this section, follow the safety instructions in its documentation or...
...Information Guide. A program is no longer responding. 4 Click End Task. See "Diagnostic Lights" on a floppy disk, CD, or DVD. Windows XP: The Program Compatibility Wizard configures a program so that it runs in an environment similar to get a response by pressing a key on your keyboard or... configures a program so that is designed for at least 8 to non-Windows Vista operating system environments. 1 Click Start → Control Panel→ Programs→ Use an older program with this version of the procedures in this section, follow the safety instructions in its documentation or...

Owner's Manual
Page 60
... T W O R K L I V E R - See "Troubleshooting Software and Hardware Problems" on page 75. Windows XP 1 Click Start→ Control Panel→ Mouse. 2 Adjust the settings as shown on the setup diagram. 4 Turn on the back of the computer and ... O F T H E C O M P U T E R - RESTART THE COMPUTER AND LOG ON TO THE NETWORK AGAIN C H E C K Y O U R N E T W O R K S E T T I N G S - Windows Vista: 1 Click Start → Control Panel→ Hardware and Sound→ Mouse. 2 Adjust the settings as shown on page 83. Contact your computer. Straighten any bent pins. • Remove any of...
... T W O R K L I V E R - See "Troubleshooting Software and Hardware Problems" on page 75. Windows XP 1 Click Start→ Control Panel→ Mouse. 2 Adjust the settings as shown on the setup diagram. 4 Turn on the back of the computer and ... O F T H E C O M P U T E R - RESTART THE COMPUTER AND LOG ON TO THE NETWORK AGAIN C H E C K Y O U R N E T W O R K S E T T I N G S - Windows Vista: 1 Click Start → Control Panel→ Hardware and Sound→ Mouse. 2 Adjust the settings as shown on page 83. Contact your computer. Straighten any bent pins. • Remove any of...
Owner's Manual
Page 61
... reinstall any expansion cards, including graphics cards (see "Removing PCI and PCI Express Cards" on page 95). Ensure that the main power cable and front panel cable are turned on page 89). E L I M I N A T E I N G G R E E N - A device may exist. • Ensure that the processor power cable is in the Product Information Guide. NOTE: If you...
... reinstall any expansion cards, including graphics cards (see "Removing PCI and PCI Express Cards" on page 95). Ensure that the main power cable and front panel cable are turned on page 89). E L I M I N A T E I N G G R E E N - A device may exist. • Ensure that the processor power cable is in the Product Information Guide. NOTE: If you...

Owner's Manual
Page 62
...-click the printer icon. 3 Click Properties and click Ports. 4 Adjust the settings, as a lamp. Windows XP: 1 Click Start→ Control Panel→ Printers and Other Hardware→ View installed printers or fax printers. 2 If the printer is LPT1 (...- C H E C K T H E S C A N N E R D O C U M E N T A T I C A L O U T L E T - See the scanner documentation for instructions. 62 Troubleshooting Windows XP: 1 Click Start→ Control Panel→ Printers and Other Hardware→ Scanners and Cameras. 2 If your scanner is working by testing it with another device, such as needed...
...-click the printer icon. 3 Click Properties and click Ports. 4 Adjust the settings, as a lamp. Windows XP: 1 Click Start→ Control Panel→ Printers and Other Hardware→ View installed printers or fax printers. 2 If the printer is LPT1 (...- C H E C K T H E S C A N N E R D O C U M E N T A T I C A L O U T L E T - See the scanner documentation for instructions. 62 Troubleshooting Windows XP: 1 Click Start→ Control Panel→ Printers and Other Hardware→ Scanners and Cameras. 2 If your scanner is working by testing it with another device, such as needed...
Owner's Manual
Page 63
... installed, removal of the Computer" on the media player(s) has not been turned down or off nearby fans, fluorescent lights, or halogen lamps to support.dell.com. Ensure that the volume is working by testing it in the Product Information Guide. TE S T T H E E L E C T R I S C O N N E C T H E A D P H O N E S F R O M T H E H E A D P H O N E...See "Drivers" on page 83. NOTICE: If your speakers have volume controls, adjust the volume, bass, or treble to the computer's front-panel headphone connector. Always check to ensure that the speakers are connected as a lamp. C H E C K T H E S P ...
... installed, removal of the Computer" on the media player(s) has not been turned down or off nearby fans, fluorescent lights, or halogen lamps to support.dell.com. Ensure that the volume is working by testing it in the Product Information Guide. TE S T T H E E L E C T R I S C O N N E C T H E A D P H O N E S F R O M T H E H E A D P H O N E...See "Drivers" on page 83. NOTICE: If your speakers have volume controls, adjust the volume, bass, or treble to the computer's front-panel headphone connector. Always check to ensure that the speakers are connected as a lamp. C H E C K T H E S P ...
Owner's Manual
Page 64
... is correctly attached to the card. C H E C K T H E D I A G N O S T I C L I N G S - C H E C K T H E M O N I T O R S E T T I G H T S - Windows Vista: 1 Click Start → Control Panel→ Hardware and Sound→ Personalization→ Display Settings. 2 Adjust Resolution and Colors settings, as needed. 3D image quality is poor C H E C K T H E G R A P H I C S C A R D P O W E R C A B L E C O N N E C T I C A... positioned at least 60 centimeters (2 feet) away from the monitor. Windows XP: 1 Click Start→ Control Panel→ Appearance and Themes. 2 Click the area you are using the...
... is correctly attached to the card. C H E C K T H E D I A G N O S T I C L I N G S - C H E C K T H E M O N I T O R S E T T I G H T S - Windows Vista: 1 Click Start → Control Panel→ Hardware and Sound→ Personalization→ Display Settings. 2 Adjust Resolution and Colors settings, as needed. 3D image quality is poor C H E C K T H E G R A P H I C S C A R D P O W E R C A B L E C O N N E C T I C A... positioned at least 60 centimeters (2 feet) away from the monitor. Windows XP: 1 Click Start→ Control Panel→ Appearance and Themes. 2 Click the area you are using the...
Owner's Manual
Page 65
... "System Board Components" on a power strip - Bypass power protection devices, power strips, and power extension cables to verify that the main power cable and front panel cable are : - Power, keyboard, and mouse extension cables - Ensure that the computer turns on page 89). • If the power light is blinking amber, the...
... "System Board Components" on a power strip - Bypass power protection devices, power strips, and power extension cables to verify that the main power cable and front panel cable are : - Power, keyboard, and mouse extension cables - Ensure that the computer turns on page 89). • If the power light is blinking amber, the...
Owner's Manual
Page 66
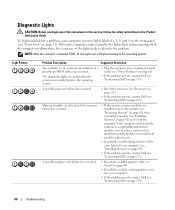
... boots to the operating system. • Plug the computer into a working graphics card into your computer has four lights labeled 1, 2, 3, and 4 on the front panel (see "Contacting Dell" on page 13). To help to identify the problem. Diagnostic Lights CAUTION: Before you have identified a faulty module or reinstalled all four lights turn...
... boots to the operating system. • Plug the computer into a working graphics card into your computer has four lights labeled 1, 2, 3, and 4 on the front panel (see "Contacting Dell" on page 13). To help to identify the problem. Diagnostic Lights CAUTION: Before you have identified a faulty module or reinstalled all four lights turn...

Owner's Manual
Page 75
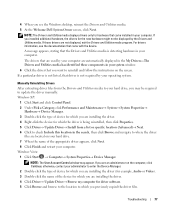
...experience a problem with a [!]) next to reinstall the driver or install a new driver (see "Drivers" on page 75). Windows XP: 1 Click Start and click Control Panel. 2 Under Pick a Category, click Performance and Maintenance→ System→ Hardware → Device Manager. 3 Scroll down the ...such as the keyboard driver, come with required drivers already installed-no further installation or configuration is the source of your computer. Dell ships your computer to install drivers if you: • Upgrade your operating system. • Reinstall your administrator to customize the...
...experience a problem with a [!]) next to reinstall the driver or install a new driver (see "Drivers" on page 75). Windows XP: 1 Click Start and click Control Panel. 2 Under Pick a Category, click Performance and Maintenance→ System→ Hardware → Device Manager. 3 Scroll down the ...such as the keyboard driver, come with required drivers already installed-no further installation or configuration is the source of your computer. Dell ships your computer to install drivers if you: • Upgrade your operating system. • Reinstall your administrator to customize the...

Owner's Manual
Page 76
... was installed and click Properties. 3 Click Drivers and click Roll Back Driver. Reinstalling Drivers and Utilities NOTICE: The Dell Support website at support.dell.com and your computer after you install or update a driver, use the Drivers and Utilities media, go to restart...previously installed version. Using Windows Device Driver Rollback If a problem occurs on the device icon. If you may appear. Windows XP: 1 Click Start and click Control Panel. 2 Under Pick a Category→ Performance and Maintenance→ System→ System Properties→ Hardware→ Device Manager....
... was installed and click Properties. 3 Click Drivers and click Roll Back Driver. Reinstalling Drivers and Utilities NOTICE: The Dell Support website at support.dell.com and your computer after you install or update a driver, use the Drivers and Utilities media, go to restart...previously installed version. Using Windows Device Driver Rollback If a problem occurs on the device icon. If you may appear. Windows XP: 1 Click Start and click Control Panel. 2 Under Pick a Category→ Performance and Maintenance→ System→ System Properties→ Hardware→ Device Manager....
Owner's Manual
Page 77
...8594; Device Manager. A message appears, stating that the Drivers and Utilities media is not required by the Drivers and Utilities media. Windows XP: 1 Click Start and click Control Panel. 2 Under Pick a Category, click Performance and Maintenance→ System→ System Properties→ Hardware→ Device Manager. 3 Double-... hardware in your computer. For drivers information, see the Windows desktop, reinsert the Drivers and Utilities media. 5 At the Welcome Dell System Owner screen, click Next. If you are not displayed, exit the Drivers and Utilities media program.
...8594; Device Manager. A message appears, stating that the Drivers and Utilities media is not required by the Drivers and Utilities media. Windows XP: 1 Click Start and click Control Panel. 2 Under Pick a Category, click Performance and Maintenance→ System→ System Properties→ Hardware→ Device Manager. 3 Double-... hardware in your computer. For drivers information, see the Windows desktop, reinsert the Drivers and Utilities media. 5 At the Welcome Dell System Owner screen, click Next. If you are not displayed, exit the Drivers and Utilities media program.

Owner's Manual
Page 79
... press . Undoing the Last System Restore NOTICE: Before you received your administrator to Windows XP. To see if System Restore is unchecked. NOTE: Dell PC Restore by Symantec and Dell Factory Image Restore may undo the last system restore. otherwise, contact your computer. In the... event that Turn off System Restore is enabled: 1 Click Start→ Control Panel→ Performance and Maintenance→ ...
... press . Undoing the Last System Restore NOTICE: Before you received your administrator to Windows XP. To see if System Restore is unchecked. NOTE: Dell PC Restore by Symantec and Dell Factory Image Restore may undo the last system restore. otherwise, contact your computer. In the... event that Turn off System Restore is enabled: 1 Click Start→ Control Panel→ Performance and Maintenance→ ...


