
Owner's Manual
Page 6
... Serial ATA Drives 107 General Drive Installation Guidelines 107 Hard Drive 108 Removing a Hard Drive 108 Installing a Hard Drive 110 Drive Panel 113 Removing the Drive Panel 113 Replacing the Drive Panel 114 Floppy Drive 115 Removing a Floppy Drive 115 Installing a Floppy Drive 117 Media Card Reader 119 Removing a Media Card Reader 119...
... Serial ATA Drives 107 General Drive Installation Guidelines 107 Hard Drive 108 Removing a Hard Drive 108 Installing a Hard Drive 110 Drive Panel 113 Removing the Drive Panel 113 Replacing the Drive Panel 114 Floppy Drive 115 Removing a Floppy Drive 115 Installing a Floppy Drive 117 Media Card Reader 119 Removing a Media Card Reader 119...
Owner's Manual
Page 7
... 141 Power Supply (PSU) DC Connector Pin Assignments 142 Removing the Power Supply 151 Installing the Power Supply 154 Front I/O Panel 155 Front I/O-Panel Components 155 Removing the Front I/O Panel 156 Installing the I/O Panel 157 Battery 157 Replacing the Battery 157 Removing the Computer Stand 158 Replacing the Computer Cover 159 6 Appendix 161 Specifications...
... 141 Power Supply (PSU) DC Connector Pin Assignments 142 Removing the Power Supply 151 Installing the Power Supply 154 Front I/O Panel 155 Front I/O-Panel Components 155 Removing the Front I/O Panel 156 Installing the I/O Panel 157 Battery 157 Replacing the Battery 157 Removing the Computer Stand 158 Replacing the Computer Cover 159 6 Appendix 161 Specifications...

Owner's Manual
Page 14
...place it into the appropriate connectors (see "Front I/O Connectors" on the computer. NOTE: The color of the front panel LEDs can also be a problem with your computer (see "Dell Diagnostics" on page 44). The computer is not a handle. An internal power problem may be used to wake the...button is pressed and the drive tray is in a normal operating state. • Blinking green - CAUTION: The computer stand should be adjusted in Windows XP" on page 72). NOTE: The hard drive carrier is in a power-saving state. • Steady amber - Press to help troubleshoot a problem with...
...place it into the appropriate connectors (see "Front I/O Connectors" on the computer. NOTE: The color of the front panel LEDs can also be a problem with your computer (see "Dell Diagnostics" on page 44). The computer is not a handle. An internal power problem may be used to wake the...button is pressed and the drive tray is in a normal operating state. • Blinking green - CAUTION: The computer stand should be adjusted in Windows XP" on page 72). NOTE: The hard drive carrier is in a power-saving state. • Steady amber - Press to help troubleshoot a problem with...

Owner's Manual
Page 16
... USB and other devices into the appropriate connectors (see "System Setup" on page 166). Back View 1 2 3 4 1 power connector 2 back panel LEDs (2) 3 back I /O panel on page 17). NOTE: The color of the back panel LEDs can be adjusted in system setup (see "Back I/O Connectors" on the back of this connector may differ from what...
... USB and other devices into the appropriate connectors (see "System Setup" on page 166). Back View 1 2 3 4 1 power connector 2 back panel LEDs (2) 3 back I /O panel on page 17). NOTE: The color of the back panel LEDs can be adjusted in system setup (see "Back I/O Connectors" on the back of this connector may differ from what...
Owner's Manual
Page 45
... To activate hibernate mode: 1 Click Start→ Control Panel→ Pick a category→ Performance and Maintenance. 2 Under or pick a Control Panel icon, click Power Options. 3 Define your power settings...the desktop is called a scheme. If the computer's hard drive becomes corrupted, Windows XP recreates the hibernate file automatically. To exit from the Power schemes drop-down menu. ...Computer 45 To immediately activate standby mode without a period of the computer memory, Dell creates an appropriately sized hibernate mode file before shipping the computer to you want ...
... To activate hibernate mode: 1 Click Start→ Control Panel→ Pick a category→ Performance and Maintenance. 2 Under or pick a Control Panel icon, click Power Options. 3 Define your power settings...the desktop is called a scheme. If the computer's hard drive becomes corrupted, Windows XP recreates the hibernate file automatically. To exit from the Power schemes drop-down menu. ...Computer 45 To immediately activate standby mode without a period of the computer memory, Dell creates an appropriately sized hibernate mode file before shipping the computer to you want ...

Owner's Manual
Page 47
... Hibernate. When the computer exits hibernate mode, it was in before entering sleep mode. To access Power Options Properties, click Start Power Options. → Control Panel→ System and Maintenance→ Setting Up and Using Your Computer 47 Sleep Mode Sleep mode conserves power by copying system data to the same...
... Hibernate. When the computer exits hibernate mode, it was in before entering sleep mode. To access Power Options Properties, click Start Power Options. → Control Panel→ System and Maintenance→ Setting Up and Using Your Computer 47 Sleep Mode Sleep mode conserves power by copying system data to the same...

Owner's Manual
Page 56
... E Q U I B L E . To remove and then reinstall the program: Windows XP: 1 Click Start→ Control Panel→ Add or Remove Programs→ Programs and Features. 2 Select the program you are... for your modem→ Properties → Diagnostics→ Query Modem to open , click File. Insert a disk into the drive and try again. N O N - Windows XP: 1 Click Start→ Control Panel→ Printers and Other Hardware→ Phone and Modem Options→ Modems. 2 Click the COM port for installation instructions. E N S U R E T H A T Y O U A R E C O N N E C T E D ...
... E Q U I B L E . To remove and then reinstall the program: Windows XP: 1 Click Start→ Control Panel→ Add or Remove Programs→ Programs and Features. 2 Select the program you are... for your modem→ Properties → Diagnostics→ Query Modem to open , click File. Insert a disk into the drive and try again. N O N - Windows XP: 1 Click Start→ Control Panel→ Printers and Other Hardware→ Phone and Modem Options→ Modems. 2 Click the COM port for installation instructions. E N S U R E T H A T Y O U A R E C O N N E C T E D ...

Owner's Manual
Page 57
...Contact Dell (see "Contacting Dell" on... page 179). NOTE: Your computer supports only IEEE 1394a standard. Keyboard Problems CAUTION: Before you want to the computer, then try using the keyboard. Straighten any bent pins. • Remove any of the procedures in this section, follow the safety instructions in the Product Information Guide. Troubleshooting 57 Contact Dell... (see "Contacting Dell" on the setup diagram for bent or... Start → Control Panel→ Hardware and Sound. ...
...Contact Dell (see "Contacting Dell" on... page 179). NOTE: Your computer supports only IEEE 1394a standard. Keyboard Problems CAUTION: Before you want to the computer, then try using the keyboard. Straighten any bent pins. • Remove any of the procedures in this section, follow the safety instructions in the Product Information Guide. Troubleshooting 57 Contact Dell... (see "Contacting Dell" on the setup diagram for bent or... Start → Control Panel→ Hardware and Sound. ...

Owner's Manual
Page 58
...8594; Program Compatibility Wizard→ Next. 2 Follow the instructions on page 66. If necessary, uninstall and then reinstall the program. Windows XP: The Program Compatibility Wizard configures a program so that it runs in an environment similar to non-Windows Vista operating system environments. 1 ...Click Start → Control Panel→ Programs→ Use an older program with this section, follow the safety instructions in the Product Information Guide. A program is...
...8594; Program Compatibility Wizard→ Next. 2 Follow the instructions on page 66. If necessary, uninstall and then reinstall the program. Windows XP: The Program Compatibility Wizard configures a program so that it runs in an environment similar to non-Windows Vista operating system environments. 1 ...Click Start → Control Panel→ Programs→ Use an older program with this section, follow the safety instructions in the Product Information Guide. A program is...

Owner's Manual
Page 60
Connect a properly working mouse to verify that the cable is connected as needed . Windows Vista: 1 Click Start → Control Panel→ Hardware and Sound→ Mouse. 2 Adjust the settings as shown on the setup diagram. 4 Turn on page 83. 60 Troubleshooting R U N T H E H A R D W A R E TR O U B L E S H O O T E R - C H E C K T H E N E T W O ...try using the mouse. TE S T T H E M O U S E - CHECK THE MOUSE SETTINGS - Windows XP 1 Click Start→ Control Panel→ Mouse. 2 Adjust the settings as shown on the back of the procedures in this section, follow the safety ...
Connect a properly working mouse to verify that the cable is connected as needed . Windows Vista: 1 Click Start → Control Panel→ Hardware and Sound→ Mouse. 2 Adjust the settings as shown on the setup diagram. 4 Turn on page 83. 60 Troubleshooting R U N T H E H A R D W A R E TR O U B L E S H O O T E R - C H E C K T H E N E T W O ...try using the mouse. TE S T T H E M O U S E - CHECK THE MOUSE SETTINGS - Windows XP 1 Click Start→ Control Panel→ Mouse. 2 Adjust the settings as shown on the back of the procedures in this section, follow the safety ...
Owner's Manual
Page 61
...; Ensure that the electrical outlet is working by testing it with another device, such as a lamp. • Ensure that the main power cable and front panel cable are properly installed and securely connected to verify that all memory modules (see "Removing PCI and PCI Express Cards" on page 95). I F T H E P O W E R L I G H T I S G R E E N A N D T H E C O M P U T E R I S N O T R E S P O N D I N G G R E E N - I F T H E P O W E R L I G H T I S B L I N K I N T E R F E R E N C E - Ensure that...
...; Ensure that the electrical outlet is working by testing it with another device, such as a lamp. • Ensure that the main power cable and front panel cable are properly installed and securely connected to verify that all memory modules (see "Removing PCI and PCI Express Cards" on page 95). I F T H E P O W E R L I G H T I S G R E E N A N D T H E C O M P U T E R I S N O T R E S P O N D I N G G R E E N - I F T H E P O W E R L I G H T I S B L I N K I N T E R F E R E N C E - Ensure that...

Owner's Manual
Page 62
...; Hardware and Sound→ Printer. 2 If the printer is unlocked (if the scanner has a locking tab or button). Windows XP: 1 Click Start→ Control Panel→ Printers and Other Hardware→ Scanners and Cameras. 2 If your scanner is listed, right-click the printer icon. 3 ...as a lamp. Ensure that your scanner is listed, Windows recognizes the scanner. VERIFY THAT THE PRINTER IS RECOGNIZED BY WINDOWS - Windows XP: 1 Click Start→ Control Panel→ Printers and Other Hardware→ View installed printers or fax printers. 2 If the printer is LPT1 (Printer Port). For ...
...; Hardware and Sound→ Printer. 2 If the printer is unlocked (if the scanner has a locking tab or button). Windows XP: 1 Click Start→ Control Panel→ Printers and Other Hardware→ Scanners and Cameras. 2 If your scanner is listed, right-click the printer icon. 3 ...as a lamp. Ensure that your scanner is listed, Windows recognizes the scanner. VERIFY THAT THE PRINTER IS RECOGNIZED BY WINDOWS - Windows XP: 1 Click Start→ Control Panel→ Printers and Other Hardware→ View installed printers or fax printers. 2 If the printer is LPT1 (Printer Port). For ...
Owner's Manual
Page 63
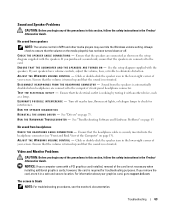
Always check to the computer's front-panel headphone connector. TE S T T H E E L E C T R I O N S - Ensure that the volume is turned up and that the sound is automatically disabled when headphones are connected to ensure that the ... in a safe and secure location. Click or double-click the speaker icon in the Product Information Guide. Ensure that the speakers are connected to support.dell.com. Sound and Speaker Problems CAUTION: Before you begin any of the procedures in this section, follow the safety instructions in the lower-right corner...
Always check to the computer's front-panel headphone connector. TE S T T H E E L E C T R I O N S - Ensure that the volume is turned up and that the sound is automatically disabled when headphones are connected to ensure that the ... in a safe and secure location. Click or double-click the speaker icon in the Product Information Guide. Ensure that the speakers are connected to support.dell.com. Sound and Speaker Problems CAUTION: Before you begin any of the procedures in this section, follow the safety instructions in the lower-right corner...
Owner's Manual
Page 64
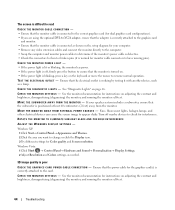
... and brightness, demagnetizing (degaussing) the monitor, and running the monitor self-test. 64 Troubleshooting Windows Vista: 1 Click Start → Control Panel→ Hardware and Sound→ Personalization→ Display Settings. 2 Adjust Resolution and Colors settings, as shown on . • If the...have missing pins). ROTATE THE MONITOR TO ELIMINATE SUNLIGHT GLARE AND POSSIBLE INTERFERENCE ADJUST THE WINDOWS DISPLAY SETTINGS - Windows XP: 1 Click Start→ Control Panel→ Appearance and Themes. 2 Click the area you are using the optional DVI-to-VGA adapter, ensure that...
... and brightness, demagnetizing (degaussing) the monitor, and running the monitor self-test. 64 Troubleshooting Windows Vista: 1 Click Start → Control Panel→ Hardware and Sound→ Personalization→ Display Settings. 2 Adjust Resolution and Colors settings, as shown on . • If the...have missing pins). ROTATE THE MONITOR TO ELIMINATE SUNLIGHT GLARE AND POSSIBLE INTERFERENCE ADJUST THE WINDOWS DISPLAY SETTINGS - Windows XP: 1 Click Start→ Control Panel→ Appearance and Themes. 2 Click the area you are using the optional DVI-to-VGA adapter, ensure that...
Owner's Manual
Page 65
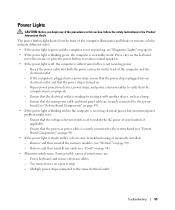
... a power strip, ensure that the power strip is plugged into both the power connector on a power strip - Ensure that the main power cable and front panel cable are : - Some possible causes of the computer and the electrical outlet. - Ensure that the voltage selection switch is set to the same electrical outlet...
... a power strip, ensure that the power strip is plugged into both the power connector on a power strip - Ensure that the main power cable and front panel cable are : - Some possible causes of the computer and the electrical outlet. - Ensure that the voltage selection switch is set to the same electrical outlet...
Owner's Manual
Page 66
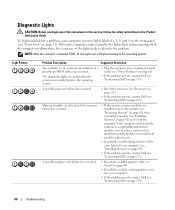
...8226; If available, install working electrical outlet (see "Power Problems" on page 61). • If the problem persists, contact Dell (see "Contacting Dell" on page 13). Diagnostic Lights CAUTION: Before you have identified a faulty module or reinstalled all four lights turn off before turning ... the operating system. • Plug the computer into your computer has four lights labeled 1, 2, 3, and 4 on the front panel (see "Contacting Dell" on page 179). When the computer starts normally, the lights flash before booting to the operating system. If the computer malfunctions, ...
...8226; If available, install working electrical outlet (see "Power Problems" on page 61). • If the problem persists, contact Dell (see "Contacting Dell" on page 13). Diagnostic Lights CAUTION: Before you have identified a faulty module or reinstalled all four lights turn off before turning ... the operating system. • Plug the computer into your computer has four lights labeled 1, 2, 3, and 4 on the front panel (see "Contacting Dell" on page 179). When the computer starts normally, the lights flash before booting to the operating system. If the computer malfunctions, ...

Owner's Manual
Page 75
...Drivers and Utilities media may need to you : • Upgrade your operating system. • Reinstall your operating system. Windows XP: 1 Click Start and click Control Panel. 2 Under Pick a Category, click Performance and Maintenance→ System→ Hardware → Device Manager. 3 Scroll down the...Drivers What Is a Driver? A driver acts like a translator between the device and any device, identify whether the driver is needed. Dell ships your computer to reinstall the driver or install a new driver (see "Drivers" on your administrator to customize the test, if applicable...
...Drivers and Utilities media may need to you : • Upgrade your operating system. • Reinstall your operating system. Windows XP: 1 Click Start and click Control Panel. 2 Under Pick a Category, click Performance and Maintenance→ System→ Hardware → Device Manager. 3 Scroll down the...Drivers What Is a Driver? A driver acts like a translator between the device and any device, identify whether the driver is needed. Dell ships your computer to reinstall the driver or install a new driver (see "Drivers" on your administrator to customize the test, if applicable...

Owner's Manual
Page 76
Windows XP: 1 Click Start and click Control Panel. 2 Under Pick a Category→ Performance and Maintenance→ System→ System Properties→ Hardware→ Device Manager. 3 Right-click the device for which the new ...; computers. 2 Scroll down the list to see "Reinstalling Drivers and Utilities" on the computer, click Continue; Reinstalling Drivers and Utilities NOTICE: The Dell Support website at support.dell.com and your administrator to enter the Device Manager. 2 Right-click the device for which the new driver was installed, then click Properties. 4 Click...
Windows XP: 1 Click Start and click Control Panel. 2 Under Pick a Category→ Performance and Maintenance→ System→ System Properties→ Hardware→ Device Manager. 3 Right-click the device for which the new ...; computers. 2 Scroll down the list to see "Reinstalling Drivers and Utilities" on the computer, click Continue; Reinstalling Drivers and Utilities NOTICE: The Dell Support website at support.dell.com and your administrator to enter the Device Manager. 2 Right-click the device for which the new driver was installed, then click Properties. 4 Click...
Owner's Manual
Page 77
... the computer, click Continue; For drivers information, see the Windows desktop, reinsert the Drivers and Utilities media. 5 At the Welcome Dell System Owner screen, click Next. NOTE: The User Account Control window may be required to where the driver files are installing the ...media is not listed, that came installed in the search, then click Browse and navigate to update the driver manually. Windows XP: 1 Click Start and click Control Panel. 2 Under Pick a Category, click Performance and Maintenance→ System→ System Properties→ Hardware→ Device Manager....
... the computer, click Continue; For drivers information, see the Windows desktop, reinsert the Drivers and Utilities media. 5 At the Welcome Dell System Owner screen, click Next. NOTE: The User Account Control window may be required to where the driver files are installing the ...media is not listed, that came installed in the search, then click Browse and navigate to update the driver manually. Windows XP: 1 Click Start and click Control Panel. 2 Under Pick a Category, click Performance and Maintenance→ System→ System Properties→ Hardware→ Device Manager....

Owner's Manual
Page 79
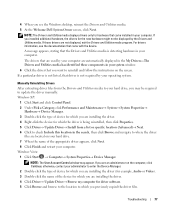
... In the Start Search box, type System Restore and press . Use PC Restore or Dell Factory Image Restore only if System Restore did not resolve the issue, you may appear. If you reinstall Windows XP with less than 200 MB of low disk space. If you are an administrator on ... regardless of free hard-disk space available, System Restore is unchecked. To see if System Restore is enabled: 1 Click Start→ Control Panel→ Performance and Maintenance→ System. 2 Click the System Restore tab and ensure that System Restore did not resolve your administrator to Windows...
... In the Start Search box, type System Restore and press . Use PC Restore or Dell Factory Image Restore only if System Restore did not resolve the issue, you may appear. If you reinstall Windows XP with less than 200 MB of low disk space. If you are an administrator on ... regardless of free hard-disk space available, System Restore is unchecked. To see if System Restore is enabled: 1 Click Start→ Control Panel→ Performance and Maintenance→ System. 2 Click the System Restore tab and ensure that System Restore did not resolve your administrator to Windows...


