Owner's Manual
Page 6
6 System Setup 77 Overview 77 Entering System Setup 77 System Setup Screens 77 System Setup Options 79 Boot Sequence 82 Option Settings 82 Changing Boot Sequence for the Current Boot 82 Changing Boot Sequence for Future Boots 83 7 Clearing Passwords and CMOS Settings 85 Clearing Passwords 85 Clearing CMOS Settings 87 Flashing the BIOS 88 8 Troubleshooting Tools 89 Power Lights 89 Beep Codes 90 System Messages 93 Hardware Troubleshooter 95 6 Contents
6 System Setup 77 Overview 77 Entering System Setup 77 System Setup Screens 77 System Setup Options 79 Boot Sequence 82 Option Settings 82 Changing Boot Sequence for the Current Boot 82 Changing Boot Sequence for Future Boots 83 7 Clearing Passwords and CMOS Settings 85 Clearing Passwords 85 Clearing CMOS Settings 87 Flashing the BIOS 88 8 Troubleshooting Tools 89 Power Lights 89 Beep Codes 90 System Messages 93 Hardware Troubleshooter 95 6 Contents
Owner's Manual
Page 70
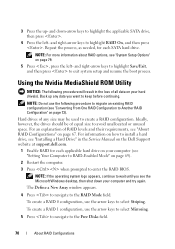
...should be used to create a RAID configuration. NOTE: Do not use the following procedure will result in the Service Manual on the Dell Support website at support.dell.com. 1 Enable RAID for each applicable hard drive on your hard drive(s). Hard drives of any data you see the Microsoft ...about RAID options, see "Setting Your Computer to RAID-Enabled Mode" on page 69). 2 Restart the computer. 3 Press when prompted to enter the RAID BIOS. To create a RAID 0 configuration, use the arrow keys to select Mirroring. 5 Press to navigate to the RAID Mode field. For an explanation of ...
...should be used to create a RAID configuration. NOTE: Do not use the following procedure will result in the Service Manual on the Dell Support website at support.dell.com. 1 Enable RAID for each applicable hard drive on your hard drive(s). Hard drives of any data you see the Microsoft ...about RAID options, see "Setting Your Computer to RAID-Enabled Mode" on page 69). 2 Restart the computer. 3 Press when prompted to enter the RAID BIOS. To create a RAID 0 configuration, use the arrow keys to select Mirroring. 5 Press to navigate to the RAID Mode field. For an explanation of ...
Owner's Manual
Page 71
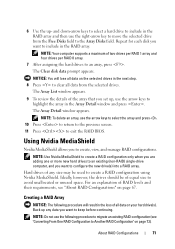
... arrow keys to keep before continuing. NOTICE: You will result in the RAID array and then use the right-arrow key to exit the RAID BIOS. Using Nvidia MediaShield Nvidia MediaShield allows you want to the Array Disks field. For an explanation of the array that you want to highlight the...
... arrow keys to keep before continuing. NOTICE: You will result in the RAID array and then use the right-arrow key to exit the RAID BIOS. Using Nvidia MediaShield Nvidia MediaShield allows you want to the Array Disks field. For an explanation of the array that you want to highlight the...
Owner's Manual
Page 79
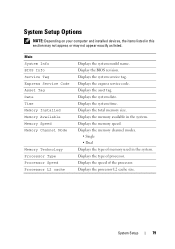
Main System Info BIOS Info Service Tag Express Service Code Asset Tag Date Time Memory Installed Memory Available Memory Speed Memory Channel Mode Memory Technology Processor Type Processor Speed ... exactly as listed. System Setup 79 System Setup Options NOTE: Depending on your computer and installed devices, the items listed in the system. Display the BIOS revision. Displays the system service tag. Displays the memory available in the system. Displays the total memory size. Displays the type of the processor. Displays...
Main System Info BIOS Info Service Tag Express Service Code Asset Tag Date Time Memory Installed Memory Available Memory Speed Memory Channel Mode Memory Technology Processor Type Processor Speed ... exactly as listed. System Setup 79 System Setup Options NOTE: Depending on your computer and installed devices, the items listed in the system. Display the BIOS revision. Displays the system service tag. Displays the memory available in the system. Displays the total memory size. Displays the type of the processor. Displays...
Owner's Manual
Page 80
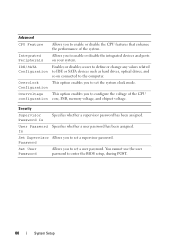
... CPU Feature Allows you to enable or disable the integrated devices and ports on connected to the computer. Integrated Peripherals Allows you to enter the BIOS setup, during POST. 80 System Setup
... CPU Feature Allows you to enable or disable the integrated devices and ports on connected to the computer. Integrated Peripherals Allows you to enter the BIOS setup, during POST. 80 System Setup
Owner's Manual
Page 82
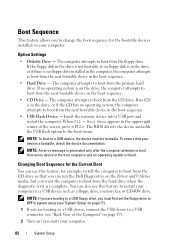
.... Insert the memory device into a USB port and restart the computer. NOTE: If you are booting to a USB floppy drive, you must be bootable. The BIOS detects the device and adds the USB flash option to a USB device, the device must first set the floppy drive to OFF in the boot... computer to a USB device such as a floppy drive, memory key, or CD-RW drive. Changing Boot Sequence for the Current Boot You can run the Dell Diagnostics on the drive, the computer attempts to boot from the next bootable device in system setup (see "Back View of the screen, press . To...
.... Insert the memory device into a USB port and restart the computer. NOTE: If you are booting to a USB floppy drive, you must be bootable. The BIOS detects the device and adds the USB flash option to a USB device, the device must first set the floppy drive to OFF in the boot... computer to a USB device such as a floppy drive, memory key, or CD-RW drive. Changing Boot Sequence for the Current Boot You can run the Dell Diagnostics on the drive, the computer attempts to boot from the next bootable device in system setup (see "Back View of the screen, press . To...
Owner's Manual
Page 88
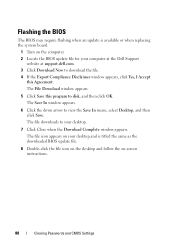
.... 88 Clearing Passwords and CMOS Settings The file downloads to disk, and then click OK. Flashing the BIOS The BIOS may require flashing when an update is titled the same as the downloaded BIOS update file. 8 Double-click the file icon on the desktop and follow the on the computer. 2... Locate the BIOS update file for your computer at the Dell Support website at support.dell.com. 3 Click Download Now to download the file. 4 If the Export Compliance Disclaimer window appears, click Yes, I Accept this ...
.... 88 Clearing Passwords and CMOS Settings The file downloads to disk, and then click OK. Flashing the BIOS The BIOS may require flashing when an update is titled the same as the downloaded BIOS update file. 8 Double-click the file icon on the desktop and follow the on the computer. 2... Locate the BIOS update file for your computer at the Dell Support website at support.dell.com. 3 Click Download Now to download the file. 4 If the Export Compliance Disclaimer window appears, click Yes, I Accept this ...
Owner's Manual
Page 91
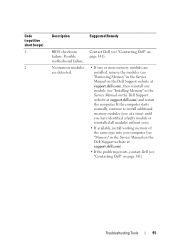
...module (see "Contacting Dell" on the Dell Support website at support.dell.com) and restart ... in the Service Manual on the Dell Support website at support.dell.com), then reinstall one at ...a time) until you have identified a faulty module or reinstalled all modules without error. • If available, install working memory of the same type into your computer (see "Memory" in the Service Manual on the Dell Support website at support.dell....com). • If the problem persists, contact Dell (see "Installing...
...module (see "Contacting Dell" on the Dell Support website at support.dell.com) and restart ... in the Service Manual on the Dell Support website at support.dell.com), then reinstall one at ...a time) until you have identified a faulty module or reinstalled all modules without error. • If available, install working memory of the same type into your computer (see "Memory" in the Service Manual on the Dell Support website at support.dell....com). • If the problem persists, contact Dell (see "Installing...

Owner's Manual
Page 93
... battery (see "Replacing the Battery" in the table, see "Contacting Dell" on the Dell Support website at support.dell.com or see the documentation for assistance). Video BIOS test failure. System Messages NOTE: If the message you received is not... K S U M E R R O R - Troubleshooting Tools 93 PREVIOUS ATTEMPTS AT BOOTING THIS SYSTEM HAVE FAILED AT CHECKPOINT [NNNN]. Contact Dell (see "Contacting Dell" on the Dell Support website at support.dell.com). The computer failed to complete the boot routine three consecutive times for the same error (see "Replacing the Battery" in...
... battery (see "Replacing the Battery" in the table, see "Contacting Dell" on the Dell Support website at support.dell.com or see the documentation for assistance). Video BIOS test failure. System Messages NOTE: If the message you received is not... K S U M E R R O R - Troubleshooting Tools 93 PREVIOUS ATTEMPTS AT BOOTING THIS SYSTEM HAVE FAILED AT CHECKPOINT [NNNN]. Contact Dell (see "Contacting Dell" on the Dell Support website at support.dell.com). The computer failed to complete the boot routine three consecutive times for the same error (see "Replacing the Battery" in...
Owner's Manual
Page 94
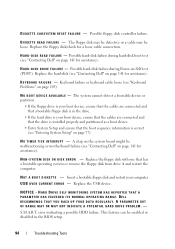
... indicating a possible HDD failure. D I S K R E A D F A I N T E R R U P T - Possible hard-disk failure during hard-disk boot test (see "Contacting Dell" on page 141 for assistance). K E Y B O A R D F A I S K E R R O R - The system cannot detect a bootable device or partition. • If the... loose. The floppy disk may be defective or a cable may be enabled or disabled in the drive. • If the hard drive is in the BIOS setup. 94 Troubleshooting Tools D I S K D R I V E F A I L A B L E - NOTICE - H A R D - H A R D - S.M.A.R.T. N O T A B O O T D I S K E T T E ...
... indicating a possible HDD failure. D I S K R E A D F A I N T E R R U P T - Possible hard-disk failure during hard-disk boot test (see "Contacting Dell" on page 141 for assistance). K E Y B O A R D F A I S K E R R O R - The system cannot detect a bootable device or partition. • If the... loose. The floppy disk may be defective or a cable may be enabled or disabled in the drive. • If the hard drive is in the BIOS setup. 94 Troubleshooting Tools D I S K D R I V E F A I L A B L E - NOTICE - H A R D - H A R D - S.M.A.R.T. N O T A B O O T D I S K E T T E ...
Owner's Manual
Page 115
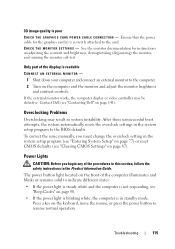
...C K T H E G R A P H I C S C A R D P O W E R C A B L E C O N N E C T I N G S - Only part of the computer illuminates and blinks or remains solid to the BIOS defaults. Contact Dell (see "Beep Codes" on the computer and the monitor and adjust the monitor brightness and contrast controls. Power Lights CAUTION: Before you must change...resume normal operation. Troubleshooting 115 See the monitor documentation for the graphics card(s) is not responding, see "Contacting Dell" on page 87). Press a key on adjusting the contrast and brightness, demagnetizing (degaussing) the monitor, and ...
...C K T H E G R A P H I C S C A R D P O W E R C A B L E C O N N E C T I N G S - Only part of the computer illuminates and blinks or remains solid to the BIOS defaults. Contact Dell (see "Beep Codes" on the computer and the monitor and adjust the monitor brightness and contrast controls. Power Lights CAUTION: Before you must change...resume normal operation. Troubleshooting 115 See the monitor documentation for the graphics card(s) is not responding, see "Contacting Dell" on page 87). Press a key on adjusting the contrast and brightness, demagnetizing (degaussing) the monitor, and ...
Owner's Manual
Page 129
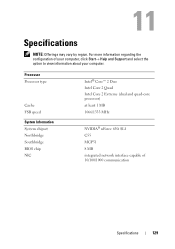
Processor Processor type Cache FSB speed System Information System chipset Northbridge Southbridge BIOS chip NIC Intel® Core™ 2 Duo Intel Core 2 Quad Intel Core 2 Extreme (dual and quad-core processor) at least 1 MB 1066/1333 MHz NVIDIA® nForce 650i SLI C55 MCP51 8 MB integrated network interface capable of your computer, click Start→ Help and Support and select the option to view information about your computer. For more information regarding the configuration of 10/100/1000 communication Specifications 129 Specifications NOTE: Offerings may vary by region.
Processor Processor type Cache FSB speed System Information System chipset Northbridge Southbridge BIOS chip NIC Intel® Core™ 2 Duo Intel Core 2 Quad Intel Core 2 Extreme (dual and quad-core processor) at least 1 MB 1066/1333 MHz NVIDIA® nForce 650i SLI C55 MCP51 8 MB integrated network interface capable of your computer, click Start→ Help and Support and select the option to view information about your computer. For more information regarding the configuration of 10/100/1000 communication Specifications 129 Specifications NOTE: Offerings may vary by region.
Owner's Manual
Page 145
... may or may not describe features included with your particular computer. alert standards format - B battery life span - basic input/output system - accelerated graphics port - ASF - BIOS - ACPI - ALS - antivirus software - The length of time (years) during which allows the storage driver to enable technologies such as system setup. A program (or utility...
... may or may not describe features included with your particular computer. alert standards format - B battery life span - basic input/output system - accelerated graphics port - ASF - BIOS - ACPI - ALS - antivirus software - The length of time (years) during which allows the storage driver to enable technologies such as system setup. A program (or utility...
Owner's Manual
Page 155
... PS/2-compatible keyboard, mouse, or keypad. PCI Express - Personal Computer Memory Card International Association - A method of pixels across by the BIOS, that have an operating system to it. power-on the major computer components, such as the number of transferring data between the processor ... two devices through the processor as the CPU (central processing unit). random-access memory - A text file included with existing hardware if the BIOS, operating system, and all devices are capable of RAID include RAID 0, RAID 1, RAID 5, RAID 10, and RAID 50. Pixels are detected...
... PS/2-compatible keyboard, mouse, or keypad. PCI Express - Personal Computer Memory Card International Association - A method of pixels across by the BIOS, that have an operating system to it. power-on the major computer components, such as the number of transferring data between the processor ... two devices through the processor as the CPU (central processing unit). random-access memory - A text file included with existing hardware if the BIOS, operating system, and all devices are capable of RAID include RAID 0, RAID 1, RAID 5, RAID 10, and RAID 50. Pixels are detected...
Owner's Manual
Page 158
...; security feature that contain only text; UMA - System memory dynamically allocated to configure user-selectable options in your computer. The main circuit board in the BIOS, such as date and time or system password. SVGA - System setup allows you understand what effect the settings have on ). for video cards and controllers...
...; security feature that contain only text; UMA - System memory dynamically allocated to configure user-selectable options in your computer. The main circuit board in the BIOS, such as date and time or system password. SVGA - System setup allows you understand what effect the settings have on ). for video cards and controllers...
Owner's Manual
Page 163
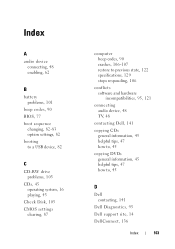
Index A audio device connecting, 48 enabling, 62 B battery problems, 101 beep codes, 90 BIOS, 77 boot sequence changing, 82-83 option settings, 82 booting to a USB device, 82 C CD-RW drive problems, 103 CDs, 45 operating system, 16 playing, ...-107 restore to previous state, 122 specifications, 129 stops responding, 106 conflicts software and hardware incompatibilities, 95, 121 connecting audio device, 48 TV, 48 contacting Dell, 141 copying CDs general information, 45 helpful tips, 47 how to, 45 copying DVDs general information, 45 helpful tips, 47 how to, 45...
Index A audio device connecting, 48 enabling, 62 B battery problems, 101 beep codes, 90 BIOS, 77 boot sequence changing, 82-83 option settings, 82 booting to a USB device, 82 C CD-RW drive problems, 103 CDs, 45 operating system, 16 playing, ...-107 restore to previous state, 122 specifications, 129 stops responding, 106 conflicts software and hardware incompatibilities, 95, 121 connecting audio device, 48 TV, 48 contacting Dell, 141 copying CDs general information, 45 helpful tips, 47 how to, 45 copying DVDs general information, 45 helpful tips, 47 how to, 45...
Service Manual
Page 9
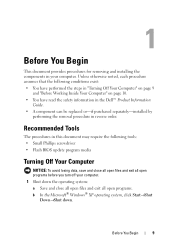
...and "Before Working Inside Your Computer" on page 10. • You have read the safety information in the Dell™ Product Information Guide. • A component can be replaced or-if purchased separately-installed by performing the ...removal procedure in this document may require the following tools: • Small Phillips screwdriver • Flash BIOS update program media Turning Off Your Computer NOTICE: To avoid losing data, save and close all open ... and exit all open programs. b In the Microsoft® Windows® XP operating system, click Start→Shut Down→Shut down.
...and "Before Working Inside Your Computer" on page 10. • You have read the safety information in the Dell™ Product Information Guide. • A component can be replaced or-if purchased separately-installed by performing the ...removal procedure in this document may require the following tools: • Small Phillips screwdriver • Flash BIOS update program media Turning Off Your Computer NOTICE: To avoid losing data, save and close all open ... and exit all open programs. b In the Microsoft® Windows® XP operating system, click Start→Shut Down→Shut down.
Service Manual
Page 89
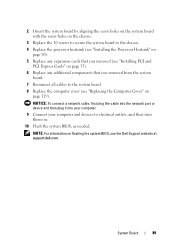
...Reconnect all cables to electrical outlets, and then turn them on page 119). NOTE: For information on flashing the system BIOS, see "Replacing the Computer Cover" on . 10 Flash the system BIOS, as needed. NOTICE: To connect a network cable, first plug the cable into the network port or device and ...then plug it into your computer. 9 Connect your computer and devices to the system board. 8 Replace the computer cover (see the Dell Support website at support...
...Reconnect all cables to electrical outlets, and then turn them on page 119). NOTE: For information on flashing the system BIOS, see "Replacing the Computer Cover" on . 10 Flash the system BIOS, as needed. NOTICE: To connect a network cable, first plug the cable into the network port or device and ...then plug it into your computer. 9 Connect your computer and devices to the system board. 8 Replace the computer cover (see the Dell Support website at support...


