
Owner's Manual
Page 2
...entities claiming the marks and names or their products. Model DCDR01 April 2008 P/N PP521 Rev. Information in this text: Dell, the DELL logo, XPS, and YOURS IS HERE are either potential damage to hardware or loss of data and tells you make better use of.... CAUTION: A CAUTION indicates a potential for property damage, personal injury, or death. disclaims any manner whatsoever without notice. © 2007-2008 Dell Inc. All rights reserved. NOTICE: A NOTICE indicates either trademarks or registered trademarks of the Blu-ray Disc Association; Intel is a registered trademark...
...entities claiming the marks and names or their products. Model DCDR01 April 2008 P/N PP521 Rev. Information in this text: Dell, the DELL logo, XPS, and YOURS IS HERE are either potential damage to hardware or loss of data and tells you make better use of.... CAUTION: A CAUTION indicates a potential for property damage, personal injury, or death. disclaims any manner whatsoever without notice. © 2007-2008 Dell Inc. All rights reserved. NOTICE: A NOTICE indicates either trademarks or registered trademarks of the Blu-ray Disc Association; Intel is a registered trademark...
Owner's Manual
Page 3
Contents Finding Information 11 1 About Your Computer 17 Front View of the Computer 17 Back View of the Computer 19 Front-Panel Connectors 20 Back-Panel Connectors 21 2 Setting Up Your Computer 25 Installing Your Computer in an Enclosure 25 Connecting to the Internet 27 Setting Up Your Internet Connection 28 Transferring Information to a New Computer 29 Microsoft® Windows® XP 30 Windows Vista 33 Setting Up a Printer 33 Printer Cable 34 Connecting a USB Printer 34 Contents 3
Contents Finding Information 11 1 About Your Computer 17 Front View of the Computer 17 Back View of the Computer 19 Front-Panel Connectors 20 Back-Panel Connectors 21 2 Setting Up Your Computer 25 Installing Your Computer in an Enclosure 25 Connecting to the Internet 27 Setting Up Your Internet Connection 28 Transferring Information to a New Computer 29 Microsoft® Windows® XP 30 Windows Vista 33 Setting Up a Printer 33 Printer Cable 34 Connecting a USB Printer 34 Contents 3
Owner's Manual
Page 4
... Display Settings 37 Power Protection Devices 37 Surge Protectors 37 Line Conditioners 38 Uninterruptible Power Supplies 38 Power Management 38 Power Management Options in Windows XP 38 Power Management Options in Windows Vista 42 3 Using Multimedia 43 Playing CDs or DVDs 43 Copying CDs and DVDs 45 How to Copy a CD...
... Display Settings 37 Power Protection Devices 37 Surge Protectors 37 Line Conditioners 38 Uninterruptible Power Supplies 38 Power Management 38 Power Management Options in Windows XP 38 Power Management Options in Windows Vista 42 3 Using Multimedia 43 Playing CDs or DVDs 43 Copying CDs and DVDs 45 How to Copy a CD...

Owner's Manual
Page 8
Troubleshooting Software and Hardware Problems in the Microsoft® Windows® XP and Windows Vista® Operating Systems 121 Restoring Your Operating System 122 Using Microsoft Windows System Restore . . . . 122 Using Dell™ PC Restore and Dell Factory Image Restore 124 Using the Operating System Media 127 11 Specifications 129 12 Getting Help 135... Order-Status Service 137 Problems With Your Order 137 Product Information 138 Returning Items for Warranty Repair or Credit . . . . 138 Before You Call 139 Contacting Dell 141 8 Contents
Troubleshooting Software and Hardware Problems in the Microsoft® Windows® XP and Windows Vista® Operating Systems 121 Restoring Your Operating System 122 Using Microsoft Windows System Restore . . . . 122 Using Dell™ PC Restore and Dell Factory Image Restore 124 Using the Operating System Media 127 11 Specifications 129 12 Getting Help 135... Order-Status Service 137 Problems With Your Order 137 Product Information 138 Returning Items for Warranty Repair or Credit . . . . 138 Before You Call 139 Contacting Dell 141 8 Contents
Owner's Manual
Page 15
...magnifying glass. 3 Click the topic that describes your problem. 3 Follow the instructions on the screen. You can choose to personalize my desktop Find It Here Windows Welcome Center The Windows Welcome Center automatically appears when you use the computer for different people • How to transfer...it appear every time you start your problem. 4 Follow the instructions on the screen. Finding Information 15 Windows Help and Support Microsoft Windows XP: 1 Click the Start button and click Help and Support. 2 Either select one of accessing the Welcome Center is to click the Windows...
...magnifying glass. 3 Click the topic that describes your problem. 3 Follow the instructions on the screen. You can choose to personalize my desktop Find It Here Windows Welcome Center The Windows Welcome Center automatically appears when you use the computer for different people • How to transfer...it appear every time you start your problem. 4 Follow the instructions on the screen. Finding Information 15 Windows Help and Support Microsoft Windows XP: 1 Click the Start button and click Help and Support. 2 Either select one of accessing the Welcome Center is to click the Windows...

Owner's Manual
Page 28
...not have an ISP and want to set up an Internet connection with a provided ISP desktop shortcut: 1 Save and close any open files, and exit any open programs. 2 Click Start→ Internet Explorer. Windows XP 1 Save and close any open files, and exit any open programs. 2 Double-...click the ISP icon on the Microsoft® Windows® desktop. 3 Follow the instructions on page 103. If you are using a dial-up...
...not have an ISP and want to set up an Internet connection with a provided ISP desktop shortcut: 1 Save and close any open files, and exit any open programs. 2 Click Start→ Internet Explorer. Windows XP 1 Save and close any open files, and exit any open programs. 2 Double-...click the ISP icon on the Microsoft® Windows® desktop. 3 Follow the instructions on page 103. If you are using a dial-up...

Owner's Manual
Page 30
... two computers, see Microsoft Knowledge Base Article #305621, titled How to a new computer. This information may not be available in Windows XP. You can use the optional Operating System media for this process or you must run the Files and Settings Transfer Wizard. Running the ... When the Files and Settings Transfer Wizard welcome screen appears, click Next. 30 Setting Up Your Computer Microsoft® Windows® XP The Microsoft Windows XP operating system provides the Files and Settings Transfer Wizard to move data from a source computer to Set Up a Direct Cable Connection ...
... two computers, see Microsoft Knowledge Base Article #305621, titled How to a new computer. This information may not be available in Windows XP. You can use the optional Operating System media for this process or you must run the Files and Settings Transfer Wizard. Running the ... When the Files and Settings Transfer Wizard welcome screen appears, click Next. 30 Setting Up Your Computer Microsoft® Windows® XP The Microsoft Windows XP operating system provides the Files and Settings Transfer Wizard to move data from a source computer to Set Up a Direct Cable Connection ...
Owner's Manual
Page 31
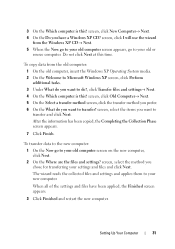
...new computer. screen, click I will use the wizard from the old computer: 1 On the old computer, insert the Windows XP Operating System media. 2 On the Welcome to Microsoft Windows XP screen, click Perform additional tasks. 3 Under What do you want to do you want to transfer? The wizard reads the ... your old computer screen appears, go to your settings and files and click Next. When all of the settings and files have a Windows XP CD? To copy data from the Windows XP CD→ Next. 5 When the Now go to transfer and click Next. 3 On the Which computer is this?
...new computer. screen, click I will use the wizard from the old computer: 1 On the old computer, insert the Windows XP Operating System media. 2 On the Welcome to Microsoft Windows XP screen, click Perform additional tasks. 3 Under What do you want to do you want to transfer? The wizard reads the ... your old computer screen appears, go to your settings and files and click Next. When all of the settings and files have a Windows XP CD? To copy data from the Windows XP CD→ Next. 5 When the Now go to transfer and click Next. 3 On the Which computer is this?
Owner's Manual
Page 32
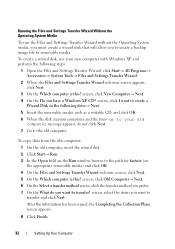
screen, click New Computer→ Next. 4 On the Do you want to transfer and click Next. screen, select the items you have a Windows XP CD? screen, click I want to create a Wizard Disk in the following drive→ Next. 5 Insert the removable media, such as a writable CD, and click OK. ...6 When the disk creation completes and the Now go to your new computer with Windows XP and perform the following steps: 1 Open the Files and Settings Transfer Wizard: click Start→ All Programs→ Accessories→ System Tools→ Files ...
screen, click New Computer→ Next. 4 On the Do you want to transfer and click Next. screen, select the items you have a Windows XP CD? screen, click I want to create a Wizard Disk in the following drive→ Next. 5 Insert the removable media, such as a writable CD, and click OK. ...6 When the disk creation completes and the Now go to your new computer with Windows XP and perform the following steps: 1 Open the Files and Settings Transfer Wizard: click Start→ All Programs→ Accessories→ System Tools→ Files ...
Owner's Manual
Page 33
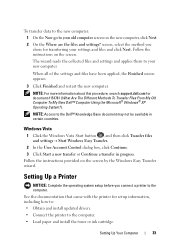
... your new computer. Setting Up Your Computer 33 screen, select the method you connect a printer to the Dell™ Knowledge Base document may not be available in progress. When all of the settings and files have ... Start a new transfer or Continue a transfer in certain countries. NOTE: For more information about this procedure, search support.dell.com for setup information, including how to: • Obtain and install updated drivers. • Connect the printer to...To Transfer Files From My Old Computer To My New Dell™ Computer Using the Microsoft® Windows®...
... your new computer. Setting Up Your Computer 33 screen, select the method you connect a printer to the Dell™ Knowledge Base document may not be available in progress. When all of the settings and files have ... Start a new transfer or Continue a transfer in certain countries. NOTE: For more information about this procedure, search support.dell.com for setup information, including how to: • Obtain and install updated drivers. • Connect the printer to...To Transfer Files From My Old Computer To My New Dell™ Computer Using the Microsoft® Windows®...
Owner's Manual
Page 35
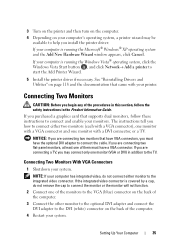
... them must have a VGA connector. Connecting Two Monitors CAUTION: Before you install the printer driver: If your computer is running the Microsoft® Windows® XP operating system and the Add New Hardware Wizard window appears, click Cancel. If you are connecting a TV, you may be available to help you begin...
... them must have a VGA connector. Connecting Two Monitors CAUTION: Before you install the printer driver: If your computer is running the Microsoft® Windows® XP operating system and the Add New Hardware Wizard window appears, click Cancel. If you are connecting a TV, you may be available to help you begin...
Owner's Manual
Page 38
Disconnect the network cable from the electrical outlet. Uninterruptible Power Supplies NOTICE: Loss of electricity your computer uses when it was in Windows XP The Microsoft Windows XP power management features can use standby mode or hibernate mode to reduce power to entering the mode. 38 Setting Up Your Computer A UPS protects against...
Disconnect the network cable from the electrical outlet. Uninterruptible Power Supplies NOTICE: Loss of electricity your computer uses when it was in Windows XP The Microsoft Windows XP power management features can use standby mode or hibernate mode to reduce power to entering the mode. 38 Setting Up Your Computer A UPS protects against...
Owner's Manual
Page 39
...vary according to entering hibernate mode. When the computer exits from standby mode, it returns to the operating state it was in Windows XP Home Edition. To set standby mode to a reserved area on the hard drive, and then completely turning off the display and ...Panel icon, click Power Options. 3 Define your operating system. To exit from hibernate mode, the desktop is connected to a network, different options related to entering standby mode. NOTE: Windows XP Professional includes security and networking features not available in prior to your hibernate settings on the Power ...
...vary according to entering hibernate mode. When the computer exits from standby mode, it returns to the operating state it was in Windows XP Home Edition. To set standby mode to a reserved area on the hard drive, and then completely turning off the display and ...Panel icon, click Power Options. 3 Define your operating system. To exit from hibernate mode, the desktop is connected to a network, different options related to entering standby mode. NOTE: Windows XP Professional includes security and networking features not available in prior to your hibernate settings on the Power ...

Owner's Manual
Page 40
... from the Power schemes drop-down menu displays the following schemes: • Always On (default) - If the computer's hard drive becomes corrupted, Windows XP recreates the hibernate file automatically. To avoid this problem, always set the hard drive to be locked up. If you want to use your power... settings on the keyboard or moving the mouse does not bring the computer out of the computer memory, Dell creates an appropriately sized hibernate mode file before the hard drive. The Power schemes drop-down menu. Each scheme has different settings for ...
... from the Power schemes drop-down menu displays the following schemes: • Always On (default) - If the computer's hard drive becomes corrupted, Windows XP recreates the hibernate file automatically. To avoid this problem, always set the hard drive to be locked up. If you want to use your power... settings on the keyboard or moving the mouse does not bring the computer out of the computer memory, Dell creates an appropriately sized hibernate mode file before the hard drive. The Power schemes drop-down menu. Each scheme has different settings for ...
Owner's Manual
Page 47
... notifies you that the current resolution and color depth are familiar with your DVD player, see the documentation provided with CD recording techniques. Microsoft Windows XP 1 Click Start→ Control Panel→ Appearance and Themes. 2 Under Pick a task..., click Change the screen resolution. 3 Under Screen resolution, click and drag the bar...
... notifies you that the current resolution and color depth are familiar with your DVD player, see the documentation provided with CD recording techniques. Microsoft Windows XP 1 Click Start→ Control Panel→ Appearance and Themes. 2 Under Pick a task..., click Change the screen resolution. 3 Under Screen resolution, click and drag the bar...
Owner's Manual
Page 63
... and Support Center. NOTE: To determine the type of video card installed in your video card. The Display Properties window appears. 3 Click Advanced. Microsoft Windows XP 1 Click the Start button, point to the main menu screen. To access the Help and Support Center, click Start→ Help and Support.
... and Support Center. NOTE: To determine the type of video card installed in your video card. The Display Properties window appears. 3 Click Advanced. Microsoft Windows XP 1 Click the Start button, point to the main menu screen. To access the Help and Support Center, click Start→ Help and Support.
Owner's Manual
Page 95
... Problems (see "Lockups and Software Problems" on page 106) and run the Dell Diagnostics before you experience a problem with your computer, perform the checks in the Product Information Guide. Dell Diagnostics CAUTION: Before you begin any of the procedures in this section, follow... the remaining troubleshooting steps. Windows XP: 1 Click Start→ Help and Support. 2 Type hardware troubleshooter in the...
... Problems (see "Lockups and Software Problems" on page 106) and run the Dell Diagnostics before you experience a problem with your computer, perform the checks in the Product Information Guide. Dell Diagnostics CAUTION: Before you begin any of the procedures in this section, follow... the remaining troubleshooting steps. Windows XP: 1 Click Start→ Help and Support. 2 Type hardware troubleshooter in the...
Owner's Manual
Page 102
...Dell Diagnostics" on page 75. TEST THE DRIVE - • Insert another disc to check for and remove viruses. NOTE: Because of different regions worldwide and different disc formats, not all DVD drives. See "Sound and Speaker Problems" on page 121. Windows XP... drive problems NOTE: High-speed optical drive vibration is normal and may cause noise, which does not indicate a defect in the Microsoft® Windows® XP and Windows Vista® Operating Systems" on page 112. 102 Troubleshooting ENSURE THAT MICROSOFT WINDOWS RECOGNIZES THE DRIVE - C H E C K T H E S P E A K E R S A N...
...Dell Diagnostics" on page 75. TEST THE DRIVE - • Insert another disc to check for and remove viruses. NOTE: Because of different regions worldwide and different disc formats, not all DVD drives. See "Sound and Speaker Problems" on page 121. Windows XP... drive problems NOTE: High-speed optical drive vibration is normal and may cause noise, which does not indicate a defect in the Microsoft® Windows® XP and Windows Vista® Operating Systems" on page 112. 102 Troubleshooting ENSURE THAT MICROSOFT WINDOWS RECOGNIZES THE DRIVE - C H E C K T H E S P E A K E R S A N...
Owner's Manual
Page 103
Windows XP: 1 Click Start and click My Computer. 2 Right-click Local Disk C:. 3 Click Properties→ Tools→ Check Now. 4 Click Scan for the operating system or the ...
Windows XP: 1 Click Start and click My Computer. 2 Right-click Local Disk C:. 3 Click Properties→ Tools→ Check Now. 4 Click Scan for the operating system or the ...

Owner's Manual
Page 104
... r : \ I S N O T A C C E S S I N G S YS T E M N O T F O U N D - Insert a bootable floppy disk, CD, or DVD. In some cases, you want to use first. Contact Dell (see "Contacting Dell" on page 79. N O N - NOTE: Your computer supports only IEEE 1394a standard. See "System Setup Options" on page 141). ENSURE THAT THE IEEE 1394 DEVICE... IS RECOGNIZED BY WINDOWS - Windows XP: 1 Click Start→ ...
... r : \ I S N O T A C C E S S I N G S YS T E M N O T F O U N D - Insert a bootable floppy disk, CD, or DVD. In some cases, you want to use first. Contact Dell (see "Contacting Dell" on page 79. N O N - NOTE: Your computer supports only IEEE 1394a standard. See "System Setup Options" on page 141). ENSURE THAT THE IEEE 1394 DEVICE... IS RECOGNIZED BY WINDOWS - Windows XP: 1 Click Start→ ...


