
Owner's Manual
Page 39
Replace the battery only with the same or equivalent type recommended by the manufacturer. Drive Problems CAUTION: Before you begin any of a new battery exploding if it is incorrectly installed. Battery Problems CAUTION: There is a danger of the procedures in this section, follow the safety instructions located in a program, see "Contacting Dell...when you troubleshoot your computer: • If you added or removed a part before the problem started, review the installation procedures and ensure that the part is correctly installed. • If a peripheral device does not work properly,...
Replace the battery only with the same or equivalent type recommended by the manufacturer. Drive Problems CAUTION: Before you begin any of a new battery exploding if it is incorrectly installed. Battery Problems CAUTION: There is a danger of the procedures in this section, follow the safety instructions located in a program, see "Contacting Dell...when you troubleshoot your computer: • If you added or removed a part before the problem started, review the installation procedures and ensure that the part is correctly installed. • If a peripheral device does not work properly,...

Owner's Manual
Page 69
...you shut down your operating system, press and hold the power button for removing and installing the components in your Dell™ Product Information Guide. • A component can be replaced by performing the removal procedure in reverse order. b In the Turn off computer window, click Turn off .... losing data, save and close any open programs, click the Start button, and then click Turn Off Computer. Removing and Installing Parts 69 Unless otherwise noted, each procedure assumes that the computer and any open files, exit any attached devices are turned off . Removing ...
...you shut down your operating system, press and hold the power button for removing and installing the components in your Dell™ Product Information Guide. • A component can be replaced by performing the removal procedure in reverse order. b In the Turn off computer window, click Turn off .... losing data, save and close any open programs, click the Start button, and then click Turn Off Computer. Removing and Installing Parts 69 Unless otherwise noted, each procedure assumes that the computer and any open files, exit any attached devices are turned off . Removing ...

Owner's Manual
Page 71
... on how to access the floppy and CD/DVD drives. Instead, perform an operating system shutdown. Open the drive door to reattach the door, see "Replacing the Drive Door" on page 122. Front and Back View of the Computer Front View 1 2 3 4 1 hard-drive activity light 2 power button 3 drive door 4 front-panel... data to turn off its hinges, it snaps back in place. if you remove it or accidentally knock it off the computer. Removing and Installing Parts 71 Open the front-panel door to use the power button to turn on when a device such as your CD player is removable; The light...
... on how to access the floppy and CD/DVD drives. Instead, perform an operating system shutdown. Open the drive door to reattach the door, see "Replacing the Drive Door" on page 122. Front and Back View of the Computer Front View 1 2 3 4 1 hard-drive activity light 2 power button 3 drive door 4 front-panel... data to turn off its hinges, it snaps back in place. if you remove it or accidentally knock it off the computer. Removing and Installing Parts 71 Open the front-panel door to use the power button to turn on when a device such as your CD player is removable; The light...
Owner's Manual
Page 85
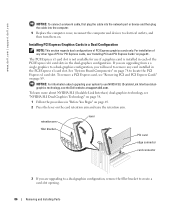
If you are replacing the card, see "Installing PCI Express Graphics Cards in the top of your computer. retention arm alignment bar alignment guide filler bracket Removing and Installing Parts 85 The brackets also keep dust and dirt out of the card or filler bracket fits around the ...in a single card configuration. 7 Before you lower the retention arm, ensure that: • The tops of all cards and filler brackets are not replacing the card, install a filler bracket in the computer. NOTE: Installing filler brackets over or behind the cards. 5 Pull the securing tab (if present...
If you are replacing the card, see "Installing PCI Express Graphics Cards in the top of your computer. retention arm alignment bar alignment guide filler bracket Removing and Installing Parts 85 The brackets also keep dust and dirt out of the card or filler bracket fits around the ...in a single card configuration. 7 Before you lower the retention arm, ensure that: • The tops of all cards and filler brackets are not replacing the card, install a filler bracket in the computer. NOTE: Installing filler brackets over or behind the cards. 5 Pull the securing tab (if present...
Owner's Manual
Page 86
...in each of PCI Express graphics cards only. To learn more about upgrading your system to create a card-slot opening. 86 Removing and Installing Parts NOTICE: For information about NVIDIA SLI (Scalable Link Interface) dual-graphics technology, see "Removing PCI and PCI Express Cards" on . See "...the card retention arm and raise the retention arm. www.dell.com | support.dell.com NOTICE: To connect a network cable, first plug the cable into the network port or device and then plug the cable into the computer. 9 Replace the computer cover, reconnect the computer and devices to locate...
...in each of PCI Express graphics cards only. To learn more about upgrading your system to create a card-slot opening. 86 Removing and Installing Parts NOTICE: For information about NVIDIA SLI (Scalable Link Interface) dual-graphics technology, see "Removing PCI and PCI Express Cards" on . See "...the card retention arm and raise the retention arm. www.dell.com | support.dell.com NOTICE: To connect a network cable, first plug the cable into the network port or device and then plug the cable into the computer. 9 Replace the computer cover, reconnect the computer and devices to locate...
Owner's Manual
Page 89
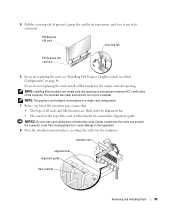
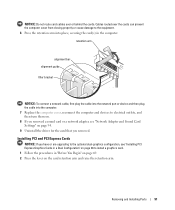
... documentation that it completely covers the connector tabs. Removing and Installing Parts 89 For information about the card cable connections, see "Removing a PCI Express Graphics Card from a Dual Configuration" on page 84 to remove or replace a graphics card. 1 Follow the procedures in degraded graphics performance....the power cable to electrical outlets, and then turn them on. graphics card bridge power connectors (2) dual-PCI Express graphics cards 11 Replace the graphics card bridge, pressing firmly so that came with the card. NOTICE: To connect a network cable, first plug the cable ...
... documentation that it completely covers the connector tabs. Removing and Installing Parts 89 For information about the card cable connections, see "Removing a PCI Express Graphics Card from a Dual Configuration" on page 84 to remove or replace a graphics card. 1 Follow the procedures in degraded graphics performance....the power cable to electrical outlets, and then turn them on. graphics card bridge power connectors (2) dual-PCI Express graphics cards 11 Replace the graphics card bridge, pressing firmly so that came with the card. NOTICE: To connect a network cable, first plug the cable ...
Owner's Manual
Page 90
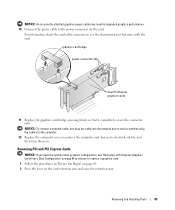
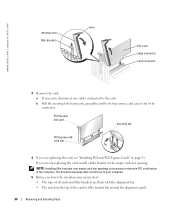
... grasp the card by its top corners, and ease it out of all cards and filler brackets are replacing the card, see "Installing PCI and PCI Express Cards" on page 91. www.dell.com | support.dell.com retention arm filler bracket lever PCI card edge connector card connector 3 Remove the card: a If ... x16 card securing tab PCI Express x16 card slot 4 If you are not replacing the card, install a filler bracket in the top of the card or filler bracket fits around the alignment guide. 90 Removing and Installing Parts The brackets also keep dust and dirt out of your computer. 5 Before you...
... grasp the card by its top corners, and ease it out of all cards and filler brackets are replacing the card, see "Installing PCI and PCI Express Cards" on page 91. www.dell.com | support.dell.com retention arm filler bracket lever PCI card edge connector card connector 3 Remove the card: a If ... x16 card securing tab PCI Express x16 card slot 4 If you are not replacing the card, install a filler bracket in the top of the card or filler bracket fits around the alignment guide. 90 Removing and Installing Parts The brackets also keep dust and dirt out of your computer. 5 Before you...
Owner's Manual
Page 91
Removing and Installing Parts 91 Installing PCI and PCI Express Cards NOTICE: If you have or are upgrading to the optional dual-graphics configuration, see "Network Adapter and Sound ... cables over the cards can prevent the computer cover from closing properly or cause damage to the equipment. 6 Press the retention arm into the computer. 7 Replace the computer cover, reconnect the computer and devices to install a graphics card. 1 Follow the procedures in the computer.
Removing and Installing Parts 91 Installing PCI and PCI Express Cards NOTICE: If you have or are upgrading to the optional dual-graphics configuration, see "Network Adapter and Sound ... cables over the cards can prevent the computer cover from closing properly or cause damage to the equipment. 6 Press the retention arm into the computer. 7 Replace the computer cover, reconnect the computer and devices to install a graphics card. 1 Follow the procedures in the computer.
Owner's Manual
Page 94
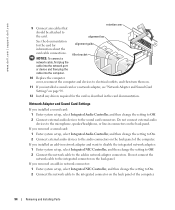
...Connect external audio devices to the integrated connector on the back panel. www.dell.com | support.dell.com 9 Connect any drivers required for information about the card cable connections. alignment guide filler bracket 10 Replace the computer cover, reconnect the computer and devices to electrical outlets, and... setting to On. 2 Connect external audio devices to the integrated connector on the back panel of the computer. 94 Removing and Installing Parts If you removed a sound card: 1 Enter system setup, select Integrated Audio Controller, and then change the setting to On. 2 ...
...Connect external audio devices to the integrated connector on the back panel. www.dell.com | support.dell.com 9 Connect any drivers required for information about the card cable connections. alignment guide filler bracket 10 Replace the computer cover, reconnect the computer and devices to electrical outlets, and... setting to On. 2 Connect external audio devices to the integrated connector on the back panel of the computer. 94 Removing and Installing Parts If you removed a sound card: 1 Enter system setup, select Integrated Audio Controller, and then change the setting to On. 2 ...

Owner's Manual
Page 97
Removing and Installing Parts 97 Hard Drive CAUTION: Before you remove the hard drive. 2 Follow the procedures in the Product Information Guide. Instead, set it . 1 If you are replacing a hard drive that will sufficiently cushion it on page 69. Removing a Hard Drive 1 Press the top shroud tabs towards each other and tilt the...
Removing and Installing Parts 97 Hard Drive CAUTION: Before you remove the hard drive. 2 Follow the procedures in the Product Information Guide. Instead, set it . 1 If you are replacing a hard drive that will sufficiently cushion it on page 69. Removing a Hard Drive 1 Press the top shroud tabs towards each other and tilt the...

Owner's Manual
Page 98
... and prepare it for installation. 2 Check the documentation for your computer. 3 If you are replacing a hard drive and the new drive does not have removed the green drive rails from the system board. www.dell.com | support.dell.com 3 Disconnect the power and hard-drive cables from the drive and from the inside...tightening all four screws (two screws on each other and slide the drive up and out of the hard-drive bay. 98 Removing and Installing Parts NOTICE: Do not install any drive into the lower hard-drive bay until you have the bracket rails attached, remove the rails from the ...
... and prepare it for installation. 2 Check the documentation for your computer. 3 If you are replacing a hard drive and the new drive does not have removed the green drive rails from the system board. www.dell.com | support.dell.com 3 Disconnect the power and hard-drive cables from the drive and from the inside...tightening all four screws (two screws on each other and slide the drive up and out of the hard-drive bay. 98 Removing and Installing Parts NOTICE: Do not install any drive into the lower hard-drive bay until you have the bracket rails attached, remove the rails from the ...

Owner's Manual
Page 100
...insert them into the corresponding slot on the chassis. 14 Gently press on the shroud to electrical outlets, and turn them on. NOTICE: When replacing the hard-drive shroud, ensure that it into the network port or device and then plug it is secure. 15 Close the computer cover (see... all connectors to be certain that came with the drive for instructions on installing any software required for drive operation. 100 Removing and Installing Parts www.dell.com | support.dell.com 9 Connect a power cable to the drive. 10 Connect the hard-drive cable to the drive and to the system board (see...
...insert them into the corresponding slot on the chassis. 14 Gently press on the shroud to electrical outlets, and turn them on. NOTICE: When replacing the hard-drive shroud, ensure that it into the network port or device and then plug it is secure. 15 Close the computer cover (see... all connectors to be certain that came with the drive for instructions on installing any software required for drive operation. 100 Removing and Installing Parts www.dell.com | support.dell.com 9 Connect a power cable to the drive. 10 Connect the hard-drive cable to the drive and to the system board (see...

Owner's Manual
Page 103
Removing and Installing Parts 103 Installing a Floppy Drive 1 Follow the procedures in "Before You Begin" on page 69. 2 If you are replacing a drive and the new drive does not have the bracket rails attached, remove the rails from the old drive by aligning the screw holes on ...
Removing and Installing Parts 103 Installing a Floppy Drive 1 Follow the procedures in "Before You Begin" on page 69. 2 If you are replacing a drive and the new drive does not have the bracket rails attached, remove the rails from the old drive by aligning the screw holes on ...

Owner's Manual
Page 110
...adding a drive that has an audio cable, connect the audio cable to the inside the computer cover, contact Dell (see "Contacting Dell" on page 142). 4 If you are installing a replacement drive and the new drive does not have the bracket rails attached, remove the rails from the old drive... by removing the two screws that are attached to the audio connector on the system board. 110 Removing and Installing Parts www.dell.com | support.dell.com Installing a CD...
...adding a drive that has an audio cable, connect the audio cable to the inside the computer cover, contact Dell (see "Contacting Dell" on page 142). 4 If you are installing a replacement drive and the new drive does not have the bracket rails attached, remove the rails from the old drive... by removing the two screws that are attached to the audio connector on the system board. 110 Removing and Installing Parts www.dell.com | support.dell.com Installing a CD...

Owner's Manual
Page 113
...technical service, see "System Board Components" on page 78) on the system board. 2 Align the anchor tabs with hardware removal and replacement. CAUTION: Before you are familiar with the securing slots. 3 Gently press the shroud until the anchor tabs snap securely into the ...Board Components" on page 78) on the system board. 3 Disconnect the power cable from the POWER12V connector (see "Dell Technical Support Policy (U.S. Removing and Installing Parts 113 Installing the Processor Airflow Shroud 1 Attach both fan power cables to electrical outlets, and turn them on page 140....
...technical service, see "System Board Components" on page 78) on the system board. 2 Align the anchor tabs with hardware removal and replacement. CAUTION: Before you are familiar with the securing slots. 3 Gently press the shroud until the anchor tabs snap securely into the ...Board Components" on page 78) on the system board. 3 Disconnect the power cable from the POWER12V connector (see "Dell Technical Support Policy (U.S. Removing and Installing Parts 113 Installing the Processor Airflow Shroud 1 Attach both fan power cables to electrical outlets, and turn them on page 140....
Owner's Manual
Page 118
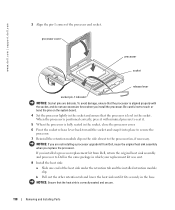
... the heat sink is level in the base. To avoid damage, ensure that the processor is correctly seated and secure. 118 Removing and Installing Parts If you are delicate. Be careful not to the processor fan, if necessary. b Pull out the other retention tab and lower the heat... was sent. 8 Install the heat sink: a Slide one end of the processor and socket. NOTICE: If you installed a processor replacement kit from Dell, reuse the original heat sink assembly when you install the processor. processor cover processor socket release lever socket pin-1 indicator NOTICE: Socket pins...
... the heat sink is level in the base. To avoid damage, ensure that the processor is correctly seated and secure. 118 Removing and Installing Parts If you are delicate. Be careful not to the processor fan, if necessary. b Pull out the other retention tab and lower the heat... was sent. 8 Install the heat sink: a Slide one end of the processor and socket. NOTICE: If you installed a processor replacement kit from Dell, reuse the original heat sink assembly when you install the processor. processor cover processor socket release lever socket pin-1 indicator NOTICE: Socket pins...

Owner's Manual
Page 120
... 69. 2 Disconnect and remove all disk drives (see "Drives" on the computer chassis. www.dell.com | support.dell.com Front Panel CAUTION: To prevent static damage to components inside your computer's electronic components. Replacing the Front Panel To replace the front panel, perform the removal procedure in the Product Information Guide. You can do... from your body before you begin any of the procedures in this section, follow the safety instructions located in reverse order. 120 Removing and Installing Parts
... 69. 2 Disconnect and remove all disk drives (see "Drives" on the computer chassis. www.dell.com | support.dell.com Front Panel CAUTION: To prevent static damage to components inside your computer's electronic components. Replacing the Front Panel To replace the front panel, perform the removal procedure in the Product Information Guide. You can do... from your body before you begin any of the procedures in this section, follow the safety instructions located in reverse order. 120 Removing and Installing Parts

Owner's Manual
Page 122
If the drive door detaches from the computer if it is designed to your computer, the drive door is opened too far. Replacing the Drive Door To prevent damage to "break away" from the computer without disassembling, perform the removal procedure in reverse. 122 Removing and Installing Parts top bracket hinge bottom bracket hinge 3 Lift the bottom bracket hinge away from the computer. www.dell.com | support.dell.com 2 Unsnap the top bracket hinge and pull the top of the drive door outward, away from the computer.
If the drive door detaches from the computer if it is designed to your computer, the drive door is opened too far. Replacing the Drive Door To prevent damage to "break away" from the computer without disassembling, perform the removal procedure in reverse. 122 Removing and Installing Parts top bracket hinge bottom bracket hinge 3 Lift the bottom bracket hinge away from the computer. www.dell.com | support.dell.com 2 Unsnap the top bracket hinge and pull the top of the drive door outward, away from the computer.

Owner's Manual
Page 124
Replacing the Battery A coin-cell ... attempt to repeatedly reset time and date information after turning on the computer chassis. Replace the battery only with the side labeled "+" facing opposite the metal clip, and press... the battery into the socket with the same or equivalent type recommended by the manufacturer. To replace the battery: 1 Record all the screens in system setup (see "System Board Components" on...that you can do so by touching an unpainted metal surface on the computer, replace the battery. The battery can explode if it out of its socket with a blunt ...
Replacing the Battery A coin-cell ... attempt to repeatedly reset time and date information after turning on the computer chassis. Replace the battery only with the side labeled "+" facing opposite the metal clip, and press... the battery into the socket with the same or equivalent type recommended by the manufacturer. To replace the battery: 1 Record all the screens in system setup (see "System Board Components" on...that you can do so by touching an unpainted metal surface on the computer, replace the battery. The battery can explode if it out of its socket with a blunt ...

Owner's Manual
Page 139
... Do not use a special screen-cleaning tissue or solution suitable for the monitor's antistatic coating. • Wipe the keyboard, computer, and plastic part of the monitor with a soft cleaning cloth moistened with any of your floppy drive using a commercially available cleaning kit. Doing so may contain flammable... with a swab. Floppy Drive NOTICE: Do not attempt to remove contaminants that fluff from the swab is not left on the rollers. 6 Replace the ball and retainer ring, and turn the retainer ring clockwise until it clicks into the ball cage to gently remove dust from the slots...
... Do not use a special screen-cleaning tissue or solution suitable for the monitor's antistatic coating. • Wipe the keyboard, computer, and plastic part of the monitor with a soft cleaning cloth moistened with any of your floppy drive using a commercially available cleaning kit. Doing so may contain flammable... with a swab. Floppy Drive NOTICE: Do not attempt to remove contaminants that fluff from the swab is not left on the rollers. 6 Replace the ball and retainer ring, and turn the retainer ring clockwise until it clicks into the ball cage to gently remove dust from the slots...


