Owner's Manual
Page 4
... responding 45 A program crashes repeatedly 45 A program is designed for an earlier Windows operating system . . . . . 46 A solid blue screen appears 46 Other software problems 46 Memory Problems 47 Mouse Problems 47 4 Contents
... responding 45 A program crashes repeatedly 45 A program is designed for an earlier Windows operating system . . . . . 46 A solid blue screen appears 46 Other software problems 46 Memory Problems 47 Mouse Problems 47 4 Contents
Owner's Manual
Page 6
... View (Doors Open 72 Back View 73 Opening the Computer Cover 76 Inside View of Your Computer 77 System Board Components 78 Memory 79 Addressing Memory Configurations 80 Installing Memory 80 Removing Memory 82 Cards 82 Removing a PCI Express Graphics Card from a Dual Configuration . . . . 84 Installing PCI Express Graphics Cards in a Dual Configuration 86...
... View (Doors Open 72 Back View 73 Opening the Computer Cover 76 Inside View of Your Computer 77 System Board Components 78 Memory 79 Addressing Memory Configurations 80 Installing Memory 80 Removing Memory 82 Cards 82 Removing a PCI Express Graphics Card from a Dual Configuration . . . . 84 Installing PCI Express Graphics Cards in a Dual Configuration 86...
Owner's Manual
Page 12
... Contact information, service call status and support history, service contract, and online discussions with other Dell NOTE: Corporate, government, and education customers customers can also use Windows XP Windows Help and Support Center 1 Click the Start button, then click Help and Support. 2...® M processors, optical drives, and USB devices. dell.com. Computer documentation, details on the screen. 12 Finding Information www.dell.com | support.dell.com What Are You Looking For? Find It Here • Solutions - as memory, the hard drive, and the operating system • ...
... Contact information, service call status and support history, service contract, and online discussions with other Dell NOTE: Corporate, government, and education customers customers can also use Windows XP Windows Help and Support Center 1 Click the Start button, then click Help and Support. 2...® M processors, optical drives, and USB devices. dell.com. Computer documentation, details on the screen. 12 Finding Information www.dell.com | support.dell.com What Are You Looking For? Find It Here • Solutions - as memory, the hard drive, and the operating system • ...
Owner's Manual
Page 17
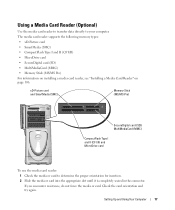
... insertion. 2 Slide the media or card into the appropriate slot until it is completely seated in the connector. The media card reader supports the following memory types: • xD-Picture card • SmartMedia (SMC) • CompactFlash Type I and II (CF I /II) and MicroDrive card To ... the media card reader: 1 Check the media or card to your computer. Setting Up and Using Your Computer 17 xD-Picture card and SmartMedia (SMC) Memory Stick (MS/MS Pro) SecureDigital card (SD)/ MultiMediaCard (MMC) CompactFlash Type I and II (CF I /II) • MicroDrive card • SecureDigital ...
... insertion. 2 Slide the media or card into the appropriate slot until it is completely seated in the connector. The media card reader supports the following memory types: • xD-Picture card • SmartMedia (SMC) • CompactFlash Type I and II (CF I /II) and MicroDrive card To ... the media card reader: 1 Check the media or card to your computer. Setting Up and Using Your Computer 17 xD-Picture card and SmartMedia (SMC) Memory Stick (MS/MS Pro) SecureDigital card (SD)/ MultiMediaCard (MMC) CompactFlash Type I and II (CF I /II) • MicroDrive card • SecureDigital ...

Owner's Manual
Page 30
... can write to and read DVD-RAM or DVD-R DL media. NOTE: Most commercial DVDs have copyright protection and cannot be copied using too much memory and preventing DVD playback, adjust the display properties. 1 Click the Start button and click Control Panel. 2 Under Pick a category, click Appearance and Themes...DVD (combo) drive. NOTE: The types of CD or DVD drives offered by 600 pixels. 5 Click the drop-down menu under Color quality, and then click Medium (16 bit). 6 Click OK. www.dell.com | support.dell.com Adjusting the Picture If an error message notifies you that the current resolution ...
... can write to and read DVD-RAM or DVD-R DL media. NOTE: Most commercial DVDs have copyright protection and cannot be copied using too much memory and preventing DVD playback, adjust the display properties. 1 Click the Start button and click Control Panel. 2 Under Pick a category, click Appearance and Themes...DVD (combo) drive. NOTE: The types of CD or DVD drives offered by 600 pixels. 5 Click the drop-down menu under Color quality, and then click Medium (16 bit). 6 Click OK. www.dell.com | support.dell.com Adjusting the Picture If an error message notifies you that the current resolution ...

Owner's Manual
Page 34
If the computer's hard drive becomes corrupted, Windows XP recreates the hibernate file automatically. To access the Power Options Properties window: 1 ..., and Hibernate tab. Each scheme has different settings for extended periods of the computer memory, Dell creates an appropriately sized hibernate mode file before shipping the computer to exit from hibernate mode, press the power... button. www.dell.com | support.dell.com To exit from hibernate mode. The computer may take a short time to you want...
If the computer's hard drive becomes corrupted, Windows XP recreates the hibernate file automatically. To access the Power Options Properties window: 1 ..., and Hibernate tab. Each scheme has different settings for extended periods of the computer memory, Dell creates an appropriately sized hibernate mode file before shipping the computer to exit from hibernate mode, press the power... button. www.dell.com | support.dell.com To exit from hibernate mode. The computer may take a short time to you want...
Owner's Manual
Page 47
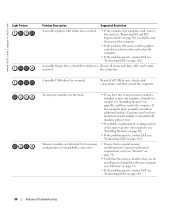
... the problem. • See the software documentation for minimum memory requirements. If necessary, install additional memory (see "Minimum memory" on page 127). • Reseat the memory modules (see "Memory" on page 79) to ensure that your computer is successfully communicating with the memory. • Run the Dell Diagnostics (see if that your computer, and then restart the...
... the problem. • See the software documentation for minimum memory requirements. If necessary, install additional memory (see "Minimum memory" on page 127). • Reseat the memory modules (see "Memory" on page 79) to ensure that your computer is successfully communicating with the memory. • Run the Dell Diagnostics (see if that your computer, and then restart the...
Owner's Manual
Page 49
... press the power button to the system board power connector (POWER12V) (see "System Board Components" on page 78). • Remove and then reinstall the memory modules (see "Memory" on page 79). • Remove and then reinstall any of the computer and the electrical outlet. • If the computer is plugged into a power...
... press the power button to the system board power connector (POWER12V) (see "System Board Components" on page 78). • Remove and then reinstall the memory modules (see "Memory" on page 79). • Remove and then reinstall any of the computer and the electrical outlet. • If the computer is plugged into a power...
Owner's Manual
Page 55
... has occurred. The diagnostic lights are detected, but a memory failure has occurred. • If you troubleshoot a problem, your computer (see "Installing Memory" on page 80). • If the problem persists, contact Dell (see "Installing Memory" on page 80), and then restart the computer. When...the Product Information Guide. Advanced Troubleshooting Diagnostic Lights CAUTION: Before you have two or more memory modules installed, remove the modules, reinstall one module (see "Contacting Dell" on page 72). Also see "Front View (Doors Open)" on page 142). Advanced...
... has occurred. The diagnostic lights are detected, but a memory failure has occurred. • If you troubleshoot a problem, your computer (see "Installing Memory" on page 80). • If the problem persists, contact Dell (see "Installing Memory" on page 80), and then restart the computer. When...the Product Information Guide. Advanced Troubleshooting Diagnostic Lights CAUTION: Before you have two or more memory modules installed, remove the modules, reinstall one module (see "Contacting Dell" on page 72). Also see "Front View (Doors Open)" on page 142). Advanced...
Owner's Manual
Page 56
...; If the problem still exists, install a graphics card that you are installing are compatible with your computer (see "Memory" on page 79). • If the problem persists, contact Dell (see "Contacting Dell" on page 142). Memory modules are detected. A possible USB failure has occurred. A possible floppy drive or hard drive failure has Reseat all...
...; If the problem still exists, install a graphics card that you are installing are compatible with your computer (see "Memory" on page 79). • If the problem persists, contact Dell (see "Contacting Dell" on page 142). Memory modules are detected. A possible USB failure has occurred. A possible floppy drive or hard drive failure has Reseat all...
Owner's Manual
Page 60
... Drivers If you with any other programs that you are running the test. www.dell.com | support.dell.com Tab Help Configuration Parameters Function Describes the test and may indicate requirements for running the Dell Diagnostics from system setup, memory, and various internal tests, and it displays the information in the device list in...
... Drivers If you with any other programs that you are running the test. www.dell.com | support.dell.com Tab Help Configuration Parameters Function Describes the test and may indicate requirements for running the Dell Diagnostics from system setup, memory, and various internal tests, and it displays the information in the device list in...
Owner's Manual
Page 78
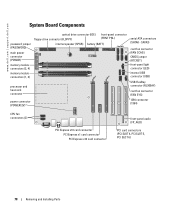
www.dell.com | support.dell.com System Board Components password jumper (PASSWORD) main power connector (POWER) memory module connectors (2, 4) memory module connectors (1, 3) processor and heat-sink connector power connector (POWER12V) optical drive connector (IDE) floppy-drive connector (FLOPPY) front-panel connector (FRNT PNL) internal speaker (...
www.dell.com | support.dell.com System Board Components password jumper (PASSWORD) main power connector (POWER) memory module connectors (2, 4) memory module connectors (1, 3) processor and heat-sink connector power connector (POWER12V) optical drive connector (IDE) floppy-drive connector (FLOPPY) front-panel connector (FRNT PNL) internal speaker (...

Owner's Manual
Page 79
... the slowest module installed. • Be sure to install a single memory module in DIMM connector 1, the connector closest to operate, but with a slight reduction in performance. The recommended memory configurations are not installed in matched pairs, the computer will continue to ... module to determine the module's capacity. DDR2 Memory Overview • DDR2 memory modules should be installed in DIMM connectors 1 and 2 or - If the DDR2 memory modules are : - A pair of matched memory modules installed in pairs of matched memory modules installed in DIMM connectors 1 and 2 ...
... the slowest module installed. • Be sure to install a single memory module in DIMM connector 1, the connector closest to operate, but with a slight reduction in performance. The recommended memory configurations are not installed in matched pairs, the computer will continue to ... module to determine the module's capacity. DDR2 Memory Overview • DDR2 memory modules should be installed in DIMM connectors 1 and 2 or - If the DDR2 memory modules are : - A pair of matched memory modules installed in pairs of matched memory modules installed in DIMM connectors 1 and 2 ...
Owner's Manual
Page 80
... If you are using a 32-bit operating system such as Microsoft® Windows® XP, your computer's electronic components. www.dell.com | support.dell.com matched pair of memory modules in DIMM connectors 3 and 4 (black securing clips) matched pair of modules in DIMM connectors 1 and 2 (white ...system board is covered under your original memory modules in pairs either in each end of the memory module connector. 80 Removing and Installing Parts NOTE: Memory purchased from Dell. You can do not pair an original memory module with a new memory module. NOTICE: To prevent static damage...
... If you are using a 32-bit operating system such as Microsoft® Windows® XP, your computer's electronic components. www.dell.com | support.dell.com matched pair of memory modules in DIMM connectors 3 and 4 (black securing clips) matched pair of modules in DIMM connectors 1 and 2 (white ...system board is covered under your original memory modules in pairs either in each end of the memory module connector. 80 Removing and Installing Parts NOTE: Memory purchased from Dell. You can do not pair an original memory module with a new memory module. NOTICE: To prevent static damage...

Owner's Manual
Page 81
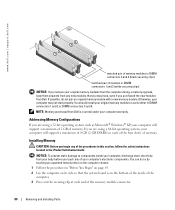
If you apply equal force to each end of the module. Removing and Installing Parts 81 memory connector closest to the memory module, press the module straight down into the connector while you insert the module correctly, the securing clips snap into the cutouts at each end of the module. 5 Insert the module into the connector until the module snaps into position. notch memory module cutouts (2) crossbar NOTICE: To avoid damage to processor securing clips (2) connector 4 Align the notch on the bottom of the module with the crossbar in the connector.
If you apply equal force to each end of the module. Removing and Installing Parts 81 memory connector closest to the memory module, press the module straight down into the connector while you insert the module correctly, the securing clips snap into the cutouts at each end of the module. 5 Insert the module into the connector until the module snaps into position. notch memory module cutouts (2) crossbar NOTICE: To avoid damage to processor securing clips (2) connector 4 Align the notch on the bottom of the module with the crossbar in the connector.

Owner's Manual
Page 82
...touch any of the procedures in this section, follow the safety instructions in the Product Information Guide. Cards CAUTION: Before you begin any of the memory module connector. 3 Grasp the module and pull up. You can be used in "Before You Begin" on the computer chassis. 1 Follow ... | support.dell.com 6 Close the computer cover. NOTICE: To prevent static damage to remove it into the computer. 7 Connect your computer and devices to electrical outlets, and turn them on. 8 When the message appears stating that the memory is difficult to remove, gently ease the module back ...
...touch any of the procedures in this section, follow the safety instructions in the Product Information Guide. Cards CAUTION: Before you begin any of the memory module connector. 3 Grasp the module and pull up. You can be used in "Before You Begin" on the computer chassis. 1 Follow ... | support.dell.com 6 Close the computer cover. NOTICE: To prevent static damage to remove it into the computer. 7 Connect your computer and devices to electrical outlets, and turn them on. 8 When the message appears stating that the memory is difficult to remove, gently ease the module back ...

Owner's Manual
Page 127
... Hyper-Threading technology or dual-core processing. 1 MB or 2 MB 533- F0000h Nvidia nForce4 SLI X16 MCP five 24 4 Mb integrated network interface capable of memory available to verify the amount of 10/100/1000 communication. 800- and 667-MHz DDR2 unbuffered SDRAM four 256 MB, 512 MB, 1 GB, or 2 GB... non-ECC 512 MB 2 GB or 8 GB NOTE: See "Addressing Memory Configurations" on your processor) PCI Express Appendix 127 or 1066-MHz data rate (depending on page 80 to the operating system.
... Hyper-Threading technology or dual-core processing. 1 MB or 2 MB 533- F0000h Nvidia nForce4 SLI X16 MCP five 24 4 Mb integrated network interface capable of memory available to verify the amount of 10/100/1000 communication. 800- and 667-MHz DDR2 unbuffered SDRAM four 256 MB, 512 MB, 1 GB, or 2 GB... non-ECC 512 MB 2 GB or 8 GB NOTE: See "Addressing Memory Configurations" on your processor) PCI Express Appendix 127 or 1066-MHz data rate (depending on page 80 to the operating system.

Owner's Manual
Page 128
...) 16 PCI Express lanes Drives Externally accessible: Available devices Internally accessible: one 3.5-inch drive bays three 5.25-inch drive bays Serial ATA drive, floppy drive, memory devices, CD drive, CD-RW drive, DVD drive, DVD-RW drive, and DVD and CD-RW combo drive, media card reader three bays for use.... www.dell.com | support.dell.com Audio Type AC97 7.1 channel Expansion Bus Bus type PCI 32-bit PCI Express x1 and x16 Bus speed PCI: 33 MHz PCI Express...
...) 16 PCI Express lanes Drives Externally accessible: Available devices Internally accessible: one 3.5-inch drive bays three 5.25-inch drive bays Serial ATA drive, floppy drive, memory devices, CD drive, CD-RW drive, DVD drive, DVD-RW drive, and DVD and CD-RW combo drive, media card reader three bays for use.... www.dell.com | support.dell.com Audio Type AC97 7.1 channel Expansion Bus Bus type PCI 32-bit PCI Express x1 and x16 Bus speed PCI: 33 MHz PCI Express...

Owner's Manual
Page 131
Certain changes can make your computer. 2 When the blue DELL™ logo appears, press immediately. If you wait too long and the operating system logo appears, continue to 35,000 ft) System Setup Overview Use ...; To change the system configuration information after you add, change a user-selectable option such as the user password • To read the current amount of memory or set the type of hard drive installed Before you use system setup, it is divided into three areas: the options list, the active options...
Certain changes can make your computer. 2 When the blue DELL™ logo appears, press immediately. If you wait too long and the operating system logo appears, continue to 35,000 ft) System Setup Overview Use ...; To change the system configuration information after you add, change a user-selectable option such as the user password • To read the current amount of memory or set the type of hard drive installed Before you use system setup, it is divided into three areas: the options list, the active options...
Owner's Manual
Page 132
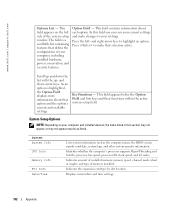
www.dell.com | support.dell.com Options List - Press to make changes to highlight an option. Scroll up - Identifies whether the computer's processor supports Hyper-Threading and lists the processor ... that option and the option's current and available settings. and down the list with the up and down -arrow keys. Press the left side of memory installed. This field appears below the Option Field and lists keys and their functions within the active system setup field. The field is highlighted, the...
www.dell.com | support.dell.com Options List - Press to make changes to highlight an option. Scroll up - Identifies whether the computer's processor supports Hyper-Threading and lists the processor ... that option and the option's current and available settings. and down the list with the up and down -arrow keys. Press the left side of memory installed. This field appears below the Option Field and lists keys and their functions within the active system setup field. The field is highlighted, the...


