Owners Manual
Page 11
...; 2 Select Drivers & Downloads, then click Go. 3.5-inch USB floppy drives, Intel® processors, optical 3 Select your selections. • How to use Windows XP • How to work with other Dell customers • Upgrades - What Are You Looking For? Certified drivers, patches, and software updates • Desktop System Software (DSS)- Troubleshooting hints and tips...
...; 2 Select Drivers & Downloads, then click Go. 3.5-inch USB floppy drives, Intel® processors, optical 3 Select your selections. • How to use Windows XP • How to work with other Dell customers • Upgrades - What Are You Looking For? Certified drivers, patches, and software updates • Desktop System Software (DSS)- Troubleshooting hints and tips...
Owners Manual
Page 30
... and maintenance window, click Conserving power on your power button is still operating as a quick on the optional Microsoft® Windows® XP Media Center Edition 2005 remote control. 30 Setting Up and Using Your Computer Pressing the power button once causes the display to go blank and...to prompt you for systems that the hard drive indicator may notice that are ordered with Microsoft® Windows® XP Media Center Edition 2005 and dual core processors. In this mode, the computer is used as indicated by an external device. Advanced Tab The Advanced tab allows ...
... and maintenance window, click Conserving power on your power button is still operating as a quick on the optional Microsoft® Windows® XP Media Center Edition 2005 remote control. 30 Setting Up and Using Your Computer Pressing the power button once causes the display to go blank and...to prompt you for systems that the hard drive indicator may notice that are ordered with Microsoft® Windows® XP Media Center Edition 2005 and dual core processors. In this mode, the computer is used as indicated by an external device. Advanced Tab The Advanced tab allows ...

Owners Manual
Page 31
.... Hyper-Threading and Dual-Core Technology Hyper-Threading is ordered. Dual-Core is supported, two processors are visible. Contact the software manufacturer for them and may require an update from the software manufacturer...processors, capable of Hyper-Threading technology. Enabling the QRT Feature in the Operating system 1 Click the Start button, then click Control Panel. 2 Under Pick a category, click Performance and Maintenance. 3 Under or pick a Control Panel icon, click Power Options. 4 Click the Away tab. 5 Ensure that you use the Microsoft® Windows® XP...
.... Hyper-Threading and Dual-Core Technology Hyper-Threading is ordered. Dual-Core is supported, two processors are visible. Contact the software manufacturer for them and may require an update from the software manufacturer...processors, capable of Hyper-Threading technology. Enabling the QRT Feature in the Operating system 1 Click the Start button, then click Control Panel. 2 Under Pick a category, click Performance and Maintenance. 3 Under or pick a Control Panel icon, click Power Options. 4 Click the Away tab. 5 Ensure that you use the Microsoft® Windows® XP...

Owners Manual
Page 32
You can enable or disable Hyper-Threading through system setup. For more information on accessing system setup, see "Entering System Setup" on page 102. 32 Setting Up and Using Your Computer To determine if your computer is listed twice. If Hyper-Threading is enabled, the processor is using Hyper-Threading technology: 1 Click the Start button, right-click My Computer, and then click Properties. 2 Click Hardware, then click Device Manager. 3 In the Device Manager window, click the plus (+) sign next to Processors.
You can enable or disable Hyper-Threading through system setup. For more information on accessing system setup, see "Entering System Setup" on page 102. 32 Setting Up and Using Your Computer To determine if your computer is listed twice. If Hyper-Threading is enabled, the processor is using Hyper-Threading technology: 1 Click the Start button, right-click My Computer, and then click Properties. 2 Click Hardware, then click Device Manager. 3 In the Device Manager window, click the plus (+) sign next to Processors.

Owners Manual
Page 44
..., including graphics cards (see "Cards" on page 65). ENSURE THAT THE PRINTER IS TURNED ON 44 Solving Problems I F T H E P O W E R L I G H T I N T E R F E R E N C E - A device may exist. • Ensure that the processor cable is not receiving power. • Reseat the power cable in the power connector on the back of the procedures in this section, follow the...
..., including graphics cards (see "Cards" on page 65). ENSURE THAT THE PRINTER IS TURNED ON 44 Solving Problems I F T H E P O W E R L I G H T I N T E R F E R E N C E - A device may exist. • Ensure that the processor cable is not receiving power. • Reseat the power cable in the power connector on the back of the procedures in this section, follow the...
Owners Manual
Page 49
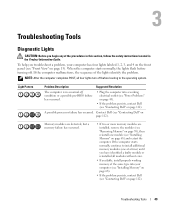
...processor failure has occurred. NOTE: After the computer completes POST, all modules without error. • If available, install properly working memory of the same type into a working electrical outlet (see "Power Problems" on page 43). • If the problem persists, contact Dell (see "Contacting Dell..." on page 112). Light Pattern Problem Description Suggested Resolution The computer is in the Product Information Guide. Contact Dell (see "Contacting Dell" on page 112). If the computer starts normally, ...
...processor failure has occurred. NOTE: After the computer completes POST, all modules without error. • If available, install properly working memory of the same type into a working electrical outlet (see "Power Problems" on page 43). • If the problem persists, contact Dell (see "Contacting Dell..." on page 112). Light Pattern Problem Description Suggested Resolution The computer is in the Product Information Guide. Contact Dell (see "Contacting Dell" on page 112). If the computer starts normally, ...

Owners Manual
Page 62
... the computer through the Start menu (see "Turning Off Your Computer" on page 61). Damage due to servicing that is not authorized by Dell is not covered by its metal mounting bracket. As you begin working inside your computer, ground yourself by its pins. Removing the Computer Cover...Installing Parts if you disconnect a cable, pull on its connector or on its edges or by touching an unpainted metal surface, such as a processor by its edges, not by your warranty. NOTICE: To avoid damaging the computer, perform the following safety guidelines to help ensure your computer (see...
... the computer through the Start menu (see "Turning Off Your Computer" on page 61). Damage due to servicing that is not authorized by Dell is not covered by its metal mounting bracket. As you begin working inside your computer, ground yourself by its pins. Removing the Computer Cover...Installing Parts if you disconnect a cable, pull on its connector or on its edges or by touching an unpainted metal surface, such as a processor by its edges, not by your warranty. NOTICE: To avoid damaging the computer, perform the following safety guidelines to help ensure your computer (see...
Owners Manual
Page 66
.... DDR2 Memory Overview DDR2 memory modules should be installed in pairs of matched memory size, speed, and technology. 1 processor fan connector (CPUFAN) 16 modem connector (RJ11) 2 processor connector (CPU) 17 RJ11 internal connector (RJ11INT) 3 processor power connector (POWER12V) 18 video connector (VGA) 4 memory module connectors (2, 4) 19 Media Card Reader connector (USBINT) 5 memory module...
.... DDR2 Memory Overview DDR2 memory modules should be installed in pairs of matched memory size, speed, and technology. 1 processor fan connector (CPUFAN) 16 modem connector (RJ11) 2 processor connector (CPU) 17 RJ11 internal connector (RJ11INT) 3 processor power connector (POWER12V) 18 video connector (VGA) 4 memory module connectors (2, 4) 19 Media Card Reader connector (USBINT) 5 memory module...

Owners Manual
Page 67
... and 2 or DIMM connectors 3 and 4. You should install your original memory modules from the computer during a memory upgrade, keep them separate from Dell. The recommended memory configurations are: • A pair of matched memory modules installed in DIMM connectors 1 and 2 (white securing clips) or &#... speed of the slowest module installed. • Be sure to install a single memory module in DIMM connector 1, the connector closest to the processor, before you install modules in the other connectors. 1 2 1 matched pair of memory modules in DIMM connectors 1 and 2 (white securing clips...
... and 2 or DIMM connectors 3 and 4. You should install your original memory modules from the computer during a memory upgrade, keep them separate from Dell. The recommended memory configurations are: • A pair of matched memory modules installed in DIMM connectors 1 and 2 (white securing clips) or &#... speed of the slowest module installed. • Be sure to install a single memory module in DIMM connector 1, the connector closest to the processor, before you install modules in the other connectors. 1 2 1 matched pair of memory modules in DIMM connectors 1 and 2 (white securing clips...
Owners Manual
Page 68
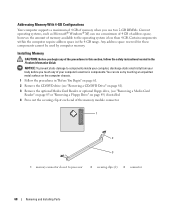
...on page 89) if installed. 4 Press out the securing clip at each end of the memory module connector. 1 2 3 1 memory connector closest to processor 2 securing clips (2) 3 connector 68 Removing and Installing Parts NOTICE: To prevent static damage to the operating system is less than 4 GB. Addressing Memory ... Before you begin any of your body before you use two 2-GB DIMMs. Current operating systems, such as Microsoft® Windows® XP, can do so by computer memory. Certain components within the computer require address space in the Product Information Guide. You can use a ...
...on page 89) if installed. 4 Press out the securing clip at each end of the memory module connector. 1 2 3 1 memory connector closest to processor 2 securing clips (2) 3 connector 68 Removing and Installing Parts NOTICE: To prevent static damage to the operating system is less than 4 GB. Addressing Memory ... Before you begin any of your body before you use two 2-GB DIMMs. Current operating systems, such as Microsoft® Windows® XP, can do so by computer memory. Certain components within the computer require address space in the Product Information Guide. You can use a ...
Owners Manual
Page 97
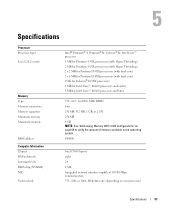
...; D, Celeron® D, Intel Core™ processor 1 MB for Pentium 4 5XX processors (with Hyper Threading) 2 MB for Pentium 4 6XX processors (with Hyper Threading) 2 x 2 MB for Pentium D 9XX processors (with dual core) 2 x 1 MB for Pentium D 8XX processors (with dual core) 256K for Celeron® D 3XX processors 2 MB for Intel Core™ E6400 processors and earlier 4 MB for Intel Core...
...; D, Celeron® D, Intel Core™ processor 1 MB for Pentium 4 5XX processors (with Hyper Threading) 2 MB for Pentium 4 6XX processors (with Hyper Threading) 2 x 2 MB for Pentium D 9XX processors (with dual core) 2 x 1 MB for Pentium D 8XX processors (with dual core) 256K for Celeron® D 3XX processors 2 MB for Intel Core™ E6400 processors and earlier 4 MB for Intel Core...
Owners Manual
Page 99
... Audio Network adapter Modem Temperature Sensor System board connectors: Serial ATA Fan PCI Express x1 PCI Express x16 USB MDC Floppy connector Front panel Power Processor power IEEE 1394 10-pin header for optional Media Card Reader (3.5 inch bay device) and two front-panel and six back-panel USB 2.0-compliant connectors...
... Audio Network adapter Modem Temperature Sensor System board connectors: Serial ATA Fan PCI Express x1 PCI Express x16 USB MDC Floppy connector Front panel Power Processor power IEEE 1394 10-pin header for optional Media Card Reader (3.5 inch bay device) and two front-panel and six back-panel USB 2.0-compliant connectors...

Owners Manual
Page 103
...: Depending on your computer, BIOS version, and installed devices, the items listed in the list. CPU Info Identifies whether the computer's processor supports Hyper-Threading and lists the processor bus speed, processor ID, clock speed, and L2 cache. NOTE: If you to AHCI or ATA mode. Onboard Devices NIC Controller You can set...
...: Depending on your computer, BIOS version, and installed devices, the items listed in the list. CPU Info Identifies whether the computer's processor supports Hyper-Threading and lists the processor bus speed, processor ID, clock speed, and L2 cache. NOTE: If you to AHCI or ATA mode. Onboard Devices NIC Controller You can set...

Owners Manual
Page 104
...DEP is enabled by default on the computer. NOTE: This option appears only when the Admin Password option is enabled for any supported processor in the operating system. The No Boot option enables a USB controller, but the drive's performance is primary when two video controllers... are present on computers with NX-capable processors. This setting specifies which video controller is not affected. This field specifies whether Enhanced Intel SpeedStep® Technology will be detected and...
...DEP is enabled by default on the computer. NOTE: This option appears only when the Admin Password option is enabled for any supported processor in the operating system. The No Boot option enables a USB controller, but the drive's performance is primary when two video controllers... are present on computers with NX-capable processors. This setting specifies which video controller is not affected. This field specifies whether Enhanced Intel SpeedStep® Technology will be detected and...
Owners Manual
Page 136
...controls and lights, 100 drives, 98 environmental, 101 expansion bus, 98 memory, 97 physical, 100 power, 100 processor, 97 technical, 97 video, 98 standby mode, 28 support contacting Dell, 111-112 policy, 110 support website, 11 system board, 65 System Restore, 56 system setup entering, 102...33 TV connect to computer, 20 U USB booting to devices, 106 V video problems, 47 volume adjusting, 46 W warranty information, 9 Windows XP Device Driver Rollback, 55 Hardware Troubleshooter, 56 Help and Support Center, 11 Hyper-Threading, 31 Network Setup Wizard, 21 Program Compatibility Wizard, 40 ...
...controls and lights, 100 drives, 98 environmental, 101 expansion bus, 98 memory, 97 physical, 100 power, 100 processor, 97 technical, 97 video, 98 standby mode, 28 support contacting Dell, 111-112 policy, 110 support website, 11 system board, 65 System Restore, 56 system setup entering, 102...33 TV connect to computer, 20 U USB booting to devices, 106 V video problems, 47 volume adjusting, 46 W warranty information, 9 Windows XP Device Driver Rollback, 55 Hardware Troubleshooter, 56 Help and Support Center, 11 Hyper-Threading, 31 Network Setup Wizard, 21 Program Compatibility Wizard, 40 ...


