Manual
Page 2
Contents 1 About Your TV Front View 5 Right Side View 6 Left Side View 7 Bottom View 8 Package Contents 9 Caring for Your TV 11 2 Setting Up Your TV Proper Location for Your TV 13 Connecting Your TV 13 3 Your Remote Control Installing Batteries 21 Using Your Remote Control 22 Using Your TV With a Universal or Learning Remote Control 24 4 Using the On-Screen Display Using Your Remote Control With the OSD 25 Selecting Your OSD Language 26 Input Select Menu 26 Picture Menu 27 Audio 28 PIP/POP/PBP 28 Contents 3
Contents 1 About Your TV Front View 5 Right Side View 6 Left Side View 7 Bottom View 8 Package Contents 9 Caring for Your TV 11 2 Setting Up Your TV Proper Location for Your TV 13 Connecting Your TV 13 3 Your Remote Control Installing Batteries 21 Using Your Remote Control 22 Using Your TV With a Universal or Learning Remote Control 24 4 Using the On-Screen Display Using Your Remote Control With the OSD 25 Selecting Your OSD Language 26 Input Select Menu 26 Picture Menu 27 Audio 28 PIP/POP/PBP 28 Contents 3
Manual
Page 3
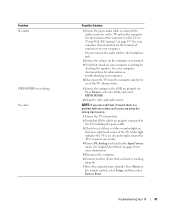
Parental Control 29 Closed Caption 30 Sleep Timer 30 OSD Setup 31 Card Reader 31 5 Troubleshooting Your TV Troubleshooting Tips 33 General Problems 34 OSD Messages 38 Remote Control Problems 39 Problems With the Card Reader 39 Using the Self-Test Feature When Your TV is Connected to Your Computer 40 Problems When Using the TV as a Monitor 40 6 Specifications for Your TV Index 47 4 Contents
Parental Control 29 Closed Caption 30 Sleep Timer 30 OSD Setup 31 Card Reader 31 5 Troubleshooting Your TV Troubleshooting Tips 33 General Problems 34 OSD Messages 38 Remote Control Problems 39 Problems With the Card Reader 39 Using the Self-Test Feature When Your TV is Connected to Your Computer 40 Problems When Using the TV as a Monitor 40 6 Specifications for Your TV Index 47 4 Contents
Manual
Page 7
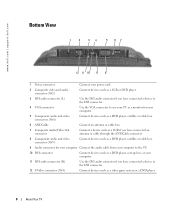
www.dell.com | support.dell.com Bottom View 1 2 34 5 67 12 11 10 9 8 1 Power connector Connect your power cord. 2 Composite video and audio connector (AV2) Connect devices such as a VCR or DVD player. 3 DVI audio connector (L) Use the DVI audio connector if you have connected a device to the DVI connector. 4 VGA connector Use the VGA connector to use your TV as a monitor for your computer. 5 Component audio and video connectors (AV6) Connect devices such as a DVD player, satellite or cable box. 6 ANT/Cable Connect an antenna or cable box. 7 Composite Audio/Video Out...
www.dell.com | support.dell.com Bottom View 1 2 34 5 67 12 11 10 9 8 1 Power connector Connect your power cord. 2 Composite video and audio connector (AV2) Connect devices such as a VCR or DVD player. 3 DVI audio connector (L) Use the DVI audio connector if you have connected a device to the DVI connector. 4 VGA connector Use the VGA connector to use your TV as a monitor for your computer. 5 Component audio and video connectors (AV6) Connect devices such as a DVD player, satellite or cable box. 6 ANT/Cable Connect an antenna or cable box. 7 Composite Audio/Video Out...

Manual
Page 13
... Setting Up Your TV If you are using an S-Video connector, you also need to Use Composite carries the video signal through a single cable. If you are using a composite video connector, you connect all five cables. S-Video splits the video signal into three signals, two color and one black-and-white. To locate the connector, see "Bottom View" on page 8. www.dell.com | support.dell.com Quality Good Cable and Connector Better Best When to connect...
... Setting Up Your TV If you are using an S-Video connector, you also need to Use Composite carries the video signal through a single cable. If you are using a composite video connector, you connect all five cables. S-Video splits the video signal into three signals, two color and one black-and-white. To locate the connector, see "Bottom View" on page 8. www.dell.com | support.dell.com Quality Good Cable and Connector Better Best When to connect...
Manual
Page 15
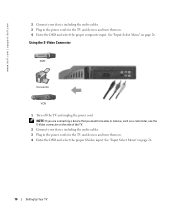
... to remove, such as a camcorder, use the S-Video connector on the side of the TV. 2 Connect your device including the audio cables. 3 Plug in the power cords for the TV and devices and turn them on page 26. Using the S-Video Connector 1 Turn off the TV and unplug the power cord. See "Input Select Menu" on . 4 Enter the OSD and select the proper composite input. www.dell.com | support.dell.com 2 Connect your device including the audio cables. 3 Plug in the power cords...
... to remove, such as a camcorder, use the S-Video connector on the side of the TV. 2 Connect your device including the audio cables. 3 Plug in the power cords for the TV and devices and turn them on page 26. Using the S-Video Connector 1 Turn off the TV and unplug the power cord. See "Input Select Menu" on . 4 Enter the OSD and select the proper composite input. www.dell.com | support.dell.com 2 Connect your device including the audio cables. 3 Plug in the power cords...
Manual
Page 19
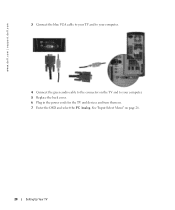
www.dell.com | support.dell.com 3 Connect the blue VGA cable to your TV and to your computer. 4 Connect the green audio cable to the connector on the TV and to your computer. 5 Replace the back cover. 6 Plug in the power cords for the TV and devices and turn them on page 26. 20 Setting Up Your TV See "Input Select Menu" on . 7 Enter the OSD and select the PC Analog.
www.dell.com | support.dell.com 3 Connect the blue VGA cable to your TV and to your computer. 4 Connect the green audio cable to the connector on the TV and to your computer. 5 Replace the back cover. 6 Plug in the power cords for the TV and devices and turn them on page 26. 20 Setting Up Your TV See "Input Select Menu" on . 7 Enter the OSD and select the PC Analog.
Manual
Page 22
... or PBP mode Cycles through the preset Audio options Increases the volume In the OSD, use Picture-In-Picture (PIP), Picture-Outside-Picture (POP), or Picture-By-Picture (PBP) Cycles through the Closed Caption menu Cycles through the size options from the Size menu Turns on the sleep timer Turns on and off Press to select a channel Returns you are watching) Enters and exits the Input Select menu Your Remote Control 23 Press again to turn off the sound.
... or PBP mode Cycles through the preset Audio options Increases the volume In the OSD, use Picture-In-Picture (PIP), Picture-Outside-Picture (POP), or Picture-By-Picture (PBP) Cycles through the Closed Caption menu Cycles through the size options from the Size menu Turns on the sleep timer Turns on and off Press to select a channel Returns you are watching) Enters and exits the Input Select menu Your Remote Control 23 Press again to turn off the sound.

Manual
Page 26
... back of the S-Video connector. AV 4 - Select when you view the Input Select menu. Picture Menu BACK PICTURE PRESET BRIGHTNESS CONTRAST SHARPNESS COLOR TEMP. Select when you have a video device, such as a DVD player, connected to the S-Video connector on page 8 for the location of the TV. See "Left Side View" on the side of the component connector. AV 3 - Select when you have a video device, such as a DVD player, connected to the composite connector...
... back of the S-Video connector. AV 4 - Select when you view the Input Select menu. Picture Menu BACK PICTURE PRESET BRIGHTNESS CONTRAST SHARPNESS COLOR TEMP. Select when you have a video device, such as a DVD player, connected to the S-Video connector on page 8 for the location of the TV. See "Left Side View" on the side of the component connector. AV 3 - Select when you have a video device, such as a DVD player, connected to the composite connector...
Manual
Page 30
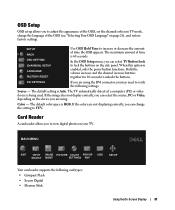
..." on the side panel. The default color space is 60 seconds. MAIN MENU EXIT INPUT IMAGE PICTURE COLOR PIP/POP SELECT MGMT SETTINGS PBP SIZE SETUP Your card reader supports the following settings: Source - SETUP BACK OSD SETTING CHANNENL SETUP LANGUAGE FACTORY RESET Use OSD Hold Time to unlock the buttons. Color - In the OSD Setup menu, you can select the source, PC or Video, depending on your TV. Hold the volume increase and the channel increase buttons together for 10 seconds...
..." on the side panel. The default color space is 60 seconds. MAIN MENU EXIT INPUT IMAGE PICTURE COLOR PIP/POP SELECT MGMT SETTINGS PBP SIZE SETUP Your card reader supports the following settings: Source - SETUP BACK OSD SETTING CHANNENL SETUP LANGUAGE FACTORY RESET Use OSD Hold Time to unlock the buttons. Color - In the OSD Setup menu, you can select the source, PC or Video, depending on your TV. Hold the volume increase and the channel increase buttons together for 10 seconds...
Manual
Page 33
... Menu on the remote control and select Size. NOTE: Some set top boxes offer aspect ratio. Press the Menu button on the remote control, select Setup, and then select Factory Reset. 5 Adjust the color temperature. After you are using the component connector. See "Input Select Menu" on page 25. 2 Reconnect the device using a different connector. See your device documentation for more information. 4 Reset the original factory defaults. For more information on using the OSD, see "Using the On-Screen Display" on page 26 for...
... Menu on the remote control and select Size. NOTE: Some set top boxes offer aspect ratio. Press the Menu button on the remote control, select Setup, and then select Factory Reset. 5 Adjust the color temperature. After you are using the component connector. See "Input Select Menu" on page 25. 2 Reconnect the device using a different connector. See your device documentation for more information. 4 Reset the original factory defaults. For more information on using the OSD, see "Using the On-Screen Display" on page 26 for...
Manual
Page 34
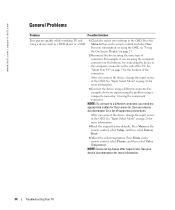
... at a time. 6 Connect another device that you are using the OSD, see "Using the On-Screen Display" on . 2 Verify that are properly connected to the TV, including the power cable. 3 Check to the TV. See "Input Select Menu" on the remote control and select Size. A blue light indicates the TV is working properly. 7 Reset the original factory defaults. If you know is on the remote control, select Setup, and then select Channel Setup. This resets the channels. 3 Check the aspect ratio settings in the Input Source menu. For...
... at a time. 6 Connect another device that you are using the OSD, see "Using the On-Screen Display" on . 2 Verify that are properly connected to the TV, including the power cable. 3 Check to the TV. See "Input Select Menu" on the remote control and select Size. A blue light indicates the TV is working properly. 7 Reset the original factory defaults. If you know is on the remote control, select Setup, and then select Channel Setup. This resets the channels. 3 Check the aspect ratio settings in the Input Source menu. For...
Manual
Page 36
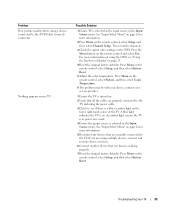
... seconds to use the remote control, press the volume up and the channel up buttons on the remote control and select Size. 2 Reset the original factory defaults. Press the Menu button on page 26 for more information. 3 Try connecting a different device. See "Input Select Menu" on the remote control and select Size. Press Menu on the remote control, and select Size. 2 This may be a problem with your remote control, select Setup. Check the OSD to see "Using the On-Screen Display" on the remote control and select Picture. 1 Update the size settings in the...
... seconds to use the remote control, press the volume up and the channel up buttons on the remote control and select Size. 2 Reset the original factory defaults. Press the Menu button on page 26 for more information. 3 Try connecting a different device. See "Input Select Menu" on the remote control and select Size. Press Menu on the remote control, and select Size. 2 This may be a problem with your remote control, select Setup. Check the OSD to see "Using the On-Screen Display" on the remote control and select Picture. 1 Update the size settings in the...
Manual
Page 39
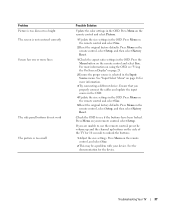
...-test mode, the power light remains green and the self-test pattern scrolls through DVI or VGA connector you can only connect your computer to support.dell.com. Problems When Using the TV as a Monitor NOTE: You can use the selftest feature to check the Image Settings. Self-Test Feature Check" dialog box appears on both your TV and reconnect the video cable; If your TV screen remains blank, the problem may need...
...-test mode, the power light remains green and the self-test pattern scrolls through DVI or VGA connector you can only connect your computer to support.dell.com. Problems When Using the TV as a Monitor NOTE: You can use the selftest feature to check the Image Settings. Self-Test Feature Check" dialog box appears on both your TV and reconnect the video cable; If your TV screen remains blank, the problem may need...
Manual
Page 40
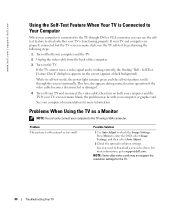
.... 2 Swap the video and audio source. NOTE: If you see if the TV volume works. 1 Ensure the settings in the Input Source menu. A blue light indicates the TV is working by checking the speakers. Press Menu to see a self-test, it means there is a problem with your computer is on the remote control, select Setup, and then select Factory Reset. See "Input Select Menu" on page 26 for information on page 19." Press Menu on . See...
.... 2 Swap the video and audio source. NOTE: If you see if the TV volume works. 1 Ensure the settings in the Input Source menu. A blue light indicates the TV is working by checking the speakers. Press Menu to see a self-test, it means there is a problem with your computer is on the remote control, select Setup, and then select Factory Reset. See "Input Select Menu" on page 26 for information on page 19." Press Menu on . See...
Manual
Page 42
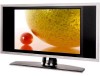
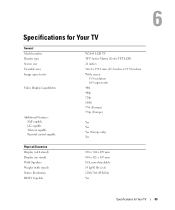
Specifications for Your TV General Model number Display type Screen size Viewable area Image aspect ratio Video Display Capabilities Additional Features: SAP capable CC capable Teletext capable Parental control capable W2600 LCD TV TFT Active Matrix (Color TFT LCD) 26 inches 566.4 x 339.8 mm (22.3 inches x 13.38 inches) Wide screen 15:9 resolution 16:9 aspect ratio 480i 480p 720p 1080i 576i (Europe) 576p (Europe) Yes Yes Yes (Europe only) Yes Physical Dimension Display (with stand) Display (no stand) With Speakers Weight (with stand) Native Resolution HDTV Capable 830 x 504 x 209...
Specifications for Your TV General Model number Display type Screen size Viewable area Image aspect ratio Video Display Capabilities Additional Features: SAP capable CC capable Teletext capable Parental control capable W2600 LCD TV TFT Active Matrix (Color TFT LCD) 26 inches 566.4 x 339.8 mm (22.3 inches x 13.38 inches) Wide screen 15:9 resolution 16:9 aspect ratio 480i 480p 720p 1080i 576i (Europe) 576p (Europe) Yes Yes Yes (Europe only) Yes Physical Dimension Display (with stand) Display (no stand) With Speakers Weight (with stand) Native Resolution HDTV Capable 830 x 504 x 209...
Product Information Guide
Page 10
... EXCLUSION MAY NOT APPLY TO YOU. Problems caused by using accessories, parts, or components not supplied by Dell - DELL'S RESPONSIBILITY FOR MALFUNCTIONS AND DEFECTS IN HARDWARE IS LIMITED TO REPAIR AND REPLACEMENT AS SET FORTH IN THIS WARRANTY STATEMENT. THIS IS THE MAXIMUM AMOUNT FOR WHICH WE ARE RESPONSIBLE. This limited warranty lasts for the time period indicated on the date of the...
... EXCLUSION MAY NOT APPLY TO YOU. Problems caused by using accessories, parts, or components not supplied by Dell - DELL'S RESPONSIBILITY FOR MALFUNCTIONS AND DEFECTS IN HARDWARE IS LIMITED TO REPAIR AND REPLACEMENT AS SET FORTH IN THIS WARRANTY STATEMENT. THIS IS THE MAXIMUM AMOUNT FOR WHICH WE ARE RESPONSIBLE. This limited warranty lasts for the time period indicated on the date of the...
Product Information Guide
Page 14
... by this limited warranty? This limited warranty does not cover: • Software, including the operating system and software added to perform preventive maintenance - External causes such as accident, abuse, misuse, or problems with missing or altered Service Tags or serial numbers • Products for Dell-Branded Hardware Products (Canada Only) What is not in your-our end-user customer's-Dell-branded hardware products...
... by this limited warranty? This limited warranty does not cover: • Software, including the operating system and software added to perform preventive maintenance - External causes such as accident, abuse, misuse, or problems with missing or altered Service Tags or serial numbers • Products for Dell-Branded Hardware Products (Canada Only) What is not in your-our end-user customer's-Dell-branded hardware products...

Product Information Guide
Page 20
... power-supply cord or plug is for cabel TV installers, Article 820-40 of the NEC that provides guidelines for proper grounding and, in particular, specifies that the cable ground shall be mounted to a wall or ceiling only as per National Electrical Code (NEC) Ground Clamp Antenna Lead in wire to and antenna-discharge unit, size of grounding connectors, location of antenna-discharge unit, connection...
... power-supply cord or plug is for cabel TV installers, Article 820-40 of the NEC that provides guidelines for proper grounding and, in particular, specifies that the cable ground shall be mounted to a wall or ceiling only as per National Electrical Code (NEC) Ground Clamp Antenna Lead in wire to and antenna-discharge unit, size of grounding connectors, location of antenna-discharge unit, connection...
Product Information Guide
Page 28
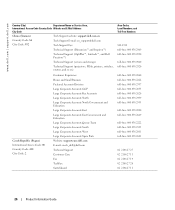
...) Department Name or Service Area, International Access Code Country Code Website and E-Mail Address City Code China (Xiamen) Tech Support website: support.dell.com.cn Country Code: 86 City Code: 592 Tech Support E-mail: cn_support@dell.com Tech Support Fax Technical Support (Dimension™ and Inspiron™) Technical Support (OptiPlex™, Latitude™, and Dell Precision™) Technical Support (servers and storage) Technical Support (projectors, PDAs, printers, switches, routers, and...
...) Department Name or Service Area, International Access Code Country Code Website and E-Mail Address City Code China (Xiamen) Tech Support website: support.dell.com.cn Country Code: 86 City Code: 592 Tech Support E-mail: cn_support@dell.com Tech Support Fax Technical Support (Dimension™ and Inspiron™) Technical Support (OptiPlex™, Latitude™, and Dell Precision™) Technical Support (servers and storage) Technical Support (projectors, PDAs, printers, switches, routers, and...
Product Information Guide
Page 33
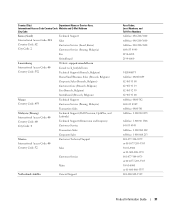
...) Macao Technical Support Country Code: 853 Customer Service (Penang, Malaysia) Transaction Sales Malaysia (Penang) International Access Code: 00 Country Code: 60 City Code: 4 Technical Support (Dell Precision, OptiPlex, and Latitude) Technical Support (Dimension and Inspiron) Customer Service Transaction Sales Corporate Sales Mexico Customer Technical Support International Access Code: 00 Country Code: 52 Sales Customer Service Main Netherlands Antilles General Support Area Codes, Local Numbers, and Toll-Free Numbers toll-free: 080-200-3800...
...) Macao Technical Support Country Code: 853 Customer Service (Penang, Malaysia) Transaction Sales Malaysia (Penang) International Access Code: 00 Country Code: 60 City Code: 4 Technical Support (Dell Precision, OptiPlex, and Latitude) Technical Support (Dimension and Inspiron) Customer Service Transaction Sales Corporate Sales Mexico Customer Technical Support International Access Code: 00 Country Code: 52 Sales Customer Service Main Netherlands Antilles General Support Area Codes, Local Numbers, and Toll-Free Numbers toll-free: 080-200-3800...


