Owners Manual
Page 3
... The Battery 11 Installing The Battery...11 3 Removing The Secure Digital (SD) Card 13 Installing The Secure Digital (SD) Card 14 4 Removing The Hinge Cover 15 Installing The Hinge Cover 16 5 Removing The Keyboard 17 Installing The Keyboard 18 6 Removing The Optical Disc Drive 19 Installing The Optical Disc Drive 20 7 Removing...
... The Battery 11 Installing The Battery...11 3 Removing The Secure Digital (SD) Card 13 Installing The Secure Digital (SD) Card 14 4 Removing The Hinge Cover 15 Installing The Hinge Cover 16 5 Removing The Keyboard 17 Installing The Keyboard 18 6 Removing The Optical Disc Drive 19 Installing The Optical Disc Drive 20 7 Removing...
Owners Manual
Page 15
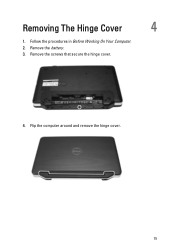
Removing The Hinge Cover 4 1. Flip the computer around and remove the hinge cover. 15 Remove the screws that secure the hinge cover. 4. Follow the procedures in Before Working On Your Computer. 2. Remove the battery. 3.
Removing The Hinge Cover 4 1. Flip the computer around and remove the hinge cover. 15 Remove the screws that secure the hinge cover. 4. Follow the procedures in Before Working On Your Computer. 2. Remove the battery. 3.

Owners Manual
Page 16
Install the battery. 4. Flip the computer around and install the screws that secure the hinge cover. 3. Follow the procedures in After Working Inside Your Computer. 16 Installing The Hinge Cover 1. Install the hinge cover and press on it to secure its connection to the computer. 2.
Install the battery. 4. Flip the computer around and install the screws that secure the hinge cover. 3. Follow the procedures in After Working Inside Your Computer. 16 Installing The Hinge Cover 1. Install the hinge cover and press on it to secure its connection to the computer. 2.
Owners Manual
Page 51
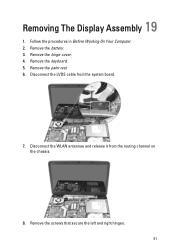
Removing The Display Assembly 19 1. Follow the procedures in Before Working On Your Computer. 2. Remove the battery. 3. Remove the hinge cover. 4. Remove the palm rest. 6. Disconnect the WLAN antennae and release it from the system board. 7. Remove the screws that secure the left and right hinges. 51 Remove the keyboard. 5. Disconnect the LVDS cable from the routing channel on the chassis. 8.
Removing The Display Assembly 19 1. Follow the procedures in Before Working On Your Computer. 2. Remove the battery. 3. Remove the hinge cover. 4. Remove the palm rest. 6. Disconnect the WLAN antennae and release it from the system board. 7. Remove the screws that secure the left and right hinges. 51 Remove the keyboard. 5. Disconnect the LVDS cable from the routing channel on the chassis. 8.

Owners Manual
Page 53
Install the screws that secure both the hinges in After Working Inside Your Computer. 53 Connect the USB board cable. 6. Install the keyboard. 8. Follow the procedures in place. 3. Align the WLAN antennae routing cable to its holder and connect the antennae to the system board. 4. Install the hinge cover. 9. Install the battery. 10. Installing The Display Assembly 1. Install the palm rest. 7. Insert the display assembly hinges into their holders. 2. Connect the LVDS cable to the WLAN card. 5.
Install the screws that secure both the hinges in After Working Inside Your Computer. 53 Connect the USB board cable. 6. Install the keyboard. 8. Follow the procedures in place. 3. Align the WLAN antennae routing cable to its holder and connect the antennae to the system board. 4. Install the hinge cover. 9. Install the battery. 10. Installing The Display Assembly 1. Install the palm rest. 7. Insert the display assembly hinges into their holders. 2. Connect the LVDS cable to the WLAN card. 5.
Owners Manual
Page 55
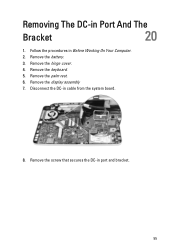
Remove the hinge cover. 4. Remove the palm rest. 6. Remove the screw that secures the DC-in cable from the system board. 8. Remove the battery. 3. Disconnect the DC-in port and bracket. 55 Remove the keyboard. 5. Removing The DC-in Before Working On Your Computer. 2. Follow the procedures in Port And The Bracket 20 1. Remove the display assembly 7.
Remove the hinge cover. 4. Remove the palm rest. 6. Remove the screw that secures the DC-in cable from the system board. 8. Remove the battery. 3. Disconnect the DC-in port and bracket. 55 Remove the keyboard. 5. Removing The DC-in Before Working On Your Computer. 2. Follow the procedures in Port And The Bracket 20 1. Remove the display assembly 7.

Owners Manual
Page 57
Install the display assembly. 5. Install the battery. 9. Connect the DC-in port. 3. Align the bracket and tighten the screw that secures the bracket and DC-in cable to the system board. 4. Install the palm rest. 6. Install the hinge cover. 8. Install the keyboard. 7. Insert the DC-in After Working Inside Your Computer. 57 Follow the procedures in port and the bracket into its compartment. 2. Installing The DC-in Port And Bracket 1.
Install the display assembly. 5. Install the battery. 9. Connect the DC-in port. 3. Align the bracket and tighten the screw that secures the bracket and DC-in cable to the system board. 4. Install the palm rest. 6. Install the hinge cover. 8. Install the keyboard. 7. Insert the DC-in After Working Inside Your Computer. 57 Follow the procedures in port and the bracket into its compartment. 2. Installing The DC-in Port And Bracket 1.
Owners Manual
Page 63
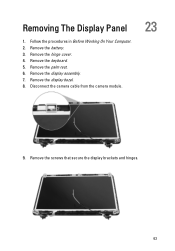
Remove the display bezel. 8. Remove the hinge cover. 4. Remove the keyboard. 5. Disconnect the camera cable from the camera module. 23 9. Removing The Display Panel 1. Remove the battery. 3. Remove the display assembly. 7. Remove the screws that secure the display brackets and hinges. 63 Remove the palm rest. 6. Follow the procedures in Before Working On Your Computer. 2.
Remove the display bezel. 8. Remove the hinge cover. 4. Remove the keyboard. 5. Disconnect the camera cable from the camera module. 23 9. Removing The Display Panel 1. Remove the battery. 3. Remove the display assembly. 7. Remove the screws that secure the display brackets and hinges. 63 Remove the palm rest. 6. Follow the procedures in Before Working On Your Computer. 2.
Owners Manual
Page 64
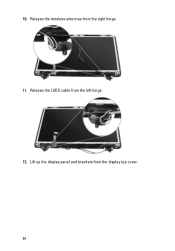
Release the LVDS cable from the display top cover. 64 Lift up the display panel and brackets from the left hinge. 12. Release the wireless antennae from the right hinge. 11. 10.
Release the LVDS cable from the display top cover. 64 Lift up the display panel and brackets from the left hinge. 12. Release the wireless antennae from the right hinge. 11. 10.

Owners Manual
Page 66
.... Follow the procedures in After Working Inside Your Computer. 66 Insert and route the display cable and wireless antennae to the WLAN card. 5. Install the hinge cover. 12. Align the WLAN antennae routing cable to its brackets to the camera module. 7. Installing The Display Panel 1. Attach the left and right...
.... Follow the procedures in After Working Inside Your Computer. 66 Insert and route the display cable and wireless antennae to the WLAN card. 5. Install the hinge cover. 12. Align the WLAN antennae routing cable to its brackets to the camera module. 7. Installing The Display Panel 1. Attach the left and right...

Owners Manual
Page 67
Follow the procedures in Before Working On Your Computer. 2. Remove the display assembly. 8. Disconnect the LVDS cable from the display panel. 67 Remove the display bezel. 9. Peel off the tape securing the LVDS cable connection. 11. Remove the display panel. 10. Remove the optical drive. 6. Remove the battery. 3. Remove the keyboard. 5. Remove the palm rest. 7. Removing The Low-Voltage Differential Signaling (LVDS) Cable 24 1. Remove the hinge cover. 4.
Follow the procedures in Before Working On Your Computer. 2. Remove the display assembly. 8. Disconnect the LVDS cable from the display panel. 67 Remove the display bezel. 9. Peel off the tape securing the LVDS cable connection. 11. Remove the display panel. 10. Remove the optical drive. 6. Remove the battery. 3. Remove the keyboard. 5. Remove the palm rest. 7. Removing The Low-Voltage Differential Signaling (LVDS) Cable 24 1. Remove the hinge cover. 4.

Owners Manual
Page 69
Install the keyboard. 9. Connect the display cable connector to the display panel and affix the tape to the display panel. 2. Install the display panel. 4. Install the optical drive. 8. Install the display assembly. 6. Install the battery. 11. Installing The Low-Voltage Differential Signaling (LVDS) Cable 1. Install the display bezel. 5. Install the palm rest. 7. Install the hinge cover. 10. Follow the procedures in After Working Inside Your Computer. 69 Attach the display cable to secure it. 3.
Install the keyboard. 9. Connect the display cable connector to the display panel and affix the tape to the display panel. 2. Install the display panel. 4. Install the optical drive. 8. Install the display assembly. 6. Install the battery. 11. Installing The Low-Voltage Differential Signaling (LVDS) Cable 1. Install the display bezel. 5. Install the palm rest. 7. Install the hinge cover. 10. Follow the procedures in After Working Inside Your Computer. 69 Attach the display cable to secure it. 3.


