Setup and Quick Reference Guide
Page 8
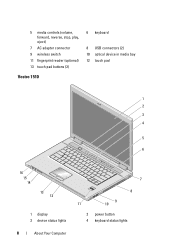
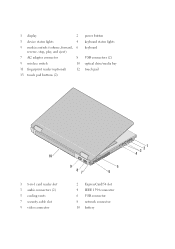
5 media controls (volume, forward, reverse, stop, play, eject) 7 AC adapter connector 9 wireless switch 11 fingerprint reader (optional) 13 touch pad buttons (2) Vostro 1510 6 keyboard 8 USB connectors (2) 10 optical device in media bay 12 touch pad 1 2 3 4 5 6 9 A 16 15 14 13 12 1 display 3 device status lights 8 About Your Computer 7 8 9 11 10 2 power button 4 keyboard status lights
5 media controls (volume, forward, reverse, stop, play, eject) 7 AC adapter connector 9 wireless switch 11 fingerprint reader (optional) 13 touch pad buttons (2) Vostro 1510 6 keyboard 8 USB connectors (2) 10 optical device in media bay 12 touch pad 1 2 3 4 5 6 9 A 16 15 14 13 12 1 display 3 device status lights 8 About Your Computer 7 8 9 11 10 2 power button 4 keyboard status lights
Setup and Quick Reference Guide
Page 15
...be included if you did not order them. 1 Connect the AC adapter to the AC adapter connector on the AC adapter to the power strip or electrical outlet may cause fire or equipment damage. NOTICE: When you disconnect the AC adapter cable from the computer, grasp the connector, not the cable itself... follow the angle of the connector on the computer and to avoid damaging the cable. CAUTION: The AC adapter works with your computer. When you wrap the AC adapter cable, ensure that shipped with electrical outlets worldwide. Using an incompatible cable or improperly connecting the cable to ...
...be included if you did not order them. 1 Connect the AC adapter to the AC adapter connector on the AC adapter to the power strip or electrical outlet may cause fire or equipment damage. NOTICE: When you disconnect the AC adapter cable from the computer, grasp the connector, not the cable itself... follow the angle of the connector on the computer and to avoid damaging the cable. CAUTION: The AC adapter works with your computer. When you wrap the AC adapter cable, ensure that shipped with electrical outlets worldwide. Using an incompatible cable or improperly connecting the cable to ...
Setup and Quick Reference Guide
Page 30
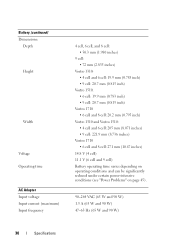
...: Depth Height Width Voltage Operating time AC Adapter Input voltage Input current (maximum) Input frequency 4 cell, 6 cell, and 8 cell: • 50.3 mm (1.980 inches) 9 cell: • 72 mm (2.835 inches) Vostro 1310: • 4 cell and 6 cell: 19.9 mm (0.783 inch) • 9 cell: 20.7 mm (0.815 inch) Vostro 1510: • 6 cell: 19.9 mm (0.783 inch...
...: Depth Height Width Voltage Operating time AC Adapter Input voltage Input current (maximum) Input frequency 4 cell, 6 cell, and 8 cell: • 50.3 mm (1.980 inches) 9 cell: • 72 mm (2.835 inches) Vostro 1310: • 4 cell and 6 cell: 19.9 mm (0.783 inch) • 9 cell: 20.7 mm (0.815 inch) Vostro 1510: • 6 cell: 19.9 mm (0.783 inch...
Setup and Features Information Tech Sheet
Page 2
1 display 2 3 device status lights 4 5 media controls (volume, forward, 6 reverse, stop, play, and eject) 7 AC adapter connector 8 9 wireless switch 10 11 fingerprint reader (optional) 12 13 touch pad buttons (2) power button keyboard status lights keyboard USB connectors (2) optical drive/media bay touch pad 10 1 8-in-1 card reader slot 3 audio connectors (2) 5 cooling vents 7 security cable slot 9 video connector 9 87 5 6 2 ExpressCard/54 slot 4 IEEE 1394 connector 6 USB connector 8 network connector 10 battery 3 21 4
1 display 2 3 device status lights 4 5 media controls (volume, forward, 6 reverse, stop, play, and eject) 7 AC adapter connector 8 9 wireless switch 10 11 fingerprint reader (optional) 12 13 touch pad buttons (2) power button keyboard status lights keyboard USB connectors (2) optical drive/media bay touch pad 10 1 8-in-1 card reader slot 3 audio connectors (2) 5 cooling vents 7 security cable slot 9 video connector 9 87 5 6 2 ExpressCard/54 slot 4 IEEE 1394 connector 6 USB connector 8 network connector 10 battery 3 21 4
Setup and Features Information Tech Sheet
Page 4
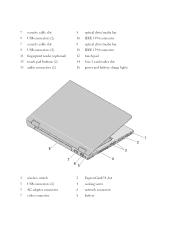
7 security cable slot 9 USB connectors (2) 7 security cable slot 9 USB connectors (2) 11 fingerprint reader (optional) 13 touch pad buttons (2) 15 audio connectors (2) 8 optical drive/media bay 10 IEEE 1394 connector 8 optical drive/media bay 10 IEEE 1394 connector 12 touch pad 14 8-in-1 card reader slot 16 power and battery charge lights 8 7 4 65 1 wireless switch 3 USB connectors (2) 5 AC adapter connector 7 video connector 2 ExpressCard/54 slot 4 cooling vents 6 network connector 8 battery 1 2 3
7 security cable slot 9 USB connectors (2) 7 security cable slot 9 USB connectors (2) 11 fingerprint reader (optional) 13 touch pad buttons (2) 15 audio connectors (2) 8 optical drive/media bay 10 IEEE 1394 connector 8 optical drive/media bay 10 IEEE 1394 connector 12 touch pad 14 8-in-1 card reader slot 16 power and battery charge lights 8 7 4 65 1 wireless switch 3 USB connectors (2) 5 AC adapter connector 7 video connector 2 ExpressCard/54 slot 4 cooling vents 6 network connector 8 battery 1 2 3

Setup and Features Information Tech Sheet
Page 6
... connectors (2) 5 USB connector 7 network connector 9 battery 2 ExpressCard/54 slot 4 cooling vents 6 AC adapter connector 8 video connector WARNING: Do not block, push objects into, or allow dust to the power strip or electrical outlet may cause fire or equipment damage. Fan noise is running. Quick Setup WARNING: Before..., read the safety information that shipped with your Dell™ computer in the air vents. For additional best practices information see www.dell.com/regulatory_compliance. However, power connectors and power strips vary among countries. The computer turns on ...
... connectors (2) 5 USB connector 7 network connector 9 battery 2 ExpressCard/54 slot 4 cooling vents 6 AC adapter connector 8 video connector WARNING: Do not block, push objects into, or allow dust to the power strip or electrical outlet may cause fire or equipment damage. Fan noise is running. Quick Setup WARNING: Before..., read the safety information that shipped with your Dell™ computer in the air vents. For additional best practices information see www.dell.com/regulatory_compliance. However, power connectors and power strips vary among countries. The computer turns on ...

Setup and Features Information Tech Sheet
Page 7
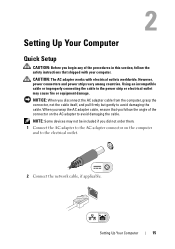
NOTE: Some devices may not be included if you did not order them. 1 Connect the AC adapter to the AC adapter connector on the computer and to the electrical outlet. 2 Connect the network cable. 3 Connect USB devices, such as a mouse or keyboard. 4 Connect IEEE 1394 devices, ...such as a DVD player. 5 Open the computer display and press the power button to avoid damaging the cable. CAUTION: When you disconnect the AC adapter cable from the computer, grasp the connector, not the cable itself, and pull firmly but gently to turn on...
NOTE: Some devices may not be included if you did not order them. 1 Connect the AC adapter to the AC adapter connector on the computer and to the electrical outlet. 2 Connect the network cable. 3 Connect USB devices, such as a mouse or keyboard. 4 Connect IEEE 1394 devices, ...such as a DVD player. 5 Open the computer display and press the power button to avoid damaging the cable. CAUTION: When you disconnect the AC adapter cable from the computer, grasp the connector, not the cable itself, and pull firmly but gently to turn on...
Service Manual
Page 4
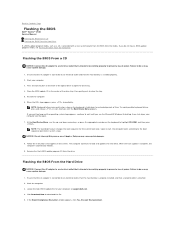
... adapter is provided with a new system board, flash the BIOS from the drive. Place the BIOS-update CD in the center of the drive tray, then gently push to an electrical outlet and that is known to be working properly to Contents Page Flashing the BIOS Dell™ Vostro™ 1510 ...Device Menu appears. To avoid possible keyboard failure, press and release in system setup. Back to prevent a loss of power. Flashing the BIOS From a CD NOTICE: Connect the AC adapter to an electrical outlet that a network cable is connected to boot and updates the new BIOS. Press the eject button...
... adapter is provided with a new system board, flash the BIOS from the drive. Place the BIOS-update CD in the center of the drive tray, then gently push to an electrical outlet and that is known to be working properly to Contents Page Flashing the BIOS Dell™ Vostro™ 1510 ...Device Menu appears. To avoid possible keyboard failure, press and release in system setup. Back to prevent a loss of power. Flashing the BIOS From a CD NOTICE: Connect the AC adapter to an electrical outlet that a network cable is connected to boot and updates the new BIOS. Press the eject button...


