
Setup and Quick Reference Guide
Page 3
Contents 1 About Your Computer 7 Front View 7 Dell™ Vostro™ 1310 7 Vostro 1510 8 Vostro 1710 9 Back View 10 Dell™ Vostro™ 1310 10 Vostro 1510 11 Vostro 1710 12 Battery Removal 13 Wireless Switch 14 2 Setting Up Your Computer 15 Quick Setup 15 Connecting to the Internet 17 Setting Up Your Internet Connection 18 Transferring Information to a New Computer 19 Microsoft® Windows® XP Operating System . . . 19 Microsoft Windows Vista 22 Contents 3
Contents 1 About Your Computer 7 Front View 7 Dell™ Vostro™ 1310 7 Vostro 1510 8 Vostro 1710 9 Back View 10 Dell™ Vostro™ 1310 10 Vostro 1510 11 Vostro 1710 12 Battery Removal 13 Wireless Switch 14 2 Setting Up Your Computer 15 Quick Setup 15 Connecting to the Internet 17 Setting Up Your Internet Connection 18 Transferring Information to a New Computer 19 Microsoft® Windows® XP Operating System . . . 19 Microsoft Windows Vista 22 Contents 3
Setup and Quick Reference Guide
Page 8
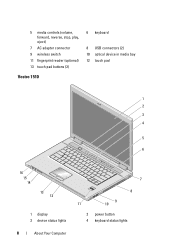
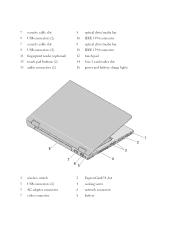
5 media controls (volume, forward, reverse, stop, play, eject) 7 AC adapter connector 9 wireless switch 11 fingerprint reader (optional) 13 touch pad buttons (2) Vostro 1510 6 keyboard 8 USB connectors (2) 10 optical device in media bay 12 touch pad 1 2 3 4 5 6 9 A 16 15 14 13 12 1 display 3 device status lights 8 About Your Computer 7 8 9 11 10 2 power button 4 keyboard status lights
5 media controls (volume, forward, reverse, stop, play, eject) 7 AC adapter connector 9 wireless switch 11 fingerprint reader (optional) 13 touch pad buttons (2) Vostro 1510 6 keyboard 8 USB connectors (2) 10 optical device in media bay 12 touch pad 1 2 3 4 5 6 9 A 16 15 14 13 12 1 display 3 device status lights 8 About Your Computer 7 8 9 11 10 2 power button 4 keyboard status lights
Setup and Quick Reference Guide
Page 10
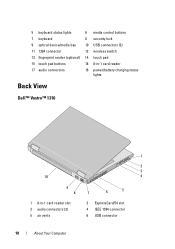
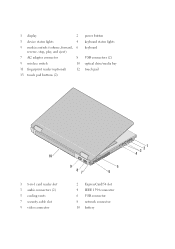
5 keyboard status lights 6 media control buttons 7 keyboard 8 security lock 9 optical device/media bay 10 USB connectors (2) 11 1394 connector 12 wireless switch 13 fingerprint reader (optional) 14 touch pad 15 touch pad buttons 16 8-in-1 card reader 17 audio connectors 18 power/battery charging status lights Back View Dell™ Vostro™ 1310 1 2 3 10 4 9 8 7 6 5 1 8-in-1 card reader slot 3 audio connectors (2) 5 air vents 2 ExpressCard/54 slot 4 IEEE 1394 connector 6 USB connector 10 About Your Computer
5 keyboard status lights 6 media control buttons 7 keyboard 8 security lock 9 optical device/media bay 10 USB connectors (2) 11 1394 connector 12 wireless switch 13 fingerprint reader (optional) 14 touch pad 15 touch pad buttons 16 8-in-1 card reader 17 audio connectors 18 power/battery charging status lights Back View Dell™ Vostro™ 1310 1 2 3 10 4 9 8 7 6 5 1 8-in-1 card reader slot 3 audio connectors (2) 5 air vents 2 ExpressCard/54 slot 4 IEEE 1394 connector 6 USB connector 10 About Your Computer
Setup and Quick Reference Guide
Page 11
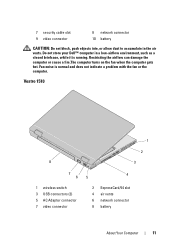
Fan noise is running. Restricting the airflow can damage the computer or cause a fire.The computer turns on the fan when the computer gets hot. Vostro 1510 1 2 8 3 7 6 1 wireless switch 3 USB connectors (2) 5 AC Adapter connector 7 video connector 4 5 2 ExpressCard/54 slot 4 air vents 6 network connector 8 battery About Your Computer 11 7 security cable slot 9 video connector 8 ...-airflow environment, such as a closed briefcase, while it is normal and does not indicate a problem with the fan or the computer. Do not store your Dell™ computer in the air vents.
Fan noise is running. Restricting the airflow can damage the computer or cause a fire.The computer turns on the fan when the computer gets hot. Vostro 1510 1 2 8 3 7 6 1 wireless switch 3 USB connectors (2) 5 AC Adapter connector 7 video connector 4 5 2 ExpressCard/54 slot 4 air vents 6 network connector 8 battery About Your Computer 11 7 security cable slot 9 video connector 8 ...-airflow environment, such as a closed briefcase, while it is normal and does not indicate a problem with the fan or the computer. Do not store your Dell™ computer in the air vents.
Setup and Quick Reference Guide
Page 14
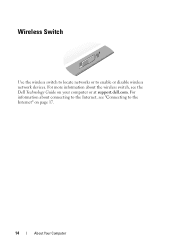
For information about the wireless switch, see "Connecting to enable or disable wireless network devices. Wireless Switch Use the wireless switch to locate networks or to the Internet" on your computer or at support.dell.com. For more information about connecting to the Internet, see the Dell Technology Guide on page 17. 14 About Your Computer
For information about the wireless switch, see "Connecting to enable or disable wireless network devices. Wireless Switch Use the wireless switch to locate networks or to the Internet" on your computer or at support.dell.com. For more information about connecting to the Internet, see the Dell Technology Guide on page 17. 14 About Your Computer

Setup and Quick Reference Guide
Page 17
... your computer and to the telephone wall connector before you set up your ISP or cellular phone service for more information. 4 5 1 1 Internet service 3 wireless router 3 2 5 laptop computer with wireless network card 3 2 1 2 cable or DSL modem 4 laptop computer with network adapter Connecting to the Internet To connect to the Internet, if applicable. If...
... your computer and to the telephone wall connector before you set up your ISP or cellular phone service for more information. 4 5 1 1 Internet service 3 wireless router 3 2 5 laptop computer with wireless network card 3 2 1 2 cable or DSL modem 4 laptop computer with network adapter Connecting to the Internet To connect to the Internet, if applicable. If...
Setup and Quick Reference Guide
Page 19
...) or Dial-up, depending on how you want to connect: • Choose Broadband if you will use a DSL, satellite modem, cable TV modem, or Bluetooth wireless technology connection. • Chose Dial-up if you must run the Files and Settings Transfer Wizard. For instructions on setting up modem or ISDN. NOTE...
...) or Dial-up, depending on how you want to connect: • Choose Broadband if you will use a DSL, satellite modem, cable TV modem, or Bluetooth wireless technology connection. • Chose Dial-up if you must run the Files and Settings Transfer Wizard. For instructions on setting up modem or ISDN. NOTE...
Setup and Quick Reference Guide
Page 25
... WLAN • one USB-based daughter card with Bluetooth® wireless technology (Dell™ Wireless 360) RJ-45 port Vostro 1310 and 1510: • four USB ports Vostro 1710: • six USB ports 15-pin VGA video connector Communications Modem Network adapter Wireless supports external USB modem Vostro 1310, 1510, and 1710: • 10/100/1000 Ethernet LAN on...
... WLAN • one USB-based daughter card with Bluetooth® wireless technology (Dell™ Wireless 360) RJ-45 port Vostro 1310 and 1510: • four USB ports Vostro 1710: • six USB ports 15-pin VGA video connector Communications Modem Network adapter Wireless supports external USB modem Vostro 1310, 1510, and 1710: • 10/100/1000 Ethernet LAN on...

Setup and Quick Reference Guide
Page 62
...information • End User License Agreement Service Manual The Service Manual for your computer can be found at support.dell.com. • How to remove and replace parts • How to configure system settings • How to troubleshoot and solve problems... Dell Technology Guide • About your operating system The Dell Technology Guide is available on your computer and at support.dell.com. • Using and maintaining peripherals • Understanding technologies such as RAID, Internet, Bluetooth® wireless technology, e-mail, and so on...
...information • End User License Agreement Service Manual The Service Manual for your computer can be found at support.dell.com. • How to remove and replace parts • How to configure system settings • How to troubleshoot and solve problems... Dell Technology Guide • About your operating system The Dell Technology Guide is available on your computer and at support.dell.com. • Using and maintaining peripherals • Understanding technologies such as RAID, Internet, Bluetooth® wireless technology, e-mail, and so on...
Setup and Features Information Tech Sheet
Page 2
1 display 2 3 device status lights 4 5 media controls (volume, forward, 6 reverse, stop, play, and eject) 7 AC adapter connector 8 9 wireless switch 10 11 fingerprint reader (optional) 12 13 touch pad buttons (2) power button keyboard status lights keyboard USB connectors (2) optical drive/media bay touch pad 10 1 8-in-1 card reader slot 3 audio connectors (2) 5 cooling vents 7 security cable slot 9 video connector 9 87 5 6 2 ExpressCard/54 slot 4 IEEE 1394 connector 6 USB connector 8 network connector 10 battery 3 21 4
1 display 2 3 device status lights 4 5 media controls (volume, forward, 6 reverse, stop, play, and eject) 7 AC adapter connector 8 9 wireless switch 10 11 fingerprint reader (optional) 12 13 touch pad buttons (2) power button keyboard status lights keyboard USB connectors (2) optical drive/media bay touch pad 10 1 8-in-1 card reader slot 3 audio connectors (2) 5 cooling vents 7 security cable slot 9 video connector 9 87 5 6 2 ExpressCard/54 slot 4 IEEE 1394 connector 6 USB connector 8 network connector 10 battery 3 21 4
Setup and Features Information Tech Sheet
Page 4
7 security cable slot 9 USB connectors (2) 7 security cable slot 9 USB connectors (2) 11 fingerprint reader (optional) 13 touch pad buttons (2) 15 audio connectors (2) 8 optical drive/media bay 10 IEEE 1394 connector 8 optical drive/media bay 10 IEEE 1394 connector 12 touch pad 14 8-in-1 card reader slot 16 power and battery charge lights 8 7 4 65 1 wireless switch 3 USB connectors (2) 5 AC adapter connector 7 video connector 2 ExpressCard/54 slot 4 cooling vents 6 network connector 8 battery 1 2 3
7 security cable slot 9 USB connectors (2) 7 security cable slot 9 USB connectors (2) 11 fingerprint reader (optional) 13 touch pad buttons (2) 15 audio connectors (2) 8 optical drive/media bay 10 IEEE 1394 connector 8 optical drive/media bay 10 IEEE 1394 connector 12 touch pad 14 8-in-1 card reader slot 16 power and battery charge lights 8 7 4 65 1 wireless switch 3 USB connectors (2) 5 AC adapter connector 7 video connector 2 ExpressCard/54 slot 4 cooling vents 6 network connector 8 battery 1 2 3
Setup and Features Information Tech Sheet
Page 5
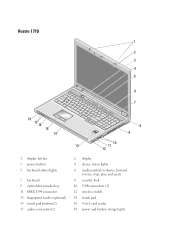
Vostro 1710 1 2 3 4 5 6 9 7 A 18 17 16 15 14 8 9 10 13 11 12 1 display latches 3 power button 5 keyboard status lights 7 keyboard 9 optical drive/media bay 11 IEEE 1394 connector 13 fingerprint reader (optional) 15 touch pad buttons(2) 17 audio connectors(2) 2 display 4 device status lights 6 media controls (volume, forward, reverse, stop, play, and eject) 8 security lock 10 USB connectors (2) 12 wireless switch 14 touch pad 16 8-in-1 card reader 18 power and battery charge lights
Vostro 1710 1 2 3 4 5 6 9 7 A 18 17 16 15 14 8 9 10 13 11 12 1 display latches 3 power button 5 keyboard status lights 7 keyboard 9 optical drive/media bay 11 IEEE 1394 connector 13 fingerprint reader (optional) 15 touch pad buttons(2) 17 audio connectors(2) 2 display 4 device status lights 6 media controls (volume, forward, reverse, stop, play, and eject) 8 security lock 10 USB connectors (2) 12 wireless switch 14 touch pad 16 8-in-1 card reader 18 power and battery charge lights
Service Manual
Page 1
... computer, any references in trademarks and trade names other countries. disclaims any manner whatsoever without notice. © 2008 Dell Inc. Dell™ Vostro™ 1510 Service Manual Troubleshooting Before Working on Your Computer Hard Drive Wireless Local Area Network (WLAN) Card Fan Processor Thermal-Cooling Assembly Processor Module Memory Hinge Cover Keyboard Power Button and...
... computer, any references in trademarks and trade names other countries. disclaims any manner whatsoever without notice. © 2008 Dell Inc. Dell™ Vostro™ 1510 Service Manual Troubleshooting Before Working on Your Computer Hard Drive Wireless Local Area Network (WLAN) Card Fan Processor Thermal-Cooling Assembly Processor Module Memory Hinge Cover Keyboard Power Button and...
Service Manual
Page 6
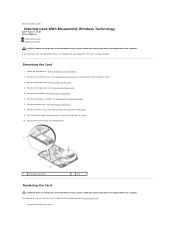
... Removing the Keyboard). 6. Remove the card from the card. 10. Back to Contents Page Internal Card With Bluetooth® Wireless Technology Dell™ Vostro™ 1510 Service Manual Removing the Card Replacing the Card CAUTION: Before you begin any of the procedures in this section, follow the ...Connect the cable to the USB board. 9. Removing the Card 1. Remove the M2 x 3-mm screw that you ordered a card with Bluetooth wireless technology with your computer, the card is already installed. This procedure assumes that connects the card to the card. Remove the WLAN card (see...
... Removing the Keyboard). 6. Remove the card from the card. 10. Back to Contents Page Internal Card With Bluetooth® Wireless Technology Dell™ Vostro™ 1510 Service Manual Removing the Card Replacing the Card CAUTION: Before you begin any of the procedures in this section, follow the ...Connect the cable to the USB board. 9. Removing the Card 1. Remove the M2 x 3-mm screw that you ordered a card with Bluetooth wireless technology with your computer, the card is already installed. This procedure assumes that connects the card to the card. Remove the WLAN card (see...
Service Manual
Page 13
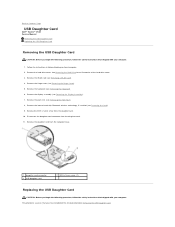
Remove the internal card with Bluetooth wireless technology, if installed (see Removing the Display Assembly). 7. Remove the display assembly (see Removing the Card). 9. Remove the daughter card from the daughter card. 10. ... the keyboard (see Removing the Hinge Cover). 5. Disconnect the daughter-card connector from the daughter card. 11. Back to Contents Page USB Daughter Card Dell™ Vostro™ 1510 Service Manual Removing the USB Daughter Card Replacing the USB Daughter Card Removing the USB Daughter Card CAUTION: Before you have completed the removal...
Remove the internal card with Bluetooth wireless technology, if installed (see Removing the Display Assembly). 7. Remove the display assembly (see Removing the Card). 9. Remove the daughter card from the daughter card. 10. ... the keyboard (see Removing the Hinge Cover). 5. Disconnect the daughter-card connector from the daughter card. 11. Back to Contents Page USB Daughter Card Dell™ Vostro™ 1510 Service Manual Removing the USB Daughter Card Replacing the USB Daughter Card Removing the USB Daughter Card CAUTION: Before you have completed the removal...

Service Manual
Page 14
Replace the internal card with Bluetooth wireless technology, if installed (see Replacing the Hinge Cover). 8. Replace the hinge cover (see Removing the Card). 4. Replace the hard drive cover. Connect the daughter card ...
Replace the internal card with Bluetooth wireless technology, if installed (see Replacing the Hinge Cover). 8. Replace the hinge cover (see Removing the Card). 4. Replace the hard drive cover. Connect the daughter card ...
Service Manual
Page 26
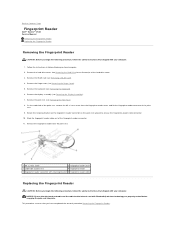
... in Before Working on the palm rest upward to Contents Page Fingerprint Reader Dell™ Vostro™ 1510 Service Manual Removing the Fingerprint Reader Replacing the Fingerprint Reader Removing the Fingerprint Reader... CAUTION: Before you have completed the removal procedure Removing the Fingerprint Reader. Rotate the retaining bracket on the fingerprint reader connector on Your Computer. 2. NOTICE: Ensure that shipped with Bluetooth® wireless...
... in Before Working on the palm rest upward to Contents Page Fingerprint Reader Dell™ Vostro™ 1510 Service Manual Removing the Fingerprint Reader Replacing the Fingerprint Reader Removing the Fingerprint Reader... CAUTION: Before you have completed the removal procedure Removing the Fingerprint Reader. Rotate the retaining bracket on the fingerprint reader connector on Your Computer. 2. NOTICE: Ensure that shipped with Bluetooth® wireless...
Service Manual
Page 34
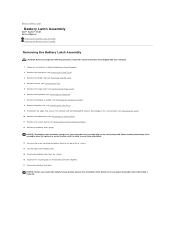
Disconnect the cable that shipped with Bluetooth® wireless technology to the system board (see Removing the Optical Drive). 11. Remove the optical drive (see Removing the Card). 10. NOTICE: The battery-latch ...fan (see Removing the System Board Assembly). 12. Remove the palm rest (see Removing the Display Assembly). 8. Back to Contents Page Battery Latch Assembly Dell™ Vostro™ 1510 Service Manual Removing the Battery Latch Assembly Replacing the Battery Latch Assembly Removing the Battery Latch Assembly CAUTION: Before you remove the battery release...
Disconnect the cable that shipped with Bluetooth® wireless technology to the system board (see Removing the Optical Drive). 11. Remove the optical drive (see Removing the Card). 10. NOTICE: The battery-latch ...fan (see Removing the System Board Assembly). 12. Remove the palm rest (see Removing the Display Assembly). 8. Back to Contents Page Battery Latch Assembly Dell™ Vostro™ 1510 Service Manual Removing the Battery Latch Assembly Replacing the Battery Latch Assembly Removing the Battery Latch Assembly CAUTION: Before you remove the battery release...

Service Manual
Page 35
... WLAN card (see Replacing the Palm Rest). 9. This procedure assumes that the battery latch spring is properly mounted on the battery latch assembly with Bluetooth wireless technology to the system board (see Replacing the Hinge Cover). 12. Replace the M2 x 3-mm screw that holds the battery release button in the battery...
... WLAN card (see Replacing the Palm Rest). 9. This procedure assumes that the battery latch spring is properly mounted on the battery latch assembly with Bluetooth wireless technology to the system board (see Replacing the Hinge Cover). 12. Replace the M2 x 3-mm screw that holds the battery release button in the battery...
Service Manual
Page 38
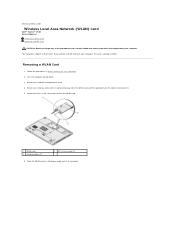
... computer. Slide the WLAN card at a 45-degree angle out of the procedures in Before Working on the cable to Contents Page Wireless Local Area Network (WLAN) Card Dell™ Vostro™ 1510 Service Manual Removing a WLAN Card Replacing a WLAN Card CAUTION: Before you ordered a WLAN card with your computer, the card is positioned...
... computer. Slide the WLAN card at a 45-degree angle out of the procedures in Before Working on the cable to Contents Page Wireless Local Area Network (WLAN) Card Dell™ Vostro™ 1510 Service Manual Removing a WLAN Card Replacing a WLAN Card CAUTION: Before you ordered a WLAN card with your computer, the card is positioned...


