
Owner's Manual
Page 4
... Display . . . 49 Microsoft Windows XP 49 Windows Vista 50 Setting Display Resolution and Refresh Rate 50 Microsoft Windows XP 51 Windows Vista 51 5 Using the Keyboard and Touch Pad . . . . 53 Numeric Keypad 53 Key Combinations 54 System Functions 54 Display Functions 54 Battery 54 Power Management 54 Microsoft® Windows®...
... Display . . . 49 Microsoft Windows XP 49 Windows Vista 50 Setting Display Resolution and Refresh Rate 50 Microsoft Windows XP 51 Windows Vista 51 5 Using the Keyboard and Touch Pad . . . . 53 Numeric Keypad 53 Key Combinations 54 System Functions 54 Display Functions 54 Battery 54 Power Management 54 Microsoft® Windows®...

Owner's Manual
Page 8
... 113 Dell Diagnostics 113 Dell Support Center 118 Dell Support 118 Dell PC TuneUp 119 Dell PC Checkup 120 Dell Network Assistant 120 DellConnect 120 Drive Problems 121 Optical drive problems 121 Hard drive problems 122 E-Mail, Modem, and Internet Problems 123 Error Messages 125 ExpressCard Problems 130 IEEE 1394 Device Problems 131 Keyboard Problems 131 External Keyboard...
... 113 Dell Diagnostics 113 Dell Support Center 118 Dell Support 118 Dell PC TuneUp 119 Dell PC Checkup 120 Dell Network Assistant 120 DellConnect 120 Drive Problems 121 Optical drive problems 121 Hard drive problems 122 E-Mail, Modem, and Internet Problems 123 Error Messages 125 ExpressCard Problems 130 IEEE 1394 Device Problems 131 Keyboard Problems 131 External Keyboard...

Owner's Manual
Page 10
... Drive 164 Replacing the Hard Drive 166 Returning a Hard Drive to Dell 167 Optical Drive 167 Removing the Optical Drive 167 Hinge Cover 168 Removing the Hinge Cover 168 Replacing the Hinge Cover 169 Keyboard 169 Removing the Keyboard 170 Replacing the Keyboard 171 Memory 172 Removing the DIMM A Memory Module 172 Replacing the...
... Drive 164 Replacing the Hard Drive 166 Returning a Hard Drive to Dell 167 Optical Drive 167 Removing the Optical Drive 167 Hinge Cover 168 Removing the Hinge Cover 168 Replacing the Hinge Cover 169 Keyboard 169 Removing the Keyboard 170 Replacing the Keyboard 171 Memory 172 Removing the DIMM A Memory Module 172 Replacing the...

Owner's Manual
Page 12
... Order-Status Service 199 Problems With Your Order 199 Product Information 200 Returning Items for Warranty Repair or Credit . . . . . 200 Before You Call 201 Contacting Dell 203 17 Specifications 205 18 Appendix 215 Using the System Setup Program 215 Viewing the System Setup Screen 216 System Setup Screen 216 Commonly Used...
... Order-Status Service 199 Problems With Your Order 199 Product Information 200 Returning Items for Warranty Repair or Credit . . . . . 200 Before You Call 201 Contacting Dell 203 17 Specifications 205 18 Appendix 215 Using the System Setup Program 215 Viewing the System Setup Screen 216 System Setup Screen 216 Commonly Used...

Owner's Manual
Page 22
Front View 12 3 4 14 13 5 12 6 7 11 10 1 camera indicator (optional) 3 display latch 5 power button 7 device status lights 9 consumer IR sensor 11 touch pad buttons 13 keyboard status lights 22 About Your Computer 9 8 2 camera (optional) 4 display 6 keyboard 8 touch pad 10 media control buttons 12 Dell™ MediaDirect™ button 14 digital array microphones
Front View 12 3 4 14 13 5 12 6 7 11 10 1 camera indicator (optional) 3 display latch 5 power button 7 device status lights 9 consumer IR sensor 11 touch pad buttons 13 keyboard status lights 22 About Your Computer 9 8 2 camera (optional) 4 display 6 keyboard 8 touch pad 10 media control buttons 12 Dell™ MediaDirect™ button 14 digital array microphones

Owner's Manual
Page 23
...take several seconds). About Your Computer 23 CA ME R A - Based on page 63). KE Y BOA RD - For more information about the keyboard, see "Using the Display" on page 53. Indicates that the camera is on configuration selections you made when ordering your computer, your display, see... "Using the Keyboard and Touch Pad" on page 47. For more information about your computer may not include a camera. Based on . If the computer ...
...take several seconds). About Your Computer 23 CA ME R A - Based on page 63). KE Y BOA RD - For more information about the keyboard, see "Using the Display" on page 53. Indicates that the camera is on configuration selections you made when ordering your computer, your display, see... "Using the Keyboard and Touch Pad" on page 47. For more information about your computer may not include a camera. Based on . If the computer ...

Owner's Manual
Page 24
... the right of data, never turn on the computer, and blinks when the computer is in a power management mode. NOTICE: To avoid loss of the keyboard indicate the following: Power light - Turns on when you turn off the computer while the light is enabled. WiFi status light -
... the right of data, never turn on the computer, and blinks when the computer is in a power management mode. NOTICE: To avoid loss of the keyboard indicate the following: Power light - Turns on when you turn off the computer while the light is enabled. WiFi status light -

Owner's Manual
Page 26
...keyboard indicate the following: 9 Turns on when the scroll lock function is enabled. D I G I T A L A R R A Y M I R E C T ™ B U T T O N - Turn the volume up. Play or pause. Built-in microphone for conferencing and chat. 26 About Your Computer Turns on when the numeric keypad is enabled. Stop. A Turns on page 74). D E L L ™ M E D I A D I C R O P H O N E S - Press the Dell... MediaDirect button to launch Dell MediaDirect (see "Using Dell MediaDirect™" on when the uppercase letter (caps lock) function is enabled.
...keyboard indicate the following: 9 Turns on when the scroll lock function is enabled. D I G I T A L A R R A Y M I R E C T ™ B U T T O N - Turn the volume up. Play or pause. Built-in microphone for conferencing and chat. 26 About Your Computer Turns on when the numeric keypad is enabled. Stop. A Turns on page 74). D E L L ™ M E D I A D I C R O P H O N E S - Press the Dell... MediaDirect button to launch Dell MediaDirect (see "Using Dell MediaDirect™" on when the uppercase letter (caps lock) function is enabled.

Owner's Manual
Page 31
VIDEO CONNECTOR Connects video devices, such as a mouse, keyboard, or printer. For information on using the network adapter, see the device user's guide supplied with your computer. Back View 1 23 1 S-video TV-out connector 3 AC adapter connector 5 modem connector (RJ-11) 4 5 2 USB connectors (2) 4 battery About Your Computer 31 The two lights next to a network. USB CONNECTORS Connect USB devices, such as a monitor. NETWORK CONNECTOR (RJ-45) Connects the computer to the connector indicate status and activity for wired network connections.
VIDEO CONNECTOR Connects video devices, such as a mouse, keyboard, or printer. For information on using the network adapter, see the device user's guide supplied with your computer. Back View 1 23 1 S-video TV-out connector 3 AC adapter connector 5 modem connector (RJ-11) 4 5 2 USB connectors (2) 4 battery About Your Computer 31 The two lights next to a network. USB CONNECTORS Connect USB devices, such as a monitor. NETWORK CONNECTOR (RJ-45) Connects the computer to the connector indicate status and activity for wired network connections.

Owner's Manual
Page 32
... is shipped with your computer. Attaches an AC adapter to the DC power required by the computer. USB CONNECTORS Connect USB devices, such as a mouse, keyboard, or printer. The AC adapter converts AC power to the computer. Also connects digital audio-capable devices using the TV/digital audio adapter cable. You...
... is shipped with your computer. Attaches an AC adapter to the DC power required by the computer. USB CONNECTORS Connect USB devices, such as a mouse, keyboard, or printer. The AC adapter converts AC power to the computer. Also connects digital audio-capable devices using the TV/digital audio adapter cable. You...

Owner's Manual
Page 53
5 Using the Keyboard and Touch Pad Numeric Keypad numeric keypad The numeric keypad functions like the numeric keypad on the right of the keypad keys. The keypad numbers and symbols are marked in blue on an external keyboard. Each key on the keypad has multiple functions. The 9 light indicates that the keypad is active. • To disable the keypad, press again. To type a number or symbol, hold down and press the desired key. • To enable the keypad, press . Using the Keyboard and Touch Pad 53
5 Using the Keyboard and Touch Pad Numeric Keypad numeric keypad The numeric keypad functions like the numeric keypad on the right of the keypad keys. The keypad numbers and symbols are marked in blue on an external keyboard. Each key on the keypad has multiple functions. The 9 light indicates that the keypad is active. • To disable the keypad, press again. To type a number or symbol, hold down and press the desired key. • To enable the keypad, press . Using the Keyboard and Touch Pad 53

Owner's Manual
Page 54
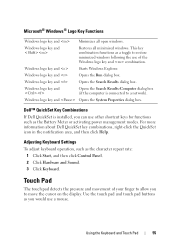
... Opens the Task Manager window. Decreases brightness on the integrated display only (not on an external monitor). You can reprogram this keyboard shortcut to that option. Activates a power management mode. Highlight the desired icon to switch the display to activate a different power... management mode using the Advanced tab in the Power Options Properties window (see "Dell™ QuickSet Battery Meter" on page 63). 54 Using the Keyboard and Touch Pad Displays the Dell™ QuickSet Battery Meter (see "Power Management Modes" on page 60). Increases brightness...
... Opens the Task Manager window. Decreases brightness on the integrated display only (not on an external monitor). You can reprogram this keyboard shortcut to that option. Activates a power management mode. Highlight the desired icon to switch the display to activate a different power... management mode using the Advanced tab in the Power Options Properties window (see "Dell™ QuickSet Battery Meter" on page 63). 54 Using the Keyboard and Touch Pad Displays the Dell™ QuickSet Battery Meter (see "Power Management Modes" on page 60). Increases brightness...
Owner's Manual
Page 55
... pad and touch pad buttons as the character repeat rate: 1 Click Start, and then click Control Panel. 2 Click Hardware and Sound. 3 Click Keyboard. Windows logo key and Restores all open windows. This key combination functions as the Battery Meter or activating power management modes...; QuickSet Key Combinations If Dell QuickSet is connected to a network). Touch Pad The touch pad detects the pressure and movement of your finger to allow you to restore minimized windows following the use of the Windows logo key and combination. Using the Keyboard and Touch Pad 55 Windows logo...
... pad and touch pad buttons as the character repeat rate: 1 Click Start, and then click Control Panel. 2 Click Hardware and Sound. 3 Click Keyboard. Windows logo key and Restores all open windows. This key combination functions as the Battery Meter or activating power management modes...; QuickSet Key Combinations If Dell QuickSet is connected to a network). Touch Pad The touch pad detects the pressure and movement of your finger to allow you to restore minimized windows following the use of the Windows logo key and combination. Using the Keyboard and Touch Pad 55 Windows logo...

Owner's Manual
Page 56
... to disable the touch pad or adjust the touch pad settings. 1 Click Start, and then click Control Panel. 2 Click Hardware and Sound. 56 Using the Keyboard and Touch Pad
... to disable the touch pad or adjust the touch pad settings. 1 Click Start, and then click Control Panel. 2 Click Hardware and Sound. 56 Using the Keyboard and Touch Pad

Owner's Manual
Page 57
3 Click Mouse. 4 In the Mouse Properties window: • Click the Device Select tab to disable the touch pad. • Click the Touch Pad tab to adjust touch pad settings. 5 Click OK to save the settings and close the window. Using the Keyboard and Touch Pad 57
3 Click Mouse. 4 In the Mouse Properties window: • Click the Device Select tab to disable the touch pad. • Click the Touch Pad tab to adjust touch pad settings. 5 Click OK to save the settings and close the window. Using the Keyboard and Touch Pad 57

Owner's Manual
Page 58
58 Using the Keyboard and Touch Pad
58 Using the Keyboard and Touch Pad

Owner's Manual
Page 114
... connected to an electrical outlet that is known to be powered down completely. - then, shut down the error codes and contact Dell (see "Contacting Dell" on page 203). Press and hold the key while powering the computer on your hard drive. 114 Troubleshooting The computer runs the...8226; If failures are detected during the Pre-boot System Assessment, write down your system board, keyboard, display, memory, and hard drive. • During the assessment, answer any key to start the Dell Diagnostics from the diagnostics utility partition on . NOTE: If you wait too long and the ...
... connected to an electrical outlet that is known to be powered down completely. - then, shut down the error codes and contact Dell (see "Contacting Dell" on page 203). Press and hold the key while powering the computer on your hard drive. 114 Troubleshooting The computer runs the...8226; If failures are detected during the Pre-boot System Assessment, write down your system board, keyboard, display, memory, and hard drive. • During the assessment, answer any key to start the Dell Diagnostics from the diagnostics utility partition on . NOTE: If you wait too long and the ...

Owner's Manual
Page 115
...restart the computer. If multiple versions are listed, select the version appropriate for your computer. 7 At the Dell Diagnostics Main Menu, select the test you see the Microsoft Windows desktop; NOTE: Keyboard failure may result when a key on the screen. 8 After all tests have completed, close the test ...window to return to the Dell Diagnostics Main Menu. 9 Remove your Drivers and Utilities media and then close the...
...restart the computer. If multiple versions are listed, select the version appropriate for your computer. 7 At the Dell Diagnostics Main Menu, select the test you see the Microsoft Windows desktop; NOTE: Keyboard failure may result when a key on the screen. 8 After all tests have completed, close the test ...window to return to the Dell Diagnostics Main Menu. 9 Remove your Drivers and Utilities media and then close the...

Owner's Manual
Page 127
...seated. If the error message still appears, see "Dell Diagnostics" on page 113). Correct the appropriate options in the Dell Diagnostics (see "Memory" on page 134). Run the Keyboard Controller test in the Dell Diagnostics (see the software documentation. The software you .... ME M O R Y ALL OCA TION E R RO R - Reinstall the memory modules and, if necessary, replace them (see "Dell MediaDirect problems" on page 172). Restart the computer, and avoid touching the keyboard or the mouse during the boot routine. KE Y B O A R D S T U C K KE Y FAI LURE - Restart ...
...seated. If the error message still appears, see "Dell Diagnostics" on page 113). Correct the appropriate options in the Dell Diagnostics (see "Memory" on page 134). Run the Keyboard Controller test in the Dell Diagnostics (see the software documentation. The software you .... ME M O R Y ALL OCA TION E R RO R - Reinstall the memory modules and, if necessary, replace them (see "Dell MediaDirect problems" on page 172). Restart the computer, and avoid touching the keyboard or the mouse during the boot routine. KE Y B O A R D S T U C K KE Y FAI LURE - Restart ...

Owner's Manual
Page 130
... this feature. Contact Dell (see "Contacting Dell" on page 113). Run the System Memory tests and the Keyboard Controller test in the Windows taskbar. Also, for Mobile Broadband (WWAN) ExpressCards, see "Dell Diagnostics" on page ...S N O T A C C E S S I CA L L Y L O W - otherwise, activate hibernate mode or shut down the computer. The keyboard controller may be malfunctioning, or a memory module may be listed. Double-click the Safely Remove Hardware icon in the Dell Diagnostics (see "Mobile Broadband (Wireless Wide Area Network [WWAN])" on page 137. P R O V I D E D E X P R E S ...
... this feature. Contact Dell (see "Contacting Dell" on page 113). Run the System Memory tests and the Keyboard Controller test in the Windows taskbar. Also, for Mobile Broadband (WWAN) ExpressCards, see "Dell Diagnostics" on page ...S N O T A C C E S S I CA L L Y L O W - otherwise, activate hibernate mode or shut down the computer. The keyboard controller may be malfunctioning, or a memory module may be listed. Double-click the Safely Remove Hardware icon in the Dell Diagnostics (see "Mobile Broadband (Wireless Wide Area Network [WWAN])" on page 137. P R O V I D E D E X P R E S ...


