
Service Manual
Page 1
...Notices, and Cautions NOTE: A NOTE indicates important information that helps you how to avoid the problem. Dell™ Vostro™ 1500 and Inspiron™ 1520/1521 Service Manual Before You Begin ExpressCards Using the Memory Card Reader Optical Drive Hard Drive Hinge Cover Internal Card With ...Pin Assignments for property damage, personal injury, or death. All rights reserved. Trademarks used in this text: Dell, the DELL logo, Inspiron, and Vostro are either trademarks or registered trademarks of your computer. Reproduction in this document to refer to either potential ...
...Notices, and Cautions NOTE: A NOTE indicates important information that helps you how to avoid the problem. Dell™ Vostro™ 1500 and Inspiron™ 1520/1521 Service Manual Before You Begin ExpressCards Using the Memory Card Reader Optical Drive Hard Drive Hinge Cover Internal Card With ...Pin Assignments for property damage, personal injury, or death. All rights reserved. Trademarks used in this text: Dell, the DELL logo, Inspiron, and Vostro are either trademarks or registered trademarks of your computer. Reproduction in this document to refer to either potential ...

Service Manual
Page 2
... Hinge Cover). 5. Remove the M2 x3-mm screw that secures the wireless sniffer board to Contents Page Computer Base and Components Dell™ Vostro™ 1500 and Inspiron™ 1520/1521 Service Manual Wireless Sniffer Board Audio Connector Board Consumer Infrared (CIR) Board Modem Connector ExpressCard Cage Computer Base Wireless Sniffer Board Removing the Wireless...
... Hinge Cover). 5. Remove the M2 x3-mm screw that secures the wireless sniffer board to Contents Page Computer Base and Components Dell™ Vostro™ 1500 and Inspiron™ 1520/1521 Service Manual Wireless Sniffer Board Audio Connector Board Consumer Infrared (CIR) Board Modem Connector ExpressCard Cage Computer Base Wireless Sniffer Board Removing the Wireless...

Service Manual
Page 10
CAUTION: Before you service the computer. NOTICE: To avoid electrostatic discharge, ground yourself by using the operating system, press and hold the power button for other Dell computers. 6. Hold a component such as a connector on the back of the computer. Click Start , click the arrow ... their electrical outlets. l You have performed the steps in this document. Back to Contents Page Before You Begin Dell™ Vostro™ 1500 and Inspiron™ 1520/1521 Service Manual Recommended Tools Before Working Inside Your Computer This document provides procedures for this particular...
CAUTION: Before you service the computer. NOTICE: To avoid electrostatic discharge, ground yourself by using the operating system, press and hold the power button for other Dell computers. 6. Hold a component such as a connector on the back of the computer. Click Start , click the arrow ... their electrical outlets. l You have performed the steps in this document. Back to Contents Page Before You Begin Dell™ Vostro™ 1500 and Inspiron™ 1520/1521 Service Manual Recommended Tools Before Working Inside Your Computer This document provides procedures for this particular...
Service Manual
Page 12
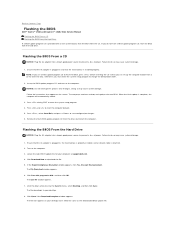
... prevent a loss of power. Failure to do not have a BIOS-update program CD, flash the BIOS from a CD for your computer at support.dell.com. 4. The file downloads to your desktop and is complete, the computer will automatically reboot. 3. The file icon appears on the screen. If... The Save In window appears. 7. Click Close if the Download Complete window appears. Back to Contents Page Flashing the BIOS Dell™ Vostro™ 1500 and Inspiron™ 1520/1521 Service Manual Flashing the BIOS From a CD Flashing the BIOS From the Hard Drive If a BIOS-update program CD is provided with a...
... prevent a loss of power. Failure to do not have a BIOS-update program CD, flash the BIOS from a CD for your computer at support.dell.com. 4. The file downloads to your desktop and is complete, the computer will automatically reboot. 3. The file icon appears on the screen. If... The Save In window appears. 7. Click Close if the Download Complete window appears. Back to Contents Page Flashing the BIOS Dell™ Vostro™ 1500 and Inspiron™ 1520/1521 Service Manual Flashing the BIOS From a CD Flashing the BIOS From the Hard Drive If a BIOS-update program CD is provided with a...

Service Manual
Page 14
... on the card. 4. Follow the procedures in Before You Begin. 2. Back to Contents Page Internal Card With Bluetooth® Wireless Technology Dell™ Vostro™ 1500 and Inspiron™ 1520/1521 Service Manual Removing the Bluetooth Card Replacing the Bluetooth Card CAUTION: Before you begin any of the procedures in this section, follow the safety...
... on the card. 4. Follow the procedures in Before You Begin. 2. Back to Contents Page Internal Card With Bluetooth® Wireless Technology Dell™ Vostro™ 1500 and Inspiron™ 1520/1521 Service Manual Removing the Bluetooth Card Replacing the Bluetooth Card CAUTION: Before you begin any of the procedures in this section, follow the safety...

Service Manual
Page 15
... procedures in this section, follow the safety instructions in the Product Information Guide. Back to Contents Page Using the Memory Card Reader Dell™ Vostro™ 1500 and Inspiron™ 1520/1521 Service Manual Memory Card Blanks Removing a Memory Card or Blank Installing a Memory Card The memory card reader provides a fast and convenient way to...
... procedures in this section, follow the safety instructions in the Product Information Guide. Back to Contents Page Using the Memory Card Reader Dell™ Vostro™ 1500 and Inspiron™ 1520/1521 Service Manual Memory Card Blanks Removing a Memory Card or Blank Installing a Memory Card The memory card reader provides a fast and convenient way to...

Service Manual
Page 17
Back to Contents Page Coin-Cell Battery Dell™ Vostro™ 1500 and Inspiron™ 1520/1521 Service Manual Removing the Coin-Cell Battery Replacing the Coin-Cell Battery Removing the Coin-Cell Battery CAUTION: Before you begin any of the mylar sleeve. 1 coin-...
Back to Contents Page Coin-Cell Battery Dell™ Vostro™ 1500 and Inspiron™ 1520/1521 Service Manual Removing the Coin-Cell Battery Replacing the Coin-Cell Battery Removing the Coin-Cell Battery CAUTION: Before you begin any of the mylar sleeve. 1 coin-...

Service Manual
Page 19
Back to Contents Page Processor Module Dell™ Vostro™ 1500 and Inspiron™ 1520/1521 Service Manual Removing the Processor Module Replacing the Processor Module Removing the Processor Module CAUTION: Before you begin the following procedure, follow the safety instructions in Before ...
Back to Contents Page Processor Module Dell™ Vostro™ 1500 and Inspiron™ 1520/1521 Service Manual Removing the Processor Module Replacing the Processor Module Removing the Processor Module CAUTION: Before you begin the following procedure, follow the safety instructions in Before ...

Service Manual
Page 22
... Removing the Hard Drive). 4. Remove the hard drive (see Replacing the Bluetooth Card). Back to Contents Page Processor Thermal-Cooling Assembly Dell™ Vostro™ 1500 and Inspiron™ 1520/1521 Service Manual Removing the Processor Thermal-Cooling Assembly Replacing the Processor Thermal-Cooling Assembly Removing the Processor Thermal-Cooling Assembly CAUTION: Before you begin...
... Removing the Hard Drive). 4. Remove the hard drive (see Replacing the Bluetooth Card). Back to Contents Page Processor Thermal-Cooling Assembly Dell™ Vostro™ 1500 and Inspiron™ 1520/1521 Service Manual Removing the Processor Thermal-Cooling Assembly Replacing the Processor Thermal-Cooling Assembly Removing the Processor Thermal-Cooling Assembly CAUTION: Before you begin...

Service Manual
Page 24
.... Close the display and turn the computer over. 3. Lift the display assembly out of the computer. 7. Back to Contents Page Display Dell™ Vostro™ 1500 and Inspiron™ 1520/1521 Service Manual Display Assembly Display Bezel Display Panel Display Latch Camera and Microphone Assembly Display Assembly Removing the Display Assembly CAUTION: Before you begin...
.... Close the display and turn the computer over. 3. Lift the display assembly out of the computer. 7. Back to Contents Page Display Dell™ Vostro™ 1500 and Inspiron™ 1520/1521 Service Manual Display Assembly Display Bezel Display Panel Display Latch Camera and Microphone Assembly Display Assembly Removing the Display Assembly CAUTION: Before you begin...

Service Manual
Page 31
Remove the palm rest (see Removing the Keyboard). 6. Remove the two M2.5 x 5-mm screws that secure the fan to Contents Page Fan Dell™ Vostro™ 1500 and Inspiron™ 1520/1521 Service Manual Removing the Fan Replacing the Fan Removing the Fan CAUTION: Before you begin the following procedure, follow the safety instructions in the...
Remove the palm rest (see Removing the Keyboard). 6. Remove the two M2.5 x 5-mm screws that secure the fan to Contents Page Fan Dell™ Vostro™ 1500 and Inspiron™ 1520/1521 Service Manual Removing the Fan Replacing the Fan Removing the Fan CAUTION: Before you begin the following procedure, follow the safety instructions in the...

Service Manual
Page 33
...Hard Drive). 4. Remove the internal card with the screw holes on the system board. 2. Align the three captive screws on the Vostro 1500 and Inspiron 1520 only. In sequential order, tighten the three captive screws to secure the graphics card assembly to the system board....Keyboard). 6. Remove the keyboard (see Removing the Palm Rest). 9. Back to Contents Page Graphics Card Assembly Dell™ Vostro™ 1500 and Inspiron™ 1520/1521 Service Manual Removing the Graphics Card Assembly Replacing the Graphics Card Assembly NOTE: The graphics card assembly is available as an...
...Hard Drive). 4. Remove the internal card with the screw holes on the system board. 2. Align the three captive screws on the Vostro 1500 and Inspiron 1520 only. In sequential order, tighten the three captive screws to secure the graphics card assembly to the system board....Keyboard). 6. Remove the keyboard (see Removing the Palm Rest). 9. Back to Contents Page Graphics Card Assembly Dell™ Vostro™ 1500 and Inspiron™ 1520/1521 Service Manual Removing the Graphics Card Assembly Replacing the Graphics Card Assembly NOTE: The graphics card assembly is available as an...

Service Manual
Page 35
... (4) 5. Slide the hard drive out of the hard drive bezel, then pull to Contents Page Hard Drive Dell™ Vostro™ 1500 and Inspiron™ 1520/1521 Service Manual Removing the Hard Drive Replacing the Hard Drive NOTE: Dell does not guarantee compatibility or provide support for hard drives obtained from the computer while the drive... You Begin. 2. Removing the Hard Drive CAUTION: Before you begin any of the hard drive if you remove the hard drive from sources other than Dell.
... (4) 5. Slide the hard drive out of the hard drive bezel, then pull to Contents Page Hard Drive Dell™ Vostro™ 1500 and Inspiron™ 1520/1521 Service Manual Removing the Hard Drive Replacing the Hard Drive NOTE: Dell does not guarantee compatibility or provide support for hard drives obtained from the computer while the drive... You Begin. 2. Removing the Hard Drive CAUTION: Before you begin any of the hard drive if you remove the hard drive from sources other than Dell.

Service Manual
Page 37
... not lift the cover on the right side. 4. Exercise care when replacing the hinge cover. 1. Back to Contents Page Hinge Cover Dell™ Vostro™ 1500 and Inspiron™ 1520/1521 Service Manual Removing the Hinge Cover Replacing the Hinge Cover Removing the Hinge Cover CAUTION: Before you begin any of the procedures in this...
... not lift the cover on the right side. 4. Exercise care when replacing the hinge cover. 1. Back to Contents Page Hinge Cover Dell™ Vostro™ 1500 and Inspiron™ 1520/1521 Service Manual Removing the Hinge Cover Replacing the Hinge Cover Removing the Hinge Cover CAUTION: Before you begin any of the procedures in this...

Service Manual
Page 38
...keyboard. 2. NOTICE: The key caps on the keyboard are fragile, easily dislodged, and time-consuming to Contents Page Keyboard Dell™ Vostro™ 1500 and Inspiron™ 1520/1521 Service Manual Removing the Keyboard Replacing the Keyboard For more information about the keyboard, see Removing the Hinge Cover). 3. Slide the .... Removing the Keyboard CAUTION: Before you begin any of the procedures in this section, follow the safety instructions in your Owner's Manual. NOTICE: The key caps on the keyboard are fragile, easily dislodged, and time-consuming to replace.
...keyboard. 2. NOTICE: The key caps on the keyboard are fragile, easily dislodged, and time-consuming to Contents Page Keyboard Dell™ Vostro™ 1500 and Inspiron™ 1520/1521 Service Manual Removing the Keyboard Replacing the Keyboard For more information about the keyboard, see Removing the Hinge Cover). 3. Slide the .... Removing the Keyboard CAUTION: Before you begin any of the procedures in this section, follow the safety instructions in your Owner's Manual. NOTICE: The key caps on the keyboard are fragile, easily dislodged, and time-consuming to replace.

Service Manual
Page 40
... battery latch assembly. 4. NOTICE: The battery latch spring is ready to be easily misplaced. Back to Contents Page Battery Latch Assembly Dell™ Vostro™ 1500 and Inspiron™ 1520/1521 Service Manual Removing the Battery Latch Assembly Replacing the Battery Latch Assembly Removing the Battery Latch Assembly CAUTION: Before you begin the following procedure...
... battery latch assembly. 4. NOTICE: The battery latch spring is ready to be easily misplaced. Back to Contents Page Battery Latch Assembly Dell™ Vostro™ 1500 and Inspiron™ 1520/1521 Service Manual Removing the Battery Latch Assembly Replacing the Battery Latch Assembly Removing the Battery Latch Assembly CAUTION: Before you begin the following procedure...
Service Manual
Page 42
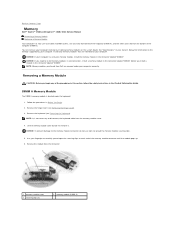
... memory supported by installing memory modules on each end of the computer (DIMM B). See "Specifications" in your Owner's Manual for your computer. Install only memory modules that are covered under the keyboard. 1. Lift the memory module cover but do... from the connector. 1 memory module cover 3 securing clips (2) 2 memory module (DIMM A) Back to Contents Page Memory Dell™ Vostro™ 1500 and Inspiron™ 1520/1521 Service Manual Removing a Memory Module Replacing a Memory Module Your computer has two user-accessible SODIMM sockets, one memory module, install the...
... memory supported by installing memory modules on each end of the computer (DIMM B). See "Specifications" in your Owner's Manual for your computer. Install only memory modules that are covered under the keyboard. 1. Lift the memory module cover but do... from the connector. 1 memory module cover 3 securing clips (2) 2 memory module (DIMM A) Back to Contents Page Memory Dell™ Vostro™ 1500 and Inspiron™ 1520/1521 Service Manual Removing a Memory Module Replacing a Memory Module Your computer has two user-accessible SODIMM sockets, one memory module, install the...

Service Manual
Page 46
... set it aside. 1 captive screws (2) 2 cover 4. Follow the procedures in the Product Information Guide. Back to Contents Page Wireless Mini Cards Dell™ Vostro™ 1500 and Inspiron™ 1520/1521 Service Manual Removing a Mini Card Replacing a Mini Card CAUTION: Before you ordered a wireless Mini Card with your computer, the card is already installed. Your...
... set it aside. 1 captive screws (2) 2 cover 4. Follow the procedures in the Product Information Guide. Back to Contents Page Wireless Mini Cards Dell™ Vostro™ 1500 and Inspiron™ 1520/1521 Service Manual Removing a Mini Card Replacing a Mini Card CAUTION: Before you ordered a wireless Mini Card with your computer, the card is already installed. Your...

Service Manual
Page 52
... the palm rest (see Removing the Keyboard). 6. Disconnect the modem cable from the system board. 11. Back to Contents Page Modem Dell™ Vostro™ 1500 and Inspiron™ 1520/1521 Service Manual Removing the Modem Replacing the Modem Removing the Modem CAUTION: Before you begin the following procedure, follow the safety instructions in the...
... the palm rest (see Removing the Keyboard). 6. Disconnect the modem cable from the system board. 11. Back to Contents Page Modem Dell™ Vostro™ 1500 and Inspiron™ 1520/1521 Service Manual Removing the Modem Replacing the Modem Removing the Modem CAUTION: Before you begin the following procedure, follow the safety instructions in the...

Service Manual
Page 54
... the optical drive from the bay. 5. Replace and tighten the device security screw, as needed. Back to Contents Page Optical Drive Dell™ Vostro™ 1500 and Inspiron™ 1520/1521 Service Manual Removing the Optical Drive Replacing the Optical Drive Removing the Optical Drive CAUTION: Before you begin any of the procedures in this...
... the optical drive from the bay. 5. Replace and tighten the device security screw, as needed. Back to Contents Page Optical Drive Dell™ Vostro™ 1500 and Inspiron™ 1520/1521 Service Manual Removing the Optical Drive Replacing the Optical Drive Removing the Optical Drive CAUTION: Before you begin any of the procedures in this...


