
Owners Manual
Page 3
... optical drive...15 Removing the keyboard...15 Installing the keyboard...17 Removing the base cover...17 Installing the base cover...18 Removing the hard drive assembly...19 Removing the hard drive from the hard drive bracket 19 Installing the hard drive into the hard drive bracket 20 Installing the hard drive assembly...20 Removing the memory module...20 Installing the memory module...21 Removing the coin cell battery...21 Installing the coin cell battery...22 Removing the WLAN card...22 Installing the WLAN card...23 Removing the Input/Output board ...23 3 Windows 7 9 After working inside...
... optical drive...15 Removing the keyboard...15 Installing the keyboard...17 Removing the base cover...17 Installing the base cover...18 Removing the hard drive assembly...19 Removing the hard drive from the hard drive bracket 19 Installing the hard drive into the hard drive bracket 20 Installing the hard drive assembly...20 Removing the memory module...20 Installing the memory module...21 Removing the coin cell battery...21 Installing the coin cell battery...22 Removing the WLAN card...22 Installing the WLAN card...23 Removing the Input/Output board ...23 3 Windows 7 9 After working inside...

Owners Manual
Page 4
... in Resource Monitor 40 Chipsets...41 Downloading the chipset driver...41 Identifying the chipset in Device Manager on Windows 10 41 Identifying chipset in Device Manager on Windows 7 41 Graphic chipset...42 AMD chipset drivers...42 AMD Radeon Graphics drivers...43 Display options...43 Identifying the display adapter...43 Changing the screen resolution 43 Rotating the display...44 Adjusting brightness in Windows 10 44 Adjusting brightness in Windows 7 44 Cleaning the display...44 Connecting to external display devices 45 4
... in Resource Monitor 40 Chipsets...41 Downloading the chipset driver...41 Identifying the chipset in Device Manager on Windows 10 41 Identifying chipset in Device Manager on Windows 7 41 Graphic chipset...42 AMD chipset drivers...42 AMD Radeon Graphics drivers...43 Display options...43 Identifying the display adapter...43 Changing the screen resolution 43 Rotating the display...44 Adjusting brightness in Windows 10 44 Adjusting brightness in Windows 7 44 Cleaning the display...44 Connecting to external display devices 45 4

Owners Manual
Page 5
... Waves MaxxAudio Pro controller 45 Downloading the audio driver...45 Identifying the audio controller in Windows 10 46 Identifying the audio controller in Windows 7 46 Realtek HD audio drivers...46 WLAN card...46 Hard drive options...47 Identifying the hard drive in Windows 10 47 Identifying the hard drive in Windows 7 47 Entering BIOS setup...47 Camera features...47 Identifying the camera in Device Manager on Windows 10 47 Identifying the camera in Device Manager on Windows 7 47 Starting the camera...47 Starting the Camera App...48 Memory features...49...
... Waves MaxxAudio Pro controller 45 Downloading the audio driver...45 Identifying the audio controller in Windows 10 46 Identifying the audio controller in Windows 7 46 Realtek HD audio drivers...46 WLAN card...46 Hard drive options...47 Identifying the hard drive in Windows 10 47 Identifying the hard drive in Windows 7 47 Entering BIOS setup...47 Camera features...47 Identifying the camera in Device Manager on Windows 10 47 Identifying the camera in Device Manager on Windows 7 47 Starting the camera...47 Starting the Camera App...48 Memory features...49...
Owners Manual
Page 7
Damage due to servicing that is not authorized by Dell is not covered by the online or telephone service and support team. As you disconnect the cable. NOTE: The color of your computer. You should only perform troubleshooting and simple repairs as authorized in this type of the computer. CAUTION: Handle components and cards with locking tabs; Do not touch the components or...
Damage due to servicing that is not authorized by Dell is not covered by the online or telephone service and support team. As you disconnect the cable. NOTE: The color of your computer. You should only perform troubleshooting and simple repairs as authorized in this type of the computer. CAUTION: Handle components and cards with locking tabs; Do not touch the components or...

Owners Manual
Page 9
... shut down your operating system, press and hold the power button for about 6 seconds to turn off your computer. 1. Connect any cards, such as a port replicator or media base, and replace any telephone or network cables to the computer, use batteries designed for this particular Dell computer. Windows 7 CAUTION: To avoid losing data, save and close all open programs before turning on your computer. Connect any external devices, such as...
... shut down your operating system, press and hold the power button for about 6 seconds to turn off your computer. 1. Connect any cards, such as a port replicator or media base, and replace any telephone or network cables to the computer, use batteries designed for this particular Dell computer. Windows 7 CAUTION: To avoid losing data, save and close all open programs before turning on your computer. Connect any external devices, such as...

Owners Manual
Page 20
...hard drive to the connector on the computer. 2. hard drive assembly b. base cover c. battery 5. Follow the procedure in After working inside your computer. Install the: a. Insert the hard drive assembly into the hard drive bracket 1. battery 5. Removing the memory module 1. Remove the: 20 keyboard d. keyboard d. Connect the hard drive cable to the hard drive bracket. 3. Install the: a. Follow the procedures in Before working inside your computer Installing the hard drive assembly 1. base cover b. Installing the hard drive into the slot on the system board...
...hard drive to the connector on the computer. 2. hard drive assembly b. base cover c. battery 5. Follow the procedure in After working inside your computer. Install the: a. Insert the hard drive assembly into the hard drive bracket 1. battery 5. Removing the memory module 1. Remove the: 20 keyboard d. keyboard d. Connect the hard drive cable to the hard drive bracket. 3. Install the: a. Follow the procedures in Before working inside your computer Installing the hard drive assembly 1. base cover b. Installing the hard drive into the slot on the system board...

Owners Manual
Page 35
... base cover e. hard drive assembly f. Follow the procedure in After working inside your computer. 2. camera 3. To remove the display panel: a. WLAN card h. memory module j. display assembly o. display bezel p. Remove the screws that secures the eDP cable to the display panel [1]. Lift the display panel to the display assembly [1]. battery b. heat sink l. Remove the display panel from the computer [4]. 35 keyboard d. power connector n. Remove the tape that secure the display panel to access the cables underneath [2]. 4. Lift the locking tab and remove the eDP cable...
... base cover e. hard drive assembly f. Follow the procedure in After working inside your computer. 2. camera 3. To remove the display panel: a. WLAN card h. memory module j. display assembly o. display bezel p. Remove the screws that secures the eDP cable to the display panel [1]. Lift the display panel to the display assembly [1]. battery b. heat sink l. Remove the display panel from the computer [4]. 35 keyboard d. power connector n. Remove the tape that secure the display panel to access the cables underneath [2]. 4. Lift the locking tab and remove the eDP cable...

Owners Manual
Page 36
...keyboard e. battery n. Remove the: a. Connect the eDP cable to secure the display cable. 3. Tighten the screws to secure the display panel to the display assembly. 5. camera d. i/o board g. base cover j. optical drive 6. Follow the procedure in After working inside your computer. 2. battery b. system board l. Install the: a. Follow the procedure in Before working inside your computer. optical drive 36 coin cell battery k. power connector m. WLAN card f. display bezel c. display assembly b. Installing the display panel 1. Removing the display...
...keyboard e. battery n. Remove the: a. Connect the eDP cable to secure the display cable. 3. Tighten the screws to secure the display panel to the display assembly. 5. camera d. i/o board g. base cover j. optical drive 6. Follow the procedure in After working inside your computer. 2. battery b. system board l. Install the: a. Follow the procedure in Before working inside your computer. optical drive 36 coin cell battery k. power connector m. WLAN card f. display bezel c. display assembly b. Installing the display panel 1. Removing the display...
Owners Manual
Page 41
... or manually browse for your laptop. 8. Click Drivers and Downloads. 5. Click Download File to download the latest version of your chipset driver. 7. Click Start → Control Panel → Device Manager. 2. Identifying chipset in Device Manager on your laptop model. 4. Identifying the chipset in Device Manager on the Windows 10 Charms Bar. 2. After the download is complete, navigate to www.Dell.com/support. 3. Select the operating system installed on Windows 10 1. From the Control Panel, select Device Manager. 3. Downloading the chipset driver 1.
... or manually browse for your laptop. 8. Click Drivers and Downloads. 5. Click Download File to download the latest version of your chipset driver. 7. Click Start → Control Panel → Device Manager. 2. Identifying chipset in Device Manager on your laptop model. 4. Identifying the chipset in Device Manager on the Windows 10 Charms Bar. 2. After the download is complete, navigate to www.Dell.com/support. 3. Select the operating system installed on Windows 10 1. From the Control Panel, select Device Manager. 3. Downloading the chipset driver 1.

Owners Manual
Page 44
... 180 degrees) • Left arrow key (Rotate 270 degrees) Adjusting brightness in a crisp clear pristine condition. NOTE: Do not leave any dirt particles. 3. Select Graphic Options → Rotation and choose one of the following key combinations: • Ctrl + Alt + Up arrow key (Rotate to enable or disable automatic-brightness adjustment. Use a microfiber cloth to clean and keep your screen. 44 Click Start → Control Panel → Display. 2.
... 180 degrees) • Left arrow key (Rotate 270 degrees) Adjusting brightness in a crisp clear pristine condition. NOTE: Do not leave any dirt particles. 3. Select Graphic Options → Rotation and choose one of the following key combinations: • Ctrl + Alt + Up arrow key (Rotate to enable or disable automatic-brightness adjustment. Use a microfiber cloth to clean and keep your screen. 44 Click Start → Control Panel → Display. 2.
Owners Manual
Page 45
... a High Definition audio codec designed for your laptop model. 4. Click Product Support, enter the Service Tag of your laptop and click Submit. Realtek ALC3234-CG Waves MaxxAudio Pro controller This laptop ships with your laptop. 2. Select one of the audio driver for Windows desktop and laptops. Audio options Downloading the audio driver 1. Press the Windows logo + P key. 3. 6. Ensure that are hard to download the latest version of the following modes: • PC screen only • Duplicate...
... a High Definition audio codec designed for your laptop model. 4. Click Product Support, enter the Service Tag of your laptop and click Submit. Realtek ALC3234-CG Waves MaxxAudio Pro controller This laptop ships with your laptop. 2. Select one of the audio driver for Windows desktop and laptops. Audio options Downloading the audio driver 1. Press the Windows logo + P key. 3. 6. Ensure that are hard to download the latest version of the following modes: • PC screen only • Duplicate...

Owners Manual
Page 47
... the Entering BIOS setup message appears. Under Device Manager, expand Imaging devices. Select Control Panel. 2. Identifying the camera in Windows 10 1. Starting the camera To start it. 2. Click All Settings on or restart your laptop. 2. Identifying the hard drive in Device Manager on the internet and the application requests to start the camera, open an application that is shipped with front-facing camera with the laptop, the camera turns on . 47 Similarly, if you tap the Dell webcam central software...
... the Entering BIOS setup message appears. Under Device Manager, expand Imaging devices. Select Control Panel. 2. Identifying the camera in Windows 10 1. Starting the camera To start it. 2. Click All Settings on or restart your laptop. 2. Identifying the hard drive in Device Manager on the internet and the application requests to start the camera, open an application that is shipped with front-facing camera with the laptop, the camera turns on . 47 Similarly, if you tap the Dell webcam central software...

Owners Manual
Page 51
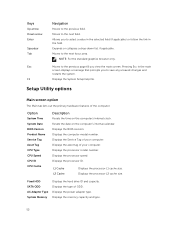
... the system hardware configuration • Enable or disable integrated devices • Set performance and power management thresholds • Manage your computer hardware and specify BIOS level options. Navigation keys The following tables describes the function of the System Setup options, changes that you can : • Access System Setup by pressing F2 key • Bring up the one-time boot menu by pressing F12 key The one-time boot menu displays the devices that you make are : • Removable Drive (if...
... the system hardware configuration • Enable or disable integrated devices • Set performance and power management thresholds • Manage your computer hardware and specify BIOS level options. Navigation keys The following tables describes the function of the System Setup options, changes that you can : • Access System Setup by pressing F2 key • Bring up the one-time boot menu by pressing F12 key The one-time boot menu displays the devices that you make are : • Removable Drive (if...
Owners Manual
Page 52
... Setup help file. Displays the processor model number. Fixed HDD SATA ODD AC Adapter Type System Memory Displays the hard drive ID and capacity. Displays the processor L2 cache size. Displays the type of the computer. Displays the asset tag of your computer. Displays the power adapter type. Allows you view the main screen. Resets the date on the computer's internal clock. Option System Time System Date BIOS Version Product Name Service Tag Asset Tag CPU Type CPU Speed CPU...
... Setup help file. Displays the processor model number. Fixed HDD SATA ODD AC Adapter Type System Memory Displays the hard drive ID and capacity. Displays the processor L2 cache size. Displays the type of the computer. Displays the asset tag of your computer. Displays the power adapter type. Allows you view the main screen. Resets the date on the computer's internal clock. Option System Time System Date BIOS Version Product Name Service Tag Asset Tag CPU Type CPU Speed CPU...

Owners Manual
Page 53
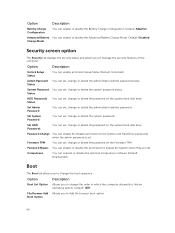
... disable the External USB Ports. Advanced screen option The Advanced tab allows you to set various functions that affect the performance of each option and its default value. The table below defines the function of the computer. Default: Enabled Function Key Behavior You can enable or disable the Internal Bluetooth. Default: Enabled Internal Bluetooth You can enable or disable the Function Key Behavior. Default: Enabled Media Card Reader You can enable or disable the Optical Device. Default: Enabled Optical Device You can enable or disable the Media Card Reader...
... disable the External USB Ports. Advanced screen option The Advanced tab allows you to set various functions that affect the performance of each option and its default value. The table below defines the function of the computer. Default: Enabled Function Key Behavior You can enable or disable the Internal Bluetooth. Default: Enabled Internal Bluetooth You can enable or disable the Function Key Behavior. Default: Enabled Media Card Reader You can enable or disable the Optical Device. Default: Enabled Optical Device You can enable or disable the Media Card Reader...
Owners Manual
Page 54
...system hard-disk drive. Status HDD Passwords Status You can set . Boot Option 54 Computrace You can enable an Unlock Setup Status (Default: Unlocked). Option Description Boot List Option Allows you to change or delete the administrator (admin) password. Default: Disabled Charge Mode Security screen option The Security tab displays the security status and allows you to manage the security features of the computer. Option Description Battery Charge Configuration You can enable or disable the Advanced Battery Charge Mode. Default: Adaptive Advanced Battery You...
...system hard-disk drive. Status HDD Passwords Status You can set . Boot Option 54 Computrace You can enable an Unlock Setup Status (Default: Unlocked). Option Description Boot List Option Allows you to change or delete the administrator (admin) password. Default: Disabled Charge Mode Security screen option The Security tab displays the security status and allows you to manage the security features of the computer. Option Description Battery Charge Configuration You can enable or disable the Advanced Battery Charge Mode. Default: Adaptive Advanced Battery You...
Owners Manual
Page 55
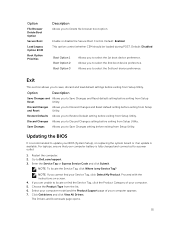
... Changes setting before exiting from Setup Utility. Restore Defaults Allows you to Save Changes setting before exiting from Setup Utility. Discard Changes Allows you to Dell.com/support. 3. Go to Restore Default setting before exiting from the list. 6. NOTE: To locate the Service Tag, click Where is my Service Tag? Proceed with the instructions on replacing the system board or if an update is fully charged and connected to a power outlet 1. Select your computer model and the Product Support...
... Changes setting before exiting from Setup Utility. Restore Defaults Allows you to Save Changes setting before exiting from Setup Utility. Discard Changes Allows you to Dell.com/support. 3. Go to Restore Default setting before exiting from the list. 6. NOTE: To locate the Service Tag, click Where is my Service Tag? Proceed with the instructions on replacing the system board or if an update is fully charged and connected to a power outlet 1. Select your computer model and the Product Support...
Owners Manual
Page 56
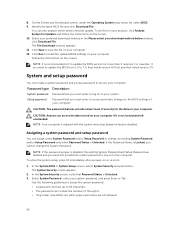
... BIOS file and click Download File. You can assign a new System Password and/or Setup Password or change the System Password. Click Run to install the updated BIOS settings on the screen. Follow the instructions on your computer. 12. The System Security screen appears. 2. Click Save to save the file on to log on your computer. Password type Description System password Password that you must enter to access and make changes to 7.0, then install...
... BIOS file and click Download File. You can assign a new System Password and/or Setup Password or change the System Password. Click Run to install the updated BIOS settings on the screen. Follow the instructions on your computer. 12. The System Security screen appears. 2. Click Save to save the file on to log on your computer. Password type Description System password Password that you must enter to access and make changes to 7.0, then install...
Owners Manual
Page 58
... any issues, error codes are performed. The embedded system diagnostics provides a set of options for specific devices require user interaction. Always ensure that inform you are present at the computer terminal when the diagnostic tests are displayed. 6 Enhanced Pre-Boot System Assessment (ePSA) diagnostics The ePSA diagnostics (also known as the Dell logo appears. 3. Running the ePSA diagnostics 1. Power-on a specific device, press...
... any issues, error codes are performed. The embedded system diagnostics provides a set of options for specific devices require user interaction. Always ensure that inform you are present at the computer terminal when the diagnostic tests are displayed. 6 Enhanced Pre-Boot System Assessment (ePSA) diagnostics The ePSA diagnostics (also known as the Dell logo appears. 3. Running the ePSA diagnostics 1. Power-on a specific device, press...

Owners Manual
Page 60
Feature Controller Internal microphone supports Speakers External interface Volume controls Specification Realtek ACL3234 Digital microphone x 1 Two 2 watts speaker Stereo headset/mic combo Program menus and keyboard shortcut keys Video specifications Feature Video type Video Controller Data bus External display support Specification UMA AMD Radeon Graphics 64 bit VGA Camera specifications Feature Specification Camera Resolution 1 Megapixel Video Resolution 1280 x 720 pixels (maximum) Diagonal viewing 74 degree angle Communication specifications Features Network adapter Wireless ...
Feature Controller Internal microphone supports Speakers External interface Volume controls Specification Realtek ACL3234 Digital microphone x 1 Two 2 watts speaker Stereo headset/mic combo Program menus and keyboard shortcut keys Video specifications Feature Video type Video Controller Data bus External display support Specification UMA AMD Radeon Graphics 64 bit VGA Camera specifications Feature Specification Camera Resolution 1 Megapixel Video Resolution 1280 x 720 pixels (maximum) Diagonal viewing 74 degree angle Communication specifications Features Network adapter Wireless ...


