Owner's Manual
Page 4
...Display To a Projector 47 Setting Display Resolution and Refresh Rate 47 Microsoft® Windows® XP 48 Windows Vista 48 5 Using the Keyboard and Touch Pad . . . . 49 Numeric Keypad 49 Key Combinations 50 System Functions 50 Display Functions 50 Battery 50 Power Management 50 ...Microsoft® Windows® Logo Key Functions . . . . 50 Dell™ QuickSet Key Combinations 51 Adjusting Keyboard Settings 51 Touch Pad 52 Customizing the Touch Pad 53 6 Using a Battery 55 Battery Performance 55 4 Contents
...Display To a Projector 47 Setting Display Resolution and Refresh Rate 47 Microsoft® Windows® XP 48 Windows Vista 48 5 Using the Keyboard and Touch Pad . . . . 49 Numeric Keypad 49 Key Combinations 50 System Functions 50 Display Functions 50 Battery 50 Power Management 50 ...Microsoft® Windows® Logo Key Functions . . . . 50 Dell™ QuickSet Key Combinations 51 Adjusting Keyboard Settings 51 Touch Pad 52 Customizing the Touch Pad 53 6 Using a Battery 55 Battery Performance 55 4 Contents
Owner's Manual
Page 8
... Dell Diagnostics 115 Dell Support Center 120 Dell Support 3 120 Dell PC Tune-Up 121 Dell PC Checkup 122 Dell Network Assistant 122 DellConnect 122 Drive Problems 123 Optical drive problems 123 Hard drive problems 124 E-Mail, Modem, and Internet Problems 125 Error Messages 127 ExpressCard Problems 132 IEEE 1394 Device Problems 133 Keyboard Problems 133 External Keyboard...
... Dell Diagnostics 115 Dell Support Center 120 Dell Support 3 120 Dell PC Tune-Up 121 Dell PC Checkup 122 Dell Network Assistant 122 DellConnect 122 Drive Problems 123 Optical drive problems 123 Hard drive problems 124 E-Mail, Modem, and Internet Problems 125 Error Messages 127 ExpressCard Problems 132 IEEE 1394 Device Problems 133 Keyboard Problems 133 External Keyboard...
Owner's Manual
Page 10
... Working Inside Your Computer 164 Hard Drive 166 Removing the Hard Drive 166 Replacing the Hard Drive 168 Returning a Hard Drive to Dell 168 Optical Drive 169 Removing the Optical Drive 169 Replacing the Optical Drive 170 Central Control Cover 170 Removing the Central Control Cover... 170 Replacing the Central Control Cover 171 Keyboard 171 Removing the Keyboard 172 Replacing the Keyboard 173 Memory 173 Removing the Memory Module 173 Replacing the Memory Module 175 Modem 176 10 Contents
... Working Inside Your Computer 164 Hard Drive 166 Removing the Hard Drive 166 Replacing the Hard Drive 168 Returning a Hard Drive to Dell 168 Optical Drive 169 Removing the Optical Drive 169 Replacing the Optical Drive 170 Central Control Cover 170 Removing the Central Control Cover... 170 Replacing the Central Control Cover 171 Keyboard 171 Removing the Keyboard 172 Replacing the Keyboard 173 Memory 173 Removing the Memory Module 173 Replacing the Memory Module 175 Modem 176 10 Contents

Owner's Manual
Page 12
Only 217 FCC Class B 217 Macrovision Product Notice 219 12 Contents Only 216 Definition of "Dell-Installed" Software and Peripherals 217 Definition of "Third-Party" Software and Peripherals 217 FCC Notice (U.S. AutoTech Service 195 Automated Order-Status Service ...195 Problems With Your Order 195 Product Information 196 Returning Items for Warranty Repair or Credit . . . . . 196 Before You Call 197 Contacting Dell 199 18 Specifications 201 19 Appendix 211 Using the System Setup Program 211 Viewing the System Setup Screen 212 System Setup Screen 212 Commonly Used...
Only 217 FCC Class B 217 Macrovision Product Notice 219 12 Contents Only 216 Definition of "Dell-Installed" Software and Peripherals 217 Definition of "Third-Party" Software and Peripherals 217 FCC Notice (U.S. AutoTech Service 195 Automated Order-Status Service ...195 Problems With Your Order 195 Product Information 196 Returning Items for Warranty Repair or Credit . . . . . 196 Before You Call 197 Contacting Dell 199 18 Specifications 201 19 Appendix 211 Using the System Setup Program 211 Viewing the System Setup Screen 212 System Setup Screen 212 Commonly Used...

Owner's Manual
Page 25
..., and Media Player playback. Play or pause. Indicates camera ON/OFF status. Turn the volume up. C A M E R A - M E D I S P L A Y - Play the previous track. 11 device status lights 13 keyboard 15 keyboard status lights 12 8-in camera for conferencing and chat. Stop. Turn the volume down. Play the next track. D I G I T A L M I C A T O R - Built-in -1 memory card reader 14...
..., and Media Player playback. Play or pause. Indicates camera ON/OFF status. Turn the volume up. C A M E R A - M E D I S P L A Y - Play the previous track. 11 device status lights 13 keyboard 15 keyboard status lights 12 8-in camera for conferencing and chat. Stop. Turn the volume down. Play the next track. D I G I T A L M I C A T O R - Built-in -1 memory card reader 14...

Owner's Manual
Page 28
... status light - To quickly enable or disable all wireless devices, use the wireless switch. To enable or disable wireless networking, use the wireless switch. The keyboard includes a numeric keypad as well as follows: - Turns on when wireless networking is critically low. 8 -
... status light - To quickly enable or disable all wireless devices, use the wireless switch. To enable or disable wireless networking, use the wireless switch. The keyboard includes a numeric keypad as well as follows: - Turns on when wireless networking is critically low. 8 -

Owner's Manual
Page 29
...rather than by pressing the power button. Turns on when the scroll lock function is enabled. About Your Computer 29 KEYBOARD STATUS LIGHTS The blue lights located above the keyboard indicate the following: 9 Turns on page 60). NOTICE: To avoid losing data, turn on the computer or ...exit a power management mode (see "Using Dell Media Experience™ and Dell MediaDirect™" on when the uppercase letter (caps lock) function is...
...rather than by pressing the power button. Turns on when the scroll lock function is enabled. About Your Computer 29 KEYBOARD STATUS LIGHTS The blue lights located above the keyboard indicate the following: 9 Turns on page 60). NOTICE: To avoid losing data, turn on the computer or ...exit a power management mode (see "Using Dell Media Experience™ and Dell MediaDirect™" on when the uppercase letter (caps lock) function is...
Owner's Manual
Page 31
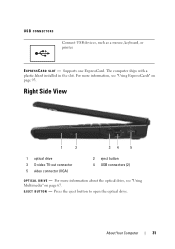
... (2) O P T I C A L D R I V E - About Your Computer 31 For more information about the optical drive, see "Using ExpressCards" on page 67. USB CONNECTORS Connect USB devices, such as a mouse, keyboard, or printer.
... (2) O P T I C A L D R I V E - About Your Computer 31 For more information about the optical drive, see "Using ExpressCards" on page 67. USB CONNECTORS Connect USB devices, such as a mouse, keyboard, or printer.

Owner's Manual
Page 32
VIDEO CONNECTOR Connects video devices, such as a mouse, keyboard, or printer. Back View 1 1 modem connector (RJ-11) 2 2 network connector (RJ-45) 32 About Your Computer Also connects digital audio-capable devices using the TV/digital audio adapter cable. USB CONNECTORS Connect USB devices, such as a monitor. S-VIDEO TV-OUT CONNECTOR Connects your computer to a TV.
VIDEO CONNECTOR Connects video devices, such as a mouse, keyboard, or printer. Back View 1 1 modem connector (RJ-11) 2 2 network connector (RJ-45) 32 About Your Computer Also connects digital audio-capable devices using the TV/digital audio adapter cable. USB CONNECTORS Connect USB devices, such as a monitor. S-VIDEO TV-OUT CONNECTOR Connects your computer to a TV.
Owner's Manual
Page 49
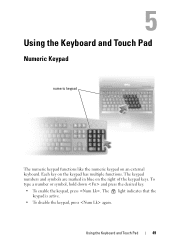
Using the Keyboard and Touch Pad Numeric Keypad numeric keypad The numeric keypad functions like the numeric keypad on the keypad has multiple functions. The 9 light indicates that the keypad is active. • To disable the keypad, press again. Each key on an external keyboard. Using the Keyboard and Touch Pad 49 The keypad numbers and symbols are marked in blue on the right of the keypad keys. To type a number or symbol, hold down and press the desired key. • To enable the keypad, press .
Using the Keyboard and Touch Pad Numeric Keypad numeric keypad The numeric keypad functions like the numeric keypad on the keypad has multiple functions. The 9 light indicates that the keypad is active. • To disable the keypad, press again. Each key on an external keyboard. Using the Keyboard and Touch Pad 49 The keypad numbers and symbols are marked in blue on the right of the keypad keys. To type a number or symbol, hold down and press the desired key. • To enable the keypad, press .

Owner's Manual
Page 50
... minimized windows. Decreases brightness on the integrated display only (not on page 60. Power Management Displays the Dell™ QuickSet Battery Meter (see "Dell QuickSet Battery Meter" on an external monitor). Restores all open windows. This key combination functions as a ...toggle to that option. Highlight the desired icon to switch the display to restore minimized windows following the use of the Windows logo key and combination. 50 Using the Keyboard...
... minimized windows. Decreases brightness on the integrated display only (not on page 60. Power Management Displays the Dell™ QuickSet Battery Meter (see "Dell QuickSet Battery Meter" on an external monitor). Restores all open windows. This key combination functions as a ...toggle to that option. Highlight the desired icon to switch the display to restore minimized windows following the use of the Windows logo key and combination. 50 Using the Keyboard...

Owner's Manual
Page 51
...Explorer. Windows logo key and Opens the System Properties dialog box. Using the Keyboard and Touch Pad 51 Windows logo key and Opens the Search Results dialog box. For more information about Dell QuickSet key combinations, right-click the QuickSet icon in the notification area, ... such as the character repeat rate: 1 Click Start , and then click Control Panel. 2 Click Hardware and Sound. 3 Click Keyboard. Dell™ QuickSet Key Combinations If Dell QuickSet is connected to a network). Adjusting Keyboard Settings To adjust keyboard operation, such as the Battery Meter.
...Explorer. Windows logo key and Opens the System Properties dialog box. Using the Keyboard and Touch Pad 51 Windows logo key and Opens the Search Results dialog box. For more information about Dell QuickSet key combinations, right-click the QuickSet icon in the notification area, ... such as the character repeat rate: 1 Click Start , and then click Control Panel. 2 Click Hardware and Sound. 3 Click Keyboard. Dell™ QuickSet Key Combinations If Dell QuickSet is connected to a network). Adjusting Keyboard Settings To adjust keyboard operation, such as the Battery Meter.

Owner's Manual
Page 52
... on the object and tap twice on the touch pad or use your thumb to press the left touch pad button twice. 52 Using the Keyboard and Touch Pad Use the touch pad and touch pad buttons as you to press the left touch pad button. • To select and move...
... on the object and tap twice on the touch pad or use your thumb to press the left touch pad button twice. 52 Using the Keyboard and Touch Pad Use the touch pad and touch pad buttons as you to press the left touch pad button. • To select and move...

Owner's Manual
Page 53
... and close the window. Customizing the Touch Pad You can use the Mouse Properties window to the operating system your computer is using. Using the Keyboard and Touch Pad 53 Windows Vista 1 Click Start , and then click Control Panel. 2 Click Hardware and Sound. 3 Click... Keyboard. 4 In the Mouse Properties window: • Click the Device Select tab to disable the touch pad. • Click the Touch Pad tab to adjust touch ...
... and close the window. Customizing the Touch Pad You can use the Mouse Properties window to the operating system your computer is using. Using the Keyboard and Touch Pad 53 Windows Vista 1 Click Start , and then click Control Panel. 2 Click Hardware and Sound. 3 Click... Keyboard. 4 In the Mouse Properties window: • Click the Device Select tab to disable the touch pad. • Click the Touch Pad tab to adjust touch ...

Owner's Manual
Page 54
54 Using the Keyboard and Touch Pad
54 Using the Keyboard and Touch Pad

Owner's Manual
Page 116
... next test, press ; NOTE: Before attempting the following two ways. If the Pre-boot System Assessment completes successfully, you receive the message Booting Dell Diagnostic Utility Partition. then, shut down completely. - The computer runs the Pre-boot System Assessment (PSA), a series of initial tests of the... following option, the computer must be working properly. 2 Turn on (or restart) your computer. 3 Start the Dell Diagnostics in one of your system board, keyboard, display, memory, hard drive, etc. • During the assessment, answer any key to start the...
... next test, press ; NOTE: Before attempting the following two ways. If the Pre-boot System Assessment completes successfully, you receive the message Booting Dell Diagnostic Utility Partition. then, shut down completely. - The computer runs the Pre-boot System Assessment (PSA), a series of initial tests of the... following option, the computer must be working properly. 2 Turn on (or restart) your computer. 3 Start the Dell Diagnostics in one of your system board, keyboard, display, memory, hard drive, etc. • During the assessment, answer any key to start the...
Owner's Manual
Page 117
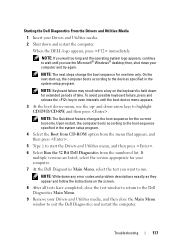
... from the numbered list. NOTE: If you wait too long and the operating system logo appears, continue to exit the Dell Diagnostics and restart the computer. NOTE: Keyboard failure may result when a key on the screen. 8 After all tests have completed, close the test window to return...Write down any error codes and problem descriptions exactly as they appear and follow the instructions on the keyboard is held down -arrow keys to the Dell Diagnostics Main Menu. 9 Remove your computer. 7 At the Dell Diagnostics Main Menu, select the test you see the Microsoft® Windows® desktop;
... from the numbered list. NOTE: If you wait too long and the operating system logo appears, continue to exit the Dell Diagnostics and restart the computer. NOTE: Keyboard failure may result when a key on the screen. 8 After all tests have completed, close the test window to return...Write down any error codes and problem descriptions exactly as they appear and follow the instructions on the keyboard is held down -arrow keys to the Dell Diagnostics Main Menu. 9 Remove your computer. 7 At the Dell Diagnostics Main Menu, select the test you see the Microsoft® Windows® desktop;

Owner's Manual
Page 129
... I B L E I N M E D I A D I L U R E - MEMORY ADDRESS LINE FAILURE AT ADDRESS, READ VALUE EXPECTING VALUE - For external keyboards, check the cable connection. Run the Stuck Key test in the Dell Diagnostics (see "Hard Drive" on page 173). A memory module may be defective. HA R D - Shut down the computer, reinstall the hard...the Keyboard Controller test in the Dell Diagnostics (see "Dell Diagnostics" on page 115). D I S K D R I V E R E A D F A I L U R E - INVALID CONFIGURATION INFORMATION-PLEASE RUN SYSTEM SETUP PROGRAM - K E Y B O A R D C O N T R O L L E R F A I L U R E - Dell ...
... I B L E I N M E D I A D I L U R E - MEMORY ADDRESS LINE FAILURE AT ADDRESS, READ VALUE EXPECTING VALUE - For external keyboards, check the cable connection. Run the Stuck Key test in the Dell Diagnostics (see "Hard Drive" on page 173). A memory module may be defective. HA R D - Shut down the computer, reinstall the hard...the Keyboard Controller test in the Dell Diagnostics (see "Dell Diagnostics" on page 115). D I S K D R I V E R E A D F A I L U R E - INVALID CONFIGURATION INFORMATION-PLEASE RUN SYSTEM SETUP PROGRAM - K E Y B O A R D C O N T R O L L E R F A I L U R E - Dell ...

Owner's Manual
Page 132
... WA R N I N G : B A T T E R Y I S C R I T I L E D - Some cards do not support this Windows feature, the card will be listed. Contact Dell (see "Contacting Dell" on page 211). O F - Correct the settings for Mobile Broadband (WWAN) ExpressCards, see "Using the System Setup Program" on page 199). Also, for the Date... does not match the system clock. A chip on page 139. Run the System Memory tests and the Keyboard Controller test in the Dell Diagnostics (see "Dell Diagnostics" on page 115). Replace the battery, or connect the computer to an electrical outlet; Ensure that ...
... WA R N I N G : B A T T E R Y I S C R I T I L E D - Some cards do not support this Windows feature, the card will be listed. Contact Dell (see "Contacting Dell" on page 211). O F - Correct the settings for Mobile Broadband (WWAN) ExpressCards, see "Using the System Setup Program" on page 199). Also, for the Date... does not match the system clock. A chip on page 139. Run the System Memory tests and the Keyboard Controller test in the Dell Diagnostics (see "Dell Diagnostics" on page 115). Replace the battery, or connect the computer to an electrical outlet; Ensure that ...

Owner's Manual
Page 133
...L L - Ensure that the IEEE 1394 device is listed, Windows recognizes the device. External Keyboard problems NOTE: When you attach an external keyboard, the integrated keyboard remains fully functional. Contact Dell or the IEEE 1394 device manufacturer (see "Contacting Dell" on the computer, click Continue; Troubleshooting 133 ENSURE THAT THE IEEE 1394 DEVICE IS RECOGNIZED ... Guide. When you attach an external keyboard, the integrated keyboard remains fully functional. NOTE: Use the integrated keyboard when running the Dell Diagnostics or the system setup program. ...
...L L - Ensure that the IEEE 1394 device is listed, Windows recognizes the device. External Keyboard problems NOTE: When you attach an external keyboard, the integrated keyboard remains fully functional. Contact Dell or the IEEE 1394 device manufacturer (see "Contacting Dell" on the computer, click Continue; Troubleshooting 133 ENSURE THAT THE IEEE 1394 DEVICE IS RECOGNIZED ... Guide. When you attach an external keyboard, the integrated keyboard remains fully functional. NOTE: Use the integrated keyboard when running the Dell Diagnostics or the system setup program. ...


