

Setup and Features Information Tech Sheet
Page 4
... computer. System Information Chipset Intel® GM45 Processor Processor • Intel Core™2 Duo • Intel Celeron®(Socket P) Video Video type integrated on system board, hardware accelerated Data bus integrated video Video controller Intel GM45 Video memory integrated graphics System memory Dynamic Video Memory Technology (DVMT) 1 GB - 2 GB - 3 GB - 4 ..., such as a printer. For more information regarding the configuration of memory for balanced graphics and system performance. 5 Open the computer display and press the power button to turn on the computer.
... computer. System Information Chipset Intel® GM45 Processor Processor • Intel Core™2 Duo • Intel Celeron®(Socket P) Video Video type integrated on system board, hardware accelerated Data bus integrated video Video controller Intel GM45 Video memory integrated graphics System memory Dynamic Video Memory Technology (DVMT) 1 GB - 2 GB - 3 GB - 4 ..., such as a printer. For more information regarding the configuration of memory for balanced graphics and system performance. 5 Open the computer display and press the power button to turn on the computer.

Service Manual
Page 41
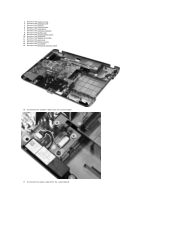
Remove the five screws that secure the system board to the computer chassis. Disconnect the power cable from the system board. 18. 17.
Remove the five screws that secure the system board to the computer chassis. Disconnect the power cable from the system board. 18. 17.
Service Manual
Page 43
Remove the access panel. 6. Remove the memory modules. 8. Remove the I/O board. 15. Remove the display assembly. 12. Disconnect the speaker cables from the system board. Remove the palm rest. 13. Remove the Bluetooth wireless card. 16. 2. Remove the control panel cover. 10. Remove the ExpressCard. 3. Remove the memory card. 4. Remove the keyboard. 11. Disconnect the power cable from the system board. 17. Remove the battery. 5. Remove the WLAN card. 9. Remove the processor fan. 14. Remove the hard drive. 7.
Remove the access panel. 6. Remove the memory modules. 8. Remove the I/O board. 15. Remove the display assembly. 12. Disconnect the speaker cables from the system board. Remove the palm rest. 13. Remove the Bluetooth wireless card. 16. 2. Remove the control panel cover. 10. Remove the ExpressCard. 3. Remove the memory card. 4. Remove the keyboard. 11. Disconnect the power cable from the system board. 17. Remove the battery. 5. Remove the WLAN card. 9. Remove the processor fan. 14. Remove the hard drive. 7.
Service Manual
Page 68
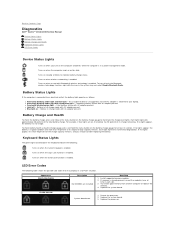
...the status button on the battery charge gauge to Contents Page Diagnostics Dell™ Vostro™ 1014/1015 Service Manual Device Status Lights Battery Status Lights Battery Charge and Health ...lights appear, less than 80 percent of its original charge capacity remains. Replace the system board. Battery in the system tray and select Disable Bluetooth Radio. If no charge. Back...another computer or replace the memory. 4. Turns on when the numeric keypad is in a power management mode. To turn on when wireless networking is already present, reseat the module(s) one ...
...the status button on the battery charge gauge to Contents Page Diagnostics Dell™ Vostro™ 1014/1015 Service Manual Device Status Lights Battery Status Lights Battery Charge and Health ...lights appear, less than 80 percent of its original charge capacity remains. Replace the system board. Battery in the system tray and select Disable Bluetooth Radio. If no charge. Back...another computer or replace the memory. 4. Turns on when the numeric keypad is in a power management mode. To turn on when wireless networking is already present, reseat the module(s) one ...
Service Manual
Page 75
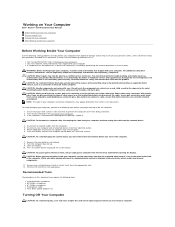
...upside-down on a flat work surface is flat and clean to prevent the computer cover from being scratched. 2. Press the power button to ground the system board. CAUTION: Before touching anything inside your computer, ground yourself by touching an unpainted metal surface, such as a processor by its...Open the display. 10. Hold a card by its pull-tab, not on the cable itself. Working on Your Computer Dell™ Vostro™ 1014/1015 Service Manual Before Working Inside Your Computer Recommended Tools Turning Off Your Computer After Working Inside Your Computer Before Working Inside Your ...
...upside-down on a flat work surface is flat and clean to prevent the computer cover from being scratched. 2. Press the power button to ground the system board. CAUTION: Before touching anything inside your computer, ground yourself by touching an unpainted metal surface, such as a processor by its...Open the display. 10. Hold a card by its pull-tab, not on the cable itself. Working on Your Computer Dell™ Vostro™ 1014/1015 Service Manual Before Working Inside Your Computer Recommended Tools Turning Off Your Computer After Working Inside Your Computer Before Working Inside Your ...


