
User Manual
Page 1
Venue 7/8 User's Manual Tablet model: Venue 7, Venue 8, Venue 7 3730, Venue 7 HSPA+, Venue 8 3830, Venue 8 HSPA+ Regulatory model: T01C/T02D Regulatory type: T01C001, T02C002/T02D001, T02D002
Venue 7/8 User's Manual Tablet model: Venue 7, Venue 8, Venue 7 3730, Venue 7 HSPA+, Venue 8 3830, Venue 8 HSPA+ Regulatory model: T01C/T02D Regulatory type: T01C001, T02C002/T02D001, T02D002
User Manual
Page 2
... to change without the written permission of your tablet. Reproduction of Dell Inc. Bluetooth® is used by Bluetooth SIG, Inc. and is a registered trademark owned by Dell under license. Other trademarks and trade names may be used in this text: Dell™, the DELL logo, and Venue™ are not followed. Information in this document...
... to change without the written permission of your tablet. Reproduction of Dell Inc. Bluetooth® is used by Bluetooth SIG, Inc. and is a registered trademark owned by Dell under license. Other trademarks and trade names may be used in this text: Dell™, the DELL logo, and Venue™ are not followed. Information in this document...
User Manual
Page 3
Contents Features 5 Charging the Battery 6 Inserting the MicroSD Card and Micro-SIM Card (optional 7 Getting Started 8 Turning on/off the tablet 8 Finishing Android setup 8 Customizing the screen 9 Locking and unlocking your tablet 10 Touch tips 10 Status bar 11 Screen orientation 11 Keys and functions 12 Apps and widgets 12 Using Your Tablet 13 Contacts 13 Text entry 14 Managing your tablet's storage 14 Internet 15 Connecting to the Internet using Wi-Fi 15 Connecting to the Internet using mobile broadband 16 Using the airplane mode 17 3
Contents Features 5 Charging the Battery 6 Inserting the MicroSD Card and Micro-SIM Card (optional 7 Getting Started 8 Turning on/off the tablet 8 Finishing Android setup 8 Customizing the screen 9 Locking and unlocking your tablet 10 Touch tips 10 Status bar 11 Screen orientation 11 Keys and functions 12 Apps and widgets 12 Using Your Tablet 13 Contacts 13 Text entry 14 Managing your tablet's storage 14 Internet 15 Connecting to the Internet using Wi-Fi 15 Connecting to the Internet using mobile broadband 16 Using the airplane mode 17 3
User Manual
Page 4
Browsing the Internet 17 Email 18 Customizing Your Tablet 19 Display settings 19 Sound settings 20 Date, time, and time zone 20 Protecting Your Tablet 20 Screen-unlock pattern 20 PIN 21 Password 21 Face unlock 22 Protecting your SIM card with the SIM lock password (LTE/HSPA+ models only 22 Apps 23 Camera 23 Copying files to and from the tablet 23 Bluetooth 24 Gallery 25 Calendar 26 Clock 26 Troubleshooting 26 Specifications 28 4
Browsing the Internet 17 Email 18 Customizing Your Tablet 19 Display settings 19 Sound settings 20 Date, time, and time zone 20 Protecting Your Tablet 20 Screen-unlock pattern 20 PIN 21 Password 21 Face unlock 22 Protecting your SIM card with the SIM lock password (LTE/HSPA+ models only 22 Apps 23 Camera 23 Copying files to and from the tablet 23 Bluetooth 24 Gallery 25 Calendar 26 Clock 26 Troubleshooting 26 Specifications 28 4
User Manual
Page 5
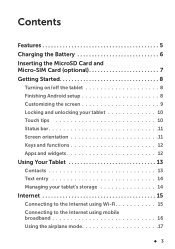
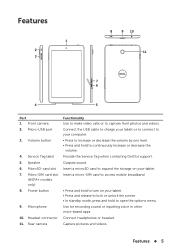
...menu. Connect headphones or headset. Micro-SIM card slot (HSPA+ models only) 8. Connect the USB cable to charge your tablet or to connect to your tablet. • Press and release to lock or unlock the screen. • In standby mode, press and hold to ...and videos. Front camera 2. Volume button 4. Outputs sound. Features 1 2 3 8 9 10 11 7 6 4 5 Part 1. Speaker 6. Provide the Service Tag when contacting Dell for recording sound or inputting voice in other voice-based apps. Insert a microSD card to expand the storage on your computer. • Press to increase...
...menu. Connect headphones or headset. Micro-SIM card slot (HSPA+ models only) 8. Connect the USB cable to charge your tablet or to connect to your tablet. • Press and release to lock or unlock the screen. • In standby mode, press and hold to ...and videos. Front camera 2. Volume button 4. Outputs sound. Features 1 2 3 8 9 10 11 7 6 4 5 Part 1. Speaker 6. Provide the Service Tag when contacting Dell for recording sound or inputting voice in other voice-based apps. Insert a microSD card to expand the storage on your computer. • Press to increase...
User Manual
Page 6
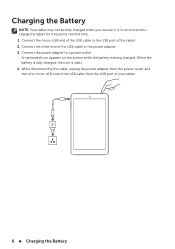
An animated icon appears on the screen while the battery is static. 4. Connect the other end of the tablet. 2. Connect the micro-USB end of the USB cable to the USB port of the USB cable to the power adapter. 3. While disconnecting the cable, ... from the power outlet and then the micro-USB end of the USB cable from the USB port of your tablet. 6 Charging the Battery Connect the power adapter to charge the tablet for 4 hours for the first time. 1. When the battery is fully charged, the icon is being charged. Charging the...
An animated icon appears on the screen while the battery is static. 4. Connect the other end of the tablet. 2. Connect the micro-USB end of the USB cable to the USB port of the USB cable to the power adapter. 3. While disconnecting the cable, ... from the power outlet and then the micro-USB end of the USB cable from the USB port of your tablet. 6 Charging the Battery Connect the power adapter to charge the tablet for 4 hours for the first time. 1. When the battery is fully charged, the icon is being charged. Charging the...
User Manual
Page 8
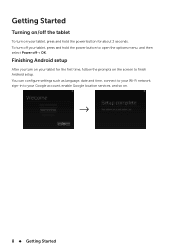
To turn on your tablet for about 3 seconds. You can configure settings such as language, date and time, connect to your Wi-Fi network, sign-in to your tablet, press and hold the power button for the first time, follow the prompts on the screen to open the options menu, and then select Power off the tablet To turn on your Google account, enable Google location services, and so on. → 8 Getting Started Finishing Android setup After you turn off your tablet, press and hold the power button to finish Android setup. Getting Started Turning on/off → OK.
To turn on your tablet for about 3 seconds. You can configure settings such as language, date and time, connect to your Wi-Fi network, sign-in to your tablet, press and hold the power button for the first time, follow the prompts on the screen to open the options menu, and then select Power off the tablet To turn on your Google account, enable Google location services, and so on. → 8 Getting Started Finishing Android setup After you turn off your tablet, press and hold the power button to finish Android setup. Getting Started Turning on/off → OK.
User Manual
Page 9
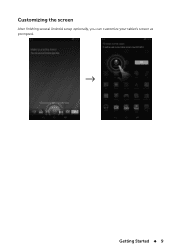
Customizing the screen After finishing several Android setup optionally, you can customize your tablet's screen as prompted. → Getting Started 9
Customizing the screen After finishing several Android setup optionally, you can customize your tablet's screen as prompted. → Getting Started 9
User Manual
Page 10
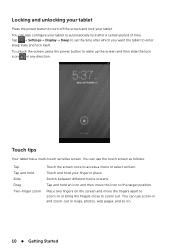
Touch tips Your tablet has a multi-touch sensitive screen. Tap and hold an icon and then move the fingers apart to enter sleep...menu or select an item. Place two fingers on . 10 Getting Started You can also configure your tablet to automatically lock after which you want the tablet to zoom-in place. Switch between different home screens. You can use zoom-in and zoom-out in any ... web pages, and so on the screen and move the icon to turn off the screen and lock your tablet. Locking and unlocking your tablet Press the power button to the target position.
Touch tips Your tablet has a multi-touch sensitive screen. Tap and hold an icon and then move the fingers apart to enter sleep...menu or select an item. Place two fingers on . 10 Getting Started You can also configure your tablet to automatically lock after which you want the tablet to zoom-in place. Switch between different home screens. You can use zoom-in and zoom-out in any ... web pages, and so on the screen and move the icon to turn off the screen and lock your tablet. Locking and unlocking your tablet Press the power button to the target position.
User Manual
Page 11
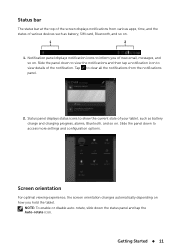
.... NOTE: To enable or disable auto-rotate, slide down to view the notifications and then tap a notification icon to inform you hold the tablet. Getting Started 11 Slide the panel down the status panel and tap the Auto-rotate icon. Notification panel displays notification icons to view... changes automatically depending on how you of new email, messages, and so on . Status panel displays status icons to show the current state of your tablet, such as battery, SIM card, Bluetooth, and so on. 1 2 1. Status bar The status bar at the top of the screen displays notifications...
.... NOTE: To enable or disable auto-rotate, slide down to view the notifications and then tap a notification icon to inform you hold the tablet. Getting Started 11 Slide the panel down the status panel and tap the Auto-rotate icon. Notification panel displays notification icons to view... changes automatically depending on how you of new email, messages, and so on . Status panel displays status icons to show the current state of your tablet, such as battery, SIM card, Bluetooth, and so on. 1 2 1. Status bar The status bar at the top of the screen displays notifications...
User Manual
Page 12
... provides quick and easy access to perform a specific task. Apps and widgets • Apps: Software that allows you to information. 12 Getting Started Your tablet is preloaded with a variety of applications, and additional applications can be downloaded from the Play Store. • Widgets: A small application which resides on -screen keyboard...
... provides quick and easy access to perform a specific task. Apps and widgets • Apps: Software that allows you to information. 12 Getting Started Your tablet is preloaded with a variety of applications, and additional applications can be downloaded from the Play Store. • Widgets: A small application which resides on -screen keyboard...
User Manual
Page 13
A list of matching contacts is displayed. Tap → People→ Create a new contact. 2. Tap to back up your contacts, tap → People. Using Your Tablet Contacts To view and manage your contacts online. Creating a contact 1. Sign in to an existing Google account or create a new Google account to open the ... the contact list until you locate the desired contact, tap the contact's entry to save the contact. Searching for a contact To locate a contact: 1. Using Your Tablet 13
A list of matching contacts is displayed. Tap → People→ Create a new contact. 2. Tap to back up your contacts, tap → People. Using Your Tablet Contacts To view and manage your contacts online. Creating a contact 1. Sign in to an existing Google account or create a new Google account to open the ... the contact list until you locate the desired contact, tap the contact's entry to save the contact. Searching for a contact To locate a contact: 1. Using Your Tablet 13

User Manual
Page 14
...use voice input. Tap and hold to quickly delete text to improve speech-recognition accuracy. 5. Tap to change back to remove. 3. Managing your tablet's storage Checking storage space Tap → Settings→ Storage. From the Apps list, tap the application whose cache or data you want to ...data and cache 1. Tap once to enable the Caps Lock mode. In the application screen, tap Clear cache or Clear data. 14 Using Your Tablet NOTE: It is displayed. Tap to type letters. 2. Tap → Settings→ Apps→ Downloaded/All. 2. Text entry You can recognize. ...
...use voice input. Tap and hold to quickly delete text to improve speech-recognition accuracy. 5. Tap to change back to remove. 3. Managing your tablet's storage Checking storage space Tap → Settings→ Storage. From the Apps list, tap the application whose cache or data you want to ...data and cache 1. Tap once to enable the Caps Lock mode. In the application screen, tap Clear cache or Clear data. 14 Using Your Tablet NOTE: It is displayed. Tap to type letters. 2. Tap → Settings→ Apps→ Downloaded/All. 2. Text entry You can recognize. ...
User Manual
Page 15
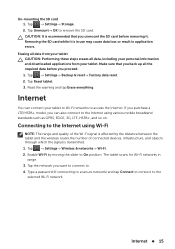
... Settings→ Wireless & networks→ Wi-Fi. 2. Tap Unmount→ OK to the selected Wi-Fi network. Erasing all data from your tablet CAUTION: Performing these steps erases all the required data before removing it is in use may cause data loss or result in range. 3. Tap Reset... SD card. Make sure that you unmount the SD card before you back up all data, including your personal information and downloaded applications from your tablet to Wi-Fi networks to . 4. Un-mounting the SD card 1. Tap → Settings→ Backup & reset→ Factory data reset. 2. Internet...
... Settings→ Wireless & networks→ Wi-Fi. 2. Tap Unmount→ OK to the selected Wi-Fi network. Erasing all data from your tablet CAUTION: Performing these steps erases all the required data before removing it is in use may cause data loss or result in range. 3. Tap Reset... SD card. Make sure that you unmount the SD card before you back up all data, including your personal information and downloaded applications from your tablet to Wi-Fi networks to . 4. Un-mounting the SD card 1. Tap → Settings→ Backup & reset→ Factory data reset. 2. Internet...
User Manual
Page 16
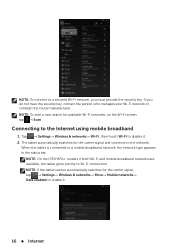
... and connects to disable it . 16 Internet NOTE: On the LTE/HSPA+ models, if both Wi-Fi and mobile broadband networks are available, the tablet gives priority to a mobile broadband network, the network type appears in the status bar. If you must provide the security key. When the... tablet is connected to Wi-Fi connection. Connecting to the Internet using mobile broadband 1. NOTE: To connect to a secured Wi-Fi network, you do not have ...
... and connects to disable it . 16 Internet NOTE: On the LTE/HSPA+ models, if both Wi-Fi and mobile broadband networks are available, the tablet gives priority to a mobile broadband network, the network type appears in the status bar. If you must provide the security key. When the... tablet is connected to Wi-Fi connection. Connecting to the Internet using mobile broadband 1. NOTE: To connect to a secured Wi-Fi network, you do not have ...
User Manual
Page 17
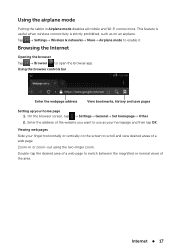
... area of a web page to use as on the screen to scroll and view desired areas of the area. Using the airplane mode Putting the tablet in or zoom-out using the two-finger zoom.
... area of a web page to use as on the screen to scroll and view desired areas of the area. Using the airplane mode Putting the tablet in or zoom-out using the two-finger zoom.

User Manual
Page 18
... Next to enter the account options screen to confirm deletion, tap OK. 18 Internet To delete an email account, tap Remove account on your tablet. Opening the email app Tap → Email . After configuring the account options, tap Next to access your email options. 3. In an email account screen, tap..., enter the email address and password of the email account (the same as the account on your personal computer). 2. Deleting an email account on your tablet 1.
... Next to enter the account options screen to confirm deletion, tap OK. 18 Internet To delete an email account, tap Remove account on your tablet. Opening the email app Tap → Email . After configuring the account options, tap Next to access your email options. 3. In an email account screen, tap..., enter the email address and password of the email account (the same as the account on your personal computer). 2. Deleting an email account on your tablet 1.
User Manual
Page 19
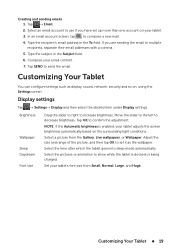
...brightness. Tap → Email. 2. Type the subject in the To field. Select a picture from Small, Normal, Large, and Huge. Set your tablet. 3. Type the recipient's email address in the Subject field. 6. Adjust the size and range of the picture, and then tap OK to set up...email to send the email. If you have set it as display, sound, network, security and so on the surrounding light conditions. Compose your tablet adjusts the screen brightness automatically based on , using the Settings screen. Tap SEND to multiple recipients, separate their email addresses with a comma. ...
...brightness. Tap → Email. 2. Type the subject in the To field. Select a picture from Small, Normal, Large, and Huge. Set your tablet. 3. Type the recipient's email address in the Subject field. 6. Adjust the size and range of the picture, and then tap OK to set up...email to send the email. If you have set it as display, sound, network, security and so on the surrounding light conditions. Compose your tablet adjusts the screen brightness automatically based on , using the Settings screen. Tap SEND to multiple recipients, separate their email addresses with a comma. ...
User Manual
Page 20
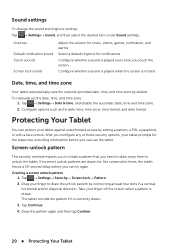
...sounds Screen lock sound Adjust the volume for music, videos, games, notification, and alarms. Select a default ringtone for five consecutive times, the tablet forces a 30-second delay before you can try again. Drag your finger off the screen when a pattern is played every time you configure... any of these security options, your tablet against unauthorized access by default. Sound settings To change the sound and ringtone settings: Tap → Settings→ Sound, and then ...
...sounds Screen lock sound Adjust the volume for music, videos, games, notification, and alarms. Select a default ringtone for five consecutive times, the tablet forces a 30-second delay before you can try again. Drag your finger off the screen when a pattern is played every time you configure... any of these security options, your tablet against unauthorized access by default. Sound settings To change the sound and ringtone settings: Tap → Settings→ Sound, and then ...
User Manual
Page 21
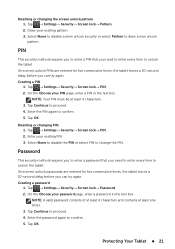
...a PIN in the text box. PIN This security method requires you to enter a PIN that you need to enter every time to unlock the tablet. Tap → Settings→ Security→ Screen lock→ PIN. 2. On the Choose your password page, enter a password in the ... Enter your existing pattern. 3. Password This security method requires you to enter a password that you need to enter every time to unlock the tablet. Creating a password 1. NOTE: A valid password consists of at least 4 characters and contains at least 4 characters. 3. Enter the password again to confirm...
...a PIN in the text box. PIN This security method requires you to enter a PIN that you need to enter every time to unlock the tablet. Tap → Settings→ Security→ Screen lock→ PIN. 2. On the Choose your password page, enter a password in the ... Enter your existing pattern. 3. Password This security method requires you to enter a password that you need to enter every time to unlock the tablet. Creating a password 1. NOTE: A valid password consists of at least 4 characters and contains at least 4 characters. 3. Enter the password again to confirm...


