UltraSharp Monitor Users Guide
Page 4
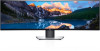
... On-Screen Display (OSD) Menu 44 Accessing the Menu System 44 OSD Warning Messages 62 Setting the Maximum Resolution 66 Setting the KVM USB Switch 67 Setting the Auto KVM 71 Using the Tilt, Swivel, and Vertical Extension 73 Tilt, Swivel 73 Vertical Extension 74 Dual-Monitor Setup 74 Troubleshooting 75 Self...
... On-Screen Display (OSD) Menu 44 Accessing the Menu System 44 OSD Warning Messages 62 Setting the Maximum Resolution 66 Setting the KVM USB Switch 67 Setting the Auto KVM 71 Using the Tilt, Swivel, and Vertical Extension 73 Tilt, Swivel 73 Vertical Extension 74 Dual-Monitor Setup 74 Troubleshooting 75 Self...
UltraSharp Monitor Users Guide
Page 9
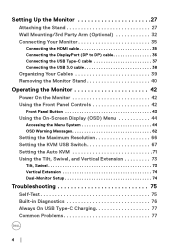
Product Features The Dell U4919DW flat panel display has an active matrix, Thin-Film Transistor (TFT), Liquid ... swivel, and vertical extension adjustment capabilities. • Ultra-thin bezel minimizes the bezel gap in PBP mode. • Supports Auto KVM for ease of 99% sRGB with an average Delta E < 2. • Supports HDMI, USB Type-C, DP sources. •...bit color at 60 Hz. • Single USB Type-C to supply power (Up to 90 W) to switch USB KVM function in multi-monitor usage, enabling easier setup with an elegant viewing experience. • Removable stand and Video Electronics ...
Product Features The Dell U4919DW flat panel display has an active matrix, Thin-Film Transistor (TFT), Liquid ... swivel, and vertical extension adjustment capabilities. • Ultra-thin bezel minimizes the bezel gap in PBP mode. • Supports Auto KVM for ease of 99% sRGB with an average Delta E < 2. • Supports HDMI, USB Type-C, DP sources. •...bit color at 60 Hz. • Single USB Type-C to supply power (Up to 90 W) to switch USB KVM function in multi-monitor usage, enabling easier setup with an elegant viewing experience. • Removable stand and Video Electronics ...

UltraSharp Monitor Users Guide
Page 67
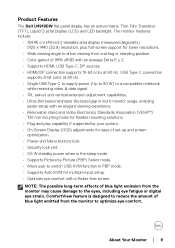
Operating the Monitor │ 67 Press the and buttons to activate the highlighted option. 4. Press the button to "USB Select Switch". Press the button to Shortcut Key 1 to "Personalize". 3. Setting the KVM USB Switch To set the KVM USB Switch as Shortcut Key for the monitor: 1. Press the and buttons to activate the highlighted option. 5. Press the button to launch the OSD menu and display the main menu. 2.
Operating the Monitor │ 67 Press the and buttons to activate the highlighted option. 4. Press the button to "USB Select Switch". Press the button to Shortcut Key 1 to "Personalize". 3. Setting the KVM USB Switch To set the KVM USB Switch as Shortcut Key for the monitor: 1. Press the and buttons to activate the highlighted option. 5. Press the button to launch the OSD menu and display the main menu. 2.

UltraSharp Monitor Users Guide
Page 68
The following are illustrations of several connection scenarios and their USB Selection menu settings, as illustrated in corresponding color frames. 1. Press the button to return to computer 2: NOTE: The USB Type-C connection currently supports only data transfer. NOTE: KVM USB Switch function only work under PBP Mode. When connecting HDMI 1 + USB 1 to computer 1 and DP + USB Type-C to the main menu. 6. Press the button to USB Type-C. 68 │ Operating the Monitor Make sure USB Selection for HDMI 1 is set to USB 1 and DP is set to confirm selection. 7.
The following are illustrations of several connection scenarios and their USB Selection menu settings, as illustrated in corresponding color frames. 1. Press the button to return to computer 2: NOTE: The USB Type-C connection currently supports only data transfer. NOTE: KVM USB Switch function only work under PBP Mode. When connecting HDMI 1 + USB 1 to computer 1 and DP + USB Type-C to the main menu. 6. Press the button to USB Type-C. 68 │ Operating the Monitor Make sure USB Selection for HDMI 1 is set to USB 1 and DP is set to confirm selection. 7.

UltraSharp Monitor Users Guide
Page 71
Ensure that Auto Select is On and Auto Select for your monitor: 1. Ensure that PBP Mode is Off. 2. Operating the Monitor │ 71 Setting the Auto KVM You can follow below instruction to set up Auto KVM for USB-C is Yes.
Ensure that Auto Select is On and Auto Select for your monitor: 1. Ensure that PBP Mode is Off. 2. Operating the Monitor │ 71 Setting the Auto KVM You can follow below instruction to set up Auto KVM for USB-C is Yes.
