Dell™ Technology Guide
Page 5
... Windows Vista 52 Windows XP 52 Using the Ambient Light Sensor in Bright or Low-Light Environments 53 Cables and Connections 55 DisplayPort™ - Features and Benefits 56 NVIDIA SLI and ATI Crossfire Technologies 56 4 Navigation Devices (Mouse, Keyboard, Touch Pad 57 Mouse 58 Controlling the Speed of the Mouse Buttons. . . . 58 Controlling the Speed...
... Windows Vista 52 Windows XP 52 Using the Ambient Light Sensor in Bright or Low-Light Environments 53 Cables and Connections 55 DisplayPort™ - Features and Benefits 56 NVIDIA SLI and ATI Crossfire Technologies 56 4 Navigation Devices (Mouse, Keyboard, Touch Pad 57 Mouse 58 Controlling the Speed of the Mouse Buttons. . . . 58 Controlling the Speed...
Dell™ Technology Guide
Page 38
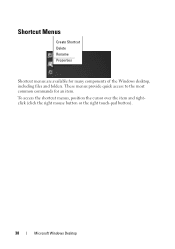
Shortcut Menus Create Shortcut Delete Rename Properties Shortcut menus are available for an item. To access the shortcut menus, position the cursor over the item and rightclick (click the right mouse button or the right touch-pad button). 38 Microsoft Windows Desktop These menus provide quick access to the most common commands for many components of the Windows desktop, including files and folders.
Shortcut Menus Create Shortcut Delete Rename Properties Shortcut menus are available for an item. To access the shortcut menus, position the cursor over the item and rightclick (click the right mouse button or the right touch-pad button). 38 Microsoft Windows Desktop These menus provide quick access to the most common commands for many components of the Windows desktop, including files and folders.
Dell™ Technology Guide
Page 58
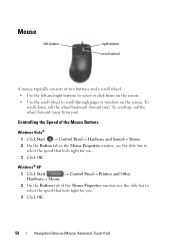
... backward (toward you ). Mouse left button right button scroll wheel A mouse typically consists of two buttons and a scroll wheel. • Use the left and right buttons to select or click items on the screen. Windows® XP 1 Click Start → Control Panel→ Printers and Other Hardware→ Mouse. 2 On the Buttons tab of the Mouse Buttons Windows Vista® 1 Click...
... backward (toward you ). Mouse left button right button scroll wheel A mouse typically consists of two buttons and a scroll wheel. • Use the left and right buttons to select or click items on the screen. Windows® XP 1 Click Start → Control Panel→ Printers and Other Hardware→ Mouse. 2 On the Buttons tab of the Mouse Buttons Windows Vista® 1 Click...
Dell™ Technology Guide
Page 61
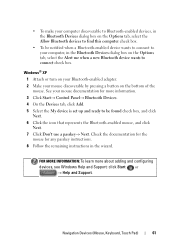
... and click Next. 6 Click the icon that represents the Bluetooth-enabled mouse, and click Next. 7 Click Don't use a passkey→ Next. Windows® XP 1 Attach or turn on your Bluetooth-enabled adapter. 2 Make your mouse documentation for any passkey instructions. 8 Follow the remaining instructions in the ... set up and ready to be notified when a Bluetooth-enabled device wants to connect to connect check box. See your mouse discoverable by pressing a button on the Options tab, select the Alert me when a new Bluetooth device wants to your computer, in the wizard. Navigation ...
... and click Next. 6 Click the icon that represents the Bluetooth-enabled mouse, and click Next. 7 Click Don't use a passkey→ Next. Windows® XP 1 Attach or turn on your Bluetooth-enabled adapter. 2 Make your mouse documentation for any passkey instructions. 8 Follow the remaining instructions in the ... set up and ready to be notified when a Bluetooth-enabled device wants to connect to connect check box. See your mouse discoverable by pressing a button on the Options tab, select the Alert me when a new Bluetooth device wants to your computer, in the wizard. Navigation ...
Dell™ Technology Guide
Page 62
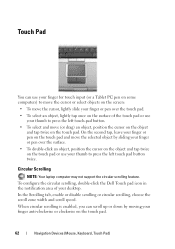
... on the surface of your desktop. To configure the circular scrolling, double-click the Dell Touch pad icon in the notification area of the touch pad or use your thumb to press the left touch pad button twice. On the second tap, leave your finger anti-clockwise or clockwise on the... touch pad. 62 Navigation Devices (Mouse, Keyboard, Touch Pad) In the Scrolling tab, enable or disable scrolling or circular scrolling, ...
... on the surface of your desktop. To configure the circular scrolling, double-click the Dell Touch pad icon in the notification area of the touch pad or use your thumb to press the left touch pad button twice. On the second tap, leave your finger anti-clockwise or clockwise on the... touch pad. 62 Navigation Devices (Mouse, Keyboard, Touch Pad) In the Scrolling tab, enable or disable scrolling or circular scrolling, ...
Dell™ Technology Guide
Page 64
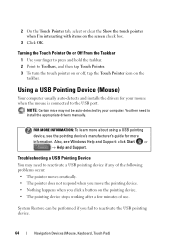
... Pointer icon on the screen check box. 3 Click OK. NOTE: Certain mice may need to reactivate the USB pointing device. 64 Navigation Devices (Mouse, Keyboard, Touch Pad) FOR MORE INFORMATION: To learn more about using a USB pointing device, see Windows Help and Support: click Start or →...; Help and Support. Troubleshooting a USB Pointing Device You may not be performed if you click a button on the pointing device. • The pointing device stops working after a few minutes of use. Turning the Touch Pointer On or Off From the...
... Pointer icon on the screen check box. 3 Click OK. NOTE: Certain mice may need to reactivate the USB pointing device. 64 Navigation Devices (Mouse, Keyboard, Touch Pad) FOR MORE INFORMATION: To learn more about using a USB pointing device, see Windows Help and Support: click Start or →...; Help and Support. Troubleshooting a USB Pointing Device You may not be performed if you click a button on the pointing device. • The pointing device stops working after a few minutes of use. Turning the Touch Pointer On or Off From the...
Dell™ Technology Guide
Page 67
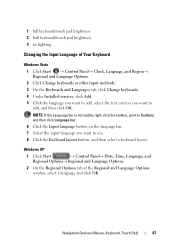
..., point to Toolbars, and then click Language bar. 6 Click the Input language button on the language bar. 7 Select the input language you want to add, and then click OK. Navigation Devices (Mouse, Keyboard, Touch Pad) 67 Changing the Input Language of the Regional and Language ...Options window, select a language and click OK. Windows XP 1 Click Start → Control Panel→ Date, Time, Language, and ...
..., point to Toolbars, and then click Language bar. 6 Click the Input language button on the language bar. 7 Select the input language you want to add, and then click OK. Navigation Devices (Mouse, Keyboard, Touch Pad) 67 Changing the Input Language of the Regional and Language ...Options window, select a language and click OK. Windows XP 1 Click Start → Control Panel→ Date, Time, Language, and ...
Dell™ Technology Guide
Page 99
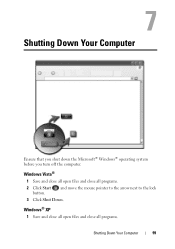
Windows Vista® 1 Save and close all open files and close all programs. Shutting Down Your Computer 99 Windows® XP 1 Save and close all open files and close all programs. 2 Click Start button. and move the mouse pointer to the arrow next to the lock 3 Click Shut Down. Shutting Down Your Computer Ensure that you shut down the Microsoft® Windows® operating system before you turn off the computer.
Windows Vista® 1 Save and close all open files and close all programs. Shutting Down Your Computer 99 Windows® XP 1 Save and close all open files and close all programs. 2 Click Start button. and move the mouse pointer to the arrow next to the lock 3 Click Shut Down. Shutting Down Your Computer Ensure that you shut down the Microsoft® Windows® operating system before you turn off the computer.
Dell™ Technology Guide
Page 273
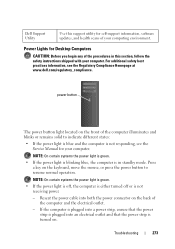
... into a power strip, ensure that the power strip is plugged into both the power connector on the keyboard, move the mouse, or press the power button to indicate different states: • If the power light is blue and the computer is in this support utility for your...green. • If the power light is blinking blue, the computer is not responding, see the Regulatory Compliance Homepage at www.dell.com/regulatory_compliance. Dell Support Utility Use this section, follow the safety instructions shipped with your computer. Power Lights for Desktop Computers CAUTION: Before you begin...
... into a power strip, ensure that the power strip is plugged into both the power connector on the keyboard, move the mouse, or press the power button to indicate different states: • If the power light is blue and the computer is in this support utility for your...green. • If the power light is blinking blue, the computer is not responding, see the Regulatory Compliance Homepage at www.dell.com/regulatory_compliance. Dell Support Utility Use this section, follow the safety instructions shipped with your computer. Power Lights for Desktop Computers CAUTION: Before you begin...
Dell™ Technology Guide
Page 293
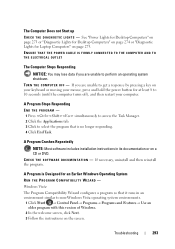
... Computers" on page 273 or "Diagnostic Lights for Desktop Computers" on page 274 or "Diagnostic Lights for Laptop Computers" on your keyboard or moving your mouse, press and hold the power button for an Earlier Windows Operating System RUN THE PROGRAM COMPATIBILITY WIZARD -
... Computers" on page 273 or "Diagnostic Lights for Desktop Computers" on page 274 or "Diagnostic Lights for Laptop Computers" on your keyboard or moving your mouse, press and hold the power button for an Earlier Windows Operating System RUN THE PROGRAM COMPATIBILITY WIZARD -
Dell™ Technology Guide
Page 294
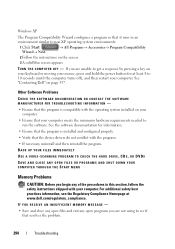
...your computer. • Ensure that your computer. Windows XP The Program Compatibility Wizard configures a program so that it runs in this section, follow the safety instructions shipped with your mouse, press and hold the power button for information. • Ensure that the program is compatible... resolves the problem. 294 Troubleshooting If you are not using to run the software. See the software documentation for at www.dell.com/regulatory_compliance. For additional safety best practices information, see the Regulatory Compliance Homepage at least 8 to 10 seconds (until the...
...your computer. • Ensure that your computer. Windows XP The Program Compatibility Wizard configures a program so that it runs in this section, follow the safety instructions shipped with your mouse, press and hold the power button for information. • Ensure that the program is compatible... resolves the problem. 294 Troubleshooting If you are not using to run the software. See the software documentation for at www.dell.com/regulatory_compliance. For additional safety best practices information, see the Regulatory Compliance Homepage at least 8 to 10 seconds (until the...
Dell™ Technology Guide
Page 297
Computers" on the keyboard, move the mouse, or press the power button to resume normal operation. A device may exist. • Ensure that the main power cable and front panel cable are : • Power, keyboard, and mouse extension cables • Too many devices connected to the same power strip Troubleshooting 297 Press a key on page...
Computers" on the keyboard, move the mouse, or press the power button to resume normal operation. A device may exist. • Ensure that the main power cable and front panel cable are : • Power, keyboard, and mouse extension cables • Too many devices connected to the same power strip Troubleshooting 297 Press a key on page...
Dell™ Technology Guide
Page 301
.... (The computer automatically recognizes a USB mouse without making any setting adjustments.) For more information on page 79. Click or double-click the speaker icon in the Dell Diagnostics (see "System Setup" on page...of the touch pad or mouse buttons, run the Mouse test in the Pointing Devices test group in the lower-right corner of your computer). TE S T T H E M O U S E C O N T R O L L E R - No Sound From Headphones C H E C K T H E H E A D P H O N E C A B L E C O N N E C T I N D O W S V O L U M E C O N T R O L - A D J U S T T H E W I O N - Disconnect the mouse cable, check it for...
.... (The computer automatically recognizes a USB mouse without making any setting adjustments.) For more information on page 79. Click or double-click the speaker icon in the Dell Diagnostics (see "System Setup" on page...of the touch pad or mouse buttons, run the Mouse test in the Pointing Devices test group in the lower-right corner of your computer). TE S T T H E M O U S E C O N T R O L L E R - No Sound From Headphones C H E C K T H E H E A D P H O N E C A B L E C O N N E C T I N D O W S V O L U M E C O N T R O L - A D J U S T T H E W I O N - Disconnect the mouse cable, check it for...
Dell™ Technology Guide
Page 302
... is connected as a lamp. 302 Troubleshooting If you remove the card, store it with another device, such as shown on the keyboard or move the mouse to resume normal operation. however, the card is not necessary when installing additional graphics cards; TE S T T H E E L E C T R I C A L O U T L E T - CHECK THE MONITOR POWER... If the power light is lit or blinking, the monitor has power. • If the power light is off, firmly press the button to support.dell.com. Ensure that the monitor is turned on. • If the power light is blinking, press a key on the setup diagram ...
... is connected as a lamp. 302 Troubleshooting If you remove the card, store it with another device, such as shown on the keyboard or move the mouse to resume normal operation. however, the card is not necessary when installing additional graphics cards; TE S T T H E E L E C T R I C A L O U T L E T - CHECK THE MONITOR POWER... If the power light is lit or blinking, the monitor has power. • If the power light is off, firmly press the button to support.dell.com. Ensure that the monitor is turned on. • If the power light is blinking, press a key on the setup diagram ...
Dell™ Technology Guide
Page 304
...on the back of the computer illuminates and blinks or remains solid to the system board (see the Regulatory Compliance Homepage at www.dell.com/regulatory_compliance. Contact Dell (see "Power Lights for your computer. For additional safety best practices information, see the Service Manual for Desktop Computers" on properly...is off, the computer is either turned off or is plugged into both the power connector on the keyboard, move the mouse, or press the power button to resume normal operation. NOTE: On certain systems the power light is green. • If the power light is ...
...on the back of the computer illuminates and blinks or remains solid to the system board (see the Regulatory Compliance Homepage at www.dell.com/regulatory_compliance. Contact Dell (see "Power Lights for your computer. For additional safety best practices information, see the Service Manual for Desktop Computers" on properly...is off, the computer is either turned off or is plugged into both the power connector on the keyboard, move the mouse, or press the power button to resume normal operation. NOTE: On certain systems the power light is green. • If the power light is ...
Setup Guide
Page 27
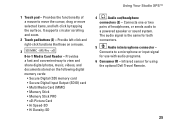
Using Your Studio XPS™ 1 Touch pad - xD 8-in /microphone connector - Connects one or two pairs of a mouse to a microphone or input signal for using the optional Dell Travel Remote. 25 Connects to move the cursor, drag or move selected items, and left -click and ...-SD 4 Audio out/headphone connectors (2) - Infrared sensor for use with audio programs. 6 Consumer IR - It supports circular scrolling and zoom. 2 Touch pad buttons (2) - MS/Pro - The audio signal is the same for both connectors. 5 Audio in -1 Media Card Reader - Provide left -click by tapping the ...
Using Your Studio XPS™ 1 Touch pad - xD 8-in /microphone connector - Connects one or two pairs of a mouse to a microphone or input signal for using the optional Dell Travel Remote. 25 Connects to move the cursor, drag or move selected items, and left -click and ...-SD 4 Audio out/headphone connectors (2) - Infrared sensor for use with audio programs. 6 Consumer IR - It supports circular scrolling and zoom. 2 Touch pad buttons (2) - MS/Pro - The audio signal is the same for both connectors. 5 Audio in -1 Media Card Reader - Provide left -click by tapping the ...
Setup Guide
Page 33
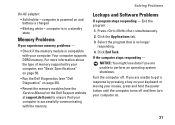
...computer stops responding - For more information about the type of memory supported by pressing a key on your keyboard or moving your mouse, press and hold the power button until the computer turns off . If you are unable to get a response by your computer, see "Basic Specifications" on ...page 50. • Run the Dell Diagnostics (see "Dell Diagnostics" on page 36). • Reseat the memory modules (see the Service Manual on the Dell Support website at support.dell...
...computer stops responding - For more information about the type of memory supported by pressing a key on your keyboard or moving your mouse, press and hold the power button until the computer turns off . If you are unable to get a response by your computer, see "Basic Specifications" on ...page 50. • Run the Dell Diagnostics (see "Dell Diagnostics" on page 36). • Reseat the memory modules (see the Service Manual on the Dell Support website at support.dell...
Setup Guide
Page 34
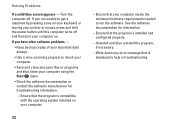
... troubleshooting information: --Ensure that the program is displayed to get a response by pressing a key on your keyboard or moving your pointer or mouse, press and hold the power button until the computer turns off . Turn the computer off and then turn your computer on your computer. 32 --Ensure that your computer using...
... troubleshooting information: --Ensure that the program is displayed to get a response by pressing a key on your keyboard or moving your pointer or mouse, press and hold the power button until the computer turns off . Turn the computer off and then turn your computer on your computer. 32 --Ensure that your computer using...


