
Service Manual
Page 16
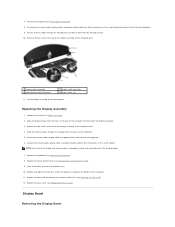
...cable to the computer base. 1 camera cable connector 3 power button cable connector 2 display cable connector 4 hinge screws (2) 11. Replace the keyboard (see Removing the Keyboard). 8. Lift the display assembly out of the computer and then lower the display into place. 3. Follow the instructions in the ...10. Disconnect the camera cable, display cable, and power button cable from the routing channel. 10. Remove the keyboard (see Replacing the Keyboard). 8. Slide the antenna cables through the routing hole and release them from their connectors on the system board and release it ...
...cable to the computer base. 1 camera cable connector 3 power button cable connector 2 display cable connector 4 hinge screws (2) 11. Replace the keyboard (see Removing the Keyboard). 8. Lift the display assembly out of the computer and then lower the display into place. 3. Follow the instructions in the ...10. Disconnect the camera cable, display cable, and power button cable from the routing channel. 10. Remove the keyboard (see Replacing the Keyboard). 8. Slide the antenna cables through the routing hole and release them from their connectors on the system board and release it ...
Service Manual
Page 26
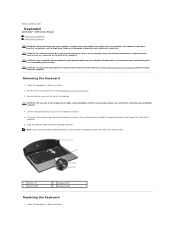
Back to Contents Page Keyboard Dell Studio™ 1555 Service Manual Removing the Keyboard Replacing the Keyboard WARNING: Before working inside your computer, read the safety information that shipped with your computer. Damage due to servicing that needs to replace. Follow the procedures in Before You Begin. Disconnect the keyboard cable from the keyboard connector on the back of the...
Back to Contents Page Keyboard Dell Studio™ 1555 Service Manual Removing the Keyboard Replacing the Keyboard WARNING: Before working inside your computer, read the safety information that shipped with your computer. Damage due to servicing that needs to replace. Follow the procedures in Before You Begin. Disconnect the keyboard cable from the keyboard connector on the back of the...
Service Manual
Page 27
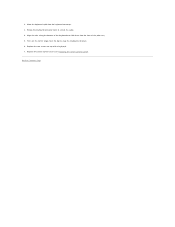
Back to secure the cable. 4. 2. Press on top of the keyboard. 7. Rotate the keyboard connector latch to Contents Page Align the tabs along the bottom of the palm rest. 5. Slide the keyboard cable into the slots of the keyboard and slide them into the keyboard connector. 3. Replace the two screws on the corner edges near the top to snap the keyboard into place. 6. Replace the center control cover (see Replacing the Center Control Cover).
Back to secure the cable. 4. 2. Press on top of the keyboard. 7. Rotate the keyboard connector latch to Contents Page Align the tabs along the bottom of the palm rest. 5. Slide the keyboard cable into the slots of the keyboard and slide them into the keyboard connector. 3. Replace the two screws on the corner edges near the top to snap the keyboard into place. 6. Replace the center control cover (see Replacing the Center Control Cover).
Service Manual
Page 28
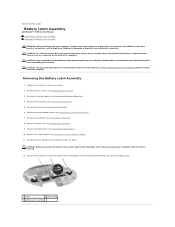
... latch, observe the orientation of the computer). Back to Contents Page Battery Latch Assembly Dell Studio™ 1555 Service Manual Removing the Battery Latch Assembly Replacing the Battery Latch Assembly WARNING: Before working inside your computer. Damage due to ensure ...the System Board Assembly). 11. Remove the system board (see the Regulatory Compliance Homepage at www.dell.com/regulatory_compliance. Remove the hard drive (see Removing the Keyboard). 8. Remove the keyboard (see Removing the Hard Drive). 5. Remove all memory modules (see Removing the Memory Module(s))....
... latch, observe the orientation of the computer). Back to Contents Page Battery Latch Assembly Dell Studio™ 1555 Service Manual Removing the Battery Latch Assembly Replacing the Battery Latch Assembly WARNING: Before working inside your computer. Damage due to ensure ...the System Board Assembly). 11. Remove the system board (see the Regulatory Compliance Homepage at www.dell.com/regulatory_compliance. Remove the hard drive (see Removing the Keyboard). 8. Remove the keyboard (see Removing the Hard Drive). 5. Remove all memory modules (see Removing the Memory Module(s))....
Setup Guide
Page 5
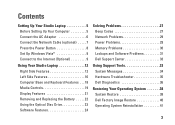
... Vista 9 Connect to the Internet (Optional 9 Using Your Studio Laptop 12 Right Side Features 12 Left Side Features 16 Computer Base and Keyboard Features 18 Media Controls 19 Display Features 21 Removing and Replacing the Battery 22 Using the Optical Disc Drive 23 Software Features...Problems 29 Memory Problems 30 Lockups and Software Problems 31 Dell Support Center 33 Using Support Tools 33 System Messages 34 Hardware Troubleshooter 35 Dell Diagnostics 36 Restoring Your Operating System 38 System Restore 38 Dell Factory Image Restore 40 Operating System Reinstallation 41 3
... Vista 9 Connect to the Internet (Optional 9 Using Your Studio Laptop 12 Right Side Features 12 Left Side Features 16 Computer Base and Keyboard Features 18 Media Controls 19 Display Features 21 Removing and Replacing the Battery 22 Using the Optical Disc Drive 23 Software Features...Problems 29 Memory Problems 30 Lockups and Software Problems 31 Dell Support Center 33 Using Support Tools 33 System Messages 34 Hardware Troubleshooter 35 Dell Diagnostics 36 Restoring Your Operating System 38 System Restore 38 Dell Factory Image Restore 40 Operating System Reinstallation 41 3
Setup Guide
Page 36
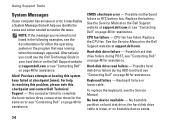
...resolving this problem, please note this system have failed at checkpoint [nnnn]. Replace the battery. Possible hard disk drive failure during HDD boot test see "Contacting Dell" on page 48 for assistance. Keyboard failure or loose cable. No bootable partition on hard disk drive, the... running when the message appeared. Alert! To replace the keyboard, see "Contacting Dell" on page 48 for assistance. Using Support Tools System Messages If your hard disk or on the Dell Support website at support.dell.com or see "Contacting Dell" on page 48 for assistance. Possible motherboard ...
...resolving this problem, please note this system have failed at checkpoint [nnnn]. Replace the battery. Possible hard disk drive failure during HDD boot test see "Contacting Dell" on page 48 for assistance. Keyboard failure or loose cable. No bootable partition on hard disk drive, the... running when the message appeared. Alert! To replace the keyboard, see "Contacting Dell" on page 48 for assistance. Using Support Tools System Messages If your hard disk or on the Dell Support website at support.dell.com or see "Contacting Dell" on page 48 for assistance. Possible motherboard ...


