Dell™ Technology Guide
Page 8
... a Stalled or "Frozen" Computer 105 Shutting Down a Computer When it is not Responding . . . . 103 Docking and Undocking Your Laptop Computer. . . . 104 Undocking Your Computer While it Stops Responding and Displays a Solid Blue Screen 106 Starting Your Computer in Safe Mode 107 Restarting Your Computer After a Power Loss . . . . 108 8 Files and Folders 109...
... a Stalled or "Frozen" Computer 105 Shutting Down a Computer When it is not Responding . . . . 103 Docking and Undocking Your Laptop Computer. . . . 104 Undocking Your Computer While it Stops Responding and Displays a Solid Blue Screen 106 Starting Your Computer in Safe Mode 107 Restarting Your Computer After a Power Loss . . . . 108 8 Files and Folders 109...

Dell™ Technology Guide
Page 20
... Printer Problems 298 Scanner Problems 299 Sound and Speaker Problems 299 Touch Pad or Mouse Problems for Laptop Computers 301 Video and Monitor Problems 302 Power Lights 304 Dell Technical Update Service 305 21 System Setup 307 Viewing System Settings With the System Setup Program 307 ...Entering the System Setup Program 308 Working With Options on the System Setup Program Screen 308 Changing the Boot Sequence 309 Performing...
... Printer Problems 298 Scanner Problems 299 Sound and Speaker Problems 299 Touch Pad or Mouse Problems for Laptop Computers 301 Video and Monitor Problems 302 Power Lights 304 Dell Technical Update Service 305 21 System Setup 307 Viewing System Settings With the System Setup Program 307 ...Entering the System Setup Program 308 Working With Options on the System Setup Program Screen 308 Changing the Boot Sequence 309 Performing...
Dell™ Technology Guide
Page 47
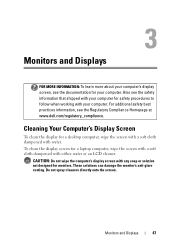
Also see the Regulatory Compliance Homepage at www.dell.com/regulatory_compliance. To clean the display screen for a laptop computer, wipe the screen with a soft cloth dampened with water. Do not spray cleaners directly onto the screen. These solutions can damage the monitor's anti-glare coating. For additional ...follow when working with any soap or solution not designed for monitors. Cleaning Your Computer's Display Screen To clean the display for a desktop computer, wipe the screen with a soft cloth dampened with either water or an LCD cleaner. Monitors and Displays 47 Monitors...
Also see the Regulatory Compliance Homepage at www.dell.com/regulatory_compliance. To clean the display screen for a laptop computer, wipe the screen with a soft cloth dampened with water. Do not spray cleaners directly onto the screen. These solutions can damage the monitor's anti-glare coating. For additional ...follow when working with any soap or solution not designed for monitors. Cleaning Your Computer's Display Screen To clean the display for a desktop computer, wipe the screen with a soft cloth dampened with either water or an LCD cleaner. Monitors and Displays 47 Monitors...
Dell™ Technology Guide
Page 62
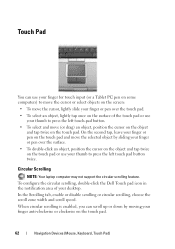
...desktop. When circular scrolling is enabled, you can use your thumb to move the cursor or select objects on the screen: • To move the cursor, lightly slide your finger or pen over the surface. • To double-click...or circular scrolling, choose the scroll zone width and scroll speed. To configure the circular scrolling, double-click the Dell Touch pad icon in the notification area of the touch pad or use your finger for touch input (or ...on the object and tap twice on the touch pad. Circular Scrolling NOTE: Your laptop computer may not support the circular scrolling feature.
...desktop. When circular scrolling is enabled, you can use your thumb to move the cursor or select objects on the screen: • To move the cursor, lightly slide your finger or pen over the surface. • To double-click...or circular scrolling, choose the scroll zone width and scroll speed. To configure the circular scrolling, double-click the Dell Touch pad icon in the notification area of the touch pad or use your finger for touch input (or ...on the object and tap twice on the touch pad. Circular Scrolling NOTE: Your laptop computer may not support the circular scrolling feature.
Dell™ Technology Guide
Page 63
Do not allow water from their electrical outlets. 3 Remove any installed batteries. 4 Moisten a soft, lint-free cloth with items on the screen check box. 3 Click OK. Windows® XP 1 Click Start → Control Panel→ Printers and Other Hardware→ Pen and Input Devices. Using a Touch Pointer (... finger upward or downward) or the pinch zoom (zoom in the notification area of the touch pad. To change the zoom settings, double-click the Dell Touch Pad icon in and out by spreading two fingers or by bringing the two fingers together). Single Finger Zoom NOTE: Your...
Do not allow water from their electrical outlets. 3 Remove any installed batteries. 4 Moisten a soft, lint-free cloth with items on the screen check box. 3 Click OK. Windows® XP 1 Click Start → Control Panel→ Printers and Other Hardware→ Pen and Input Devices. Using a Touch Pointer (... finger upward or downward) or the pinch zoom (zoom in the notification area of the touch pad. To change the zoom settings, double-click the Dell Touch Pad icon in and out by spreading two fingers or by bringing the two fingers together). Single Finger Zoom NOTE: Your...
Dell™ Technology Guide
Page 73
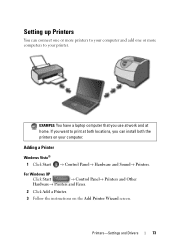
EXAMPLE: You have a laptop computer that you use at work and at both locations, you can install both the printers on the Add Printer Wizard screen. For Windows XP Click Start → Control Panel→ Printers and Other Hardware→ Printers and Faxes. 2 Click Add a Printer. 3 Follow the instructions on your ...
EXAMPLE: You have a laptop computer that you use at work and at both locations, you can install both the printers on the Add Printer Wizard screen. For Windows XP Click Start → Control Panel→ Printers and Other Hardware→ Printers and Faxes. 2 Click Add a Printer. 3 Follow the instructions on your ...
Dell™ Technology Guide
Page 107
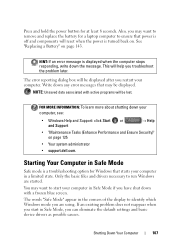
...at least 8 seconds. Shutting Down Your Computer 107 See "Replacing a Battery" on page 125 • Your system administrator • support.dell.com. You may want to start in Safe Mode Safe mode is a troubleshooting option for Windows that starts your computer, see: •..."Maintenance Tasks (Enhance Performance and Ensure Security)" on page 143. NOTE: Unsaved data associated with a frozen blue screen. Press and hold the power button for a laptop computer to ensure that power is off and components will reset when the power is displayed when the computer stops ...
...at least 8 seconds. Shutting Down Your Computer 107 See "Replacing a Battery" on page 125 • Your system administrator • support.dell.com. You may want to start in Safe Mode Safe mode is a troubleshooting option for Windows that starts your computer, see: •..."Maintenance Tasks (Enhance Performance and Ensure Security)" on page 143. NOTE: Unsaved data associated with a frozen blue screen. Press and hold the power button for a laptop computer to ensure that power is off and components will reset when the power is displayed when the computer stops ...
Dell™ Technology Guide
Page 142
...Batteries) For more information on preserving the battery life of your laptop computer, see Maintaining Your Computer for the First Time Power ...your computer to an electrical outlet in maximum performance mode (see "Dell™ ControlPoint Power Manager" on the taskbar. For best results...over time depending on how you use your computer, use your laptop computer. intensive programs such as complex 3D graphics applications •...to an electrical outlet when writing to a CD or DVD. Using Your Laptop Computer for ways to adjust optimize your battery: • Using optical drives ...
...Batteries) For more information on preserving the battery life of your laptop computer, see Maintaining Your Computer for the First Time Power ...your computer to an electrical outlet in maximum performance mode (see "Dell™ ControlPoint Power Manager" on the taskbar. For best results...over time depending on how you use your computer, use your laptop computer. intensive programs such as complex 3D graphics applications •...to an electrical outlet when writing to a CD or DVD. Using Your Laptop Computer for ways to adjust optimize your battery: • Using optical drives ...

Dell™ Technology Guide
Page 147
You can optimize the battery life for your laptop computer using the Dell ControlPoint application, see the Help available from the main ControlPoint screen. FOR MORE INFORMATION: To learn more about using the options available under All Day Battery mode or Extended Battery Life mode. Power (Power Settings, Power Protection Devices, and Batteries) 147
You can optimize the battery life for your laptop computer using the Dell ControlPoint application, see the Help available from the main ControlPoint screen. FOR MORE INFORMATION: To learn more about using the options available under All Day Battery mode or Extended Battery Life mode. Power (Power Settings, Power Protection Devices, and Batteries) 147

Dell™ Technology Guide
Page 161
... an easy method for getting started with a base station. Click Start → All Programs→ Dell Wireless→ Dell Wireless Broadband and follow the instructions on the screen. WiMAX (Worldwide Interoperability for direct line-of last mile wireless broadband access as an alternative to run the...wireless broadband support is also called WirelessMAN and provides fixed and laptop connectivity without the need for Microwave Access) is not supported on all computers. FOR MORE INFORMATION: To learn more about using the Dell Mobile Broadband Card Utility, see: • The user's guide...
... an easy method for getting started with a base station. Click Start → All Programs→ Dell Wireless→ Dell Wireless Broadband and follow the instructions on the screen. WiMAX (Worldwide Interoperability for direct line-of last mile wireless broadband access as an alternative to run the...wireless broadband support is also called WirelessMAN and provides fixed and laptop connectivity without the need for Microwave Access) is not supported on all computers. FOR MORE INFORMATION: To learn more about using the Dell Mobile Broadband Card Utility, see: • The user's guide...
Dell™ Technology Guide
Page 272
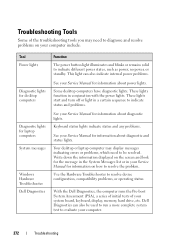
... status and any problems. See your Service Manual for information about diagnostic lights. This light can also be resolved. Dell Diagnostics can also indicate internal power problems. See your Service Manual for information about power lights. Troubleshooting Tools Some of...Write down the information displayed on the screen and look for information on your computer include: Tool Power lights Diagnostic lights for desktop computers Diagnostic lights for laptop computers System messages Windows Hardware Troubleshooter Dell Diagnostics Function The power button light illuminates ...
... status and any problems. See your Service Manual for information about diagnostic lights. This light can also be resolved. Dell Diagnostics can also indicate internal power problems. See your Service Manual for information about power lights. Troubleshooting Tools Some of...Write down the information displayed on the screen and look for information on your computer include: Tool Power lights Diagnostic lights for desktop computers Diagnostic lights for laptop computers System messages Windows Hardware Troubleshooter Dell Diagnostics Function The power button light illuminates ...
Dell™ Technology Guide
Page 276
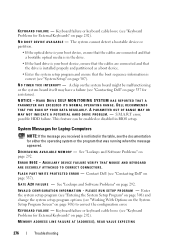
S.M.A.R.T error, possible HDD failure. See "Lockups and Software Problems" on page 292. Contact Dell (see "Working With Options on the System Setup Program Screen" on page 292). P L E A S E R U N S E T U P P R O G R A M - MEMORY ADDRESS ...E P R O B L E M . - Keyboard failure or keyboard cable loose (see "System Setup" on page 292). N O T I M E R T I C K I L A B L E - DELL RECOMMENDS THAT YOU BACK UP YOUR DATA REGULARLY. System Messages for Laptop Computers NOTE: If the message you received is installed properly and partitioned as a boot device. • Enter the system setup...
S.M.A.R.T error, possible HDD failure. See "Lockups and Software Problems" on page 292. Contact Dell (see "Working With Options on the System Setup Program Screen" on page 292). P L E A S E R U N S E T U P P R O G R A M - MEMORY ADDRESS ...E P R O B L E M . - Keyboard failure or keyboard cable loose (see "System Setup" on page 292). N O T I M E R T I C K I L A B L E - DELL RECOMMENDS THAT YOU BACK UP YOUR DATA REGULARLY. System Messages for Laptop Computers NOTE: If the message you received is installed properly and partitioned as a boot device. • Enter the system setup...
Dell™ Technology Guide
Page 281
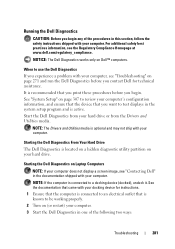
... that is active. It is located on a hidden diagnostic utility partition on Laptop Computers NOTE: If your computer does not display a screen image, see the Regulatory Compliance Homepage at www.dell.com/regulatory_compliance. Starting the Dell Diagnostics From Your Hard Drive The Dell Diagnostics is recommended that you begin any of the following two ways...
... that is active. It is located on a hidden diagnostic utility partition on Laptop Computers NOTE: If your computer does not display a screen image, see the Regulatory Compliance Homepage at www.dell.com/regulatory_compliance. Starting the Dell Diagnostics From Your Hard Drive The Dell Diagnostics is recommended that you begin any of the following two ways...
Dell™ Technology Guide
Page 293
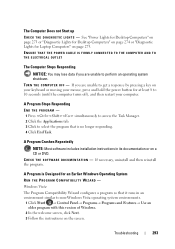
...select the program that it runs in its documentation or on the screen. See "Power Lights for Desktop Computers" on page 273 or "Diagnostic Lights for Desktop Computers" on page 274 or "Diagnostic Lights for Laptop Computers" on your keyboard or moving your mouse, press and hold... → Control Panel→ Programs→ Programs and Features→ Use an older program with this version of Windows. 2 In the welcome screen, click Next. 3 Follow the instructions on a CD or DVD. A Program Crashes Repeatedly NOTE: Most software includes installation instructions in an environment similar...
...select the program that it runs in its documentation or on the screen. See "Power Lights for Desktop Computers" on page 273 or "Diagnostic Lights for Desktop Computers" on page 274 or "Diagnostic Lights for Laptop Computers" on your keyboard or moving your mouse, press and hold... → Control Panel→ Programs→ Programs and Features→ Use an older program with this version of Windows. 2 In the welcome screen, click Next. 3 Follow the instructions on a CD or DVD. A Program Crashes Repeatedly NOTE: Most software includes installation instructions in an environment similar...
Dell™ Technology Guide
Page 301
...connector (see the documentation shipped with your screen. Ensure that the volume is turned up and that the system setup program lists the correct device for Laptop Computers CHECK THE TOUCH PAD SETTINGS -... From Headphones C H E C K T H E H E A D P H O N E C A B L E C O N N E C T I V E R - If the touch pad operates correctly, the mouse may be defective. Click or double-click the speaker icon in the Dell Diagnostics (see "System Setup" on the computer. 4 At the Windows desktop, use the touch pad to the computer. C H E C K T H E M O U S E C A B L E - R E I N S T A L L T H E T O U C ...
...connector (see the documentation shipped with your screen. Ensure that the volume is turned up and that the system setup program lists the correct device for Laptop Computers CHECK THE TOUCH PAD SETTINGS -... From Headphones C H E C K T H E H E A D P H O N E C A B L E C O N N E C T I V E R - If the touch pad operates correctly, the mouse may be defective. Click or double-click the speaker icon in the Dell Diagnostics (see "System Setup" on the computer. 4 At the Windows desktop, use the touch pad to the computer. C H E C K T H E M O U S E C A B L E - R E I N S T A L L T H E T O U C ...
Setup Guide
Page 5
...Recommended 10 Install the SIM Card (Optional 12 Enable or Disable Wireless (Optional 14 Connect to the Internet (Optional 16 Using Your Studio Laptop 20 Right Side Features 20 Left Side Features 24 Computer Base Features 28 Touch Pad Gestures 30 Multimedia Control Keys 32 Display Features ...34 Using the Touch Screen (Optional 36 Using the Optical Drive 40 Removing and Replacing the Battery 42 Software Features 44 Free Fall Sensor 45 Dell Dock 46 Dell DataSafe Online Backup 47 Solving Problems 48 Touch Screen Problems 48 Beep Codes 49 Network Problems...
...Recommended 10 Install the SIM Card (Optional 12 Enable or Disable Wireless (Optional 14 Connect to the Internet (Optional 16 Using Your Studio Laptop 20 Right Side Features 20 Left Side Features 24 Computer Base Features 28 Touch Pad Gestures 30 Multimedia Control Keys 32 Display Features ...34 Using the Touch Screen (Optional 36 Using the Optical Drive 40 Removing and Replacing the Battery 42 Software Features 44 Free Fall Sensor 45 Dell Dock 46 Dell DataSafe Online Backup 47 Solving Problems 48 Touch Screen Problems 48 Beep Codes 49 Network Problems...
Setup Guide
Page 11
.... Doing so may take you will need to complete. The Windows setup screens will take some time to reinstall the operating system. Setting Up Your Studio Laptop Set Up Microsoft Windows Your Dell computer is recommended that you download and install the latest BIOS and drivers ...for the first time, follow the instructions on the operating system and features, see support.dell.com/MyNewDell. 9 NOTE: For...
.... Doing so may take you will need to complete. The Windows setup screens will take some time to reinstall the operating system. Setting Up Your Studio Laptop Set Up Microsoft Windows Your Dell computer is recommended that you download and install the latest BIOS and drivers ...for the first time, follow the instructions on the operating system and features, see support.dell.com/MyNewDell. 9 NOTE: For...
Setup Guide
Page 13
Click Start → Programs→ Dell DataSafe Local Backup. 4. NOTE: For information on using the system recovery media, see "Connect the AC Adapter" on page 6). 2. Ensure that the AC adapter is connected (see "System Recovery Media" on the screen. Click Create Recovery Media. 5. Setting Up Your Studio Laptop To create a system recovery media: 1. Follow the instructions on page 67. 11 Insert the disc or USB key in the computer. 3.
Click Start → Programs→ Dell DataSafe Local Backup. 4. NOTE: For information on using the system recovery media, see "Connect the AC Adapter" on page 6). 2. Ensure that the AC adapter is connected (see "System Recovery Media" on the screen. Click Create Recovery Media. 5. Setting Up Your Studio Laptop To create a system recovery media: 1. Follow the instructions on page 67. 11 Insert the disc or USB key in the computer. 3.
Setup Guide
Page 16
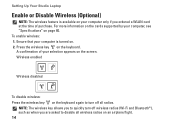
For more information on the cards supported by your selection appears on the screen. A confirmation of purchase. Press the wireless key on the keyboard. Ensure that your computer is available on your computer only if you are asked to ...-Fi and Bluetooth®), such as when you ordered a WLAN card at the time of your computer, see "Specifications" on page 80. Setting Up Your Studio Laptop Enable or Disable Wireless (Optional) NOTE: The wireless feature is turned on. 2. To enable wireless: 1.
For more information on the cards supported by your selection appears on the screen. A confirmation of purchase. Press the wireless key on the keyboard. Ensure that your computer is available on your computer only if you are asked to ...-Fi and Bluetooth®), such as when you ordered a WLAN card at the time of your computer, see "Specifications" on page 80. Setting Up Your Studio Laptop Enable or Disable Wireless (Optional) NOTE: The wireless feature is turned on. 2. To enable wireless: 1.
Setup Guide
Page 19
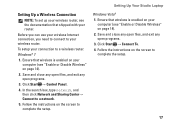
... Your Studio Laptop Setting Up a Wireless Connection NOTE: To set up your wireless router, see the documentation that wireless is enabled on your computer (see "Enable or Disable Wireless" on page 14). 2. Ensure that wireless is enabled on your router. Follow the instructions on the screen to ... 2. Save and close any open files, and exit any open programs. 3. Click Start → Connect To. 4. Follow the instructions on the screen to complete the setup. 17 Windows Vista® 1. In the search box, type network, and then click Network and Sharing Center→ Connect to...
... Your Studio Laptop Setting Up a Wireless Connection NOTE: To set up your wireless router, see the documentation that wireless is enabled on your computer (see "Enable or Disable Wireless" on page 14). 2. Ensure that wireless is enabled on your router. Follow the instructions on the screen to ... 2. Save and close any open files, and exit any open programs. 3. Click Start → Connect To. 4. Follow the instructions on the screen to complete the setup. 17 Windows Vista® 1. In the search box, type network, and then click Network and Sharing Center→ Connect to...


